

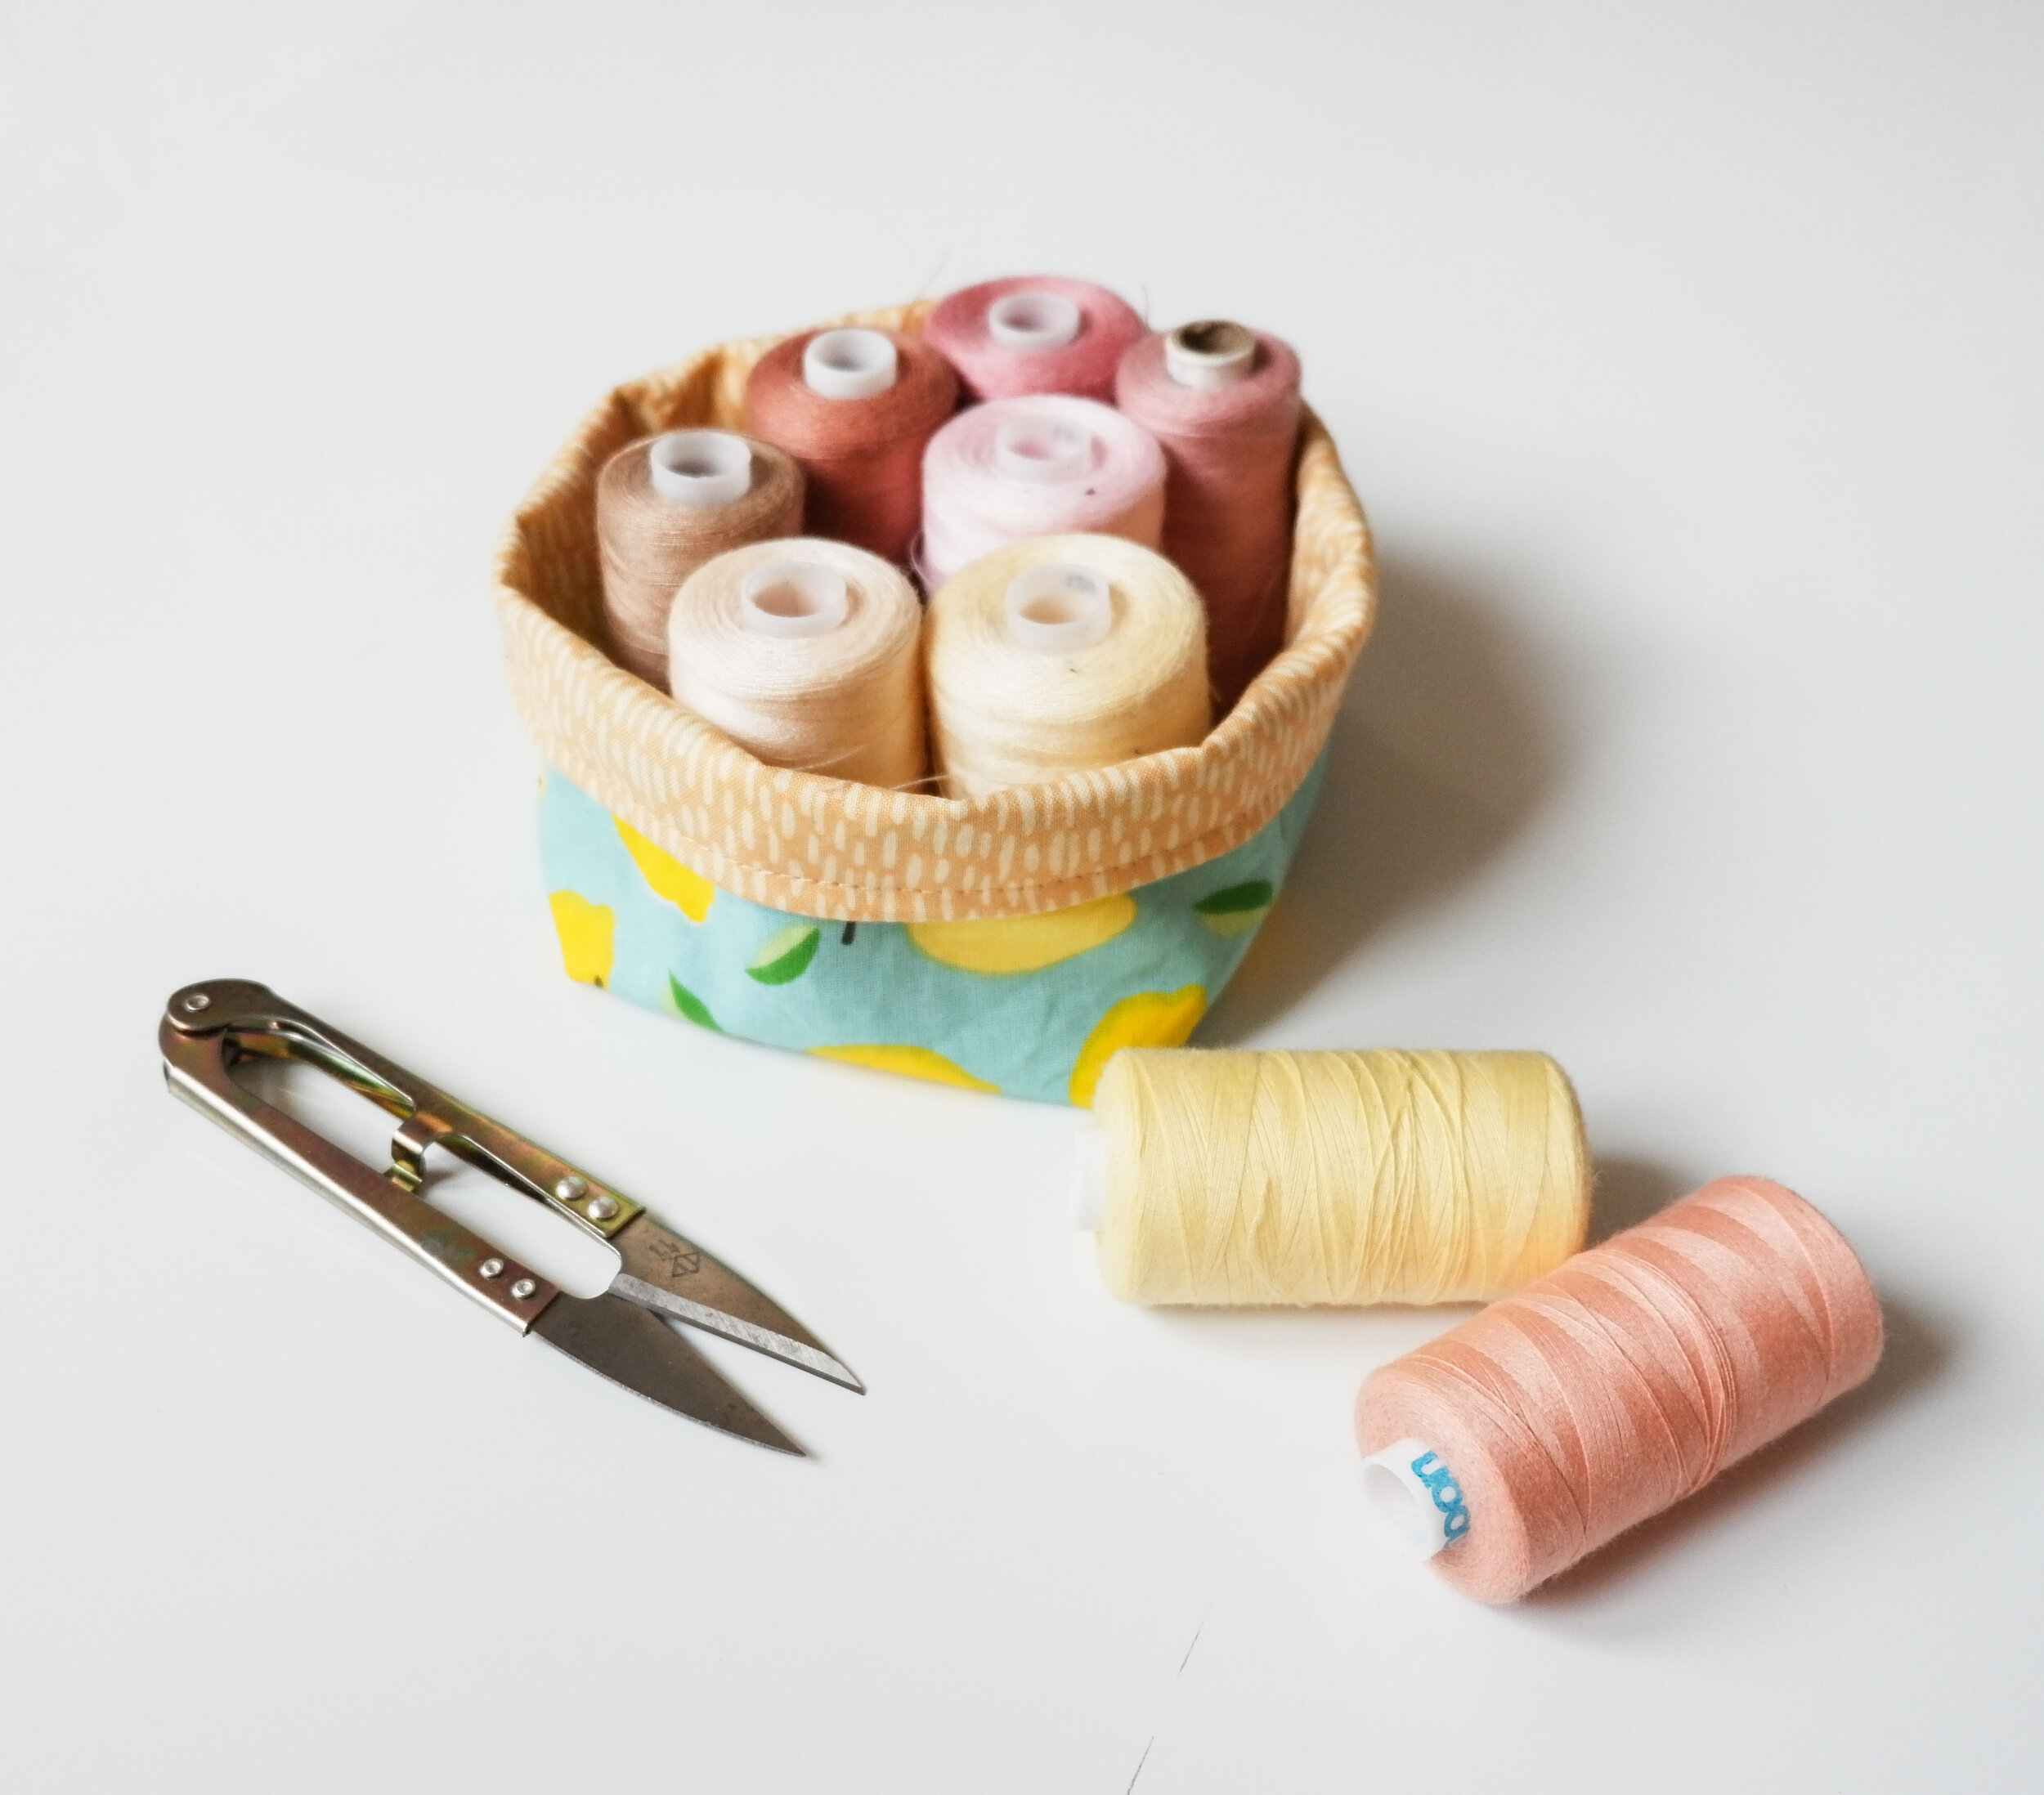
I recently made a black silk Ogden cami with a lace detail on the neckline (and then another one in mint green as a gift too) and many of you liked it a lot so I thought it would be a good idea to show you how I did it in a little tutorial.
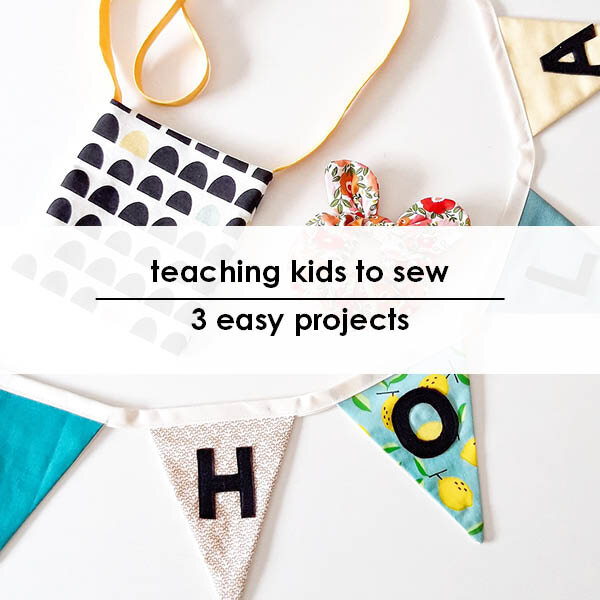
Read MoreHow to teach sewing for kids // Cómo enseñar la costura a niños
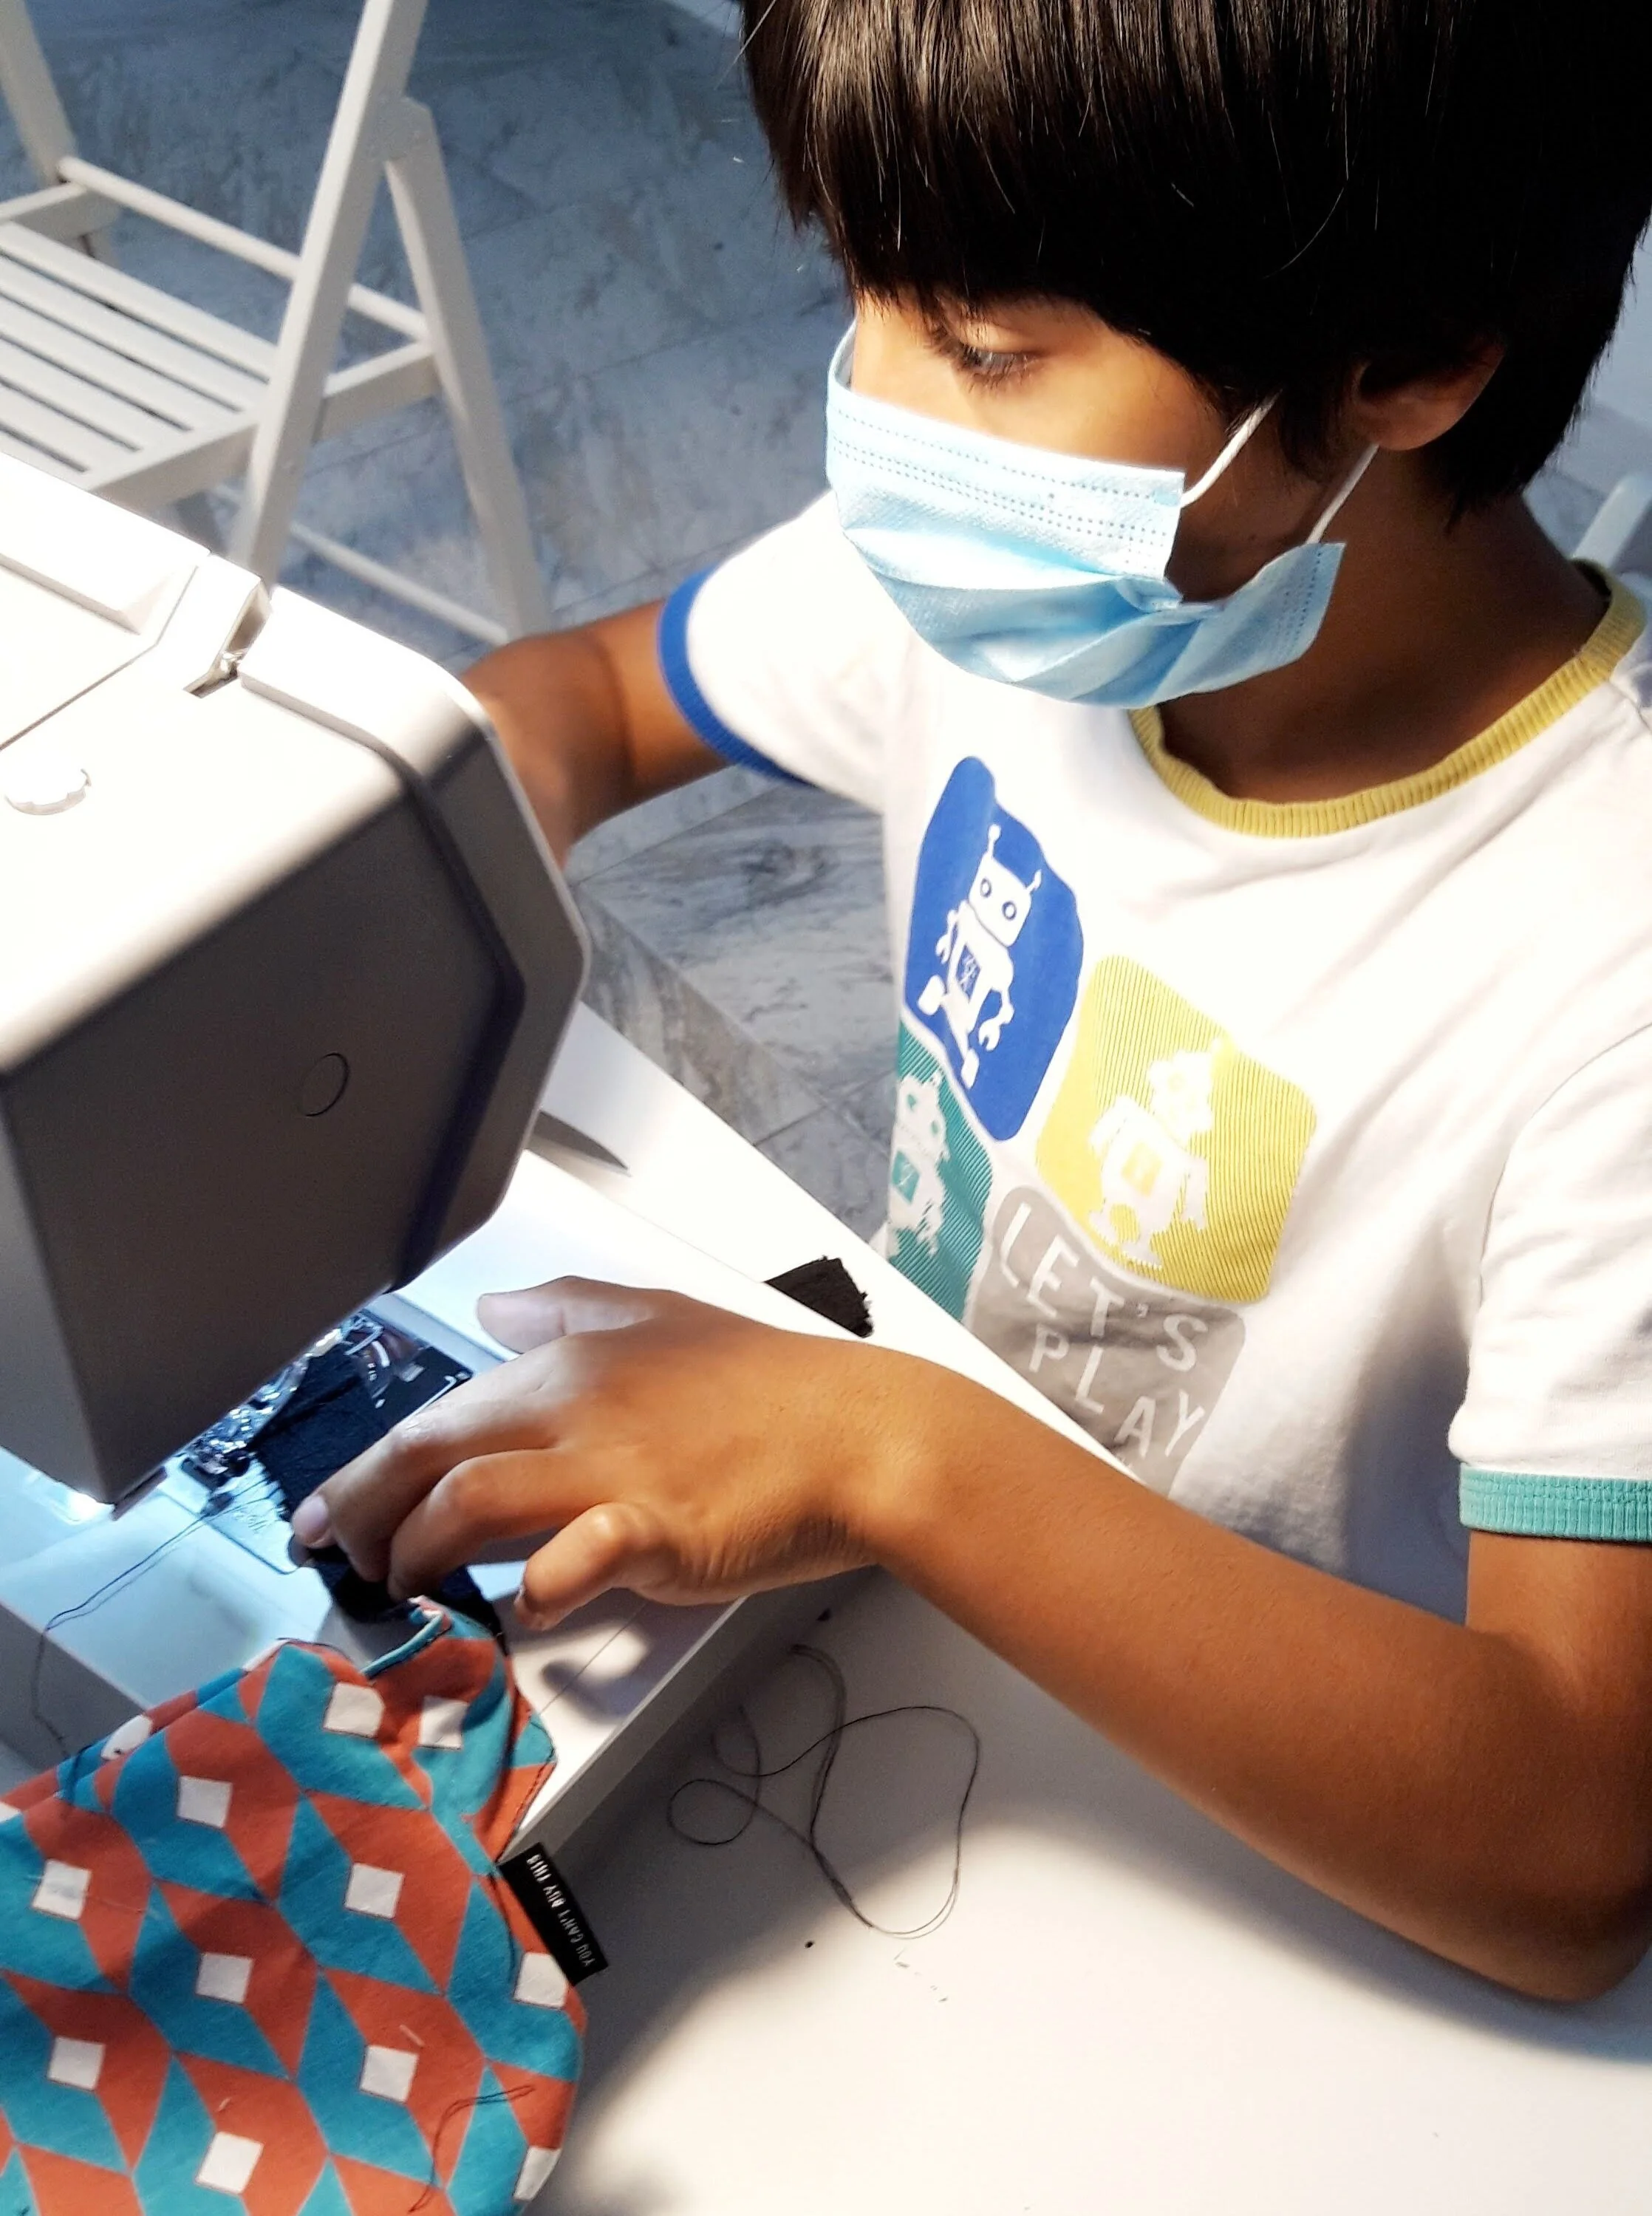
If you’re following me on Instagram you probably already know that during the summer we’re having kids sewing camps over at the academy. Last year was the first time we started to teach these classes and this summer is the second time (we also hosted a couple of smaller classes during Easter etc). Previous to these camps I had teached a couple of shorter kids sewing classes but the whole camp (5 days a week, all mornings) was a new experience for me last summer. And I’ve been so surprised about how fast they learn! The kids we’ve been having are 9 years old and up and most of them haven’t touched a sewing machine before so it’s all about starting from a blank page (literally, hehe, see below).
After my experience with numerous groups of kids I thought it would be good to write a post about how to start teaching kids to sew if you’re thinking about teaching your kids/friends kids etc. If you’re reading this you probably already know that sewing is the coolest thing in the world...so why not share your passion with others, especially with kids who will appreciate this skill so much in the future! After preparing many classes and seeing how they learn best I’ve got some tips and tricks that will make your teaching and their learning experience easier, trust me :). I’ll also show you three super easy projects that I use with my first time students.
Si me sigues por Instagram ya sabrás que durante los veranos hacemos en la academia el campamento de costura para niños. El año pasado fue la primera vez y este verano es la segunda (también hicimos un par de clases durante el año, en semana santa etc). Antes del campamento había dado algunas clases cortas pero el campamento completo (5 días a la semana, toda la mañana) fue una experiencia nueva para mí el verano pasado. Y lo que más me ha flipado es la rapidez con que aprenden los niños a coser! Los niños que tenemos tienen de 9 años y arriba y casi nadie de ellos ha probado a coser con la máquina antes así que es todo como empezar en una hoja blanca (literalmente, jeje, sigue leyendo abajo).
Después de mi experiencia con bastantes niños pensaba que estaría guay escribir un post sobre cómo enseñar a los niños para usar la máquina de coser por si estás pensando en hacerlo con tus hijos/hijos de los amigos etc. Si lees esto probablemente ya sabes que coser mola mucho...así que por qué no compartir este conocimiento con otros, especialmente con niños que lo agradecen tanto en el futuro! Después de preparar muchas clases y ver cómo aprenden de la manera más efectiva tengo unos cuantos trucos que ayudan que tu experiencia al enseñar y la suya en aprender sea más fácil, créeme :). También te enseño tres proyectos muy sencillos para usar con los principiantes.


First off I’ll share some advice before diving into the sewing projects:
Primero comparto unos consejos antes de empezar con los proyectos:

Start teaching how to sew on paper
All the threading and bobbin system is a lot of information in the beginning (both for kids and adults!) so I usually start without thread explaining how to sew by following lines on paper just with the needle. First go with easy shapes and then use curved lines and forms. I’ve even printed out some pages where you have to follow the numbers to complete a shape...just that they will be sewing instead of drawing. This part helps to develop skills like managing the pedal speed and pivoting on corners.
You can then draw the same shapes on fabric so they will sew over the lines, now using thread. Threading the machine takes a bit of practice, especially understanding how the bobbin works. With these practice fabric pieces they will learn how to sew straight and control the sewing speed. Problems will occur, there will be “something wrong with the machine” all the time and they will have to be rethreading every 5 minutes but they will get it in no time, you’ll see. Letting them experiment with decorative stitches at this point is a good idea too as this way they will be more entertained.
Choose SUPER simple projects
You want them to make and finish something, anything, and once they see they have actually made it themselves they are more excited to continue learning and making more complicated projects that take more time. That’s why I always start with very easy projects...but believe me, they are so happy when they finish their first handmade projects!
Make them understand that "slower” is better than “faster”
All kids are of course different and I guess you more or less know what you’re getting into with the specific kid you’re going to teach, haha. I’ve now had experiences with very different kids...the ones who are very quiet and follow every step slowly and also the ones who want to make everything very quickly even when their projects don’t end up being very “straight” let’s say, haha. I think that it’s important to try to make them understand that if they go slowly (in marking, in cutting, in sewing) good results actually happen quicker. Of course, they are kids, you can’t expect them to actually sew perfect lines from the beginning (although sometimes they really can surprise you!) but understanding that being concentrated in one task will lead to the results they will like, helps a lot. Of course I don’t make them unpick slightly curved lines when they just start out, it’s not the perfection that we’re after at this stage. But when I see that they just rush through a specific step and sew way off the path I will tell them that they have to unpick and sew again...which makes them understand that taking time actually pays off, haha. Little life lessons while we’re at it, right?
Use stable fabrics
It’s way easier to cut and sew fabrics that don’t shift around. Quilting cottons and lighter canvas fabrics are great for first classes.
Empieza con coser en papel
Para empezar todo el tema de enhebrar y el sistema de canillero etc tiene bastante información de golpe (tanto para los niños como los adultos!) así que suelo empezar sin hilo explicando cómo coser simplemente siguiendo con la aguja las líneas en papel. Primero hago unas formas sencillas y rectas y luego sigo con líneas curvadas y formas más avanzadas. Incluso he impreso páginas donde tienes que seguir números para crear formas...solo que en vez de seguir la líneas con lápiz, lo harán cosiendo. Esta parte ayuda desarrollar aspectos como el manejo de velocidad del pedal y aprenden cómo girar dejando la aguja debajo en las esquinas.
Puedes después dibujar las mismas formas en tela para que cosan ya con hilo encima de ellas. Enhebrar la máquina cuesta un poco al principio pero todo es práctica, especialmente lo de entender cómo funciona la canilla. Con estos trozos de tela de práctica aprenden cómo coser líneas rectas y cómo controlar la velocidad. Va a haber problemas, bastante de “algo le pasa a la máquina” y estarán enhebrando de nuevo cada 5 minutos pero lo van entendiendo, ya verás. Si les dejas practicar con puntadas decorativas se entretienen más en esta fase.
Elige proyectos SUPER sencillos
Lo que quieres es que hagan un proyecto y que lo terminen, lo que sea, pero cuando terminan algo hecho por ellos están super motivados para seguir aprendiendo y haciendo proyectos más complicados con que tardan más. Por eso siempre empiezo con cosas muy sencillas...pero créeme, están muy orgullosos de sus primeras cosas terminadas!
Hazles entender que es mejor ir despacio que con prisas
Cada niño es un mundo pero me imagino que ya sabrás un poco sobre qué tienes delante cuando empiezas con el niño a quien vas a enseñar, jeje. Ahora ya he tenido experiencia con niños muy diferentes...los hay que son muy tranquilos y siguen cada paso poco a poco y los hay que quieren terminar todo rápido incluso si sus proyectos no salen quizás “lo más rectos”, jeje. Creo que es importante que les hagas entender que si van despacio (en marcar, cortar y coser) los resultados buenos realmente llegan más rápido. Por supuesto, son niños, no puedes esperar que empiezan a coser y enseguida hagan líneas rectas (aunque a veces me sorprenden lo perfeccionistas que son!) pero que entiendan que hay que concentrarse y eso ayuda a llegar a resultados que les gustarán, ayuda mucho. Obviamente no les hago deshacer líneas que van un poco fuera nada más empezar a usar la máquina, en esta etapa no estamos intentando hacerlo perfecto. Pero si veo que lo hacen corriendo y cosen muuuy lejos de donde va la línea sí que les digo que tienen que descoser y volver a coser de nuevo...cosa que hace que entienden que tomar el tiempo realmente da su resultado, jeje. Un poco de lecciones de vida ya que estamos, no?
Usa telas estables
Es mucho más fácil coser con telas que no se muevan por todas partes. Telas de patchwork y lonetas van bien para las primeras clases.

Precut the fabric in suitable length
In sewing we’re always trying to get the most out of the fabric...but kids might not get it right away, haha. I always tell them to cut their pattern pieces starting on one edge of the fabric to make good use of the supplies. When you give them a bigger piece of fabric they might forget about it and cut right in the middle! Make sure it won’t happen by cutting a piece of fabric with suitable size before, this way they won't make a giant hole in the middle of a pretty fabric (been there, haha).
Mark the stitching lines previously
This is a step that will make it way easier for them to sew straight lines so whenever you can, make them mark the seam allowance lines. That’s easier to do when you choose fabrics that can be drawn on easily, preferably with light color at least on the wrong side. In class I usually just use regular pencils to mark the stitching lines. Try explaining how to position their project using the presser foot as a reference point so they will eventually sew with even seam allowance without the pencil markings but take it slow...we’re in the very introduction phase here and done is better than perfect.
Recorta los trozos de tela previamente
En costura siempre queremos sacar lo máximo de la tela...pero los niños a veces no lo pillan enseguida, jaja. Yo siempre les digo que empiecen en un borde de la tela para aprovechar bien los materiales. Si les das un corte más grande puede que se olvidan y cortan justo en el medio! Lo más fácil para que esto no pase es recortar previamente un trozo adecuado, así no habrá agujeros en la mitad de la tela (he visto unos cuantos, jaja).
Dibuja las líneas de costura previamente
Este paso hace que les cueste mucho menos conseguir coser líneas rectas así que siempre que puedas haz que ellos marquen las líneas donde tienen que coser. Es más fácil de hacer si eliges telas que se pueden marcar fácilmente, preferiblemente en colores claros por lo menos el revés de la tela. Intenta explicar cómo usar el prensatelas como referencia a la hora de coser, así llegan a coser a un margen uniforme sin marcar todas las costuras previamente pero hazlo despacio...todavía están en muy principio así que hecho es mejor que perfecto.

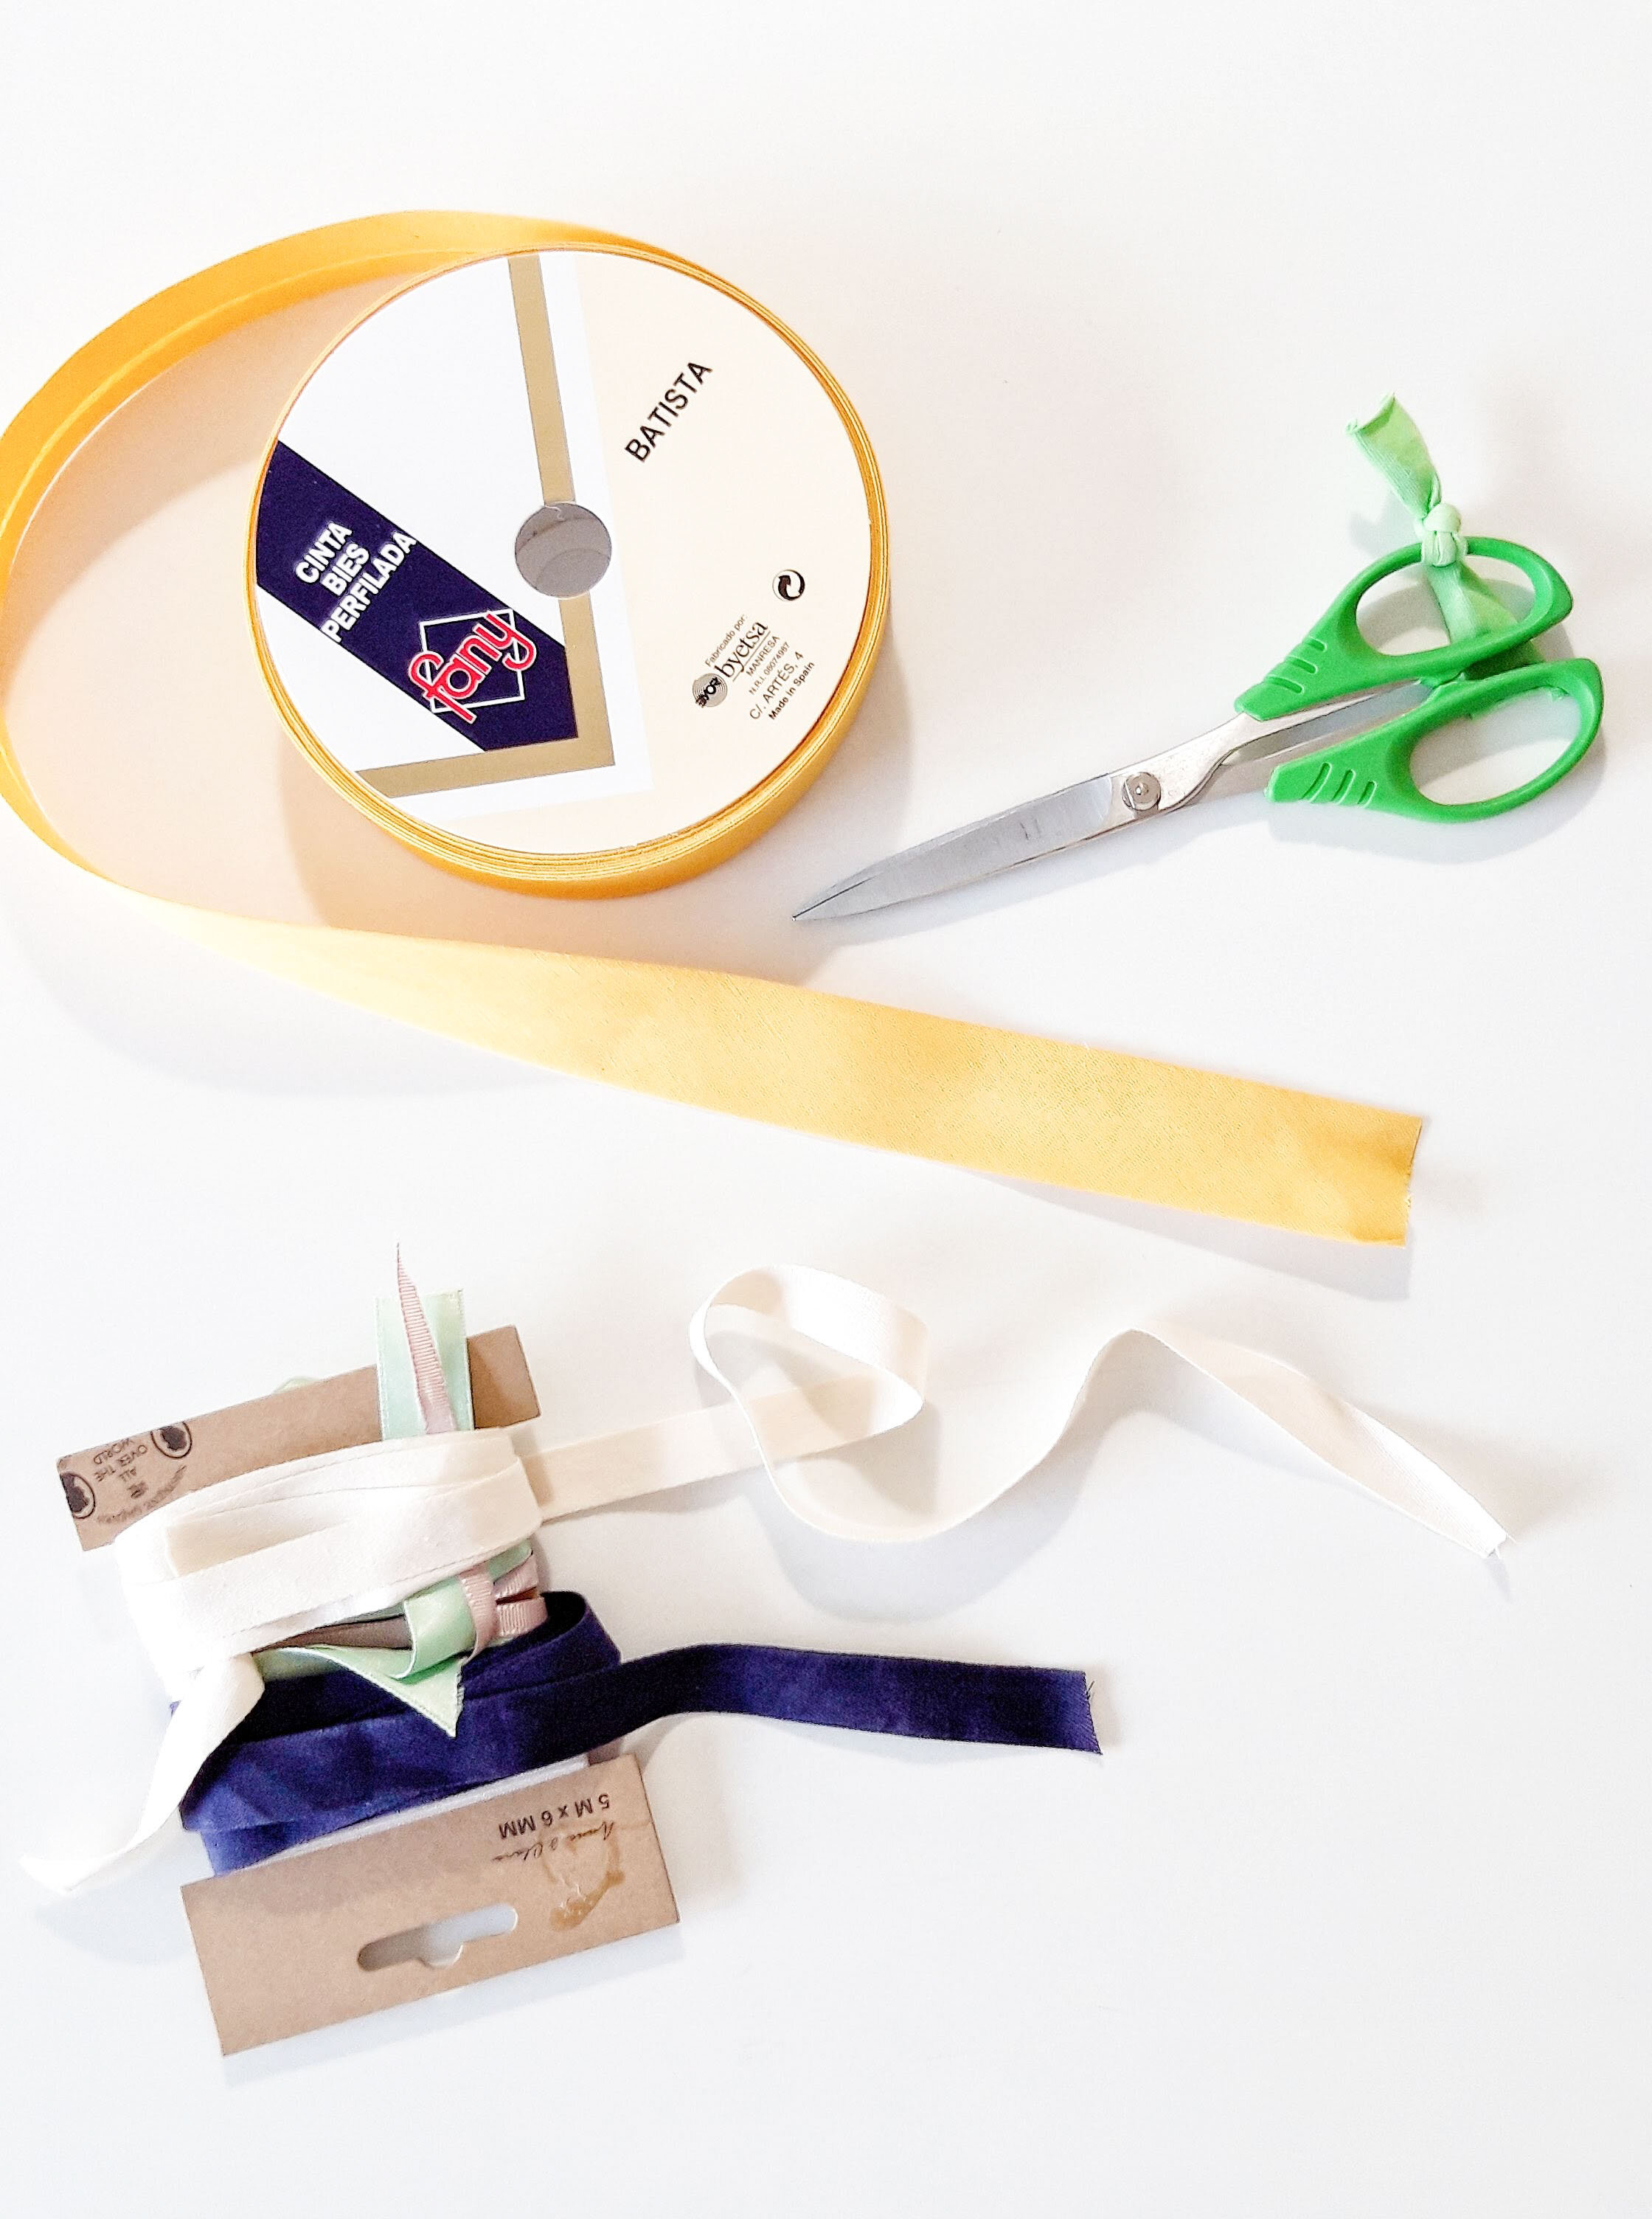
Try alternatives for pins
Pinning fabric can be difficult for kids in the beginning (100% of pinching their fingers in class has happened with pins and not with actual sewing machine needles) so you can use alternatives like clips or glue when joining bias tape (for the fabric buntings).
Of course you can also make them baste their seams by hand before starting with the sewing machine. I personally don’t do it a lot in the beginning because the projects we make are very easy. My theory is that if they first make a couple of projects relatively fast (with the “go slow” mentality mentioned in the first point of course, hehe) they’ll be more motivated to continue after seeing that they are actually able to sew cool stuff. When we’re starting with more difficult fabrics/projects I will make them baste some specific things to ensure that everything will go smoothly. It really depends on a child, you’ll see if they need to baste or if they will manage sewing with pins.
Be patient and encouraging
I mean I guess I don’t really have to say this but I will do it anyway. I know that kids behave differently in class and at home...so just stay patient as they get past the initial phase where “things don’t work out” frequently. It’s a normal part of the process and it only gets better with hours of practice with the machine...once they’ve had these hours they will sew like champs, I’ve seen it with every kid I’ve teached!
Another obvious thing: be encouraging, it’s not the time to seek perfectionism! I say it because I’ve seen some parents who pick up their kids and when they are shown the projects they’ve made they sometimes say things like “well this line is a bit wonky, right?”. I really don’t think you should be focusing on the mistakes in this phase...they have created something from scratch and they are proud, this is the best thing ever! They have years of practice ahead and they will sew perfect seams, let’s not focus on the mistakes, these comments can be very hurtful. Sewing is fun and that is what I want the kids to feel when they are just starting out.
Usa alternativas a los alfileres
Poner alfileres puede costarles a los niños al principio (100% de los pinchazos en los dedos en clase han pasado a la hora de poner alfileres y no con la máquina de coser) así que puedes usar alternativas como pinzas de coser o pegamento cuando unen cinta de bies (para los banderines).
Por supuesto puedes también decirles que hilvanen las costuras a mano antes de coser con la máquina. Yo personalmente no lo hago mucho al principio porque los proyectos que hacemos son muy sencillos. Mi teoría es que en este punto es mejor si hacen unos proyectos relativamente rápido (con la mentalidad de “lento” mencionado anteriormente, claro, jeje) porque así estarán más motivados para continuar después de ver que realmente pueden coser cosas que molan. Cuando ya nos ponemos con proyectos/telas más complicadas sí que hago que hilvanen ciertas costuras para asegurar que todo va bien. Realmente eso depende mucho del niño, vas a ver si es necesario que hilvanen o si se apañan bien con los alfileres.
Ten paciencia y dales ánimos
Ya sé, me imagino que no lo tengo que decir pero lo haré. Sé que los niños se comportan de una manera diferente en clase y en casa...así que ten paciencia mientras están en la primera fase cuando “las cosas no salen bien” frecuentemente. Es una parte normal del proceso y se mejora solo con horas de práctica en la máquina...una vez que han pasado estas horas van a coser como campeones, lo he visto con todos los niños!
Otra cosa obvia: tienes que animarles, no es el momento de buscar la perfección! Lo digo porque he visto a padres que recogen a sus niños y cuando ven los proyectos que han hecho dicen cosas como “bueno, esta línea no está muy recta, no?”. De verdad digo que no deberías concentrarte en los errores en esta fase...ellos han creado algo desde cero y están orgullosos, eso mola mucho! Tendrán años de práctica delante y coserán costuras perfectas, no nos enfoquemos en los errores, estos comentarios hacen daño a cualquiera. Coser es divertido y eso es lo que quiero que se sientan los niños cuando empiezan a aprenderlo.

So now that I’ve given you my long speech about the theory...let’s get to the actual sewing, hehe. These three projects are the exact ones all my students have been sewing at the camp so you can be sure that they will work out. Of course you can teach them whatever you think is easy in the beginning but here are some ideas that have been working well for me.
Así que ahora que os he dejado mi larga charla sobre la teoría...vamos con lo de coser, jeje. Estos tres proyectos son los mismos que yo uso con los niños del campamento así que puedes estar segura de que van a funcionar. Por supuesto puedes enseñarles con lo que tú consideres que sea sencillo para empezar pero aquí tienes estas ideas que a mí me han funcionado bien.

This small bag is perfect for beginners as it’s basically two rectangles sewn together with a strap in the middle, you can’t really go more basic than that.
Este bolsito pequeño es perfecto para los principiantes ya que básicamente son dos rectángulos junto a una tira para el asa en el medio, es difícil hacer algo más sencillo.

The measurements I used are 19 x 19 cm and I made a template directly with this size. Kids cut fabric better when they first mark the lines on the fabric, remove the template and then cut the fabric.
Cut a rectangle on fold from the exterior fabric and from the lining, and with the piece on fold press to maintain the shape well.
Las medidas que he usado son de 19 x 19 cm e hice la plantilla directamente con este tamaño. Los niños se apañan mejor si primero dibujan la forma en la tela, quitan la plantilla y luego lo recortan de la tela.
Corta el rectángulo en doblez de la tela de la tela exterior y del forro, plancha las piezas en doblez para que mantengan bien su forma.


Pin both layers together, using a couple of pins in the middle of the piece works fine. Mark the 1 cm seam allowances with pencil on the two sides of the exterior piece and do the same with the lining but leave an opening on one side so you can turn the bag with the right side out once the exterior and the lining are sewn together. Sew.
Sujeta las dos capas con alfileres, con un par de alfileres en el medio de la pieza van bien. Marca los márgenes de costura de 1 cm con lápiz en los dos lados de la pieza exterior y haz lo mismo con el forro pero allí deja una abertura para luego poder dar la vuelta al bolso. Cose.

For the strap you can use different ribbons and tapes like the cotton twill tape etc. You can also use bias tape like I did for this example. Wider bias tape is easier to sew (mine is 1,5 cm wide once sewn together).
When using bias tape just sew the tape together, you can use glue to temporarily hold the tape together. You can also use sewing clips that are easier to handle tan regular pins.
Para las asas puedes usar diferentes cintas. También puedes usar cinta de bies como yo hice en este ejemplo. Un bies más ancho es más fácil de coser (el mío tiene el ancho de 1,5 cm una vez cosida).
Si usas cinta de bies puedes usar pegamento para sujetarlo juntos temporalmente. También puedes usar pinzas de costura que son más fáciles de manejar que los alfileres.


Turn the exterior layer with the right side out and pin the tape ends to the side seams, right sides facing. Sew the tape ends in place. Then put the exterior layer inside the lining (that is still with the wrong side out) and pin the bag openings together matching the side seams (the strap will be sandwiched between the two layers and tucked inside the bag at that point). Mark the 1 cm seam allowance for easier sewing.
Da la vuelta a la pieza exterior y sujeta los extremos de las asas en las costuras laterales, derecho con derecho. Cose las asas en su sitio. Después mete la pieza exterior dentro del forro (que todavía está con el revés hacia fuera) y sujeta la abertura de la bolsa con alfileres haciendo coincidir las costuras laterales (las asas están entre las dos capas dentro del bolso ahora mismo). Marca el margen de costura de 1 cm para que sea más fácil de coser.

If you can use the free arm on your machine you can use that to sew the opening in a circle. If you can’t /the piece isn’t wide enough to use it, switch the lining and exterior pieces so the lining will be visible on the inside of the circle, this way it’s easier to sew while you can see the marked line. Sew in circle. Turn the work around and close the hole in the lining sewing on top of it with the machine or close it with hand sewing. That’s it, hopefully your young student is proud of her/his first make!
Si tienes el brazo libre en tu máquina puedes aprovechar eso para coser en círculo. Si no puedes/la pieza no cabe allí, da la vuelta al bolso para que el forro sea visible dentro de la abertura circular, así es más fácil seguir la línea dibujada. Cose en circulo. Da la vuelta a la bolsa y cierra el agujero en el forro cosiendo encima con la máquina o a mano. Ya está, espero que tu joven aprendiz esté contento con su primer proyecto terminado!

The second project is a fabric bunting. Kids love this project as they can pick out the fabric combination they like and they can make it with their name/phrase they prefer. There’s already a tutorial about how to make one, see the blog post here (it’s only in Spanish but I’m sure you’ll get the idea with the pictures). I did make some changes for the kids:
El segundo proyecto son los banderines. A los niños les gusta mucho porque pueden elegir la combinación de telas que les gustan y pueden hacerlo con su nombre/frase que prefieran. En el blog ya tengo el tutorial sobre cómo coserlos, lo puedes ver en este post. Para los niños he hecho algunos cambios:

The triangles are a bit wider, they measure 15 cm for the base and 18 cm for the length + add the 1 cm seam allowance for the both sides. With kids I use this template cut out in cardboard, it’s easier for them to mark the pieces on fabric. Cut the desired number of triangles from the fabrics you choose and then cut the same amount of triangles for the back from a light colored fabric (this way it’s easier to mark the sewing lines). I printed the letters out in Arial font, bold, 200px and cut them from felt.
Sew the letters on following the outlines. This is actually another secret sewing machine practice as it involves a lot of slow sewing and pivoting...they probably don’t realize it but they are getting better at operating the machine, hehe.
Los triángulos son un poco más anchas, miden 15 cm para la base y 18 cm para el largo + añade 1 cm de costura a los dos lados. Con los niños uso la plantilla recortada en cartón, así es más fácil para marcar las piezas. Corta el numero deseado de triángulos de las telas elegidos y luego el mismo numero de triángulos para la parte trasera de alguna tela de color claro (así es más fácil marcar las líneas de costura). Las letras las imprimí en Arial, negrita, de 200px y los corta de fieltro.
Cose las letras siguiendo los bordes de las piezas de fieltro. Esto realmente es una práctica secreta para usar la máquina bien ya que tienen que ir girando y cosiendo poco a poco….probablemente no lo notan pero se mejora mucho su manejo de la maquina, jeje.

Once you have the letters sewn on top of the exterior pieces, mark the sewing lines on the back pieces. This way it’s easier for them to calculate where to sew. I’d also suggest using a wider bias tape, this way it’s easier for them to sew the triangles in place as described in the tutorial. The result is a cute personalized project that can be used in their room or they can make a gift for their friends...there are so many possibilities!
Cuando tienes las letras cosidas encima de los triángulos marca las líneas de costura en las partes traseras. Así es más fácil para ellos para saber dónde coser. También recomiendo usar una cinta de bies que sea más bien ancha, así es más fácil coserlo a los triángulos tal como explicado en el tutorial. El resultado es un proyecto personalizado muy mono que pueden usar para decorar su habitación o para regalar a sus amigos...hay tantas posibilidades!

The third project is a scrunchie...really a super easy thing to sew. I wanted the three project examples to be “suitable” both for girls and boys and thought that a hair scrunchie is probably not the best example but the boys in class have actually been sewing them for their sisters and mothers so I did include it anyway. You can make a simple scrunchie or add the bow tie which looks really cute too. Use lightweight fabrics for this project.
El tercer proyecto es el coletero...una cosa super fácil para coser. Quería que los tres proyectos de este post sean “apropiados” tanto para niños como para niñas y pensé que probablemente el coletero no es el mejor ejemplo pero realmente los niños en clase sí que los han estado cosiendo para sus hermanas y sus madres así que lo he incluído tal cual. Puedes hacer un coletero simple o añadir un lazo para hacerlo diferente. Para este proyecto usa telas finitas.

First cut a rectangle of 40 x 12 cm and press it in half, pin the long edge. For the bow tie cut two pieces with the dimensions shown on the picture (I actually cut a bow too small when I started to make this tutorial, the measurements included are correct but I later cut out a larger bow so it’s normal that when you use the given measurements it will be bigger than what it looks on this picture, hehe).
Primero corta un rectángulo de 40 x 12 cm y plancha a la mitad, sujeta el lado largo con alfileres. Para el lazo corta dos piezas con las medidas que vienen en la foto (yo realmente corté mi lazo demasiado pequeño cuando empecé a hacer las fotos de este tutorial, las medidas de la foto son correctas, yo luego me corté otras piezas...por si lo veis diferente en al foto, jaja).

Sew the long edge of the scrunchie with 1 cm seam allowance (mark lines if necessary). Sew the two pieces of the tie with the right sides together all around leaving an opening a couple of cm wide in the center.
Cose el lado largo del coletero a 1 cm desde el borde (marca las líneas si lo ves necesario). Cose las dos piezas del lazo derecho con derecho todo alrededor a 1 cm de margen dejando una abertura de unos cm en la parte del medio.


Using a safety pin turn the scrunchie with the right side out, press. Cut an elastic 18 cm long and pass it through the tunnel with the safety pin.
Da la vuelta al coletero usando un imperdible, plancha. Corta un elástico con largo de 18 cm y pásalo por el túnel con la ayuda de imperdible.

Tie the ends, try if the elastic length is correct.
Haz un nudo y prueba si el largo de la goma te va bien.


Fold under 1 cm of one of the ends of the scrunchie and slip the other end inside of it to make a neat finish. Pin in place. You can either close this by hand or if you’re using the bow tie you can also sew it with the machine as the tie will be covering this area anyway.
Reduce the seam allowances on the tie a bit to get neater corners and turn it with the right side out. Press and sew the opening together. Then just make a knot and it’s done!
Dobla 1 cm de uno de los extremos hacia dentro para hacer un doblez y pasa el otro lado dentro del primero para crear un acabado limpio. Puedes coser esto a mano o si usas el lazo puedes también coserlo a máquina ya que el lazo tapa esta parte.
Recorta los márgenes de costura un poco para conseguir esquinas más bonitas y da la vuelta para que esté con el lado derecho hacia fuera. Plancha y cose la abertura. Después haz el lazo y ya está!


So these are the three quick projects for kids. All the students have been making them in the beginning of the camp and it has been great to see how proud they are after completing their first projects. I hope you found this post useful and that you’ll try out teaching the art of sewing to someone...may it be a child or an adult! There are more easy sewing tutorials here at the blog that you can check out in this section.
Have you ever tried teaching kids to sew, do you have tips to share? Would you be interested in a post about ideas about what else to sew with kids when they already handle well their sewing machines? We’ve been using many different beginner patterns to make both clothes and accessories during the camp weeks and I can make a short list to give you ideas. Let me know :)
Así que estos son los tres proyectos sencillos para los niños. Todos mis alumnos han estado haciéndolos en el principio del campamento y ha sido muy guay ver lo orgullosos que están después de terminar sus primeros proyectos. Espero que te haya gustado este post y que pruebes a enseñar a alguien...da igual si es un niño o un adulto! En el blog hay más tutoriales de proyectos sencillos que puedes ver en esta sección.
Has enseñado alguna a vez costura a los niños? Si tienes trucos me encantaría saber más! Estás interesada en un post con más ideas para coser con los niños cuando ya se apañan bien con la máquina? Hemos usado en la academia un montón de patrones que van bien para los principiantes para hacer tanto ropa como accesorios y podría hacer una lista de proyectos para darte más ideas. Ya me dices :)


Tutorial: pincushion + fabric tray // Tutorial: alfiletero + cesta de tela
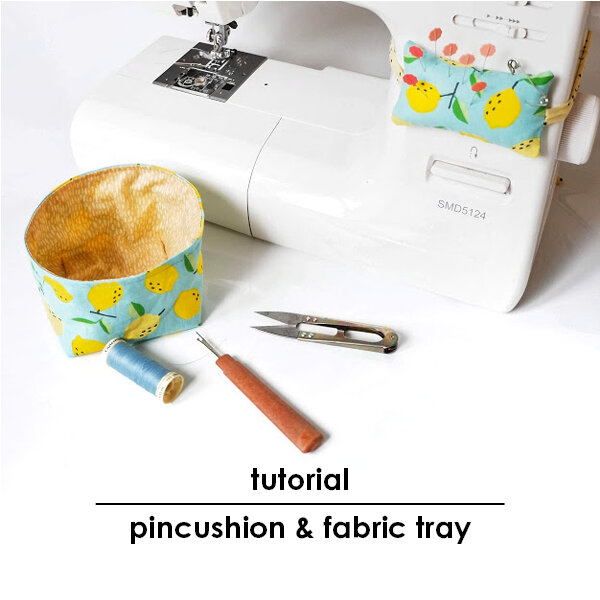
Today I’m bringing you this super easy tutorial about sewing two things that are essential for my sewing practice: the pin cushion for your sewing machine and a small fabric tray to have next to your machine so you can throw in there your thread ends and any small fabric waste you generate when sewing. I first got the idea of this pincushion when I was working in the textile industry, we had these pincushions on all the industrial machines so you could easily have your pins in one space when you take them out of your project when sewing. Believe me, once you have it attached to your machine it becomes the second nature to put your pins there :).
Hoy os traigo un tutorial super fácil sobre las dos cosas que son imprescindibles para mí a la hora de coser: el alfiletero que se engancha a tu máquina de coser y una cesta de tela pequeña que puedes tener al lado de tu máquina donde puedes echar los recortes de hilos y telas que generas cuando coses. La primer vez que vi esta idea de alfiletero de maquina era cuando trabajé en la industria textil, teníamos estos alfileteros en todas las máquinas industriales para poner allí fácilmente los alfileres que quitamos a la hora de coser las prendas. Creeme, una vez que lo tengas puesto en tu máquina lo de poner allí los alfileres va a ser automático :)

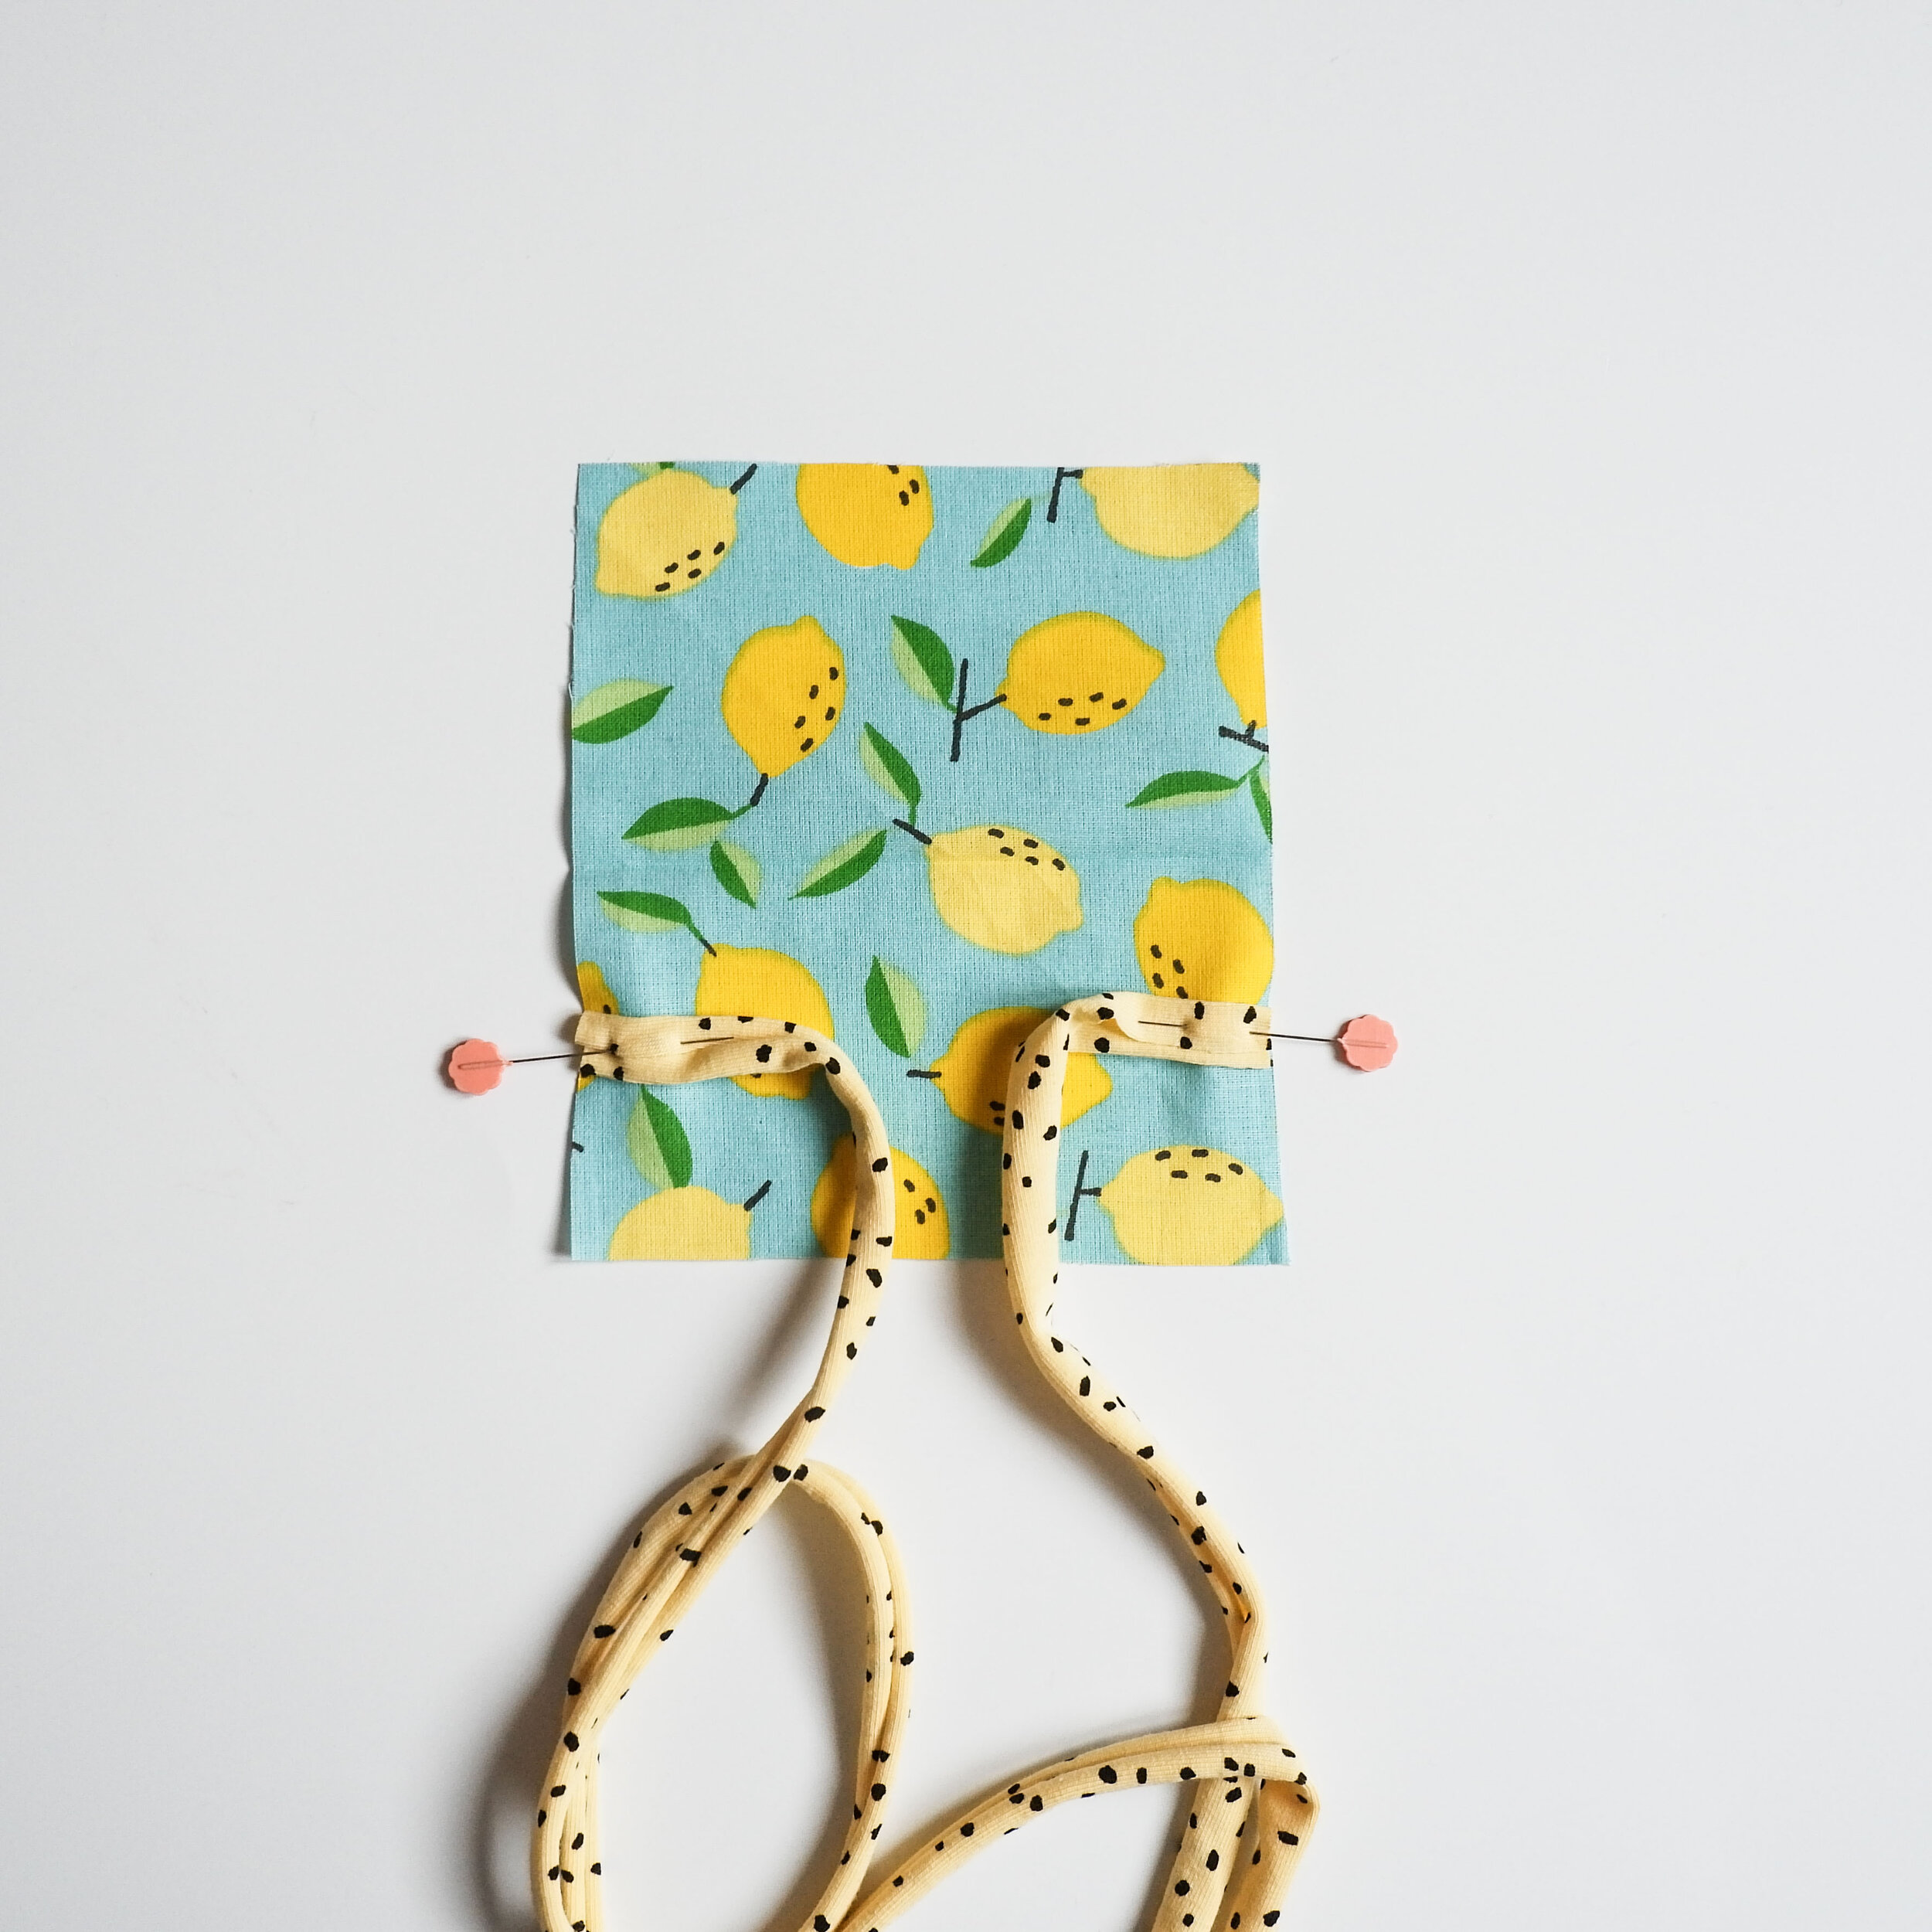
First up, you need a 12 x 14 cm (5 x 5 1/2 in) rectangle (it’s an average size, you can experiment with other sizes of course). You can use different fabrics, usual cotton works very well. You also need ties to tie the pincushion around your machine, 50 cm (20 in) long each . You can use any kind of ribbons, twill tape, elastic, you name it. This time I’m using knit fabric strips (3 cm/ 1 1/2 in wide), you can just cut the strips from any knit fabric and when you pull a bit they roll themselves up creating this cord like strips. As I said you can use any kind of ties but I like something stretchy better as it’s easy to move the pincushion around when you have to cover the machine etc.
Now pin the ties in place on top of the right side of the rectangle, x cm from the lower edge (basically you are just pinning them in the center of the lower half of the pincushion). You can sew over them 6 mm (1/4 in) from the edge so they will be in their place.
Primero necesitas un rectángulo de 12 a 14 cm (es un tamaño para este tipo de proyecto, puedes experimentar con otros tamaños por supuesto). Puedes usar diferentes telas, normalmente algodón funciona muy bien. También necesitas cinta con que vas a atar el alfiletero a la máquina, dos de 50 cm van bien. Puedes usar de todo tipo de cintas y elásticos, lo que tengas por casa. Esta vez yo usé tiras de tela de punto (con un ancho de 3 cm), puedes cortar las tiras de cualquier tela de punto que tengas y al cortarlos si estiras se hacen enrollan y se convierten en cintas ideales. Como dije puedes usar cualquier tipo de cinta pero yo casi que prefiero que sea elástico porque así puedes mover el alfiletero muy fácil si tienes que tapar la máquina etc.
Ahora coloca las tiras con alfileres encima de la tela con el derecho hacia arriba, x cm desde la parte de abajo (para que se queden a la mitad una vez que se dobla la tela). Puedes coser encima de ellas a 6 mm desde el borde para mantenerlos en su sitio.


Put the ties in the center of the rectangle and fold the upper part on top of the lower part. Now sew the sides and the bottom with 1 cm (3/8 in) seam allowance leaving a small opening on the bottom.
Coloca las cintas en el medio del rectángulo y dobla la parte de arriba encima de la parte de abajo. Ahora cose los laterales y la parte baja a 1 cm desde el borde, dejando un pequeño hueco para dar la vuelta en la parte de abajo.

Turn your pincushion with the right side out and stuff it! The best material is soft stuffing but if you don’t have any you can also use yarn or fabric leftovers cutting them in small pieces. In that case don’t stuff the pincushion with a lot of material as it’s stiffer than stuffing and you won’t be able to insert the pins so easily. If you are short on stuffing and have kids who maybe have a particular soft toy you’re not so in fond of, this can be an idea….haha, just kidding, I guess you have to negotiate first if you’re going to use their toys for your sewing practice, haha.
Da la vuelta al alfiletero y rellenalo! Lo mejor es el relleno tipo cojín pero si no lo tienes puedes usar restos de lanas o telas, solo tienes que cortarlos en piezas pequeñas. En este caso no lo rellenes mucho porque estos materiales son más duros y no dejan clavar fácilmente los alfileres si está demasiado relleno el alfiletero. Si no tienes el relleno suave pero tienes hijos que tienen algún peluche que no te cae muy bien, eso puede ser una idea….jaja, esto solo es una broma, habrá que negociar con ellos primero, antes de usar sus juguetes para tus proyectos de costura, jaja.

Then just hand sew the opening together and you are done! Tie the pincushion around the machine and start using it :)
Después simplemente cose la abertura a mano y ya está! Ata el alfiletero en la máquina y empieza a usarlo.


Now lets go with the fabric tray. I’m giving you the measurements I used for this one that is perfect for thread cuts and small fabric waste, but you can easily make it bigger if you want to. I’m using my lazy method which means I’m not drawing in any corners before, I’m just using rectangles for the fastest cutting experience and I then measure the corners as I want and sew them (you’ll see!). I used two quilting cotton fabrics for this tray on the photo and I didn’t interface the fabrics, for a small tray like this they hold up nicely. You can use any kind of fabric really, when using heavier fabrics like canvas you get a sturdier tray, you can also use interfacing if you want to.
Cut two 15 x 40 cm (6 x 16 in) rectangles, one for the exterior and one for the lining. Fold them horizontally and sew the side seam and the bottom seam with 1 cm (3/8 in) seam allowance.
Ahora vamos con la cesta de tela. Te voy a dar las medidas que yo usé para este tamaño que es perfecto para los restos de hilos y recortes pequeños de telas, pero lo puedes hacer fácilmente más grande si quieres. Estoy usando mi método para vagos que significa que no estoy dibujando ningún patrón con esquinas previamente, lo que hago es que empiezo con rectángulos fáciles de cortar y luego ya mido las esquinas como quiero cuando haya cosido los laterales (ahora lo verás). He usado dos algodones tipo patchwork para la cesta en la foto y no he usado entretela, una cesta pequeña como esta no lo necesita la verdad. Puedes usar muchos tipos de telas la verdad, si suas telas con más cuerpo como loneta tendrás una cesta más firme y si quieres puedes usar también entretela.
Corta dos rectángulos de 15 x 40 cm, uno para el exterior y otro para el forro. Doblalos en horizontal y cose el lado y el bajo a 1 cm.


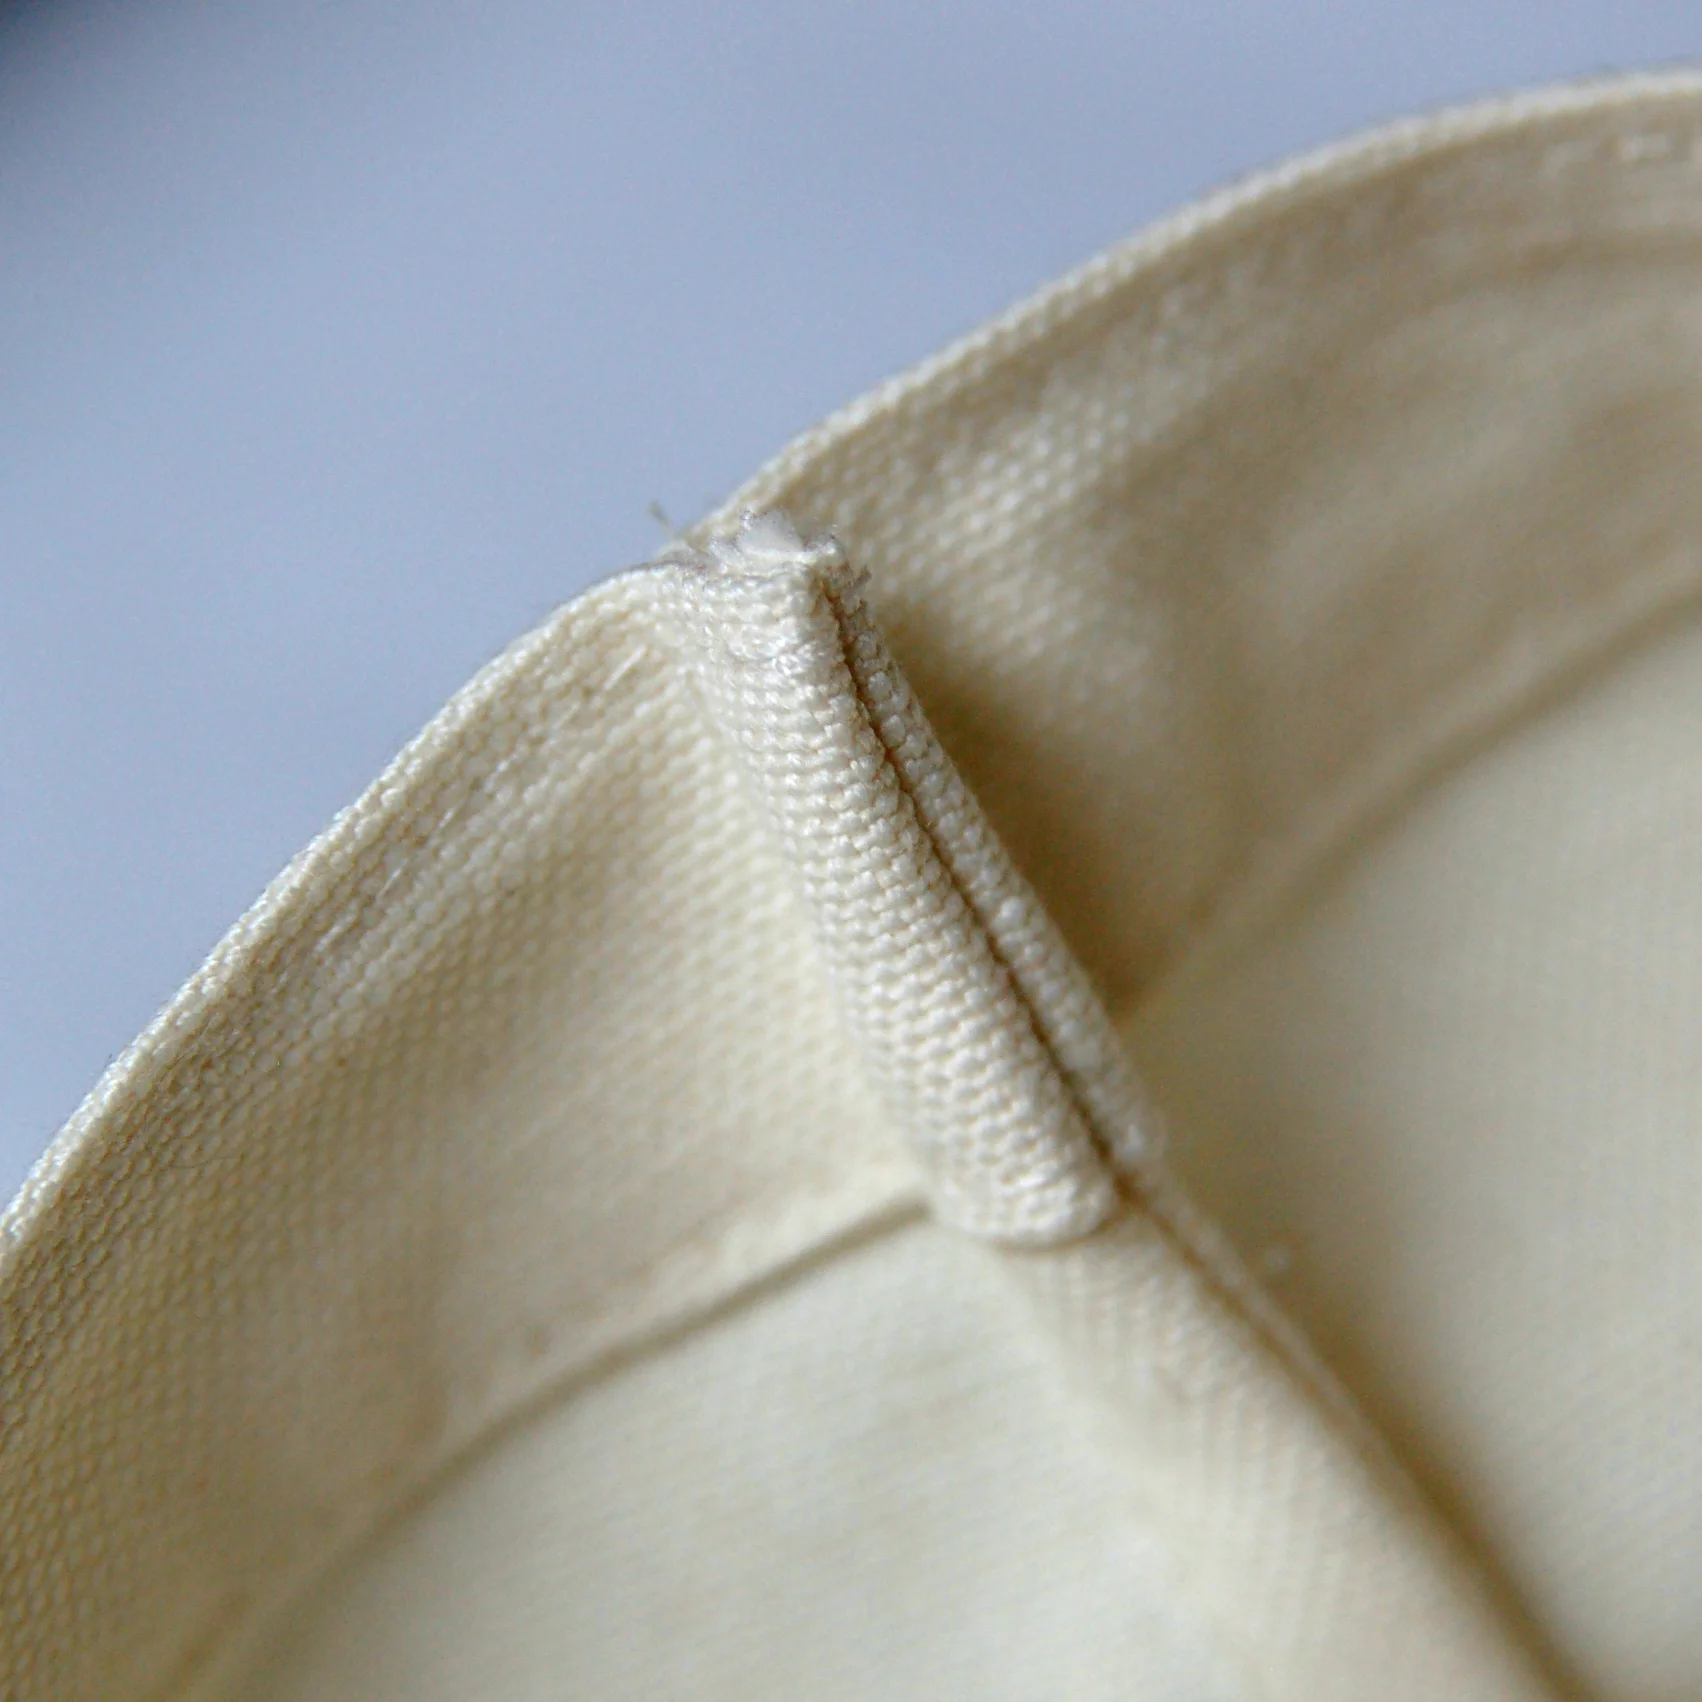
To sew the corners first double the seams in a way that your side and bottom seams are matching. Insert a pin into the stitching line from one side and make sure it comes out on the other side on the stitching line. This step is important because you’re making sure that a 90 degree angle is formed and the seams will match up correctly.
Para hacer las esquinas primero junta las costuras del lateral y del bajo. Mete un alfiler dentro de la costura justo donde están tus puntadas y que salga en el otro lado justo en la línea de costura también. Este paso es importante porque así estás comprobando que salga el ángulo de 90 grados y que las costuras casen bien.
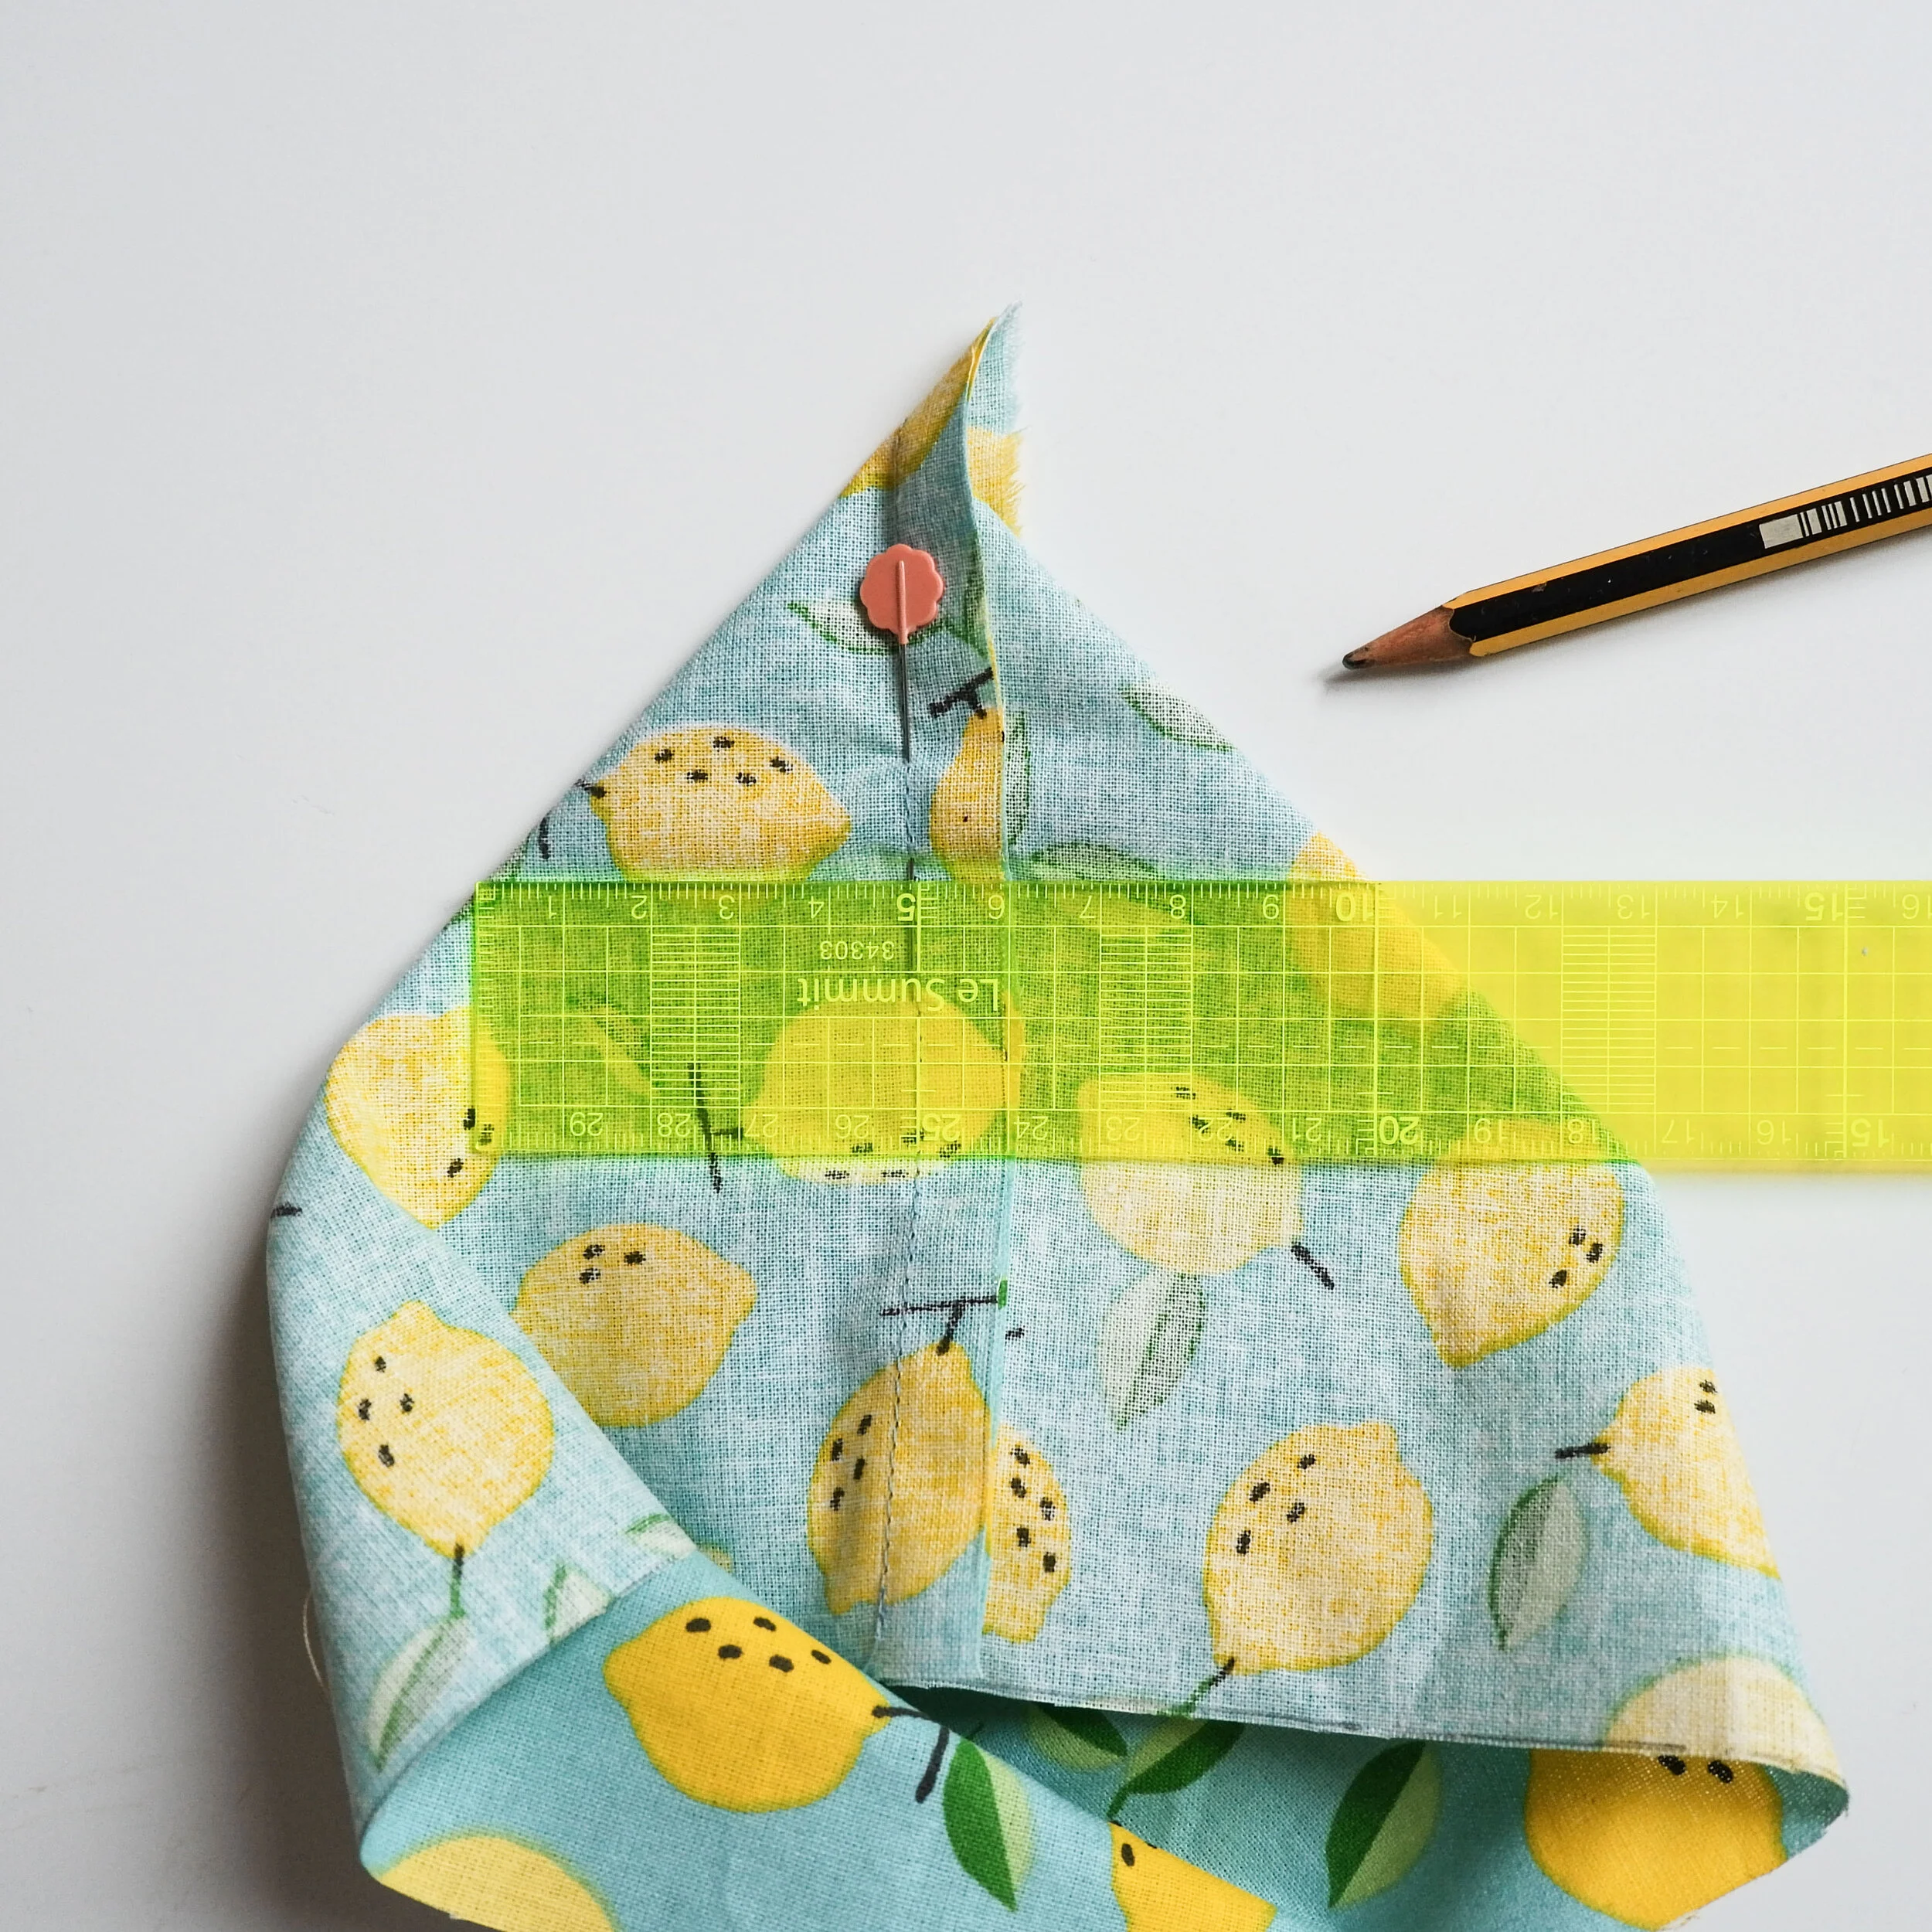
Once you have the pieces correctly lined up measure the corner you want to sew. I’m using 10 cm (4 in) this time, so I’m making sure I draw a perpendicular line that measures 5 cm (2 in) form one side and 5 cm (2 in) from the other side of the stitching line.
Una vez que tengas la piezas bien colocadas mide la esquina que quieres hacer. He hecho una esquina de 10 cm así que he hecho una línea perpendicular que mide 5 cm de un lado y 5 cm del otro lado de mi costura.
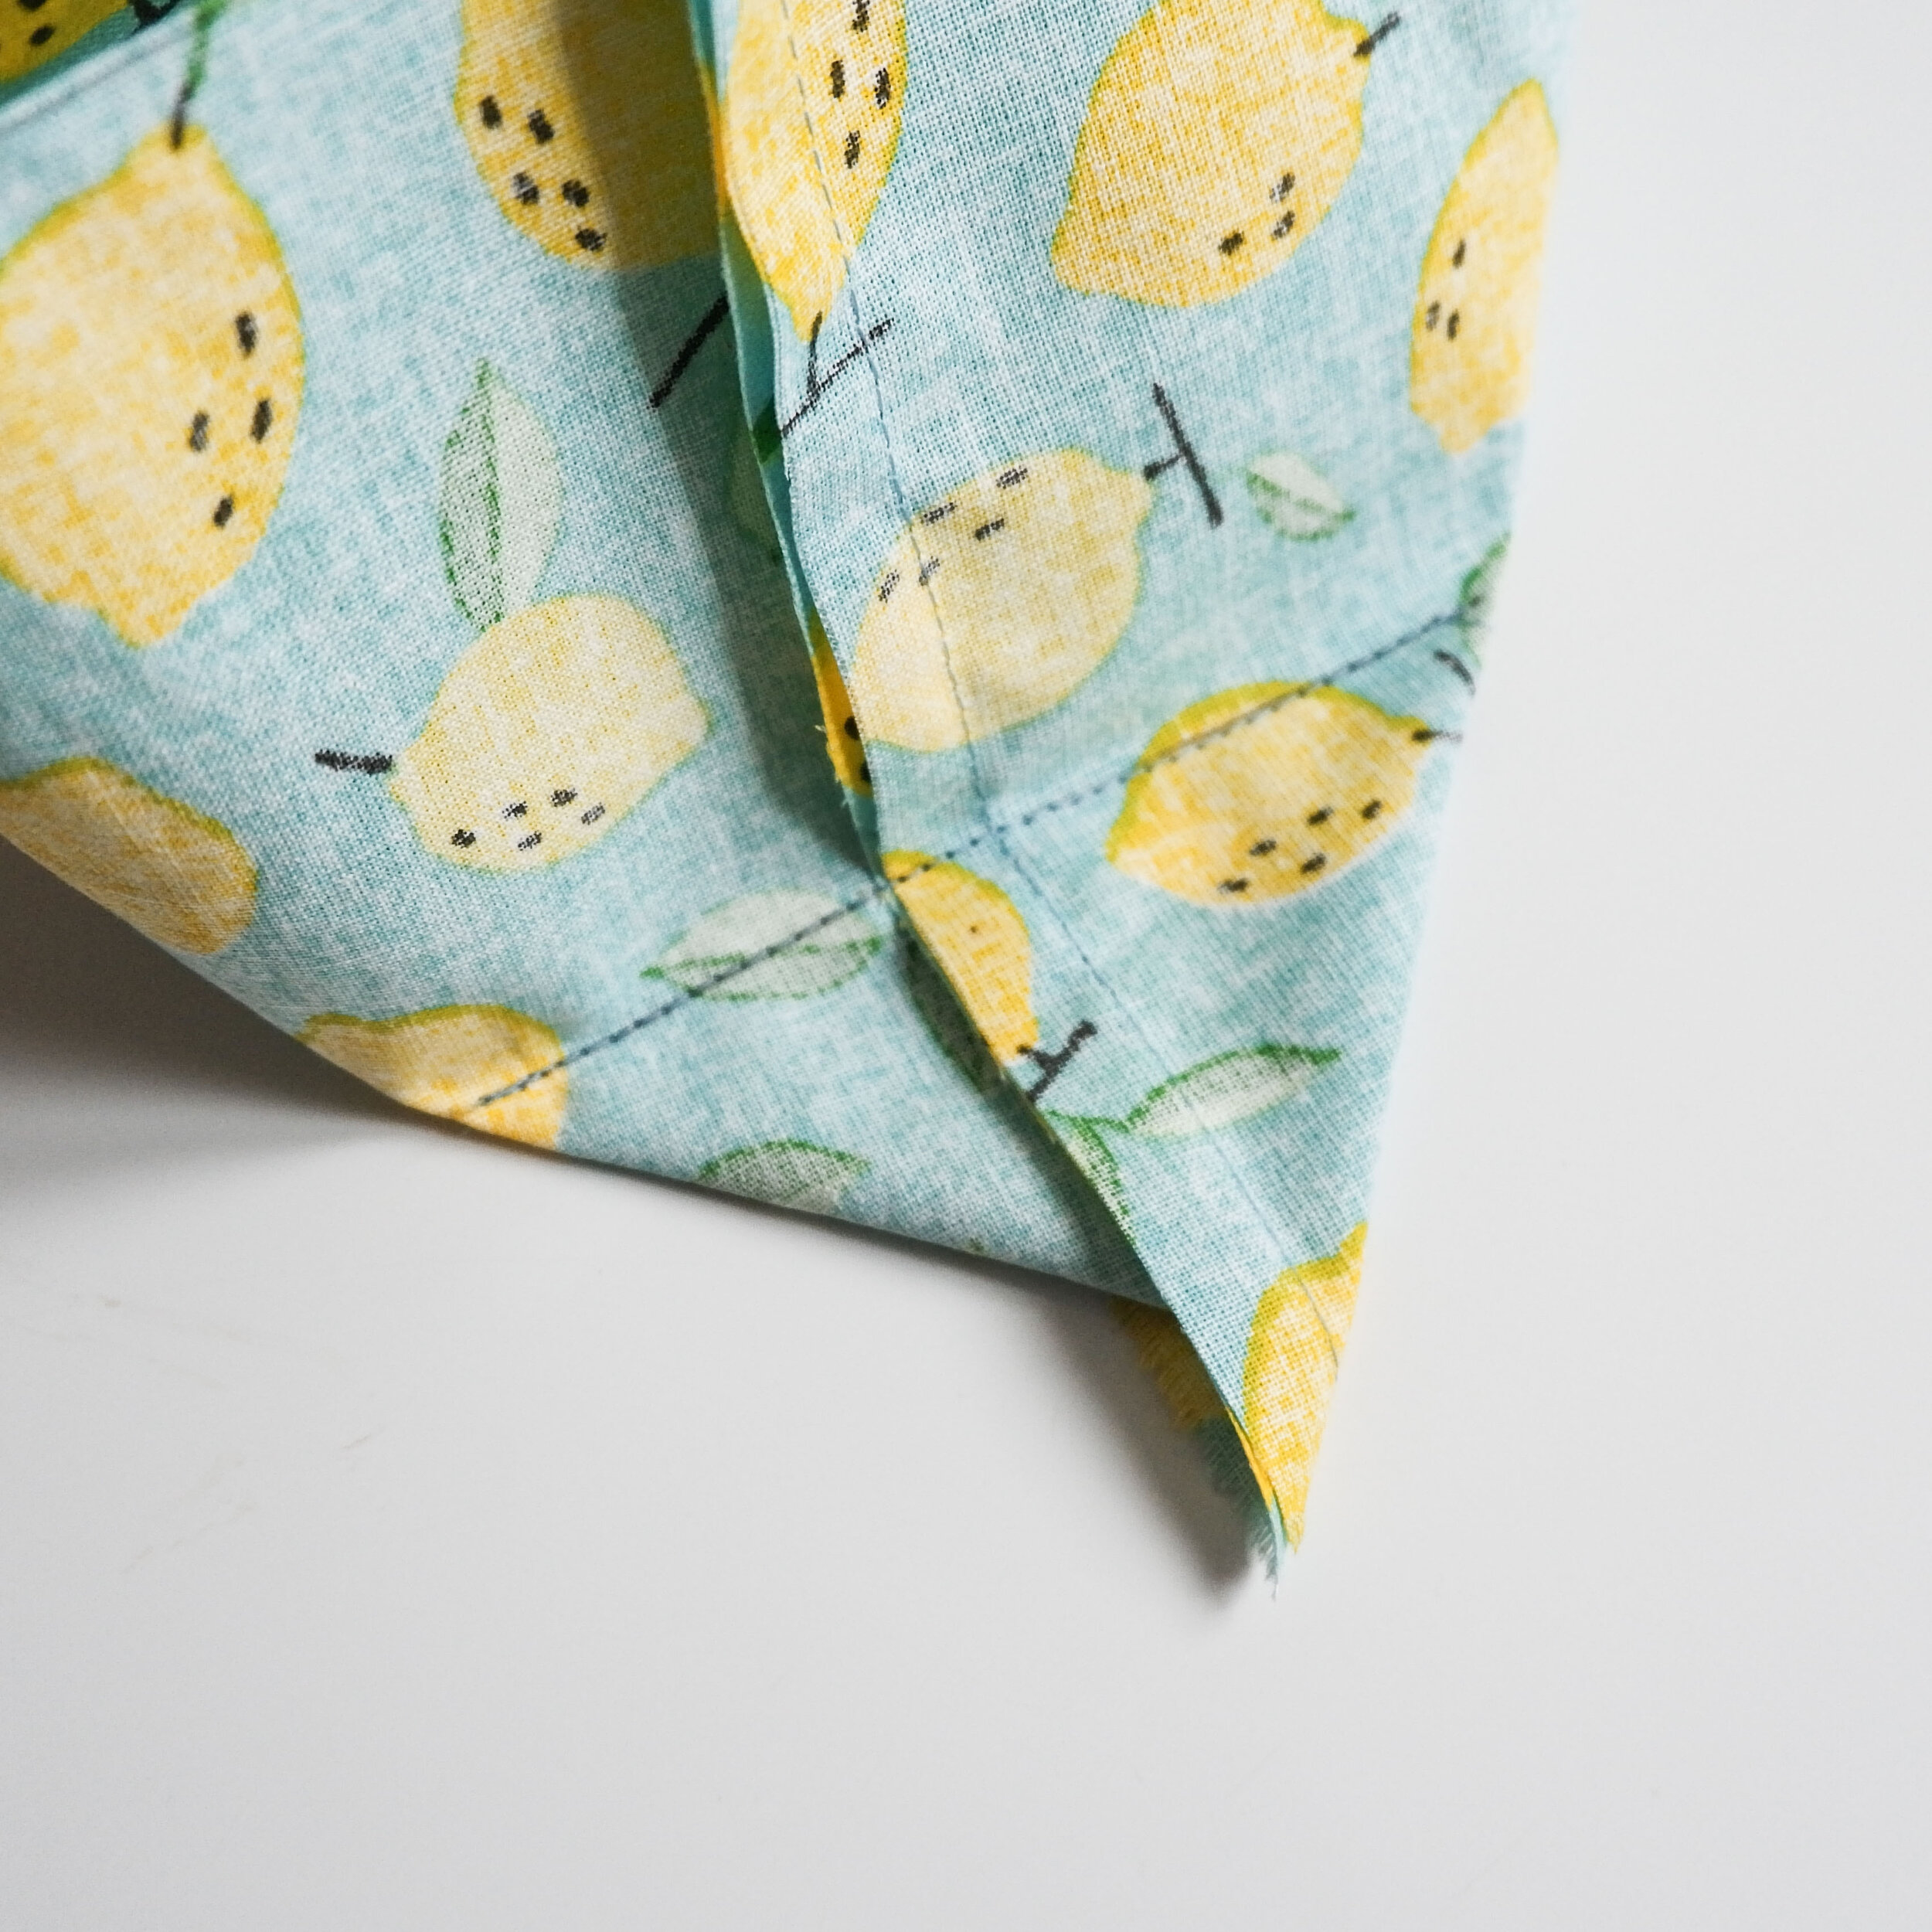

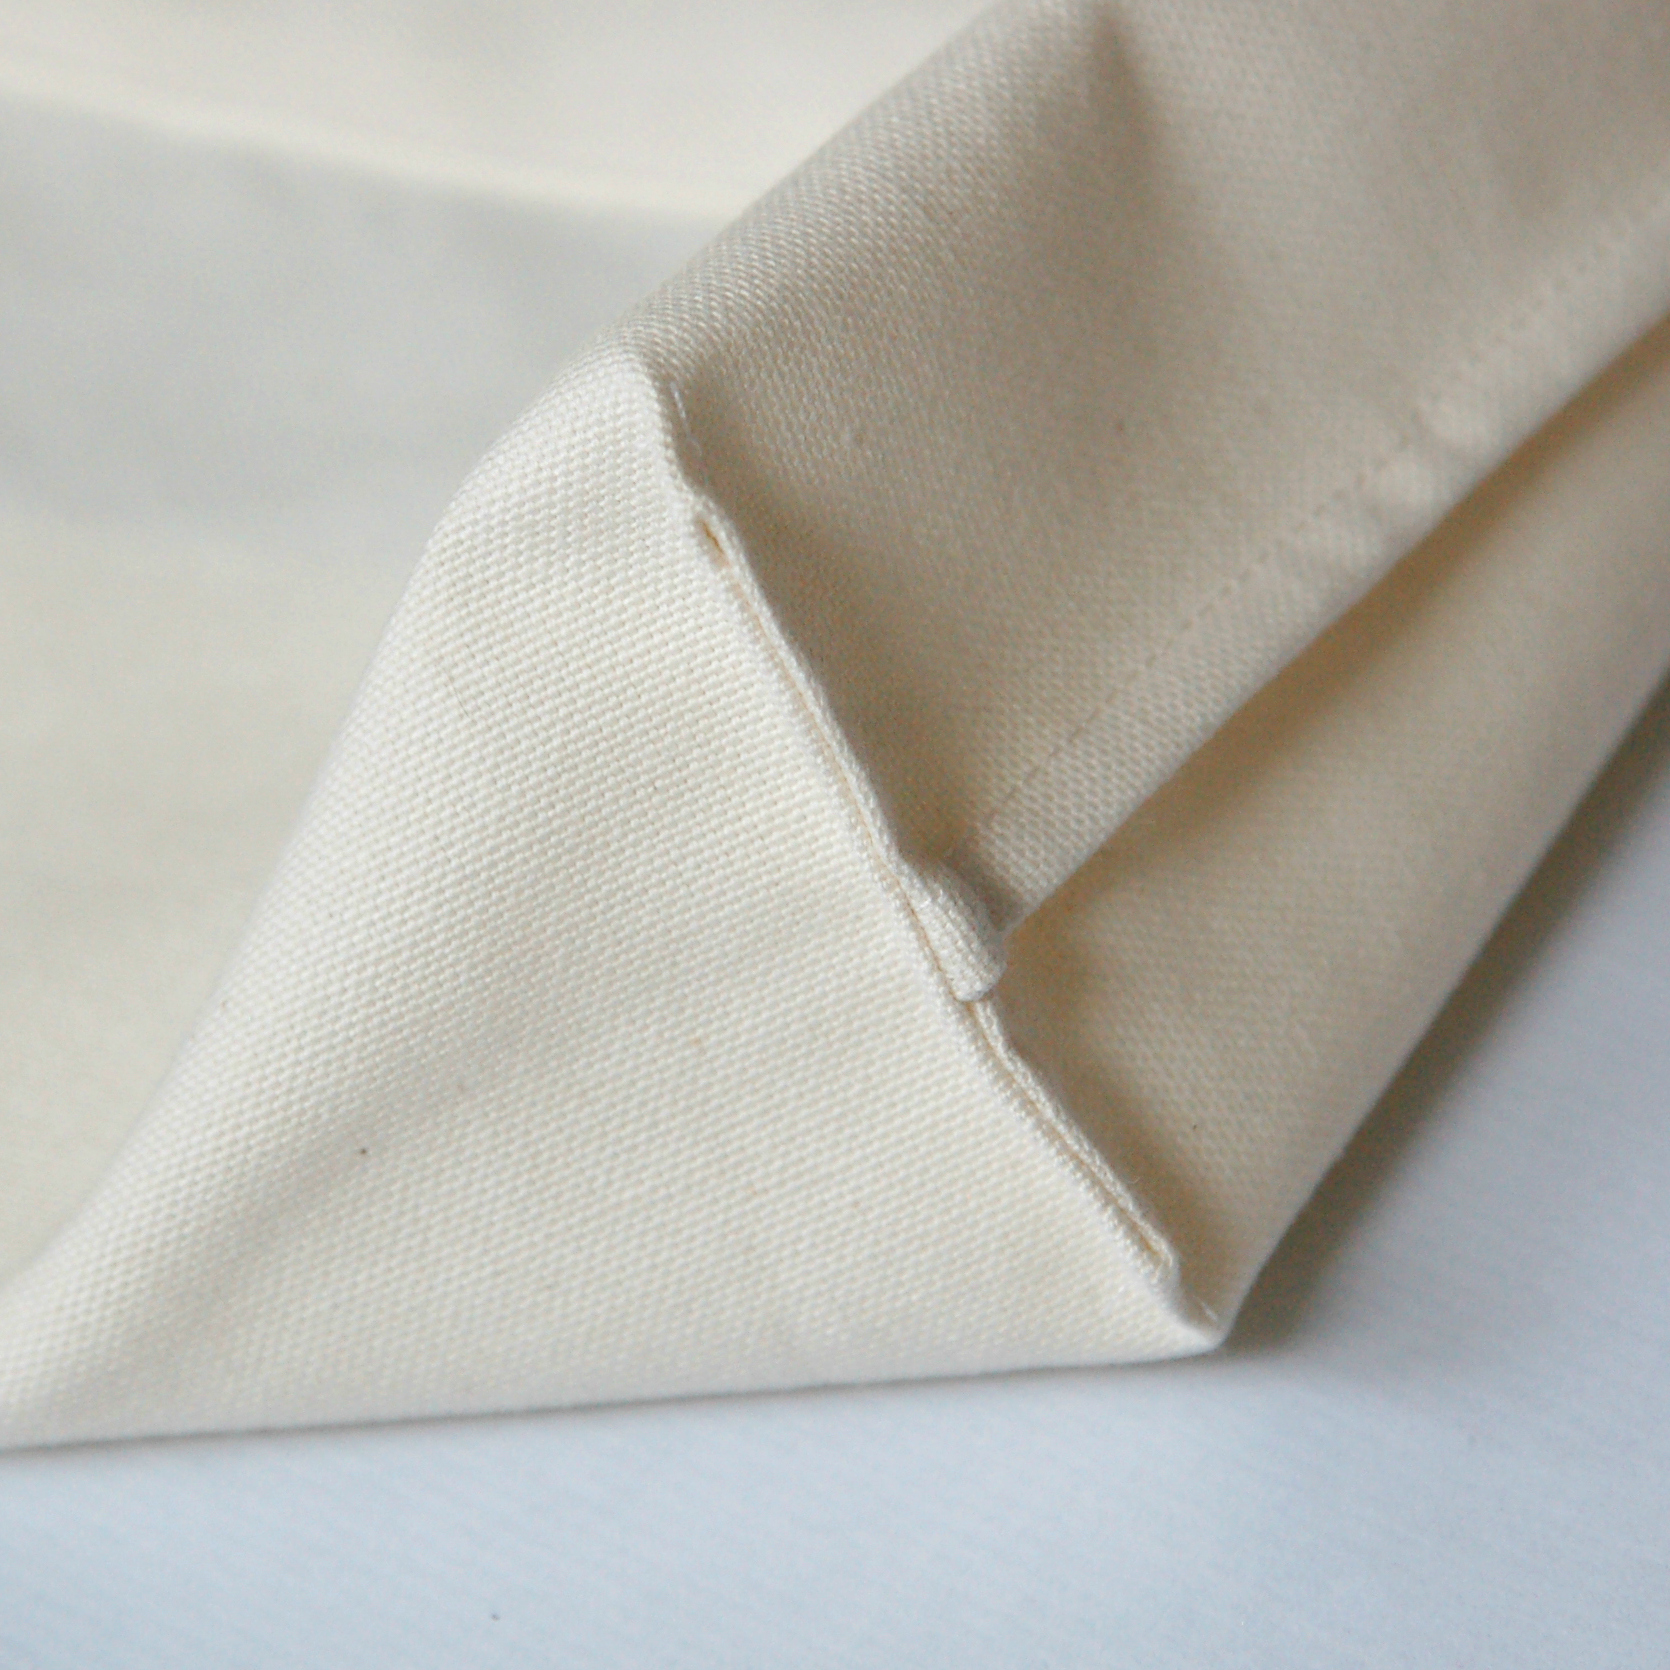
Sew over the line you just marked. Repeat the same thing with the other corner. This time you don’t have two stitching lines as the side seam is on fold. Just mark the crease with your fingernail, this is the line you are using instead of the stitching line.
Cose encima de la línea que acabas de marcar. Repite con la otra esquina. Esta vez no tienes dos costuras porque el lateral está en doblez. Simplemente marca el doblez bien con la uña y vas a usar esto de referencia en vez de la costura lateral.
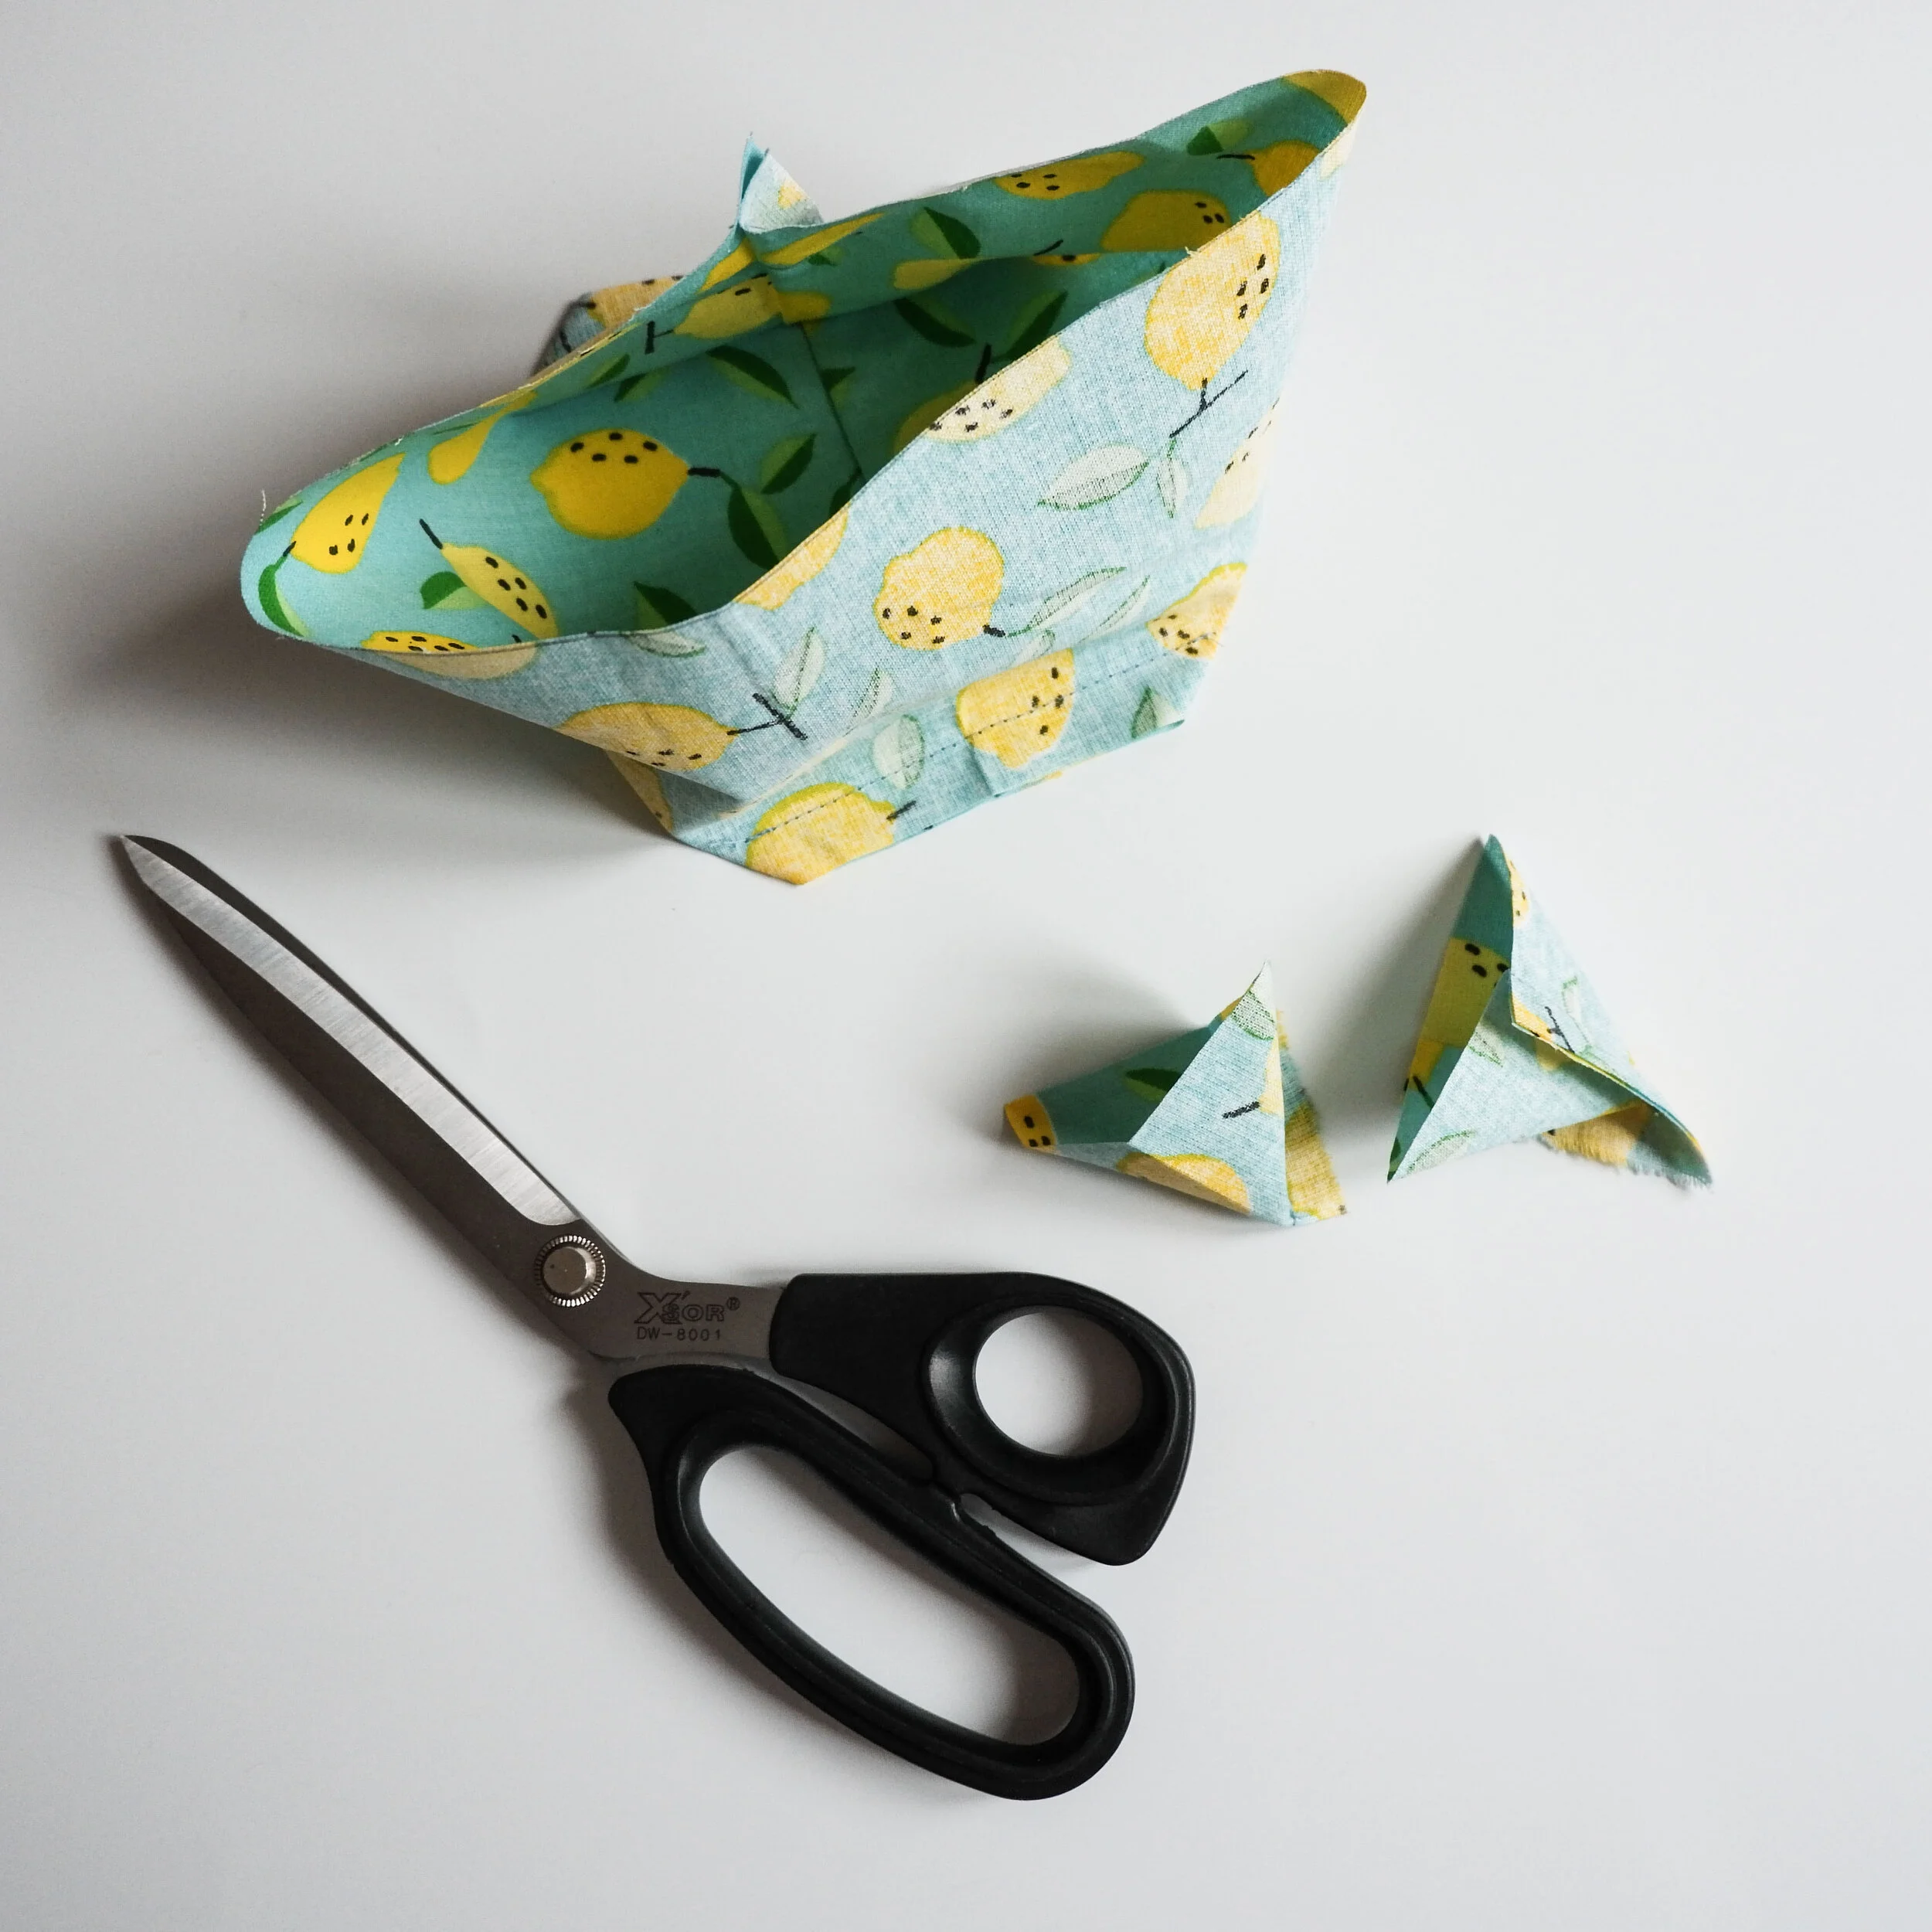

Once you’ve sewn the two corners, cut away the excess fabric leaving 1 cm (3/8) of seam allowance for the corner seam. Repeat the same process with the lining and turn it right side out when you finish.
You now have the exterior layer with the right side in and the lining with the right side out.
Una vez que tengas la dos esquinas corta el exceso de tela dejando un margen de 1 cm para la esquina. Repite el mismo proceso con el forro y cuando hayas terminado dale la vuelta al forro para tenerlo con el lado derecho hacia fuera.
Ahora tienes el exterior con el derecho hacia dentro y el forro con el derecho hacia fuera.


Put the lining inside of the exterior layer, the right sides are together. Sew in round on the upper edge but leave a small opening, about 4 cm (2 in) is enough. Turn your fabric tray with the right side out and then just sew around the opening, 2 mm (1/8 in) from the edge to make the seam flat and to close the opening you left before.
Mete el forro dentro de exterior, los derecho juntos. Cose alrededor de la parte de arriba para cerrarlo, dejando una abertura pequeña, unos 4 cm está bien. Da la vuelta a tu cesta y ahora simplemente cose en el borde superior a 2 mm desde el borde para dejar las costuras planas y de paso cerrar el hueco que dejaste.

And that’s it, you’ve got your quick little fabric tray ready.
Y ya está lista la cesta de tela.


I hope you liked this tutorial and I highly recommend you to make these two quick sewing projects because they are so so useful. All my machines have them attached and when we opened the sewing academy the first thing I did was to make one for every machine...there are twelve at the moment so I made them all in a row, hehe. The fabric trays are also very useful in the academy, that’s how we keep the place clean and you end up with a lot less thread waste on the floor.
If you have a machine that has stitches on the right side like my other machine on the picture you can just tie the pincushion in another position, just make sure that the ties are not on your way when threading the machine.
Espero que te haya gustado este tutorial y te recomiendo mucho que hagas estos dos proyectos rápidos porque son super utiles. Todas mis máquinas tienen un alfiletero de estos puestos y cuando abrimos la academia, lo primero que hice era hacer uno para cada máquina...tenemos doce así que era la costura en cadena, jaja. Las cestas de tela también son muy útiles en la academia ya que así es más fácil mantener el taller más limpio y tener menos hilos en el suelo.
Si tienes una maquina que tiene las puntadas en el lado derecho como mi otra maquina en la foto puedes simplemente atar el alfiletero en otra parte. Solo tienes que asegurarte de que las tiras no estén atadas donde enhebras la maquina.
And as I mentioned, you can use this way of sewing fabric trays to make any size you want for anything you’d like to keep organized...they work well for threads, small tools and whatever you have on your sewing desk! You can also fold the opening down to show more of the lining or you can use bias tape to create a contrast edge...there are so many possibilities!
You can find more tutorials on this page of my blog. And if you want to know more about the sewing machinines that are on these pictures you can read this post about my machines.
Y como ya mencioné antes, puedes usar esta manera de hacer cestas de tela para cestas de cualquier tamaño para cualquier cosa que quieras tener organizado...funcionan bien para los hilos, herramientas pequeñas o para cualquier cosa que tengas en tu mesa de costura! También puedes doblar el borde hacia abajo para que se vea mejor el forro o puedes usar cinta de bies para tener una abertura con contraste...hay un montón de posibilidades!
Puedes encontrar más tutoriales en esta página de mi blog. Y si quieres saber más sobre las máquinas que están en estas fotos puedes leer este post sobre mis máquinas de coser.
Estuche con cremallera - patrón gratis / Zipper Pouch - free pattern

Hola! Hoy os cuento sobre un proyecto que quería compartir desde hace tiempo. Ya sabéis que este año he publicado tres patrones de costura digitales, todos ellos de lencería. Ahora toca el turno para algo que no tiene que ver ni con encajes ni elásticos de lencería. Os presento este nuevo patrón de estuche, que además es gratis!
He usado el proyecto de estuche muchísimo en mis clases de costura porque viene muy bien para los principiantes. De hecho suele ser el segundo proyecto (después de un sencillo bolso de tela) que cosemos con gente que empieza desde cero a aprender a coser. Así que de verdad, es sencillo para todos los niveles. Aunque es una cosa muy fácil de coser, no por eso es menos bonito o útil. A mí me encanta este proyecto porque se puede hacer de miles de maneras, puedes usar muchos tipos de tejidos y es un regalo ideal.
Hey! Today I want to tell you about a project I’ve wanted to share for some time now. As you know I have published three digital sewing patterns this year, all of them are lingerie patterns. Now it’s time to present you something that doesn’t include neither lace nor lingerie elastics. Here’s my new zipper pouch pattern and the good news is that it’s free!
I’ve used the zipper pouch project so much in my sewing classes as it’s the perfect thing for beginners to sew. We actually make it as a second project with people who start from zero (after an easy tote bag). So honestly, it’s a simple make for all levels. Although it’s easy to sew, it’s also pretty and practical. I love this project because you can customize it in so many ways, use different fabrics and it makes a perfect gift.

Normalmente a la gente les da un poco de miedo el tema de coser cremalleras. Con el método que te enseño en este patrón no hay complicaciones. Puedes seguir las instrucciones paso a paso y verás que el resultado queda muy bonito. He escrito las instrucciones especialmente pensando en gente sin experiencia así que aunque sabes muy poco, lo vas a poder coser!
En las instrucciones aprendes cómo hacer el patrón a la medida que TÚ quieras, explico cómo usar cualqier largo de cremallera. El estuche está completamente forrado y queda bonito tanto fuera como por dentro. Todos los pasos vienen con fotos y texto explicativo tanto en castellano como en inglés. Espero que os gusta y os resulta útil!
Normally people are a bit afraid of sewing zippers. With the method I show you in this tutorial you’ll see it’s easy. Just follow the steps and it turns out great. I’ve written the instructions so they will be understandable for new sewers and even when you have very little experience you will be able to sew this project!
Following the instructions you will learn how to make the pattern according to the measurements YOU choose, I show you how to use any size of zipper. The pouch is completely lined and will be pretty both on the outside and on the inside. All the steps come with photos and text both in English and Spanish. I hope you’ll like it and that you find it useful!

Estoy muy contenta de poder compartir este patrón porque me parece que puede molar a mucha gente. Estuve un tiempo dudando si publicar el estuche o seguir con lencería. De hecho, pensaba que si hago patrones de lencería debería “siempre” seguir con eso. Y la verdad es que me agobié un poco estando en un punto muerto entre muchas ideas y sin saber qué hacer este verano.
Pero luego al pensar bien sobre por qué hago los patrones y qué es lo que me motiva de este trabajo, llegué a la conclusión que la palabra es ENSEÑAR. Y entonces tenía claro que en vez de quedarme en un nicho concreto de patrones y seguir con lo mismo porque es lo que yo “debería hacer” y porque es algo que otra gente espera de mí, era una tontería. Tengo más ideas, más que compartir y hoy quizás es un estuche pero mañana puede ser una camiseta. Creo que lo importante es producir contenido de calidad, sea lo que sea la temática. Con eso quiero decir que mi siguiente patrón va a ser de bolso de tela donde quiero explicar muchas maneras de cremalleras, bolsillos, forros etc. También quiero decir que eso no significa que ya no haga más patrones de lencería. Simplemente en este momento me motiva más la idea de bolsos y tengo mucha ilusión al preparar las cosas nuevas para compartir mi trabajo con vosotros. También estoy abierta a sugerencias por si buscáis algún patrón en concreto y pensáis que lo pueda hacer :)
Así que aquí os dejo este patrón gratis para que lo uséis a vuestro gusto y me encantaría saber si os gusta y/o si tenéis sugerencias sobre el tema, siempre me podéis escribir un correo electrónico o un mensaje en Instagram. Volveré en breve con un post de inspiración de estuches…por si todavía no os he convencido para que cosáis uno! Pincha en el botón de abajo para obtener el patrón en formato PDF:
I’m really happy to share this pattern with you and I think that a lot of people will like it. For a while I was doubting if I should publish the pouch pattern or if I should continue with lingerie patterns. Actually I thought that as I make lingerie patterns I should continue just making them “forever”. And I did stress out this summer when facing a mental block and not knowing which idea to pick for the next pattern.
But then I started to think about why I actually do what I do and what motivates me about my work. I came to a conclusion that it is TEACHING. And then I saw it: it’s kind of stupid to stay in the same niche of products just because it’s something that “I should do” or if I think that it’s what other people expect me to do. I have more ideas, more to share and maybe today it’s a zipper pouch and tomorrow it can be a t-shirt. I think that the important thing is to produce quality content no matter what the topic is. With this I want to announce that my next pattern will be a tote bag and I want to share all I know about sewing zippers, pockets, linings etc. With this I also want to say that it doesn’t mean that I will not make lingerie patterns anymore. It’s just that at this moment I’m more motivated to work with bags and I feel really passionate about preparing new stuff so I can share my work with you. I’m also open for recommendations if you are looking for a specific pattern and think that I could make it happen :)
So here goes this free pattern, use it as you like and I’d love to get the feedback so you can always write me on my email or at Instagram. I’ll be back soon with an inspirational post about zipper pouches…just in case I haven’t convinced you yet to sew one for yourself! Now click on the button to get the free pattern in PDF format:


Tutorial: funda de macetero / flower pot cover

Hola! Hace mucho que no escribo un tutorial, así que hoy os traigo uno muy fácil y práctico. Tengo varias de estas fundas para los maceteros y me parecen muy bonitos. Esta vez tenía que hacer un regalo para una persona que me cae muy bien pero la verdad es que no la conozco mucho (la profe de mi niña, jaja), así que se me ocurrió que una planta bonita sería una buena idea. Y si se le añade algo hecho a mano, pues mejor. Así que aproveché para de paso hacer el tutorial y compartirlo con vosotros por si alguien más se anima a coser este proyecto que se hace rápido y queda muy mono.
Hey! It's been ages since I wrote a tutorial around here, so today I'm bringing you a real simple and useful one. I have many of those flower pot covers and I think they are really cute. This time I had to give a present to someone I like a lot but I don't really know her (my kids teacher, hahaha) so I tought that a plant would be a good gift. And if you throw something handmade in too, well it's even better, right? So when sewing it I also prepared a tutorial for you guys if anyone is up to try it out too, it's a very fast make and looks good.

He usado telas tipo loneta, el de estampado es de Black Oveja y el liso es de Tejidos Paredes. Se puede usar todo tipo de telas, mejor que sean más bien fuertes como loneta, telas de tapicería etc pero también puedes aprovechar algodones más finos si usas entretela para darles un poco más de grosor. Yo he usado dos telas distintas para tener un poco de contraste, pero también puedes hacer el exterior e interior de la misma tela. La cantidad depende del tamaño de tu maceta.
I used a canvas type of fabric, the print is from Black Oveja and the solid one is from Tejidos Paredes. You can use many types of fabrics, middle weight would be a good choice, like canvas for example or home dec fabrics etc, you can also use lighter weight cottons if you interface them to give them a bit more stability and weight. I used two different fabrics to have a bit of contrast but you can of course use the same fabric for the inner and outer shell. The quantity you need depends on the size of your flower pot.
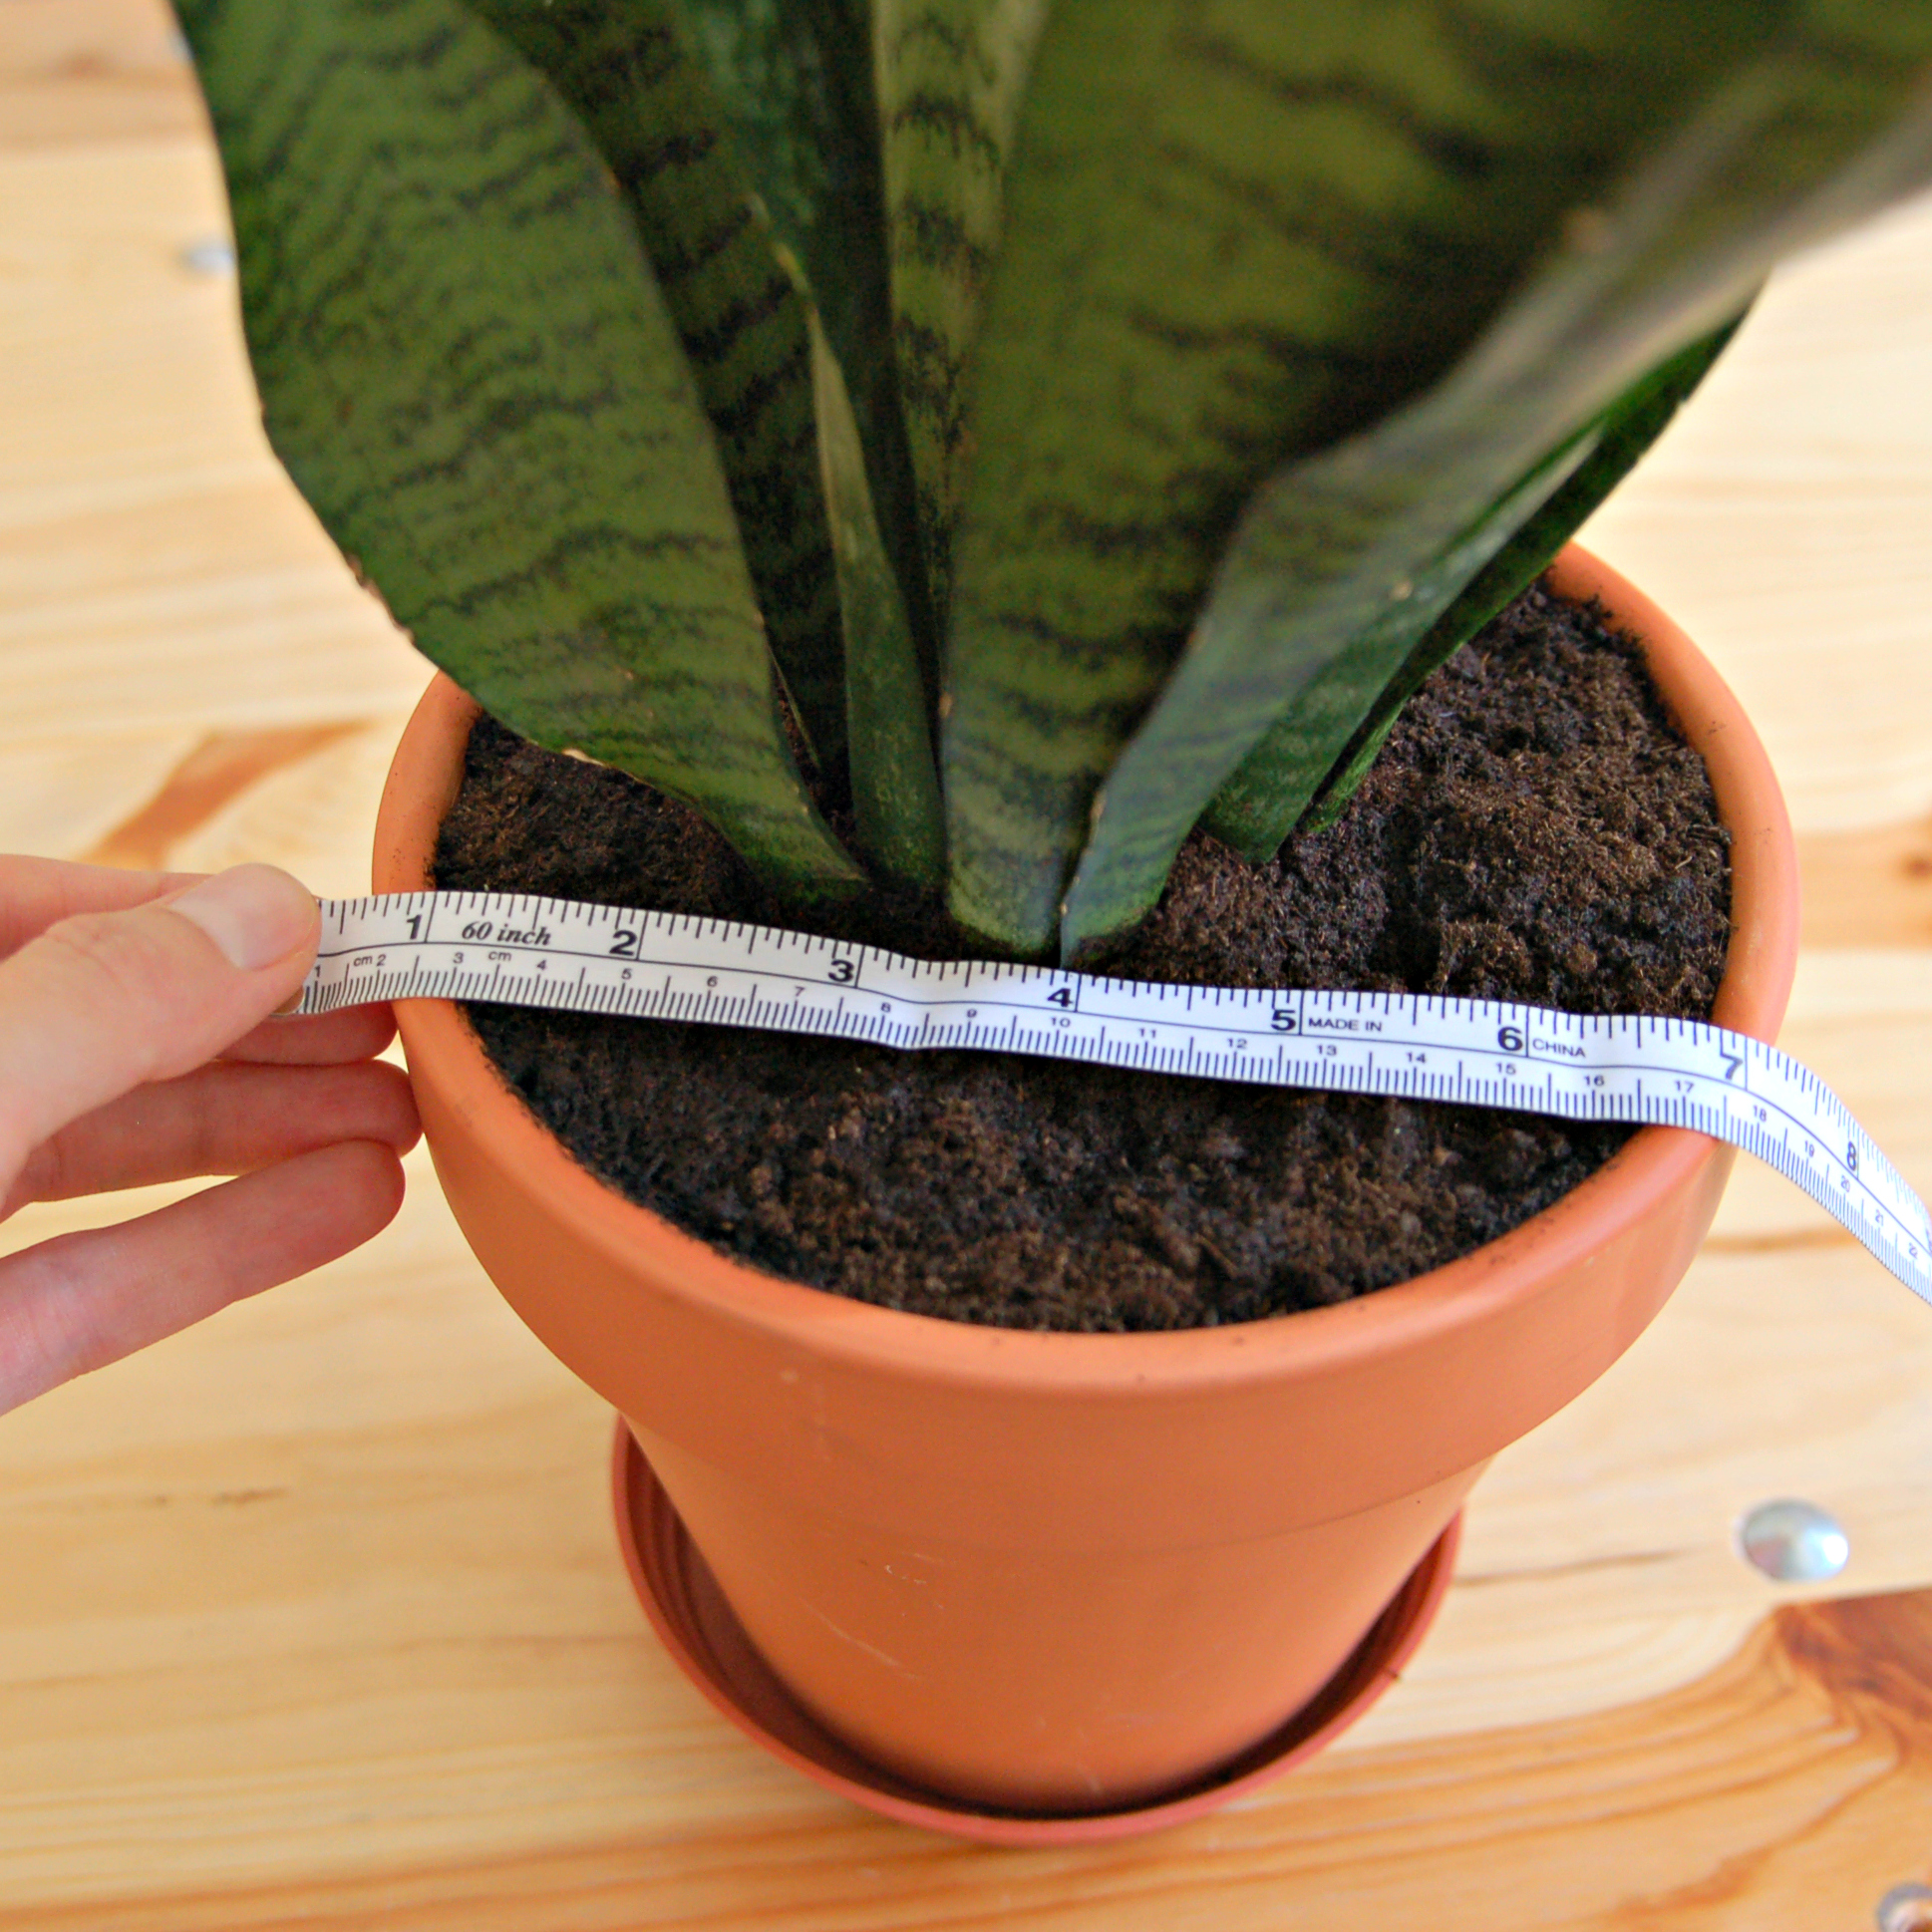
Para empezar mide el diámetro de tu maceta en la parte más ancha y añadele un poco más de margen para que sea cómodo de poner y sacar la planta. También mide el alto de la maceta para saber cuánto va a medir tu funda. Yo lo he hecho un poco más alto para que pueda doblar el borde y que se vea la tela amarilla.
To start with, measure the widest part of your pot and add a bit extra room to be able to take the plant out later. Also measure the height of the pot to know how high your cover will be. I added a bit of height there to be able to fold down the border for the color effect.

El diámetro (más margen de comodidad) de mi maceta es de 20 cm, he dibujado el círculo de base sabiendo esto. Luego para calcular el lateral necesitas calcular la circunferencia de tu base, y sería el diámetro multiplicado por π (3,14). En mi caso es 20 x 3.14 = 63 cm.
Así que tengo mi base que dibujé en papel sabiendo que el diámetro es de 20 cm, luego le añadí 1 cm de margen de costura alrededor. Y la pieza lateral mide 63cm x 20 cm (el alto de la maceta más un poco para doblar). A esta pieza también le doy 1 cm a todos los laterales para margen de costura después. Yo prefiero siempre primero calcular cuánto miden las piezas y después añadir margen a todo, sino me lío con el tema de la circunferencia y los margenes etc.
The diameter (and the extra space) of my pot is 20 cm, I've drawn the circle based on that measurement. To calculate the size of the body piece you need to know the circumference of the base circle and this would be the diameter multiplied by π (3,14). In my case it's 20 x 3,14 = 63 cm.
So I have my base pattern drawn on the paper knowing that the diameter is 20 cm, I then added the seam allowance of 1 cm around that. The body piece is 63 cm x 20 cm (the height of the pot and some extra to fold down). I also added 1 cm seam allowance to that piece later. I prefer to first calculate everything and then add the seam allowances to not mess up with the circumference etc.

Con los cálculos hechos corta una pieza de base y una pieza de lateral de la tela exterior y exactamente las mismas piezas también de la tela interior: dos bases y dos laterales.
With all the calculations made, cut a piece of the base and a piece of the body from the outer fabric and exactly the same pieces from the inner fabric too: two bases and two bodys.

Para empezar, dobla las piezas laterales por la mitad, derecho con derecho, para coser la costura lateral para formar un tubo. Lo haces una vez en la tela interior y una vez en la tela exterior. Plancha abierta esta costura para que haya menos bulto luego.
To start with, double the body piece right side with right side and sew the side seam to form a tube. It's done one time with the outer fabric and one time with the inner one. Press the seam open to reduce bulk later on.

Ahora divide tu base en cuatro partes iguales: doblas primero el círculo por la mitad y marcas dos puntos y luego lo doblas por otro lado y marcas los otros dos puntos. La pieza lateral que ahora es un tubo también tiene que estar marcado en cuatro partes de la misma forma.
Now it's time to divide the base circle in four equal parts: fold the circle in half and mark the two points and then fold it again in other direction and you'll have the other two points. The body piece that's now a tube needs to be divided in four parts the same way.

Ahora es fácil unir todos los puntos que marcaste entre sí, así sabes que todo el círculo está repartido igual. La base y el lateral se unen entre sí derecho con derecho.
Now it's easy to fit the base and the body together using the same marks, the space will be divided equally. The pieces need to be put right isdes together.

Ahora se une la base con los laterales. Yo prefiero coser teniendo la pieza de lateral encima y el círculo abajo, me parece que es más fácil unir la parte recta a la parte curvada al hacerlo de esta manera. Coses todo alrededor.
Now it's time to sew the base and the body together. I prefer to sew with the body piece on top of the circle piece as it seems to be easier to sew a straight edge to a curved one that way. Sew all the way around.
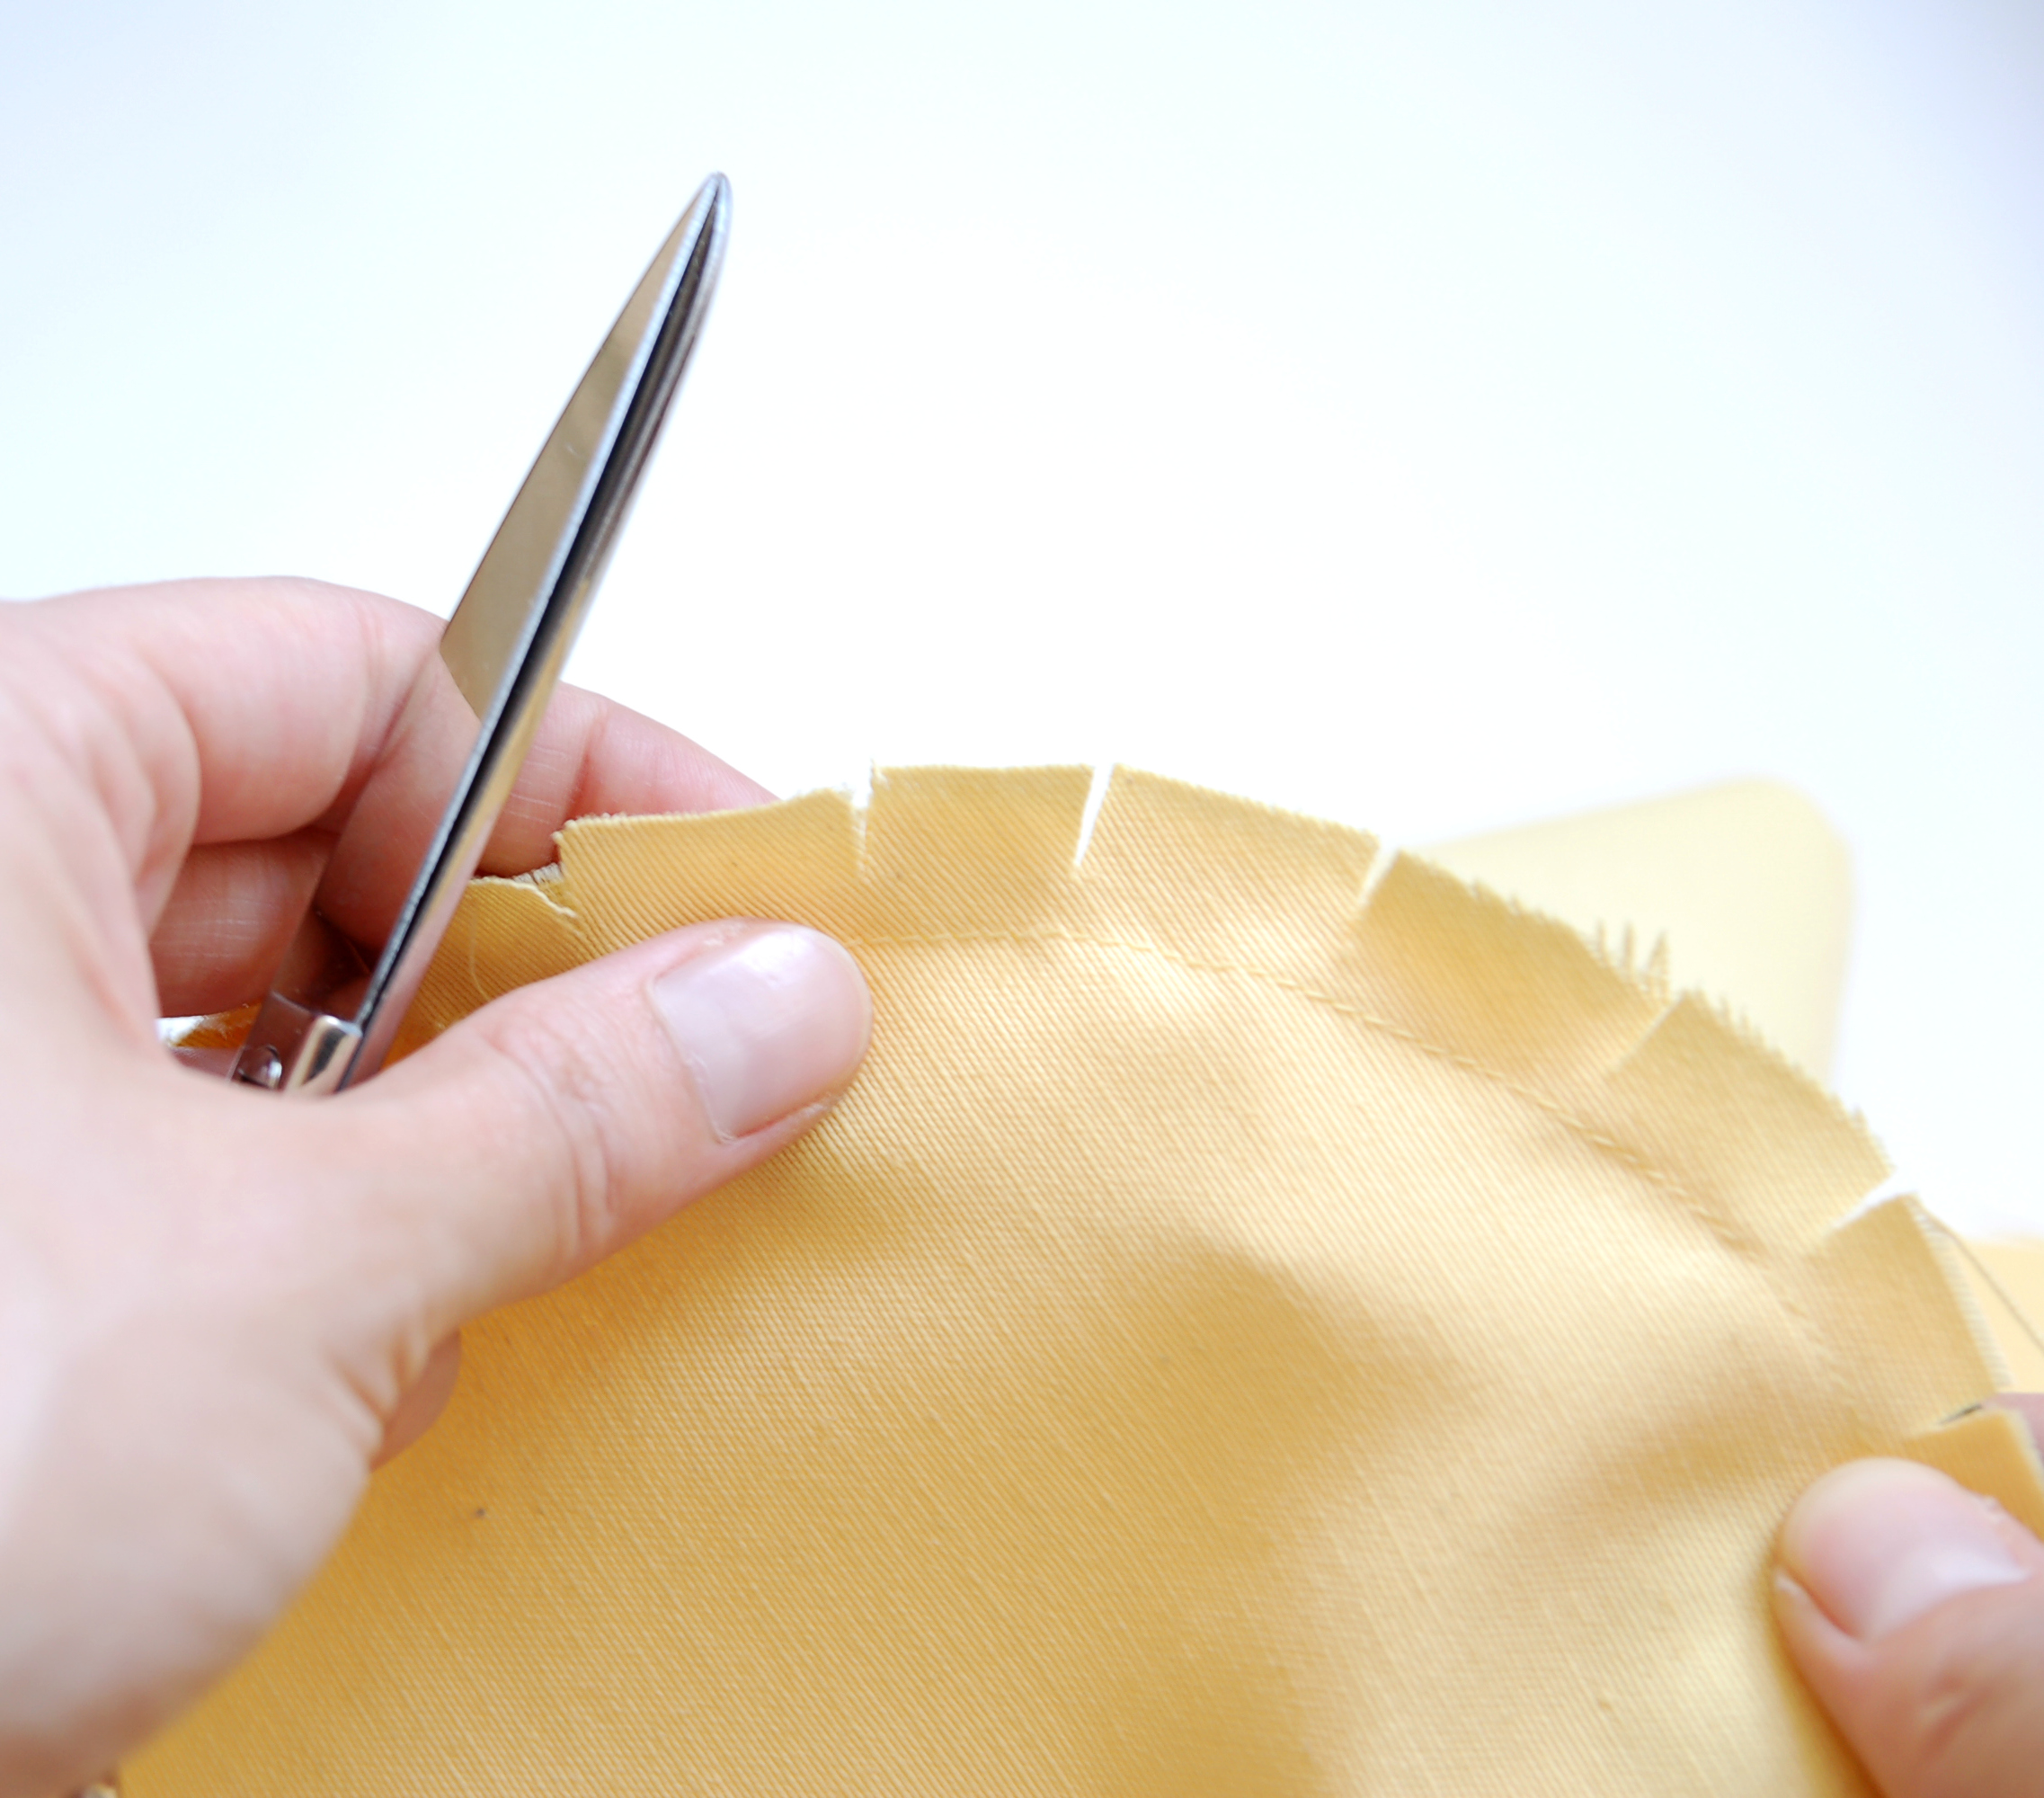
Una vez hecho esto, le das unos piquetes para que el margen esté más "libre" y que no tire.
Repites el mismo proceso con la otra parte de la funda.
Once this is done, clip the seam allowances a bit to relax the fabric.
Repeat the same step with the other shell.

Ahora tienes dos fundas ya montadas independientes. Para cerrar la funda se mete uno dentro del otro, primero dale la vuelta a una de ellas y ponlo dentro del otro, tienen que estar derecho con derecho. Se cose todo alrededor de la parte de arriba, dejando un hueco de aprox 5 cm para dar la vuelta.
Now you have two separate shells sewn up. To finish the cover you have to put one inside the other: first turn one of them the around because they need to be with right sides together. Sew all around the upper edge leaving a aprox 5 cm long opening to be able to turn your work around.
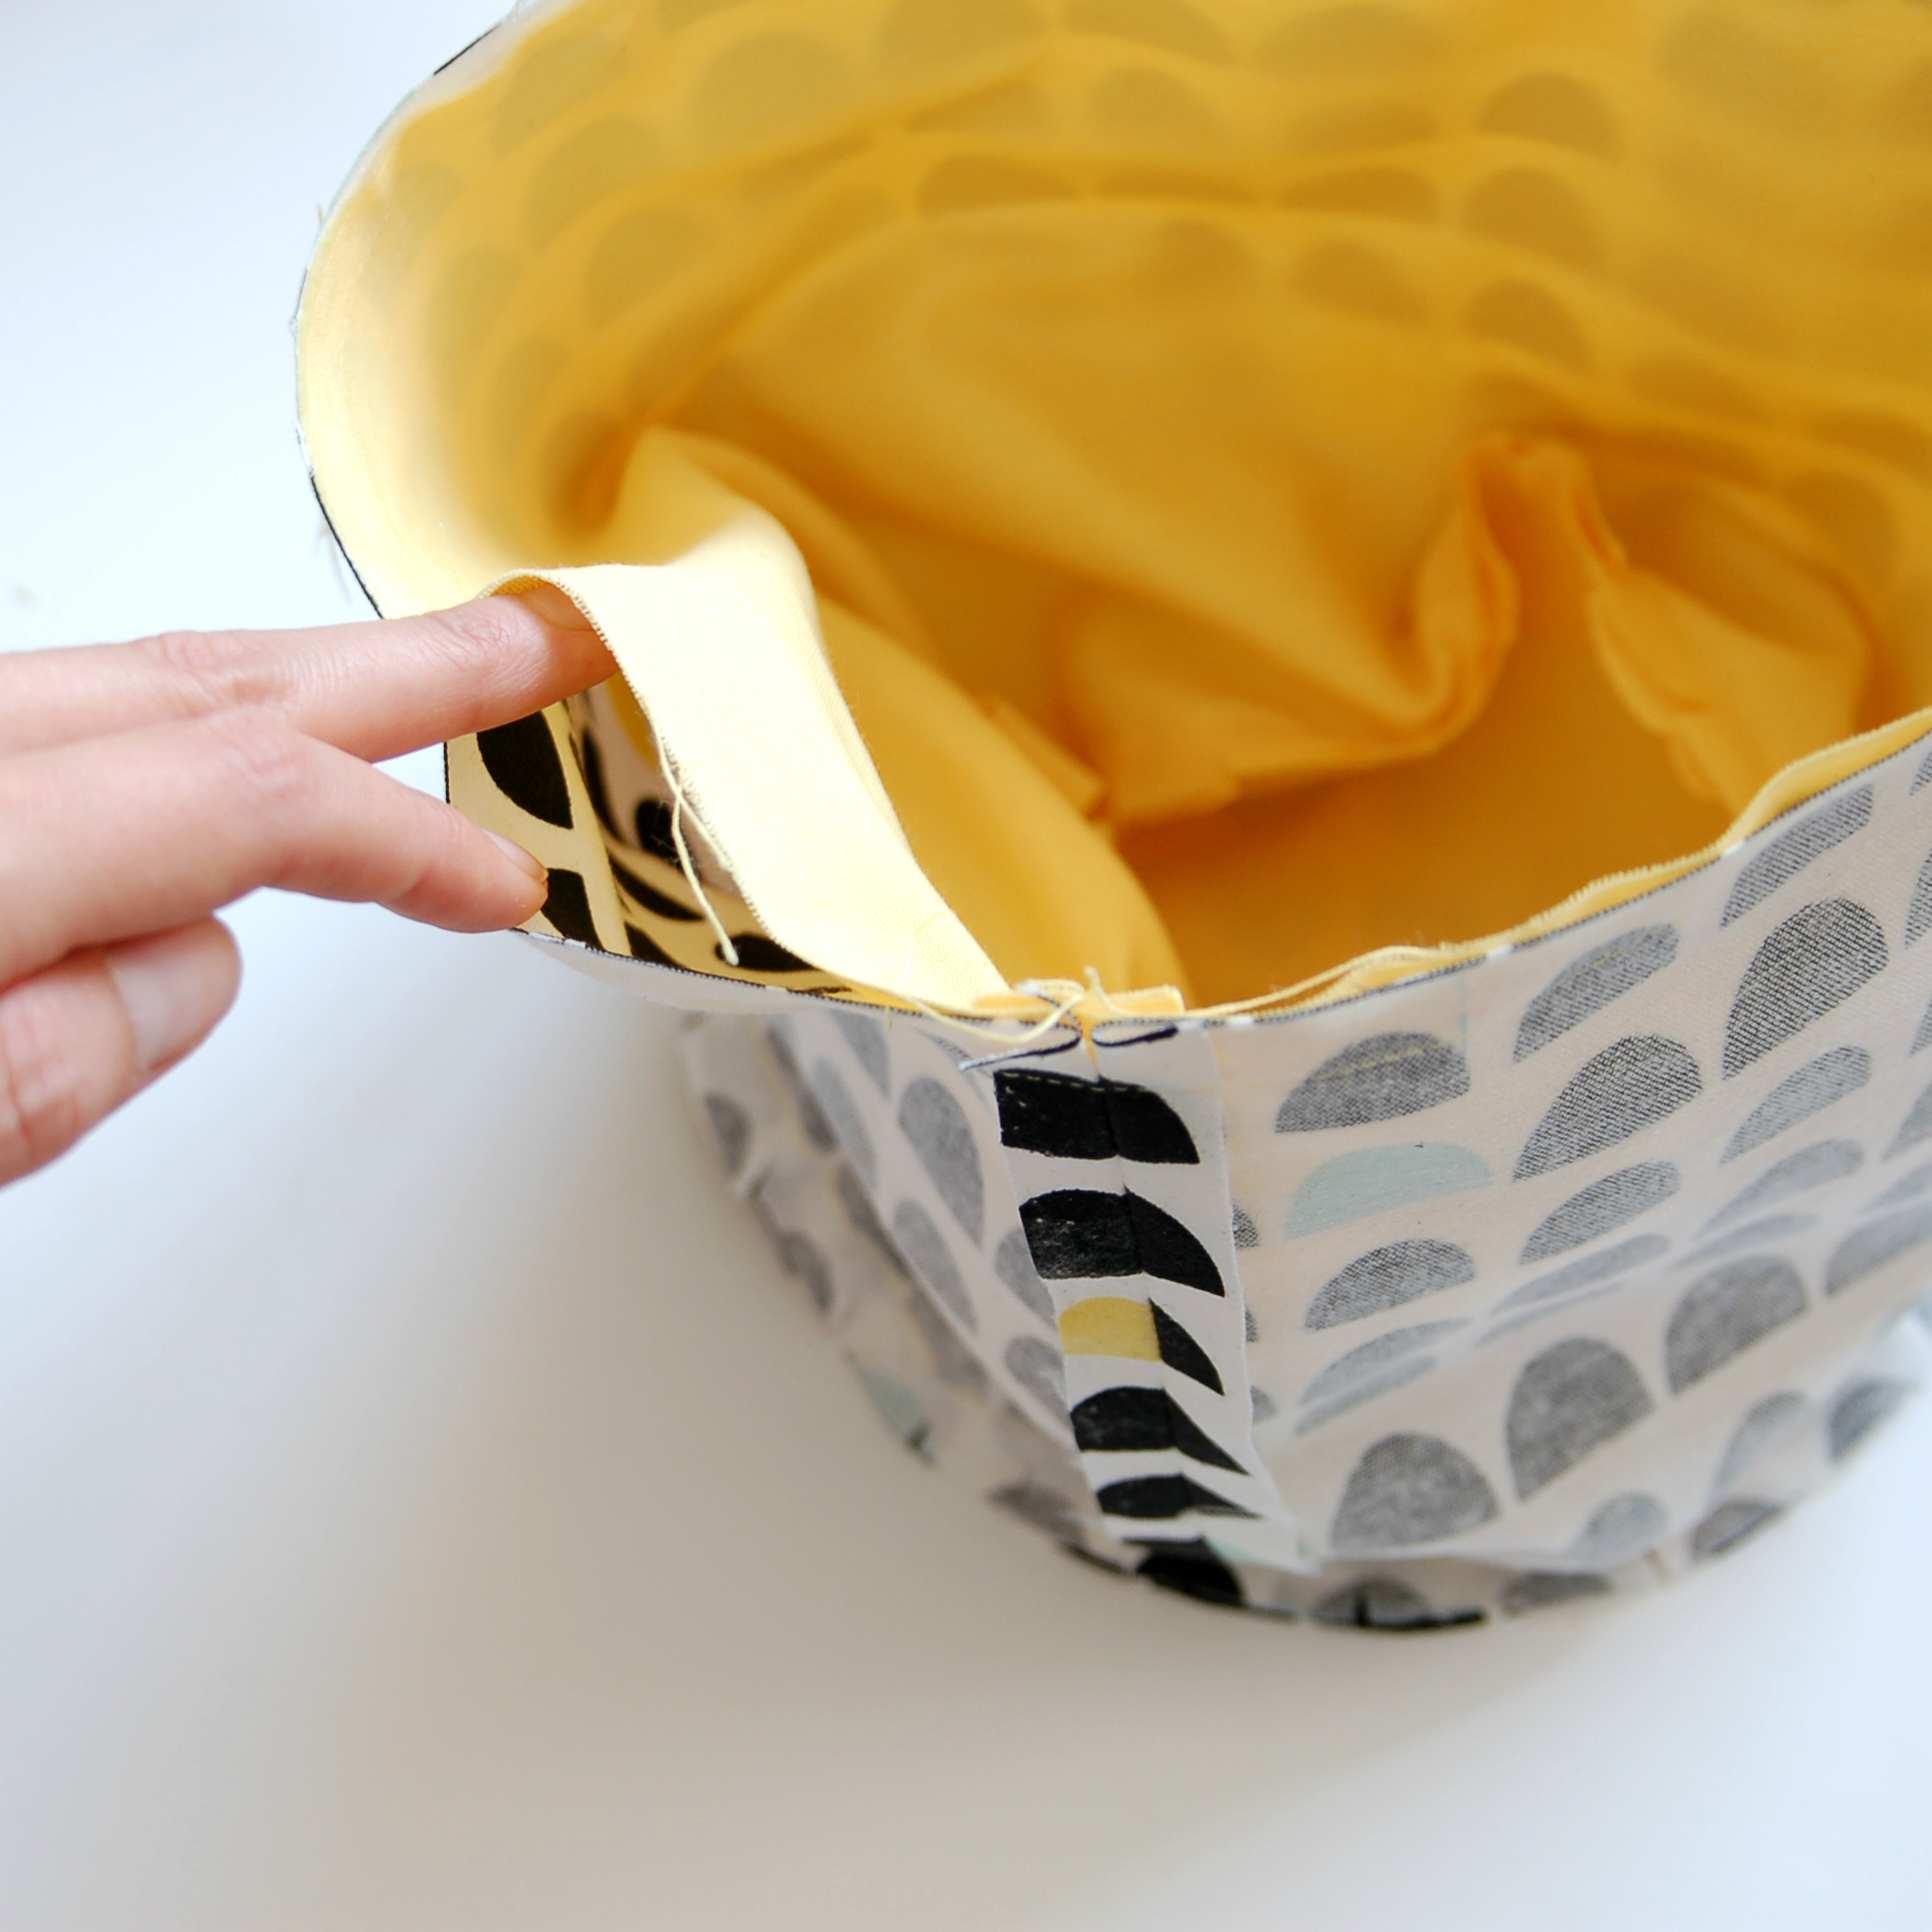
Allí está el hueco para dar la vuelta. Si prefieres, este hueco lo hubieras podido dejar también en la costura lateral (la primera que hicimos) del forro de la funda, pero yo entre que siempre me olvido de hacerlo antes, casi prefiero que esté allí arriba porque de todas maneras voy a dar un pespunte después que va a cerrar este hueco.
There's the hole to turn the work around. If you like, you could leave the opening in the side seam of the lining shell of the cover (the first one we sew), but as I always forget to do it, I also prefer to leave it in the upper seam as I anyway will sew another row of stitching that will close it.
Da la vuelta a tu funda a través del hueco y plancha un poco el resultado (que suele ser arrugado, jeje).
Turn the project inside out and press it a bit (it tends to be full of wrinkles at that point, hehe).

Para terminar, cose un pespunte en el borde superior para asentar esa costura y de paso cerrar el hueco que usamos para dar la vuelta antes. Yo subí un poco el forro para este efecto de color que se vea un poco, pero también puedes mantener los bordes exactamente iguales y dar el pespunte. A veces también uso el bies para rematar este borde y también queda bonito, allí ya cómo cada uno quiere.
To finish it off, sew a topstitching row in the upper part of the cover to make the seam flat and also to close the opening we left before. I raised the lining a bit to have this color effect there but you can also just leave both of the shells on equal heights and sew it that way. I also use bias tape sometimes and it's a very cute finishing method too, you have lot's of choices there.

Y ya está! Como veis, es muy sencillo pero queda muy bien y puedes usar todo tipo de estampados chulos que has comprado pero no sabes muy bien qué hacer con ellas (ehmmm...alguien adicta a las telas de Ikea por aquí?). Y como comenté antes, me parece buena idea de regalo cuando no sabes muy bien qué regalar pero quieres dar una sorpresa bonita. Espero que os haya gustado!
That's it! As you can see it's so simple but looks good and you can use all those cool prints you've been hoarding and don't know what to do with them (ehmmm...any more Ikea fabric addicts around here?). And as I told you before, I think it's a good gift idea when you're not very sure what to give but you need a cute surprise. Hope you liked it!

Ropita de cumpleaños y tutorial para coser aplicaciones // Birthday garments and an appliqué tutorial
Hola, parece que mis posts van intercambiando entre lencería y costura infantil jeje...(y efectivamente el siguiente es algo sobre lencería otra vez). Hoy os escribo un poco sobre las dos prendas que hice para mi pequeña por su cumple!
Quería hacerle algo que ella pueda poner en la guarde el día de su cumple y como los vestidos no son del todo cómodos allí, pensaba en algo como sudadera o blusa. Encontré esta tela gris que ya había usado el año pasado para hacerle un mono que no ha salido por el blog pero quedó super bien y el invierno pasado lo usó mucho en el parque. Yo soy muy friolera y siempre le quiero poner ropa que no se le destape la espalda y me horroriza ver niños pequeños con sus abrigos cortítos enseñando el ombligo en pleno enero...por eso la mía iba con el mono, el gorrito y esta bufanda redonda hecha a mano que me regaló una alumna muy maja.
Hello, looks like my posts interchange between lingerie and sewing for kids, hehe (and the next one by the way is about lingerie, oh well...). Today I'm going to tell you about two little pieces I made for my girl for her birthday!
I wanted to make her something she could wear at the daycare on her birthday and as the dresses aren't really the most comfortable things to wear there I was thinking about maybe a blouse or a sweatshirt. I found this grey fabric that I used for an overall (not blogged) for her the last year, it was so cute on her and she used it a lot. I'm really not a cold wather person and I always try to dress her the way she wouldn't have her back exposed and that she wouldn't get gold out there and I kind of panic with those kids with their short winter clothes and their bellies out there in the wind in the middle of the winter...so my kid was going out with her jumpsuit, a beenie and a scarf that is a handmade gift from one of my nice students.

El patrón del mono es de Ottobre Design (no recuerdo ya el número...uno del año pasado probablemente). El gorro también es de Ottobre.
The pattern for the jumpsuit is from Ottobre Design (I don't remember the number anymore...but from last year I guess). The beenie is also from Ottobre.

Así que se me ocurrió la idea de hacerle una sudadera con el "2" para su cumple. El patrón es el mismo que usé para las sudaderas que hice este verano, pero esta vez sin capucha. Le quité 1 cm a las piezas en la parte del cuello para que quepa mejor por la cabeza. De hecho es una talla 80 pero bastante grande.
So it occured to me that I could make a sweatshirt with a "2" on it for her birthday. The pattern is the same one as the hoodies I made this summer, but this time I took away the hood. I cut away 1 cm or so in the neck parts of the patterns so it's not so snug there. It's size 80 but it's kind of big anyway.

Hacer la aplicación realmente es muy fácil y así puedes hacer cualquier cosa que se te ocurra con la tela: números, letras, simbolos. Yo vi esa técnica en el blog de Grainline Studio y voy a hacer un pequeño tutorial aquí también para que lo veáis.
Sewing the appliqué is actually really easy and you can use it in so many ways: for making numbers, letters, symbols. I saw this tutorial in Grainline Studios blog and I'm just going to recap a little bit here about the process too.
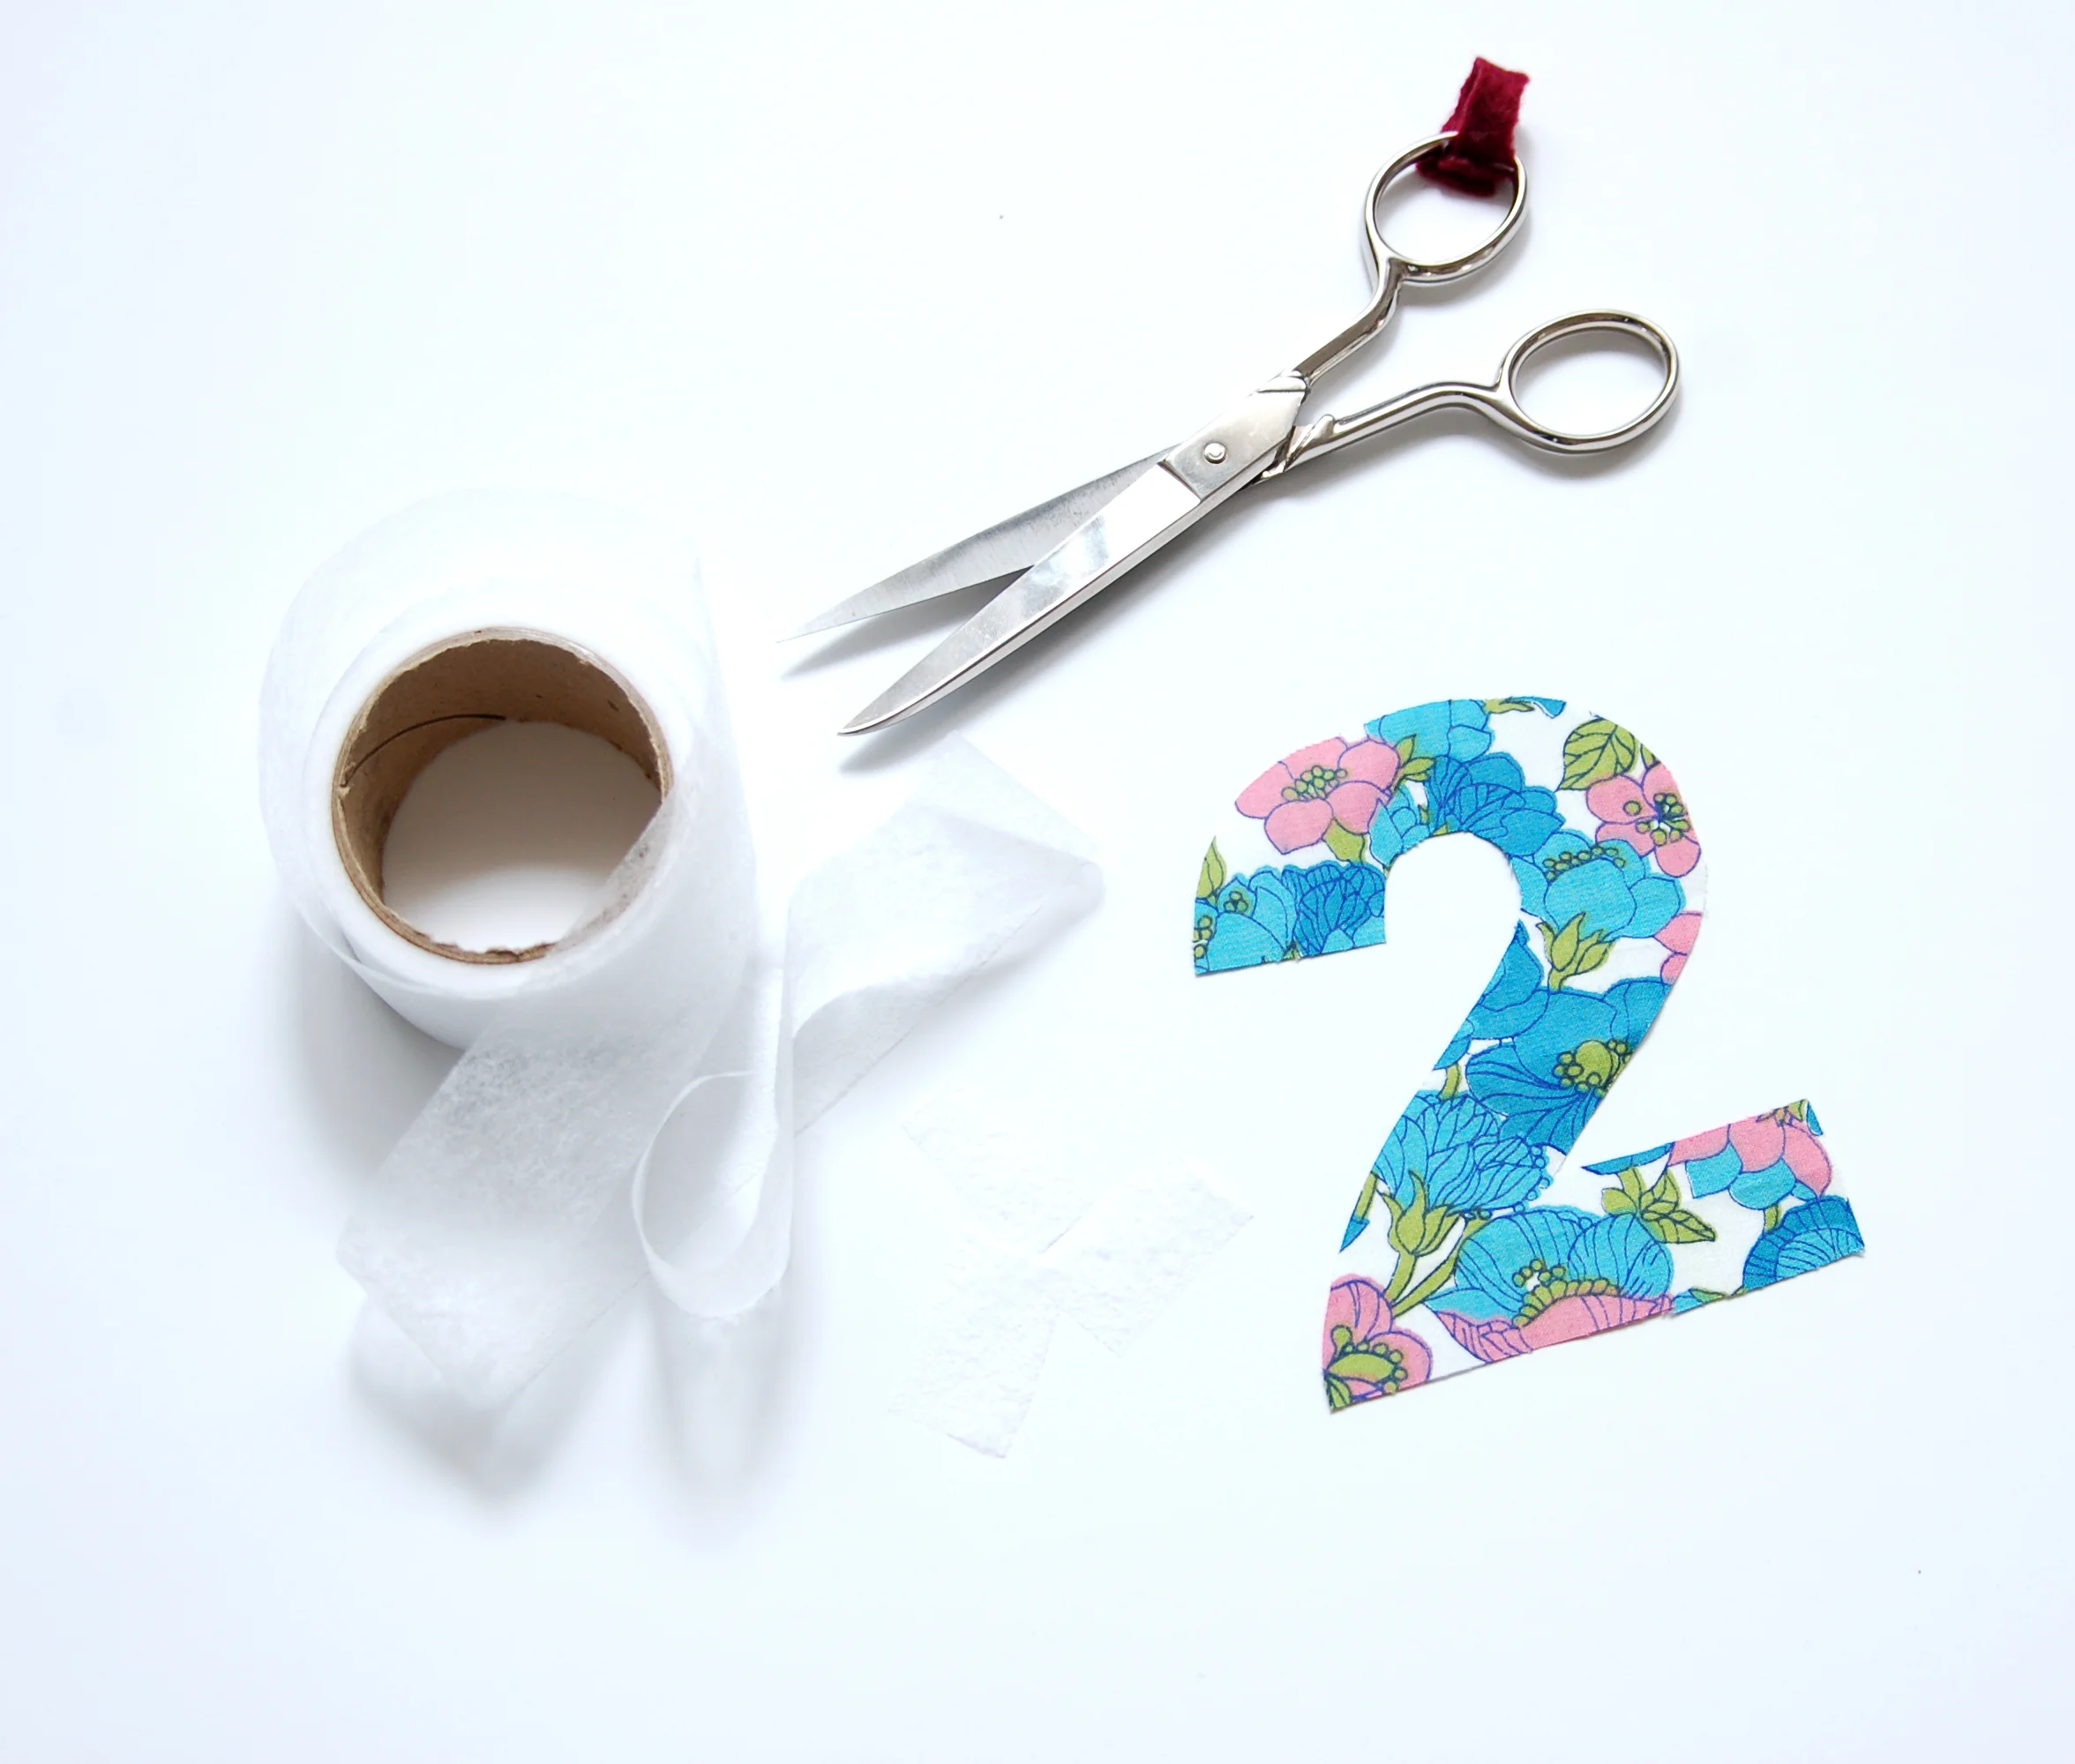
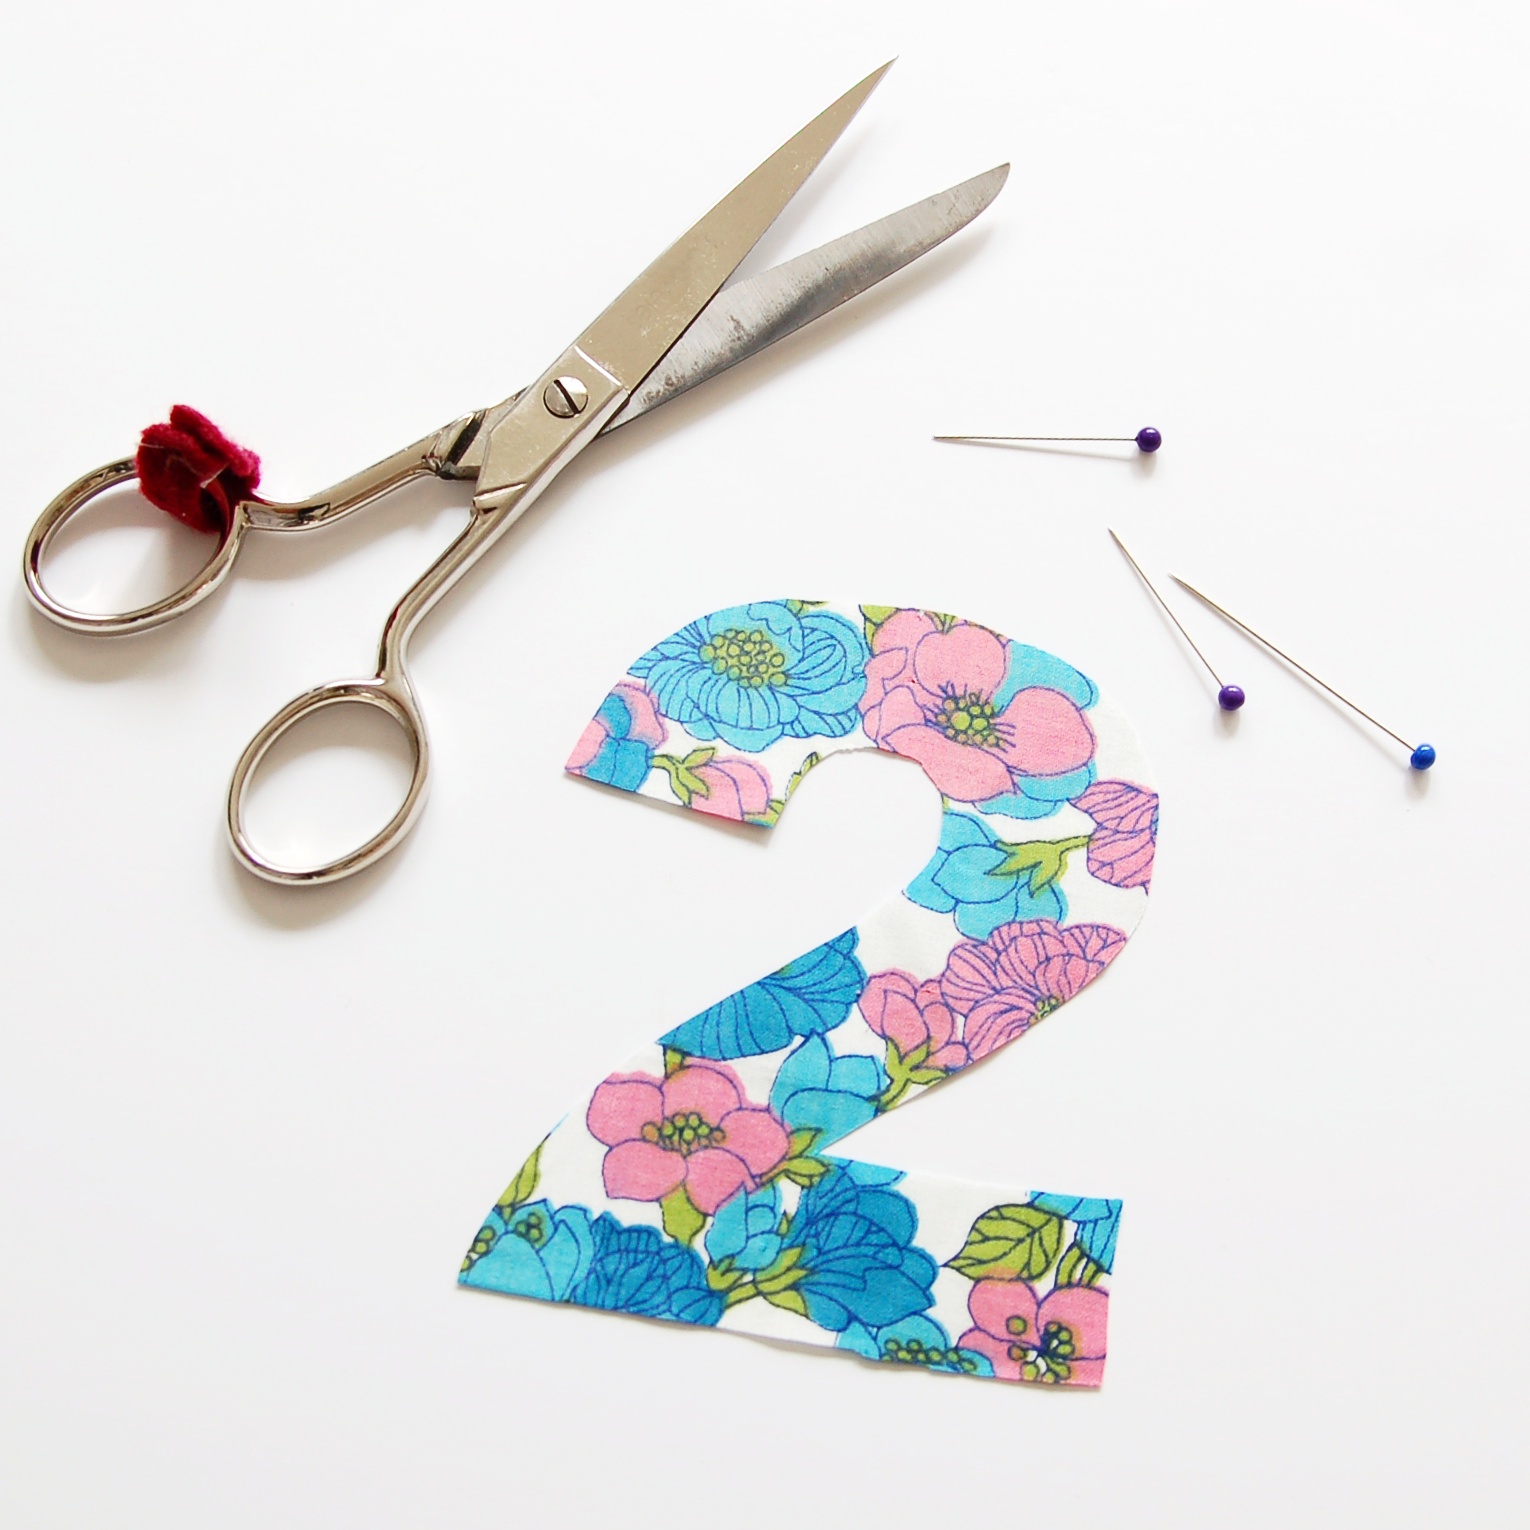
Lo primero es cortar la pieza que vas a usar para tu aplicación. Puede ser tanto de telas planas como de punto. Yo imprimí en papel un 2 grande y lo usé como patrón. Recuérdate de cortarlo al revés, si no se te queda luego con el estampado al revés. El primer paso que hago es cortar un poquito de Fliselina en trozos pequeños para pegar la aplicación a la tela para que no se mueva mientras coso. El que ves en la foto viene en formato de tira y es como entretela pero de dos lados, así se pega entre las dos telas y tienes tu pieza fija.
Puedes encontrar Fliselina como tela por metro y así podrías directamente cortar la misma pieza sin tener que usar trocítos como yo. También lo he visto en formato con papel en una cara, así primero lo pegas a tu aplicación y luego con las dos capas ya juntadas lo pegas a donde quieras que vaya. Y por último ahora parece ganar popularidad también un producto que se llama Wondertape o una cinta que cumple la misma función pero luego desaparece con el lavado. Lo que tengas a mano vale para este proyecto.
The first thing to do is to cut out the piece you are going to use for your appliqué. It can be done both in normal fabrics and knits. I printed out a big 2 on paper and then used it as a pattern. Remember to cut the pieces out mirrored, otherwise you'll have the print on the other side. First I cut out some Fliseline stay tape in small pieces so I can fix my piece in place and it won't move when I sew. The one you see on the photo comes in a tape version and it's like a interfacing but with the two sides that can be glued on the fabric, you just iron it between your pieces and that's it.
You can also find Fliseline per meter like fabric and then you just cut out your appliqué piece and you don't have to use scraps like I did. I also saw it in a verison with one side having like a paper layer on it so you can first iron one side, then tear off the paper and iron the other side too. And one more version that you can use is the Wondertape that does the same thing but later dissapears when you wash your garment.

He colocado el 2 en su sitio y le puse pequeños trozos de Fliselina abajo, no muchos, pero suficiente como para que se quede más o menos fijo.
I've put the 2 in the place I want it to be and then added some Fliseline scraps between the two layers, not too many, but enough for it to stay where I want it to be.
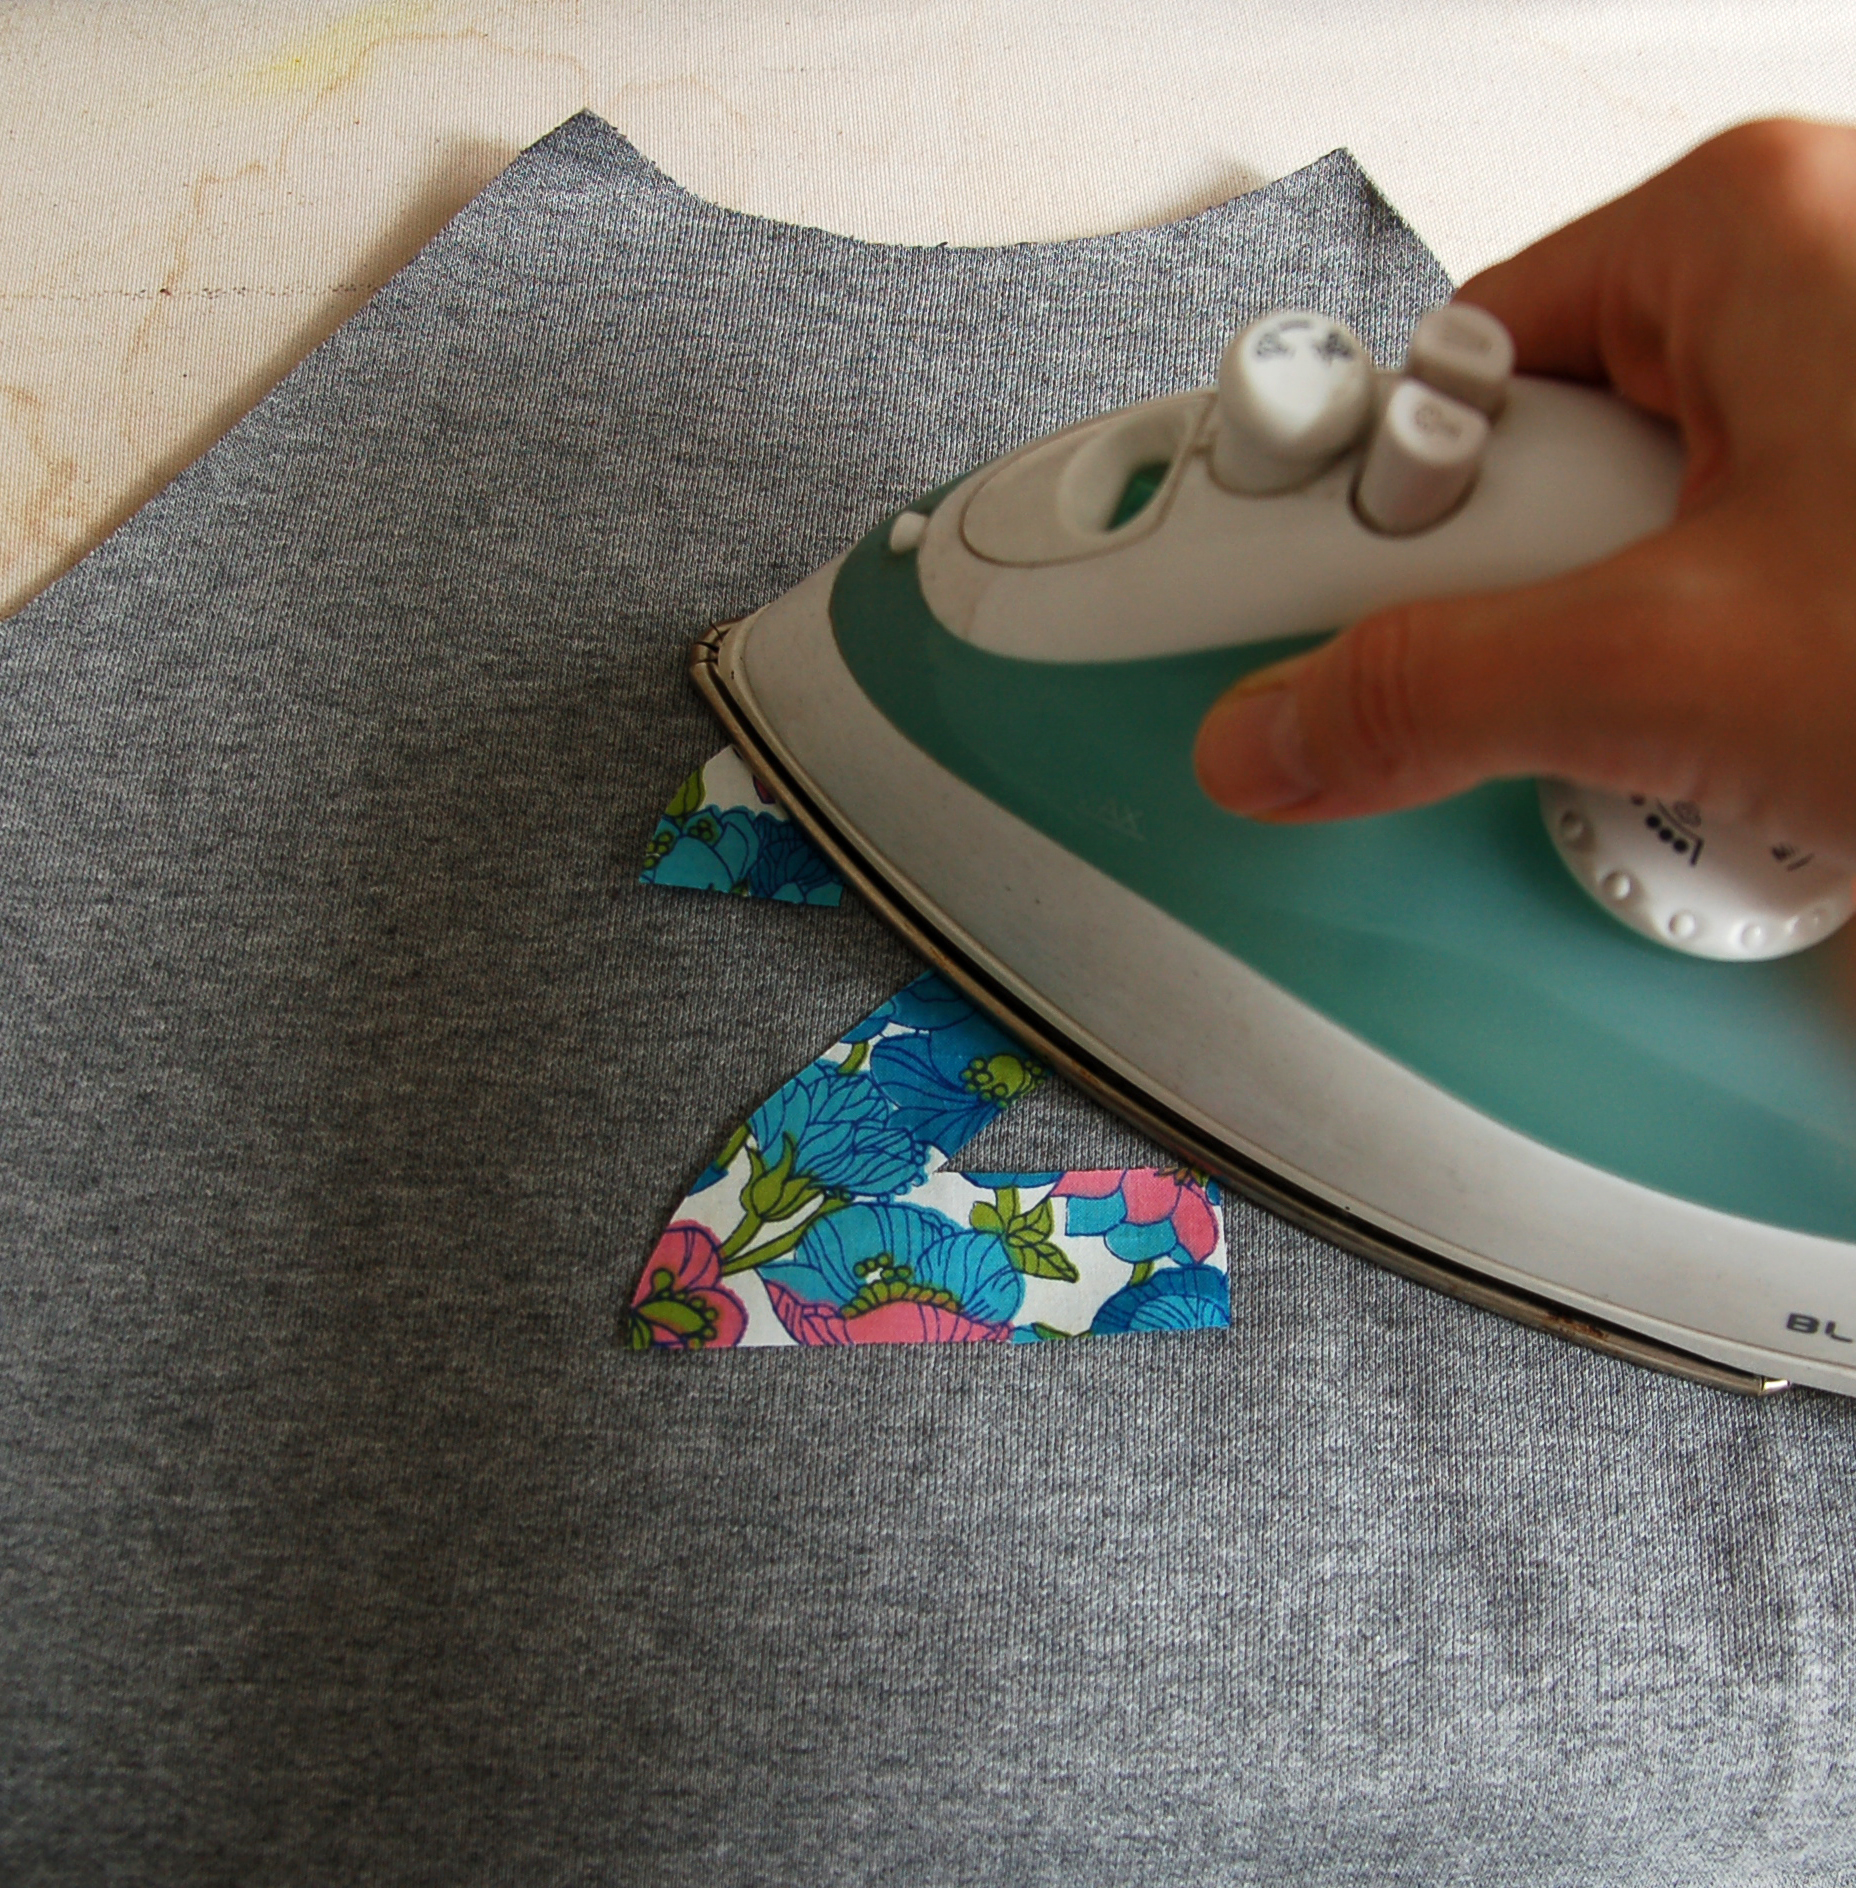
Un poco de plancha para que se peguen entre sí.
Press a little and the layers glue together.

Y ahora a coser. Lo que hago es que le paso puntada de zigzag todo alrededor de los bordes, estando segura de pillar bien la orilla de la pieza. Yo usé un zigzag de 0.5 largo y 3 de ancho. Básicamente es la puntada de ojal si en tu máquina no puedes controlar el ancho directamente. Mi tela de sudadera es algo gruesa y no tuve problemas de que la máquina no quiere coser, pero si usas punto tipo camiseta puede que te pase que la tela se engancha en los dientes de la máquina. Pues no pasa nada, para eso hay un truco: pon entre tu trabajo y los dientes trozo de papel de seda o similar y la máquina va mucho mejor teniendo como una barrera para no "comer" tu tela.
Now the sewing part. I just sew a narrow zigzag stitch all the way around the pattern piece, making sure I catch the borders of it well. I used a zigzag with 0.5 lenght and 3 wide. Basicaly it's a buttonhole stitch so if your machine doesn't have so many different ones just use your buttonhole setting. My knit fabric is medium weight so I didn't have any problems when sewing it but if you use lighter weight knits you might have problems with fabric getting stuck between the feed dogs. No worrys, there's a trick for that: put some tracing paper between your sewing project and the feed dogs and the machine goes way better having something to block the feed dogs from "eating" your fabric.

Ahora toca rodear toda la pieza con el zigzag teniendo un poco de cuidado en las esquinas para que quede bonito. Lo que hago es seguir un poquito más después de llegar a la esquina de la aplicación, entonces clavo la aguja y giro para ver si tengo bien el ancho para que quede una esquina correcta. Nada más: así de fácil es coser este tipo de cosas y la verdad es que las posibilidades son infinitas!
En algunas telas de punto que tienen más elasticidad te conviene usar algo para estabilizar esa zona, hay entretelas que se pegan primero en el revés de la tela y después de coser la aplicación se quitan tirando las partes que no pillaste con tu costura, así se queda más reforzado. En mi caso no lo he usado porque mi tela es bastante estable pero sería una opción con telas más finas. Tengo para probar también un producto que es como plástico pero pensado también para bordar a máquina...ya os contaré.
Now you just have to stitch all the way around your piece making sure you sew beautiful corners. I just sew a bit past the corner and then put the needle down, turn the work to the next direction and see if I'm on a right width from my previous stitching line. That's it: it's quite easy to sew this kind of things and you have so many possibilities!
In some stretchier knits it's a good idea to use tear away stabilizer in that area, it's like a intercafing that is applied on the wrong side of the fabric before sewing and you tear away the parts that you didn't sew on after making your appliqué. In that case this area will be more stable. In my case I haven't used it as my fabric is quite stable, but it's sure a good option for light weight knits. I also have some clear elastic like product here for machine embroidery that I haven't tried out yet but I'll tell you when I do that.

Mis puntadas no son perfectas porque al ir a veces más despacio y a veces más rápido al girar en las curvas pues es lo que tiene, igual si vas más despacíto tus puntadas salen más uniformes. Pero a mí me vale...normalmente la gente no anda con la lupa mirando las costuras, jaja.
My stitches aren't perfect because I went in some parts slower and the other ones faster when turning the curved sides, when you go slowly all the way around it sure is more beautiful. But I'm OK with that...normally people don't observe your appliqué stitching too much, hehe.

Otra cosíta que cosí es este vestido en punto. Era para el día del cumple familiar. Descubrí que había que coser un vestido la noche anterior y aunque estaba muerta de cansancio decidí esforzarme por la buena causa (y para que en el futuro tenga fotos de todos los cumples de ella con los vestidos, claro, qué te crees, jaja). Dos horas desde sacar el patrón, modificarlo, cortar y coser. Remalladora, eres mi mejor amiga! Nada especial, pero algo así quería: que lo pueda llevar día a día pero que sea bonito también.
En el día del cumple se tiró encima un vaso de agua así que durante la fiesta su vestido estaba secando. No digo nada...
The other garment I made was this knit dress. It was for the family birthday party. I found out I had to sew a dress the night before and altough I was very tired I made an effort for the good cause (and that I would have photo of her in all her birthday dresses in the future, of course, hehe). It took me two hours to copy the pattern, alter it, cut the fabric and sew it up. Serger, you really are my best friend! Nothing special but it's as I wanted it to be: so she can wear it daily but that it would be pretty too.
At that day she spilled a glass of water on the dress and during the party the dress was drying out there. No comments...

El patrón es de Ottobre Design 1/2015 (ojo con el ruso, jaja) y lo que cambié es que hice un corte bajo la sisa y aumenté el el ancho del patrón para tener esa falda con frunce. Usé elástico transparente para fruncir y me encanta porque hace un frunce muy uniforme. La tela es suave punto de algodón con 5% de elastán y muchos corazones.
Esto es todo por hoy, te animo a probar lo de aplicaciones, que queda muy bonito!
The pattern is from Ottobre Desing 1/2015 (Russian in your face, haha) and my alteration was to cut the bodice and widen the skirt so it would have some ruffle. I used clear elastic tape to shir the skirt and I love it as it makes really pretty shirring. The fabric is soft cotton and 5% spandex knit with lots of hearts on it :)
That's it for today, I recommend you to try out sewing appliqué, it's really pretty!
Tutorial: Cómo coser bolsillos redondos

Hoy un tutorial fácil que te ayudará a la hora de coser todo tipo de curvas en bolsillos, parches y otras cosas de este tipo. Antes de saber este truco intentaba simplemente ir doblando el margen de costura para dentro pero nunca me gustaba el resultado...las curvas eran imposibles de coser igual. Pero con el tiempo he descubierto cosas que te hacen la vida mucho más fácil (toda una evolución jaja) y aquí comparto hoy uno de ellos.

Todo empieza con el patrón para el bolsillo. Dibuja el bolsillo tal y como lo quieres que quede (después de coser) en un cartón o algún papel que sea duro. Después, o puedes hacer otro patrón en papel normal con 1 cm de margenes de costura en los laterales y el fondo y el dobladillo en la parte superior (yo añadí 1 cm a los laterales y 3 cm para el dobladillo) o directamente dibujas encima de la tela con el patrón de cartón y le añades los margenes.
De todas maneras marca los margenes con un lápiz o jaboncillo porque eso ayuda a saber la distancia a la hora de coser. Primero haz el dobladillo en la parte superior como siempre.

Ahora sube la longitud de la puntada en tu máquina al máximo (4 o 5) y haz una costura dentro del margen de la costura, es para fruncir los bordes. No remates y deja los hilos largos en principio y en el final para poder fruncir.

Ahora vamos a necesitar el patrón de cartón: pon el patrón dentro del bolsillo y empieza a tirar de los hilos para que los bordes empiecen a fruncir y coger la forma del patrón del bolsillo. Es más fácil si tiras de los hilos de abajo, los que vienen de la bobina.

Una vez que tengas los frunces más o menos repartidos en las curvas, y con el patrón de cartón dentro del bolsillo, plancha los margenes. Puede ser que los hilos se aflojen un poco, tira de nuevo para tener la forma exacta.

Quita el patrón de cartón y ya está! Ahora sólo falta poner el bolsillo con unos alfileres donde va a ir y coser los laterales. En las curvas lo mejor es ir haciendo las puntadas sólo con la rueda y cada par de puntadas clavar la aguja, levantar el prensatelas y cambiar poco a poco la dirección para poder coser una curva perfecta.
EL ejemplo lo hice con un bolsillo, pero vale para todo tipo de curvas, por ejemplo:


También te puede interesar el tutorial sobre cómo hacer esquinas fuertes para los bolsillos que puedes encontrar aqúi.
Tutorial: Cómo hacer costura francesa

Costura francesa es probablemente mi favorita para acabados "limpios" y bonitos en mis prendas y bolsos. Con esa técnica de coser no tendrás que usar ni el zigzag ni la remalladora y el resultado queda profesional! Los pasos son siguientes:

Aquí voy a usar dos trozos de telas de muestra, en el caso real tendrías las piezas que quieres unir.

Junta las telas: el revés con el revés (la cara de la tela que no tiene el estampado para dentro).
2. Cose a 0,5 cm de la orilla rematando al principio y al final.

3. Plancha esa costura a un lado y da la vuelta a las telas, ahora tienes las telas cara a cara con el lado derecho (las caras con estampados para dentro). Plancha la costura de la manera que la línea de la costura que acabas de hacer quede justo en el medio.

4. Ahora cose a 1 cm, rematando al principio y al final.

5. Plancha la costura a un lado y ya lo tienes! En el revés de la prenda verás esa costura con el borde limpio.

En el derecho de la prenda parece una costura normal.
Como ves, la técnica consiste en hacer dos costuras en vez de una costura y un sobrehilado (zigzag, remallado etc). En el caso de coser primero a 0,5 cm y luego a 1 cm, nuestro margen de costura que tenemos que añadir al patrón sería 1,5 cm. Si quieres que la costura sea más fina, tienes la posibilidad de coser primero a 0,5 cm y cortar ese margen para que sea más fino, así cuando haces la segunda costura, puedes hacerlo más cerca del borde y se quedará menos de 1 cm.
Dos cosas importantes: corta todos los hilos en los bordes de las telas porque si no, pueden quedar en el medio de la segunda costura y luego es más difícil ir sacándolos. Y otra: sigue las medidas porque así sabes que la segunda costura tapa bien el margen que deja la primera costura, la primera está siempre más cerca del borde que la segunda.
La costura francesa queda bien en tejidos ligeros y de peso medio, para los tejidos muy gruesos va a haber demasiado bulto.
Se usa con telas finas para dar más fuerza a las costuras y con telas que tienen transparencia para que el dentro de la prenda sea igual de bonito que lo de fuera. En lencería puedes ver muchas costuras francesas. Otros sitios donde viene bien usarlo es en fundas de cojines y fundas nórdicas.
Yo coso casi todos mis bolsos que no tienen forro también con costuras francesas y queda fenomenal (las fotos de arriba son de un bolso de tela de loneta). De esa manera puedes hacer incluso bolsos reversibles!