Two makes with boiled wool

 
www.studiocostura.com

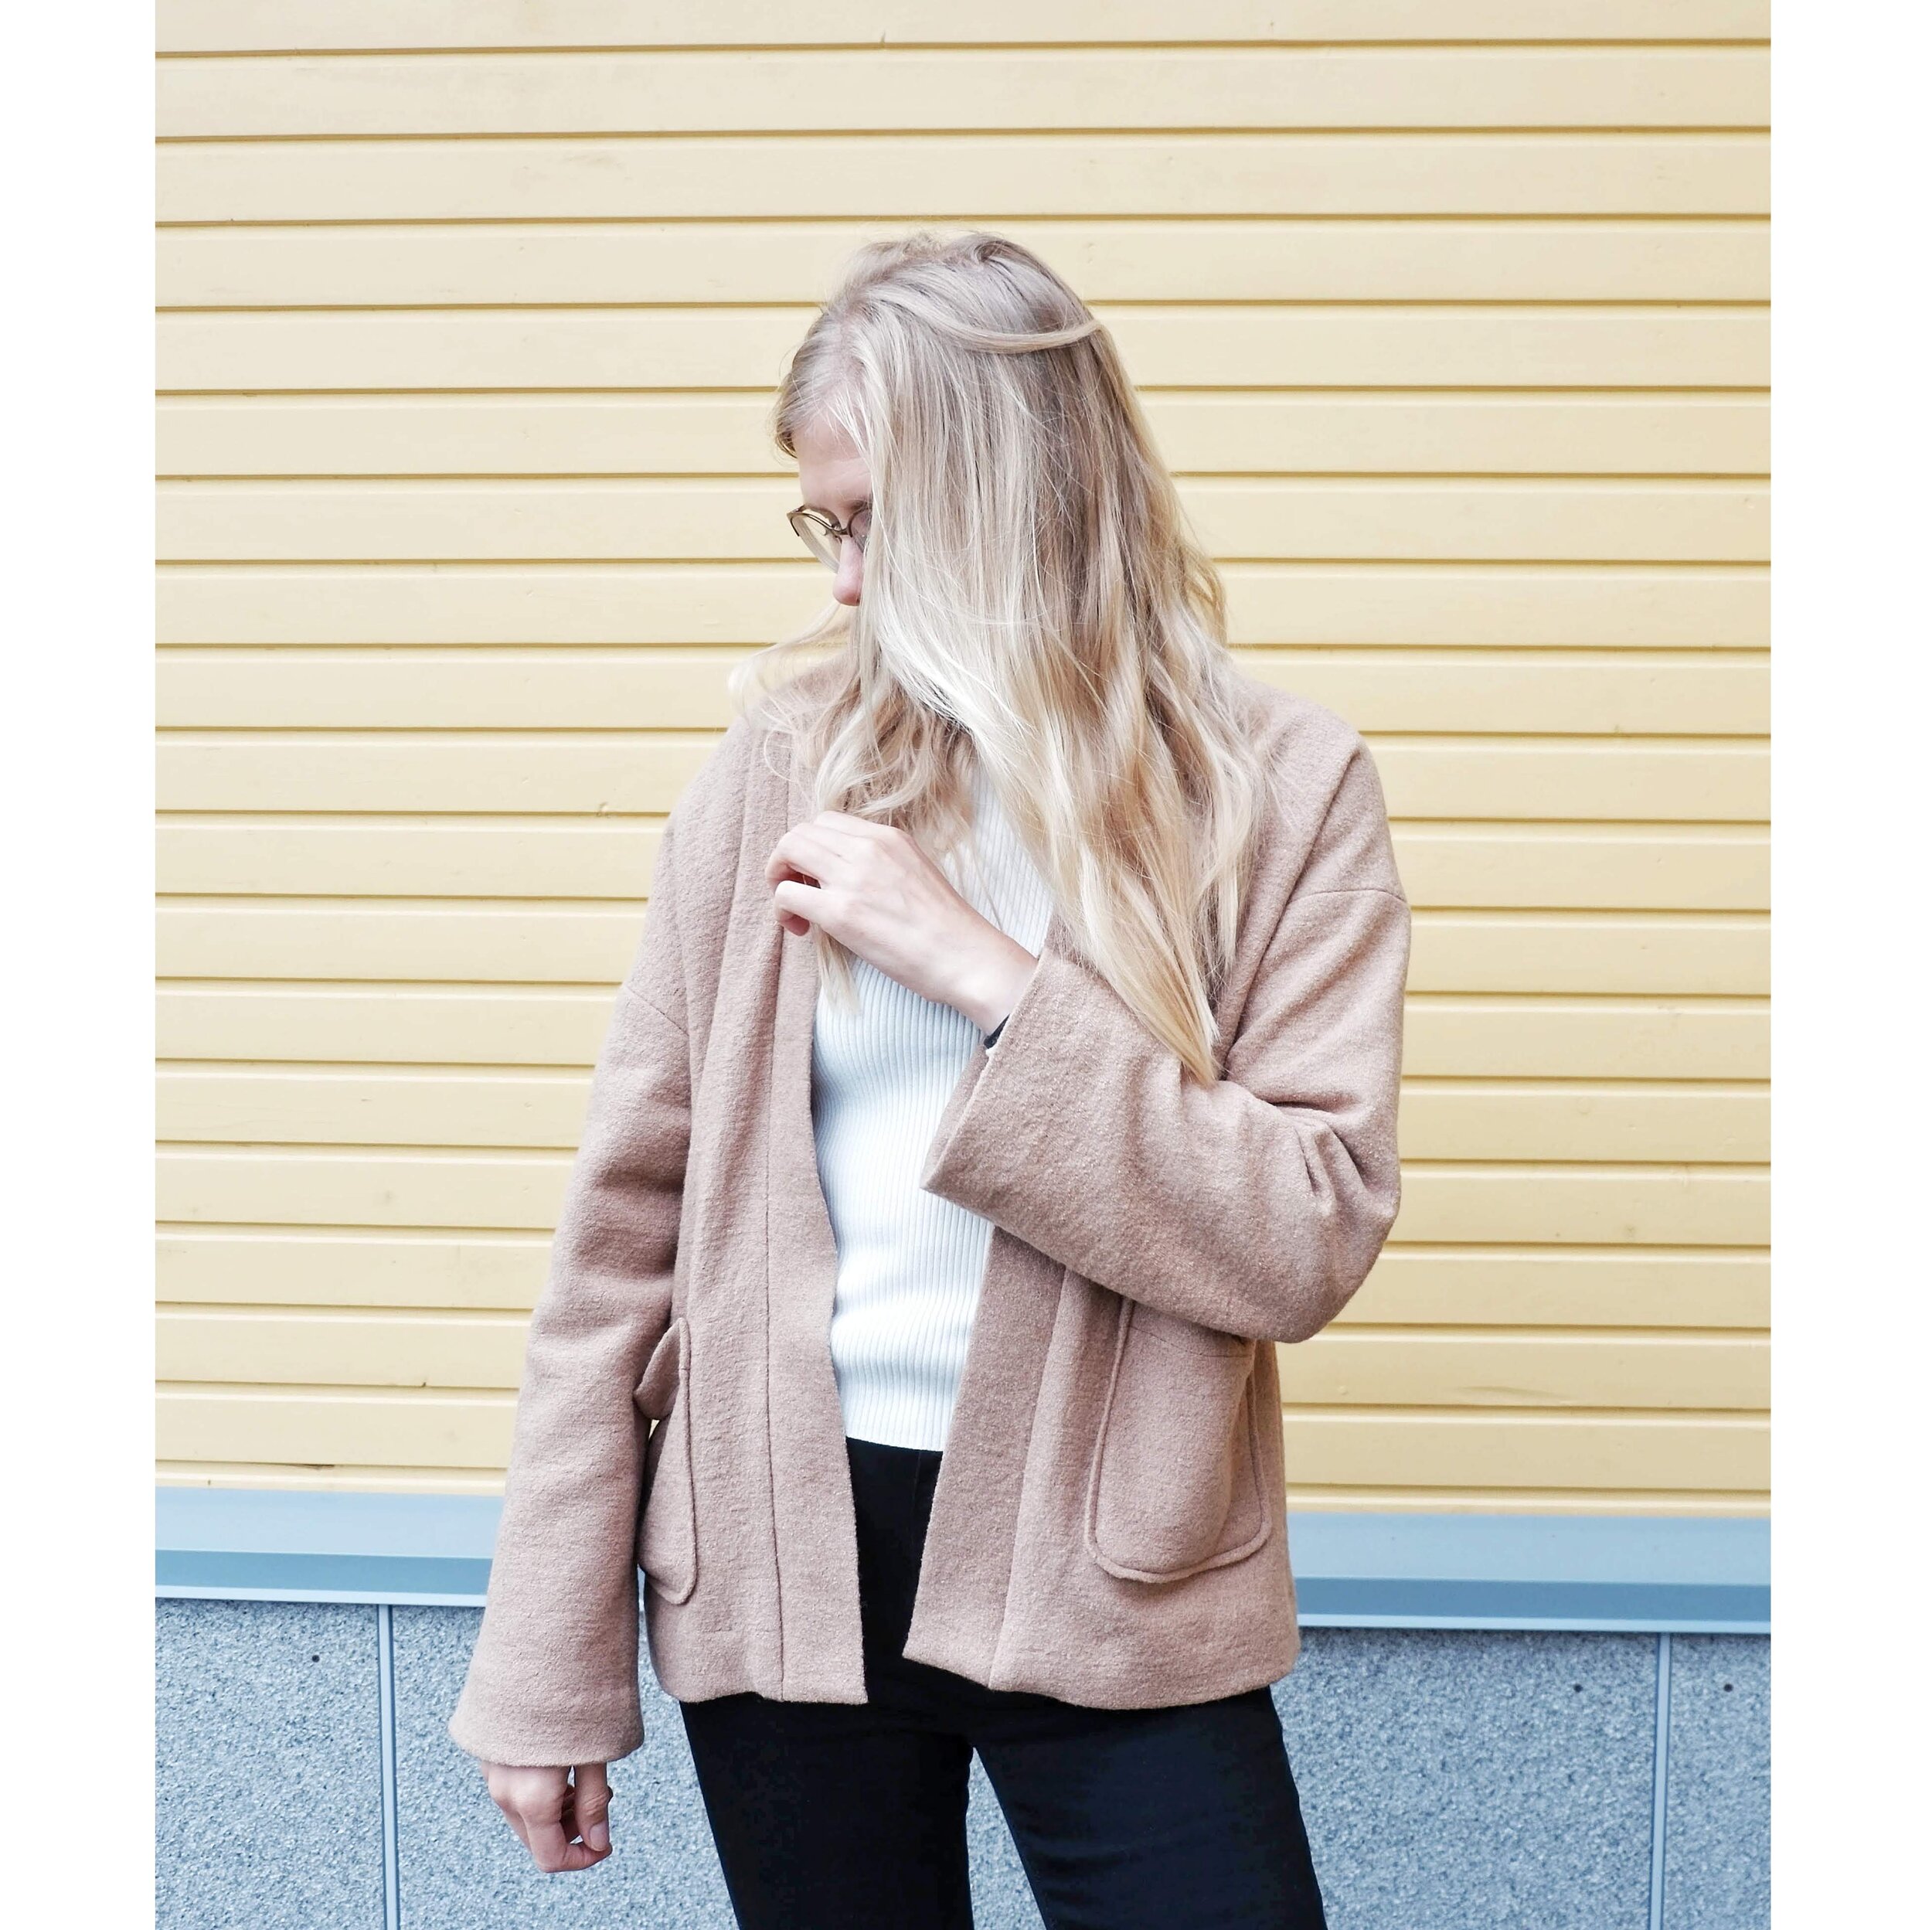
Autumn is definitively here and I wanted to share two projects I made with boiled wool, a fabric that is just perfect for this season. The one I used this time is a blend of wool and viscose and it’s lighter weight than the regular 100% boiled wool and it also has a really nice drape. It can be lined and worn as a jacket or on it’s own too (you’ll see my second project with the same fabric unlined below). I already made two coats with “regular” 100% boiled wool, that fabric is great for winter garments, it’s very nice to work with, presses amazingly well and it gives you all the warmth. I used it for this Burda coat and the black Berlin jacket below.

I don’t know about a specific shop where you can find a wool blend like I used but you can get 100% boiled wool in different places. We just received at the academy different wools we ordered at this online shop (the shop is in Germany, you can see the site for UK customers in English here) and the quality is really nice for the very reasonable pricing they offer (we got different wool coatings and boiled wool and everything was good quality and the shipping only took a couple of days to Spain). If you’re thinking about making a coat this winter I’d recommend you to buy wool coatings as they are so much easier to work with than cheap polyester coatings. You can of course first make a toile in a similar more affordable fabric but I’d really encourage you to try wool, you’ll be thankful later!

www.studiocostura.com

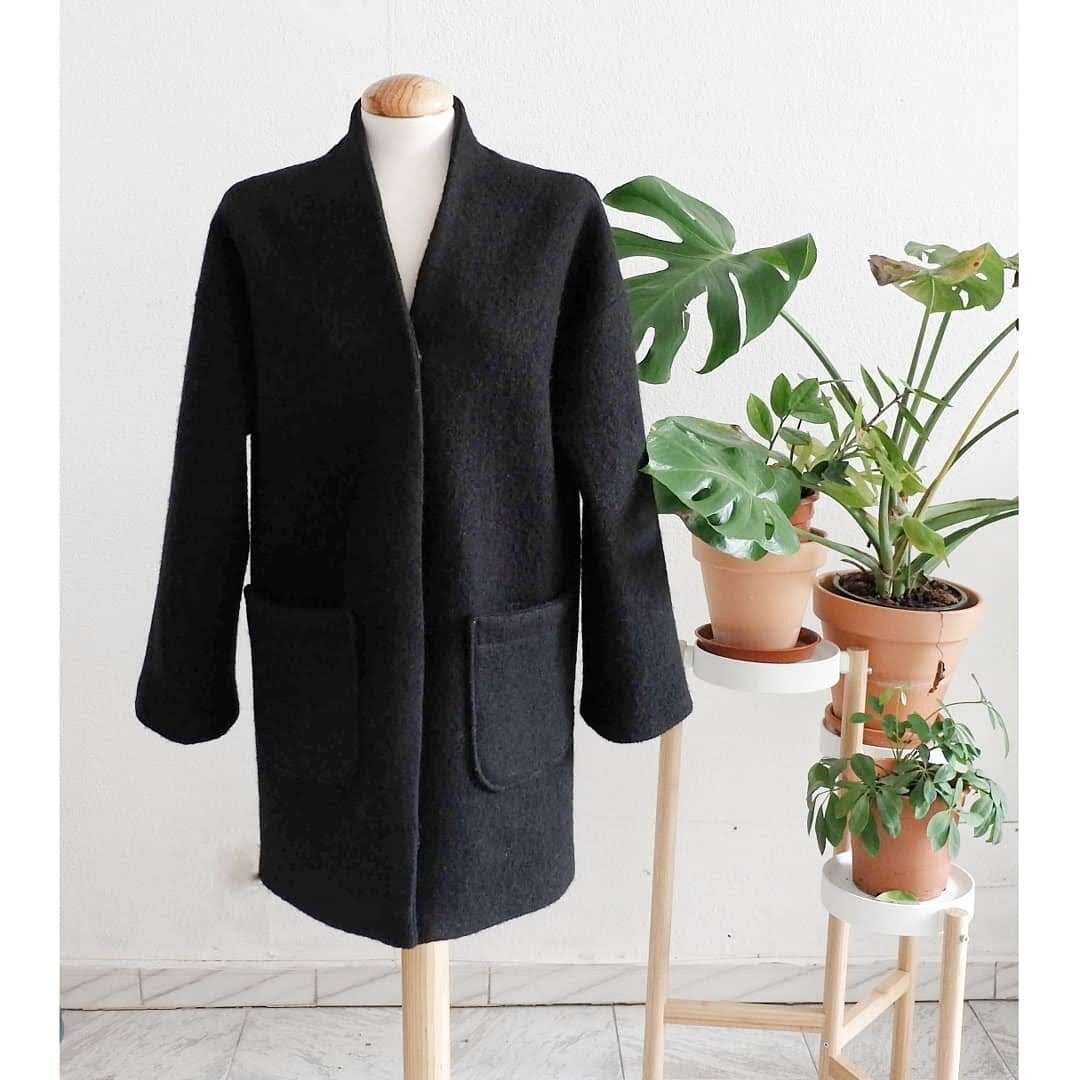
Now before talking about these two makes I have to start with previous makes with the same pattern, the Berlin jacket by Tessuti Patterns (I’m also including them here as I wasn’t really active posting my own makes over here at the blog during last year so they don’t appear in a separate post). I’ve used this pattern a couple of times already and I really like the simple shape. First I made this black boiled wool coat without lining like suggested in the pattern. The pattern actually is made specifically for boiled wool as this fabric can be left with raw edges and there’s no fraying involved. So it’s a very easy project really. 

The only change I made was to draw an overlap for the front piece as I wanted to use snaps to close the coat (I know that when I’m already wearing a wool coat it must be cold enough to not walk around with the coat left open in the front, haha). After wearing it a couple of times over my wool sweaters I noticed that the friction between the two layers wasn’t really good for my wool sweaters and I knew I had to line the coat. So I unpicked the whole thing (the construction on the Berlin coat is a bit different and I wanted to have normal seams not the overlapped seams) and lined the coat so I could wear it comfortably (you can see more photos here).

www.studiocostura.com

This summer I discovered that the quick toile I had made for the black coat actually looked cute (I used a random not stretchy cotton knit), the peach color looked like something I could wear in the summer. So I cut the jacket shorter and finished it to wear in Estonia where the summers are not so hot like here in Madrid. I really really like how that one came together, it’s the perfect layering piece! Inspired by that make I actually made the boiled wool jacket featured in this post :)

www.studiocostura.com

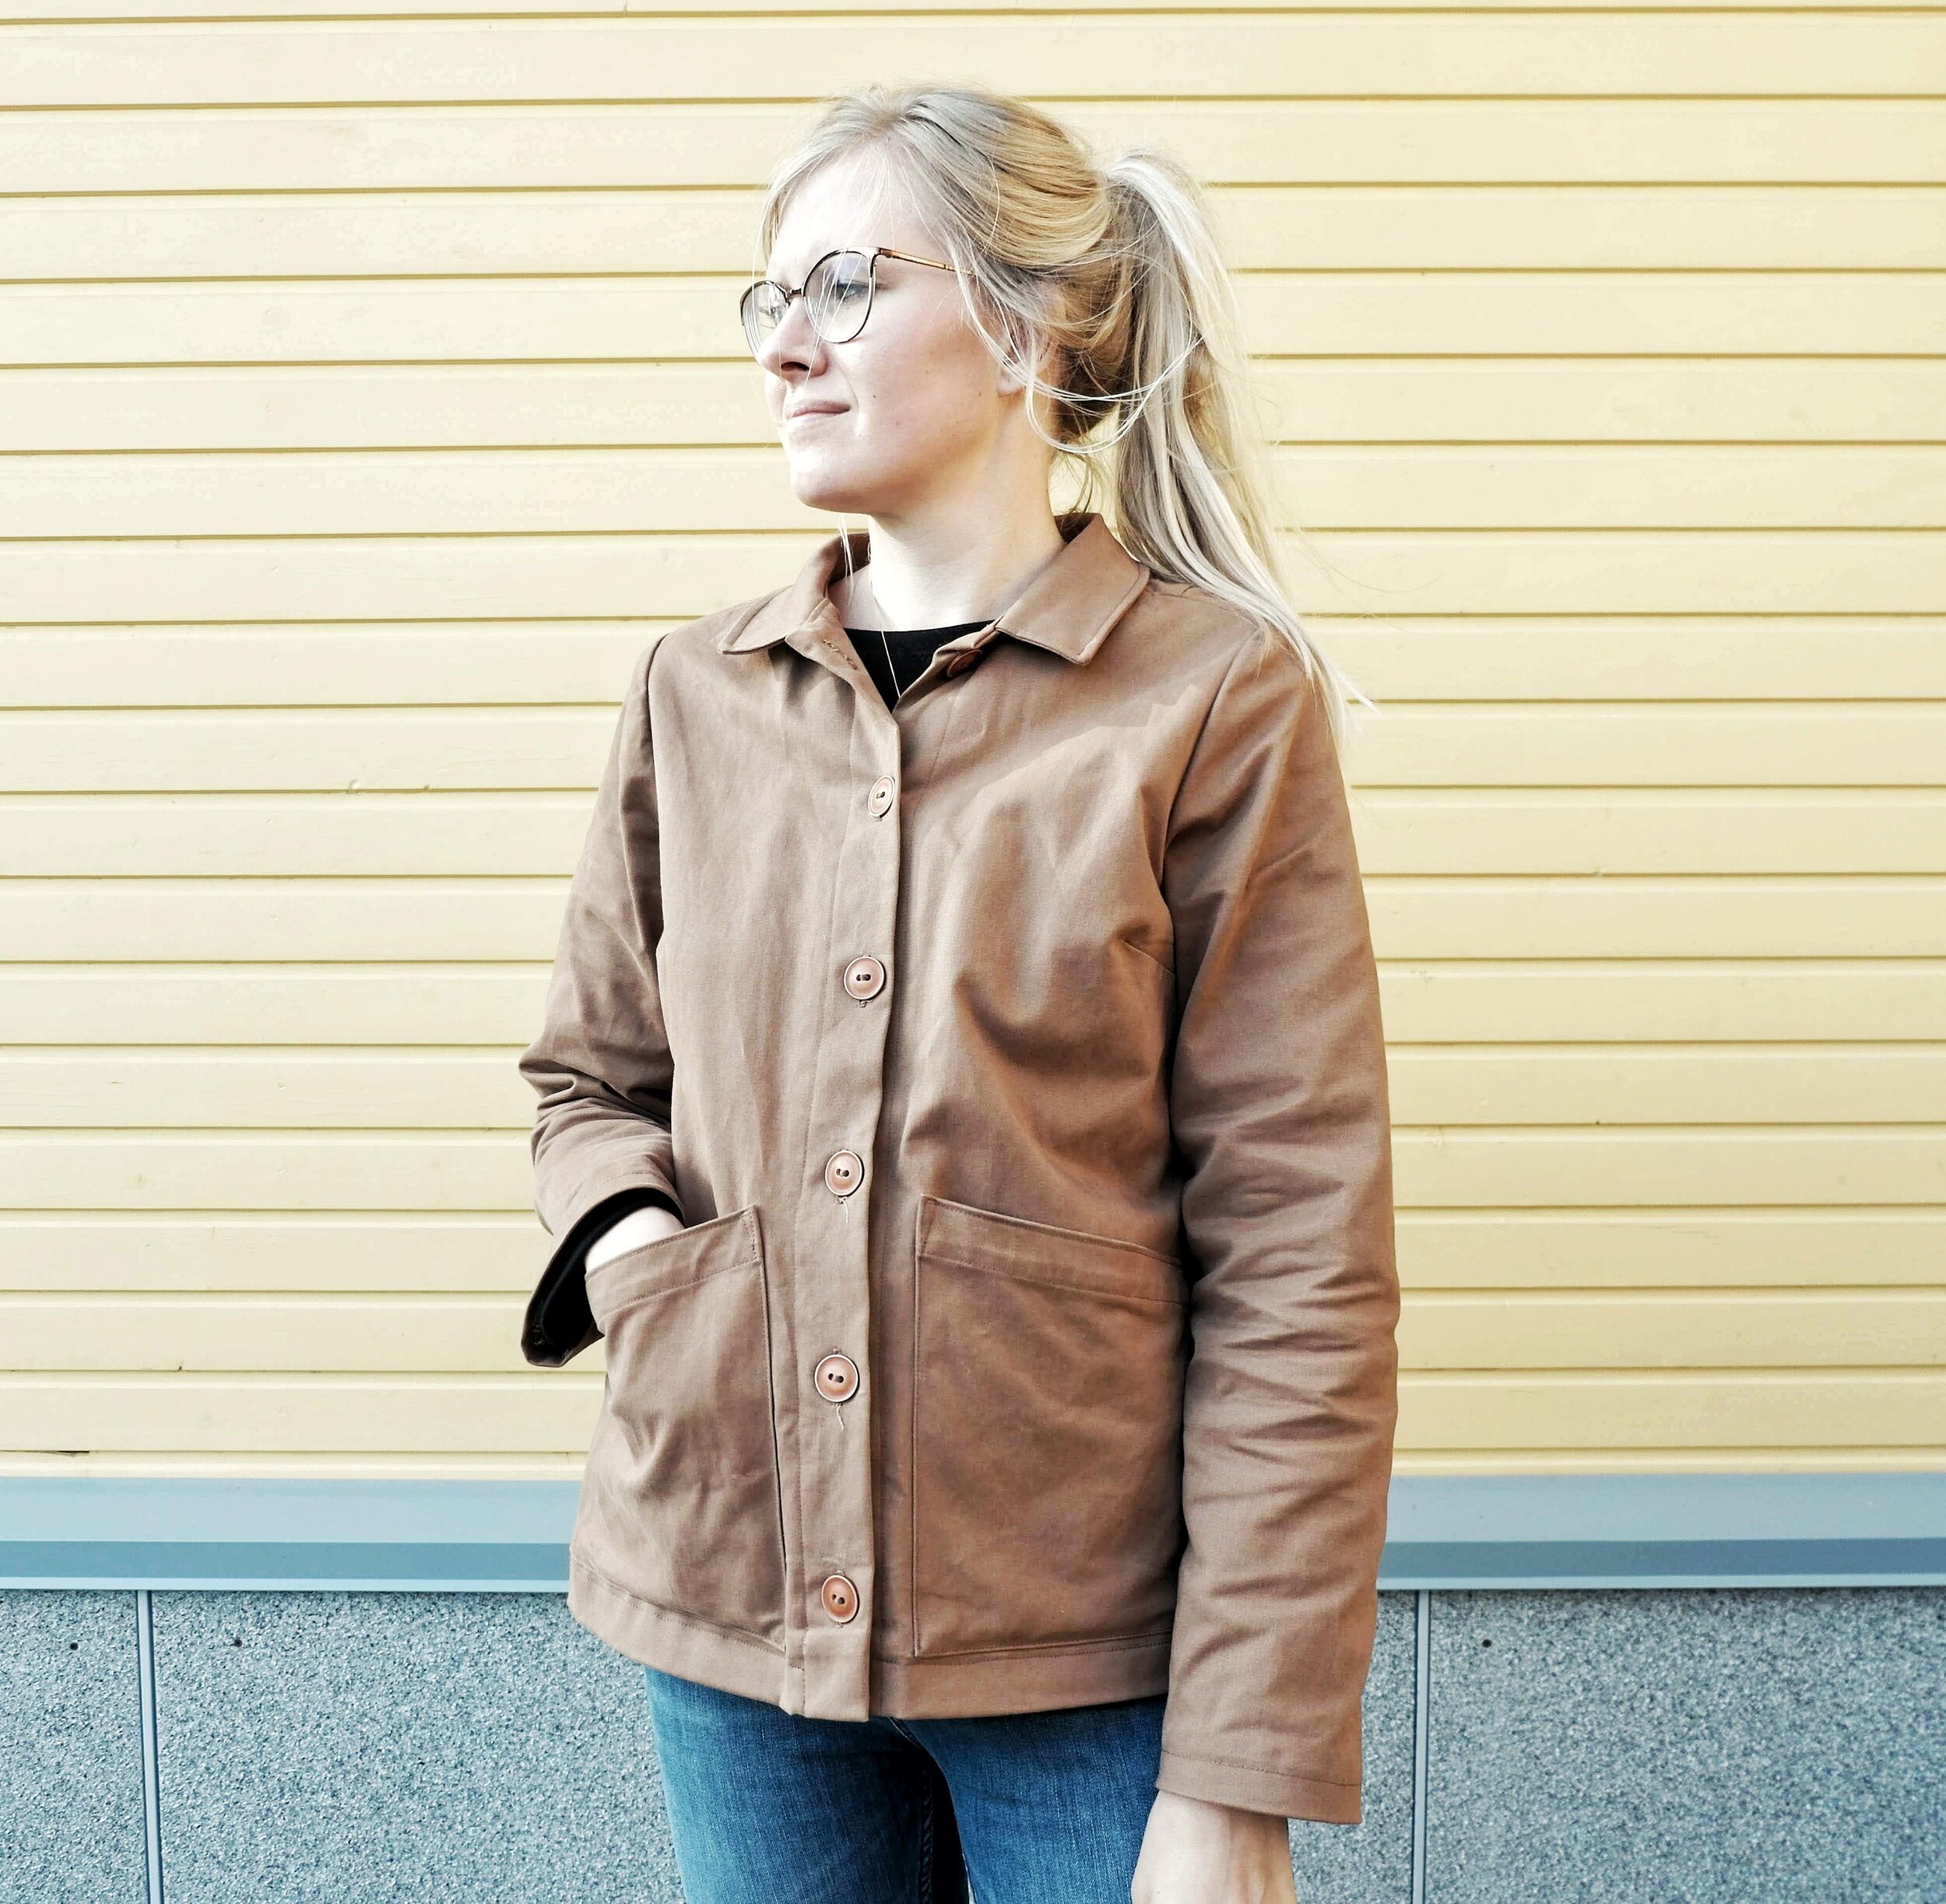
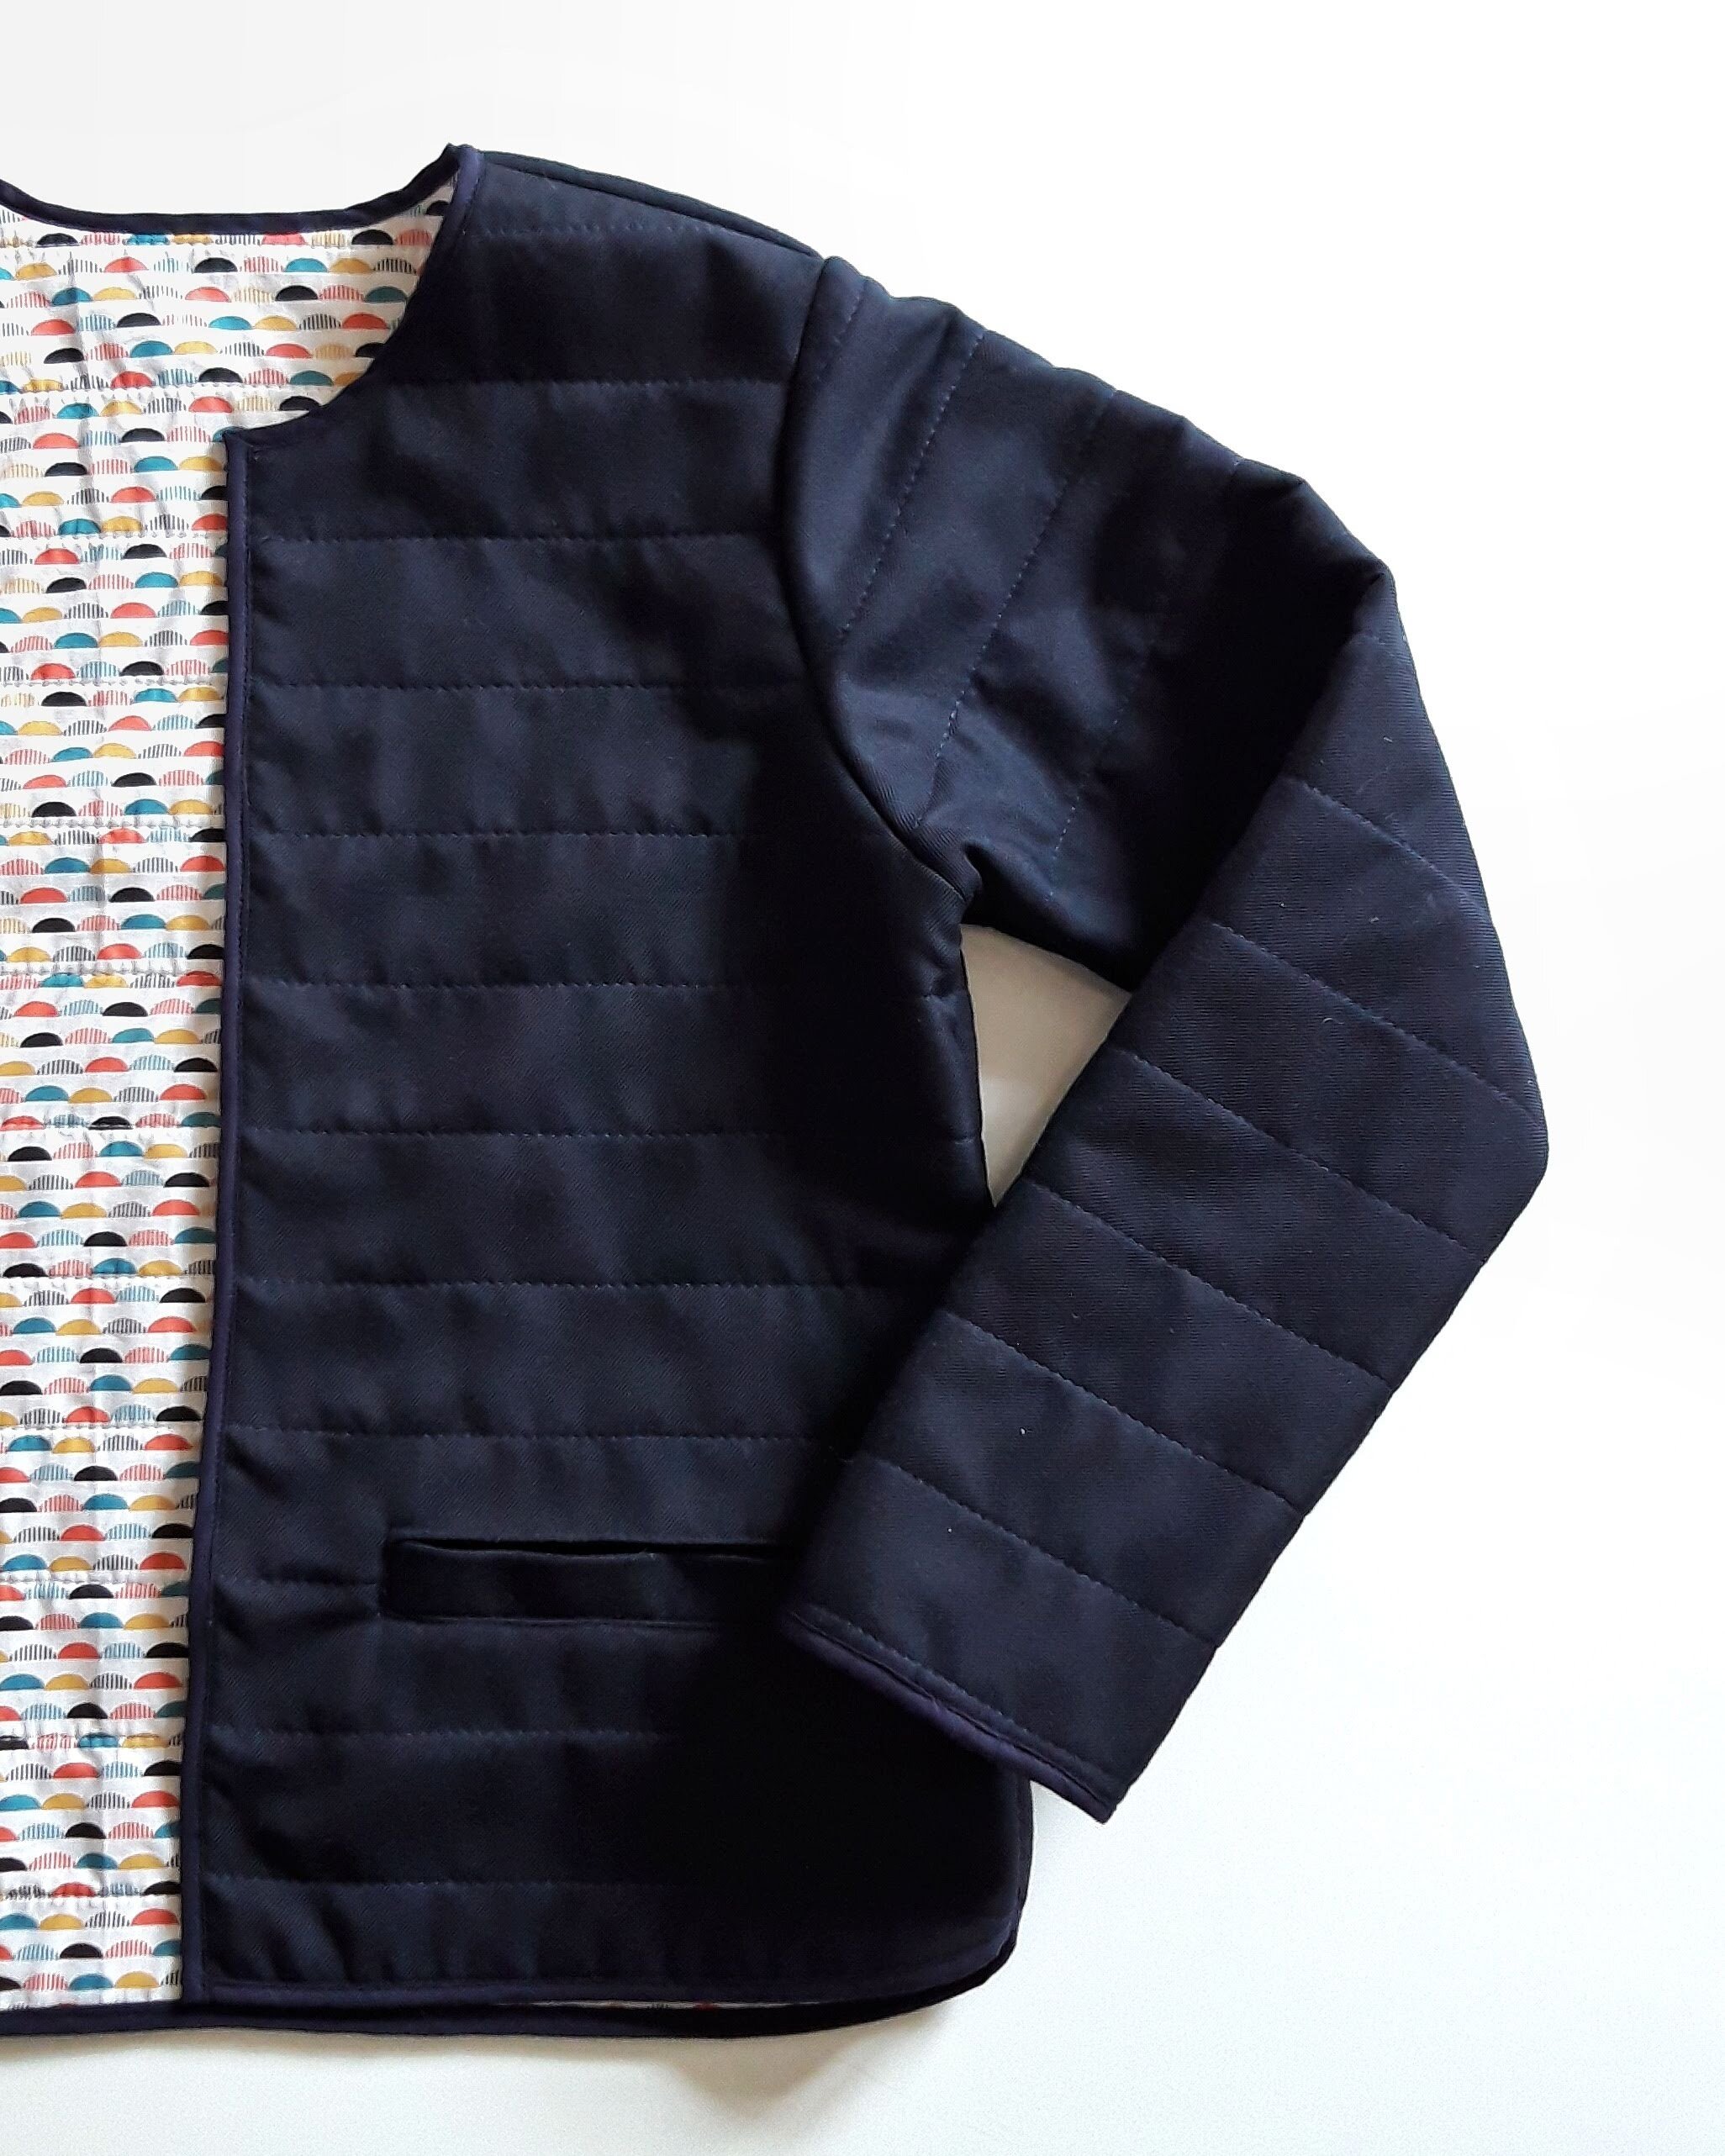
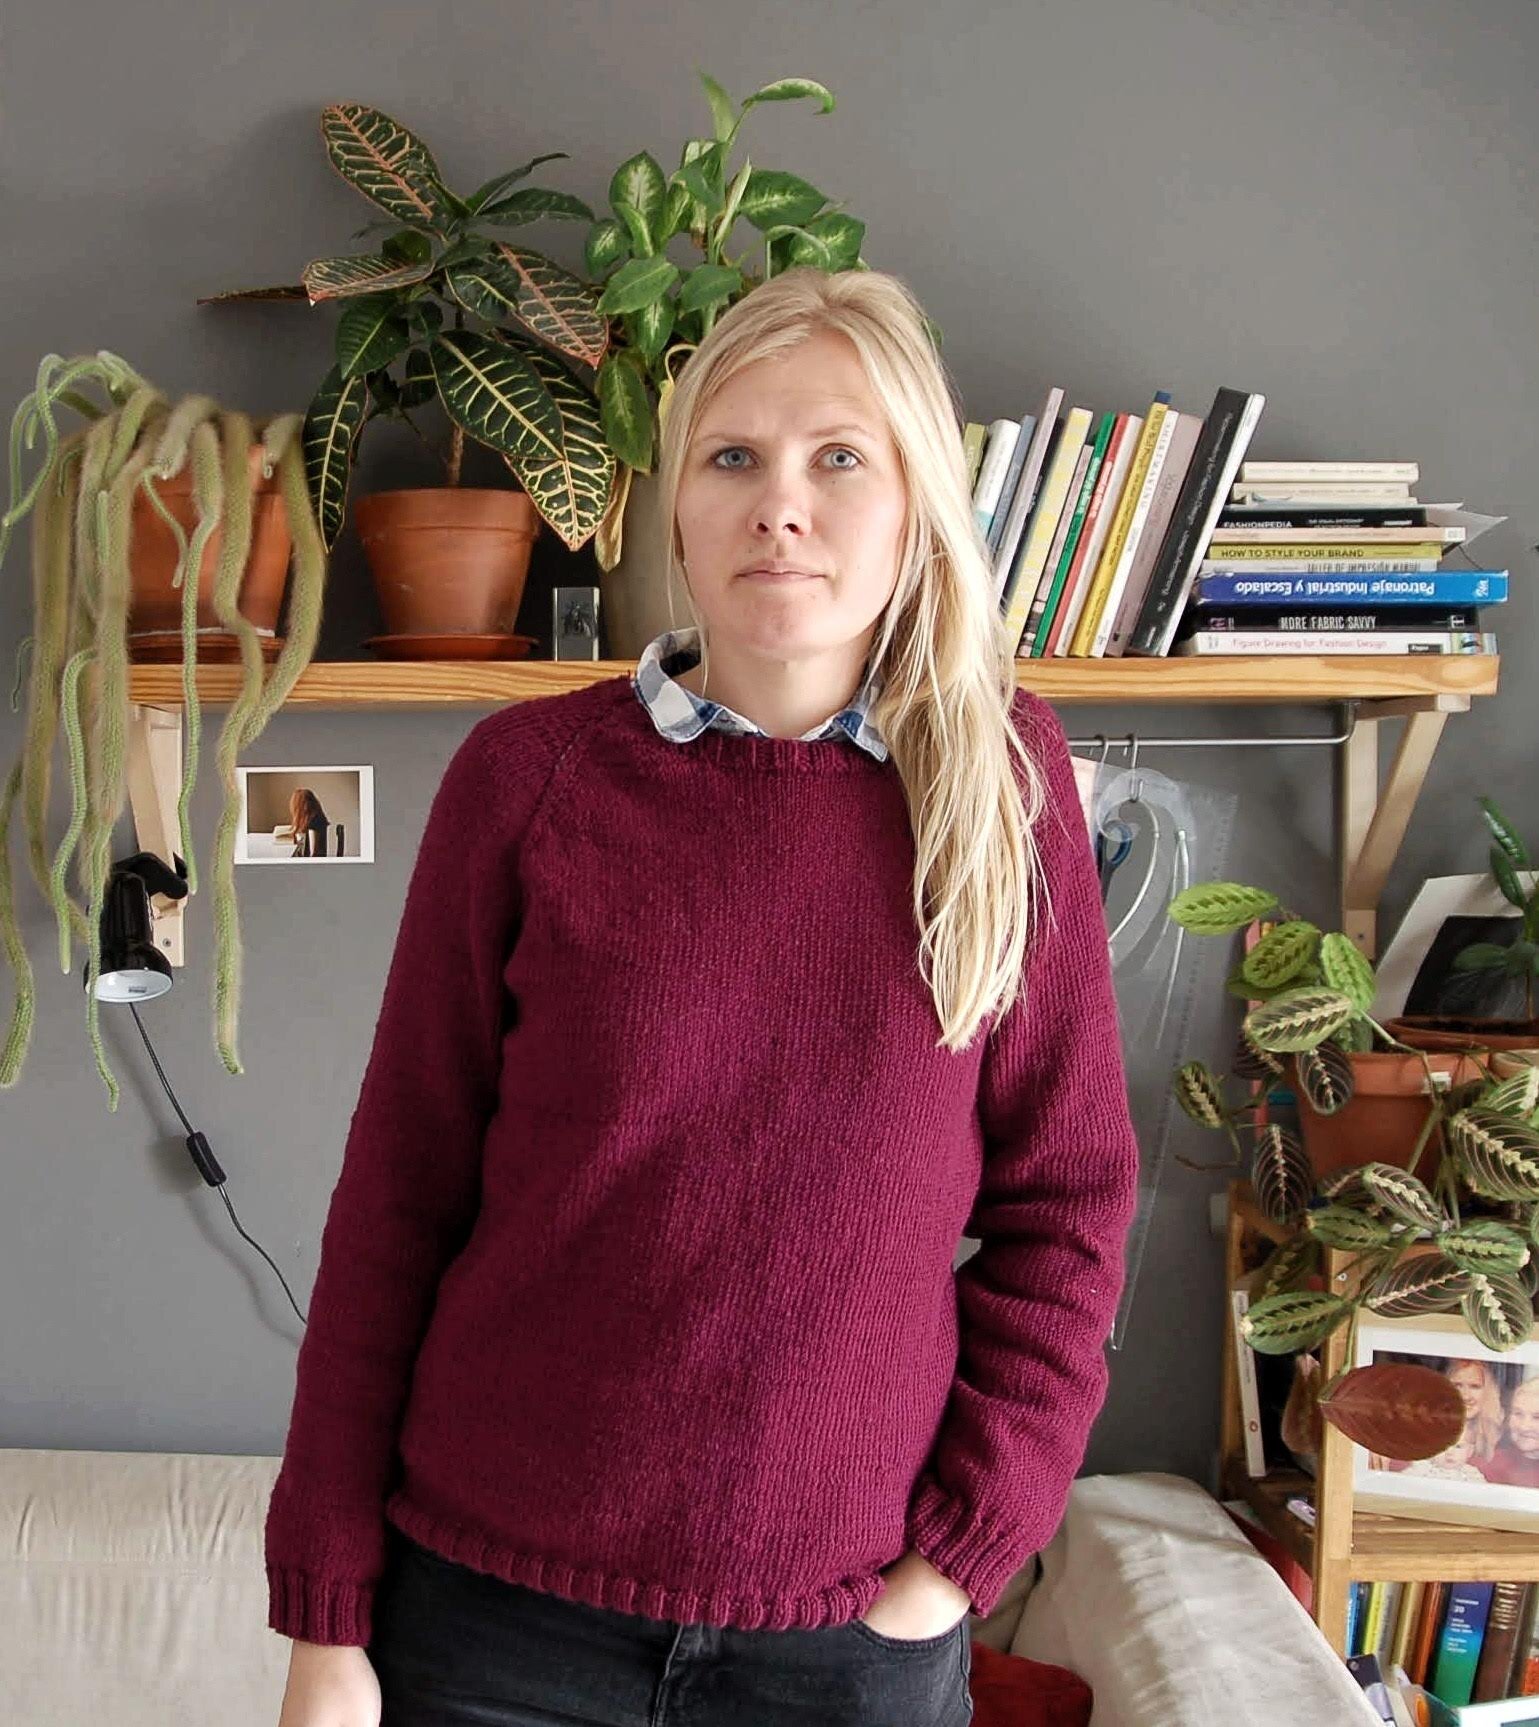
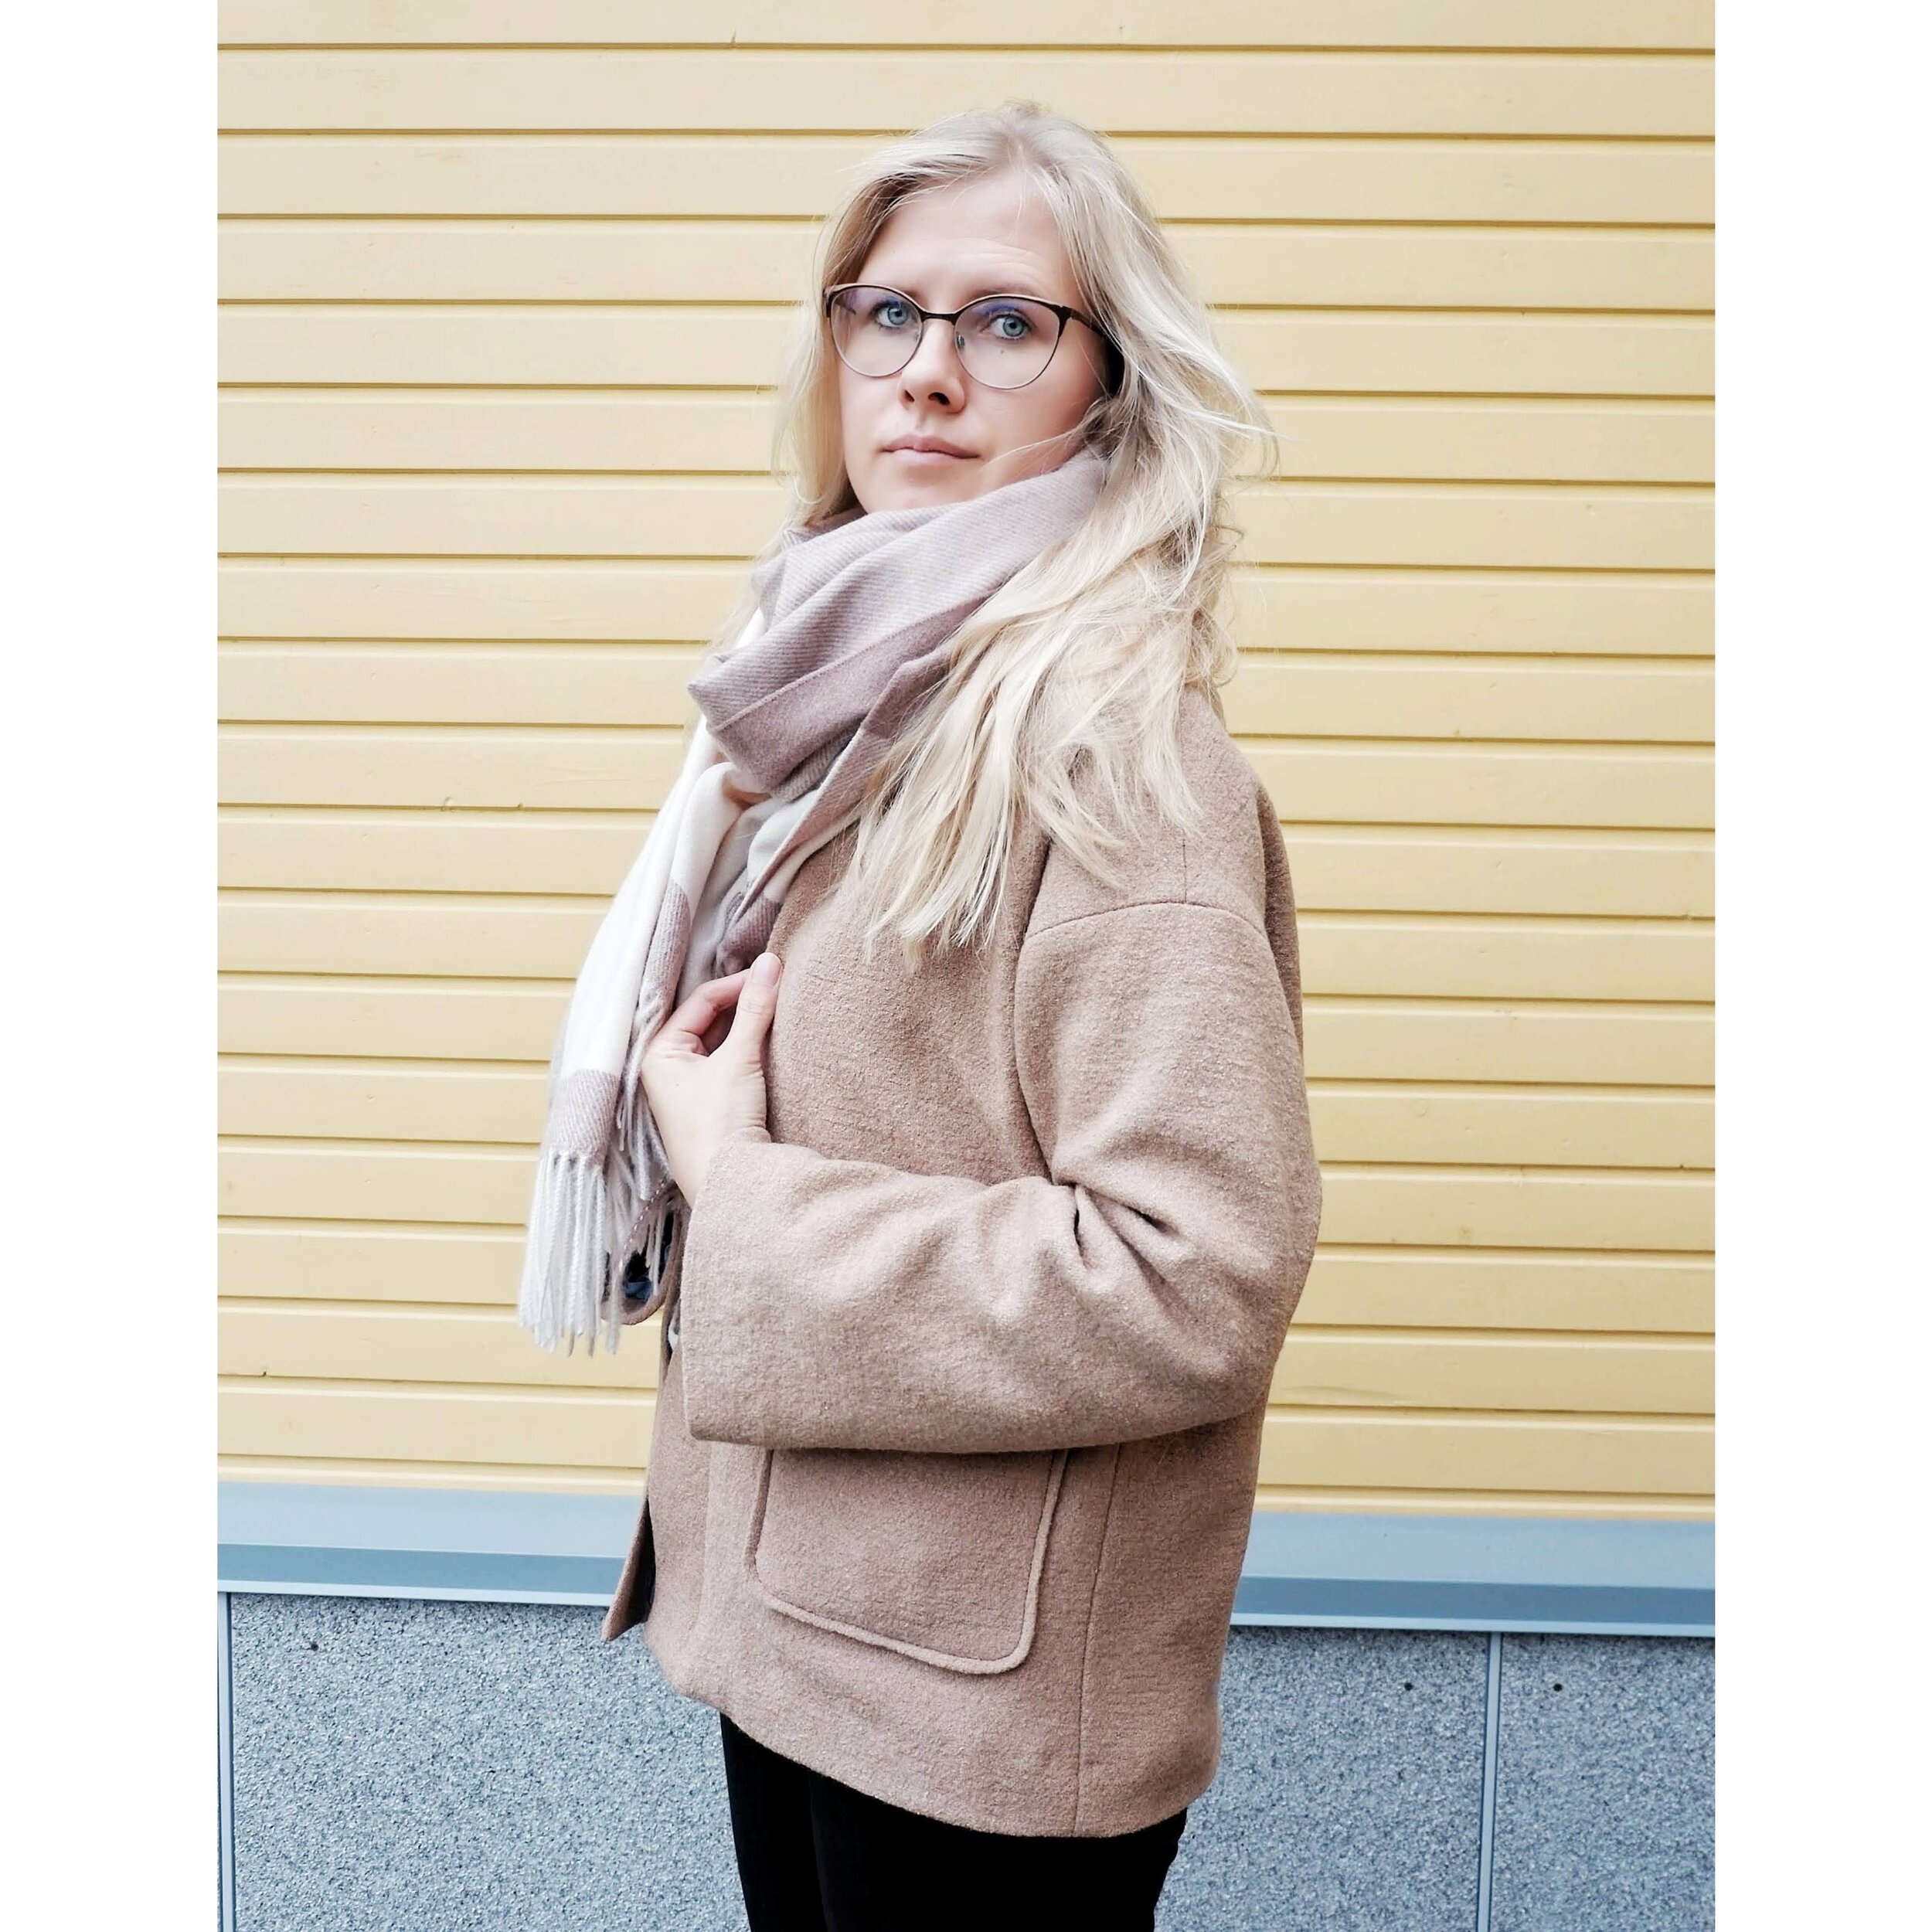
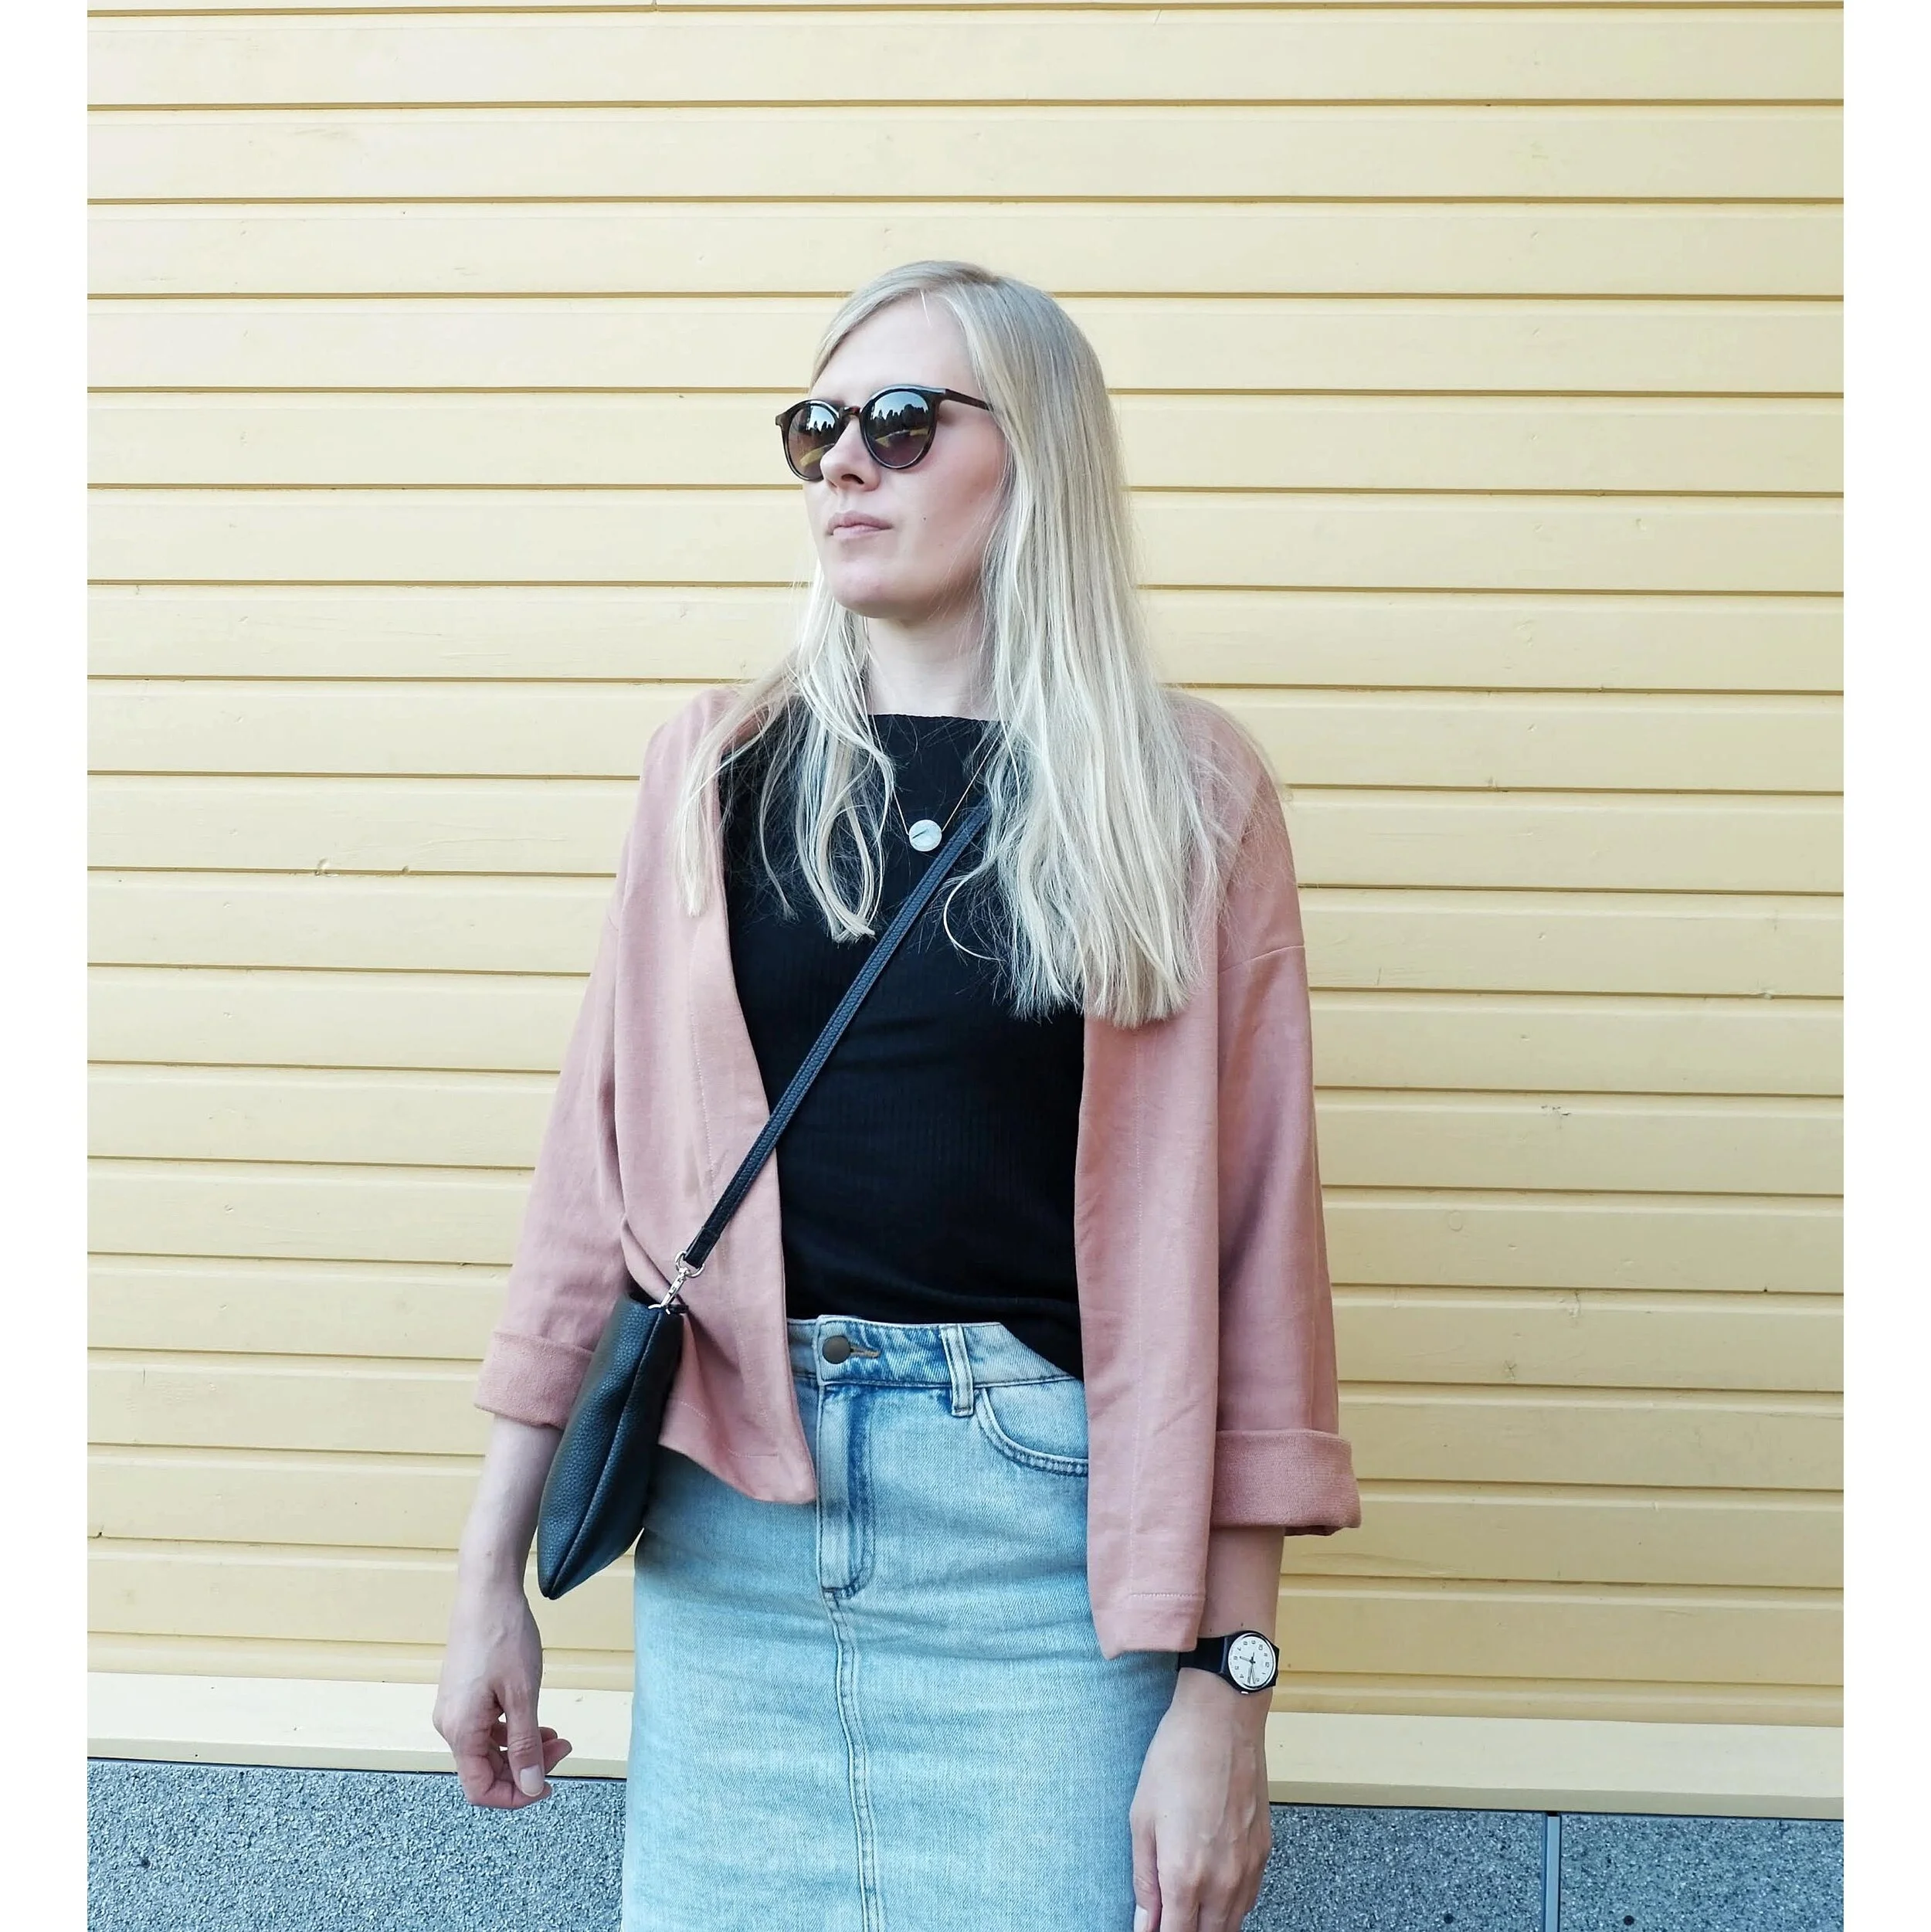
So after liking my short Berlin jacket so much I thought I should also make a more autumn appropriate version in something like a boiled wool. I had also seen so many gorgeous Wiksten haori makes on Instagram (check out the #wikstenhaori hashtag for some serious jacket inspiration!) and as the pattern is actually very similar I thought I would just hack my Berlin pattern a bit. The main difference is that the Wiksten has a separate collar band and the Berlin has the band incorporated to the front pieces so what I did was to remove the band width from the front pattern and use a straight collar piece instead. I made mine narrower than the Wiksten and I didn’t fold it under. Again I lined the jacket for more warmth and comfort. 

www.studiocostura.com

I really like the result and I’ve been wearing it a lot this season! Remember that I wrote before that when I decided to make the black coat I knew I had to close it in order to keep warm...well for some reason I didn’t really think about it when sewing up this one, haha. But it became obvious I had to do something as using a blanket scarf to cover myself wasn’t really going to work in the long run. Buttons wasn’t an option I was thinking about...but I did get some pretty decorative safety pins, big enough to close the jacket comfortably and also to stay hidden under the scarf, haha. But then it occurred to me that I could maybe make a belt with the same fabric to resolve this problem.

www.studiocostura.com

And the belt was a very good idea actually! I’m now wearing it tied up and I think it looks really nice. It does not really have the same oversized jacket vibe but I’m liking it very much! I also added little loops on the sides so the belt stays in place.

www.studiocostura.com

My second make is sewn with the same fabric. You might ask why I’d get so much of it to make two garments...well, there actually is an explanation, not a very logical one, but what can I say, haha. So I got this fabric for the first time last year in Estonia and took it with me to Madrid to make something with it but I didn’t use it yet. This summer in Estonia I got the idea for the jacket, went to look for a fabric and the one I liked the most was...the same one, haha. I knew I already had it back in Madrid….then again I also knew that a basic beige like this will always be used at some point! So I got the same fabric again and made the jacket in September.

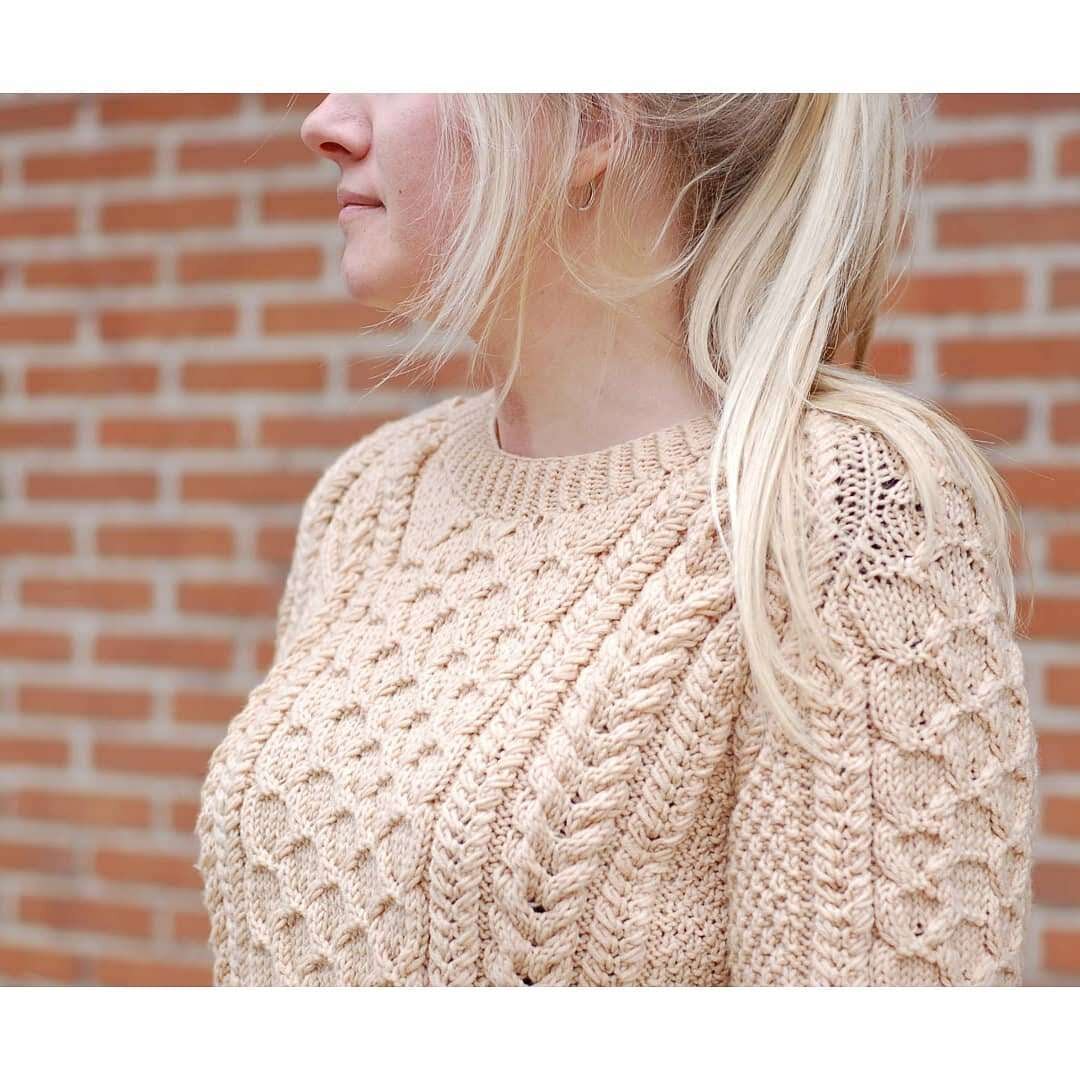
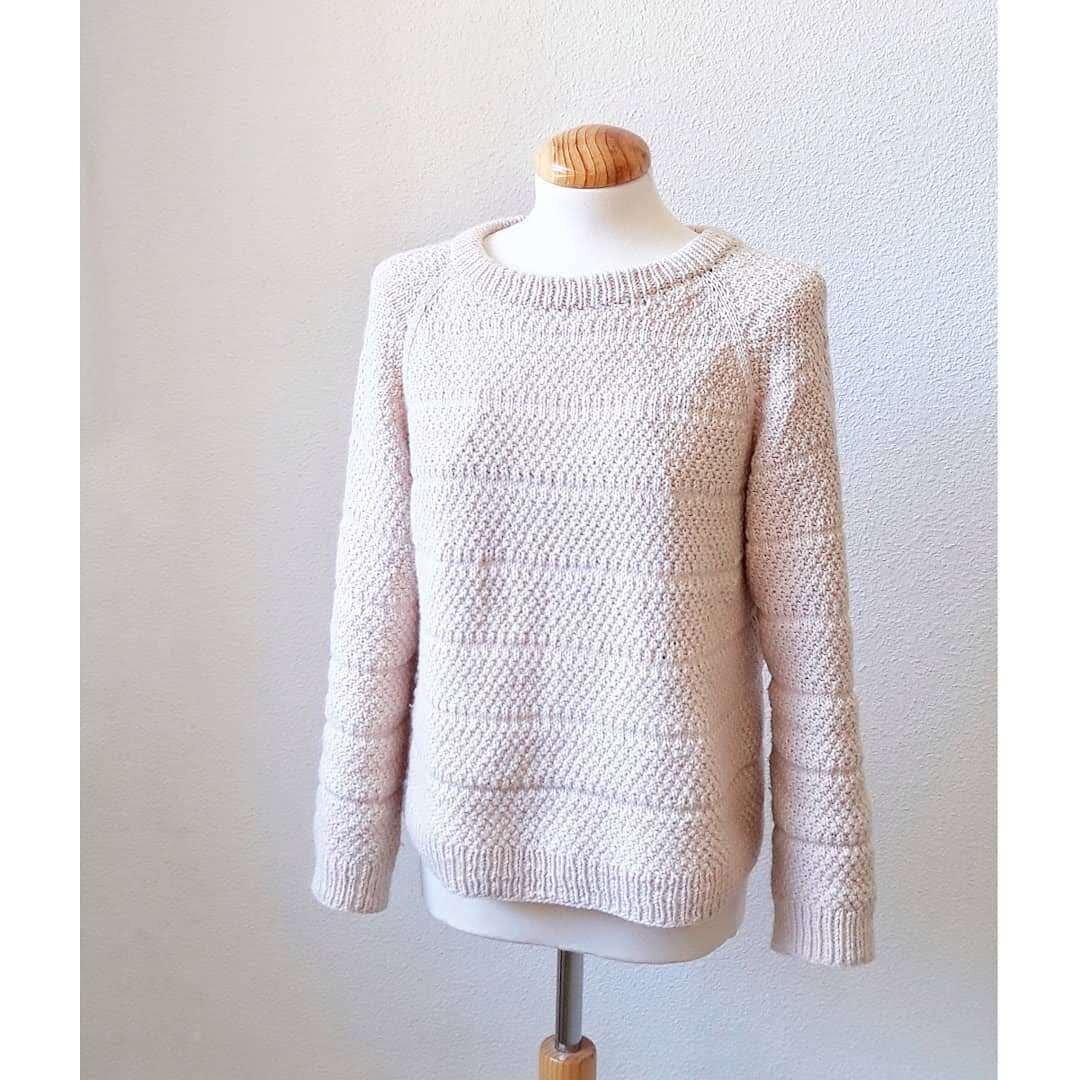
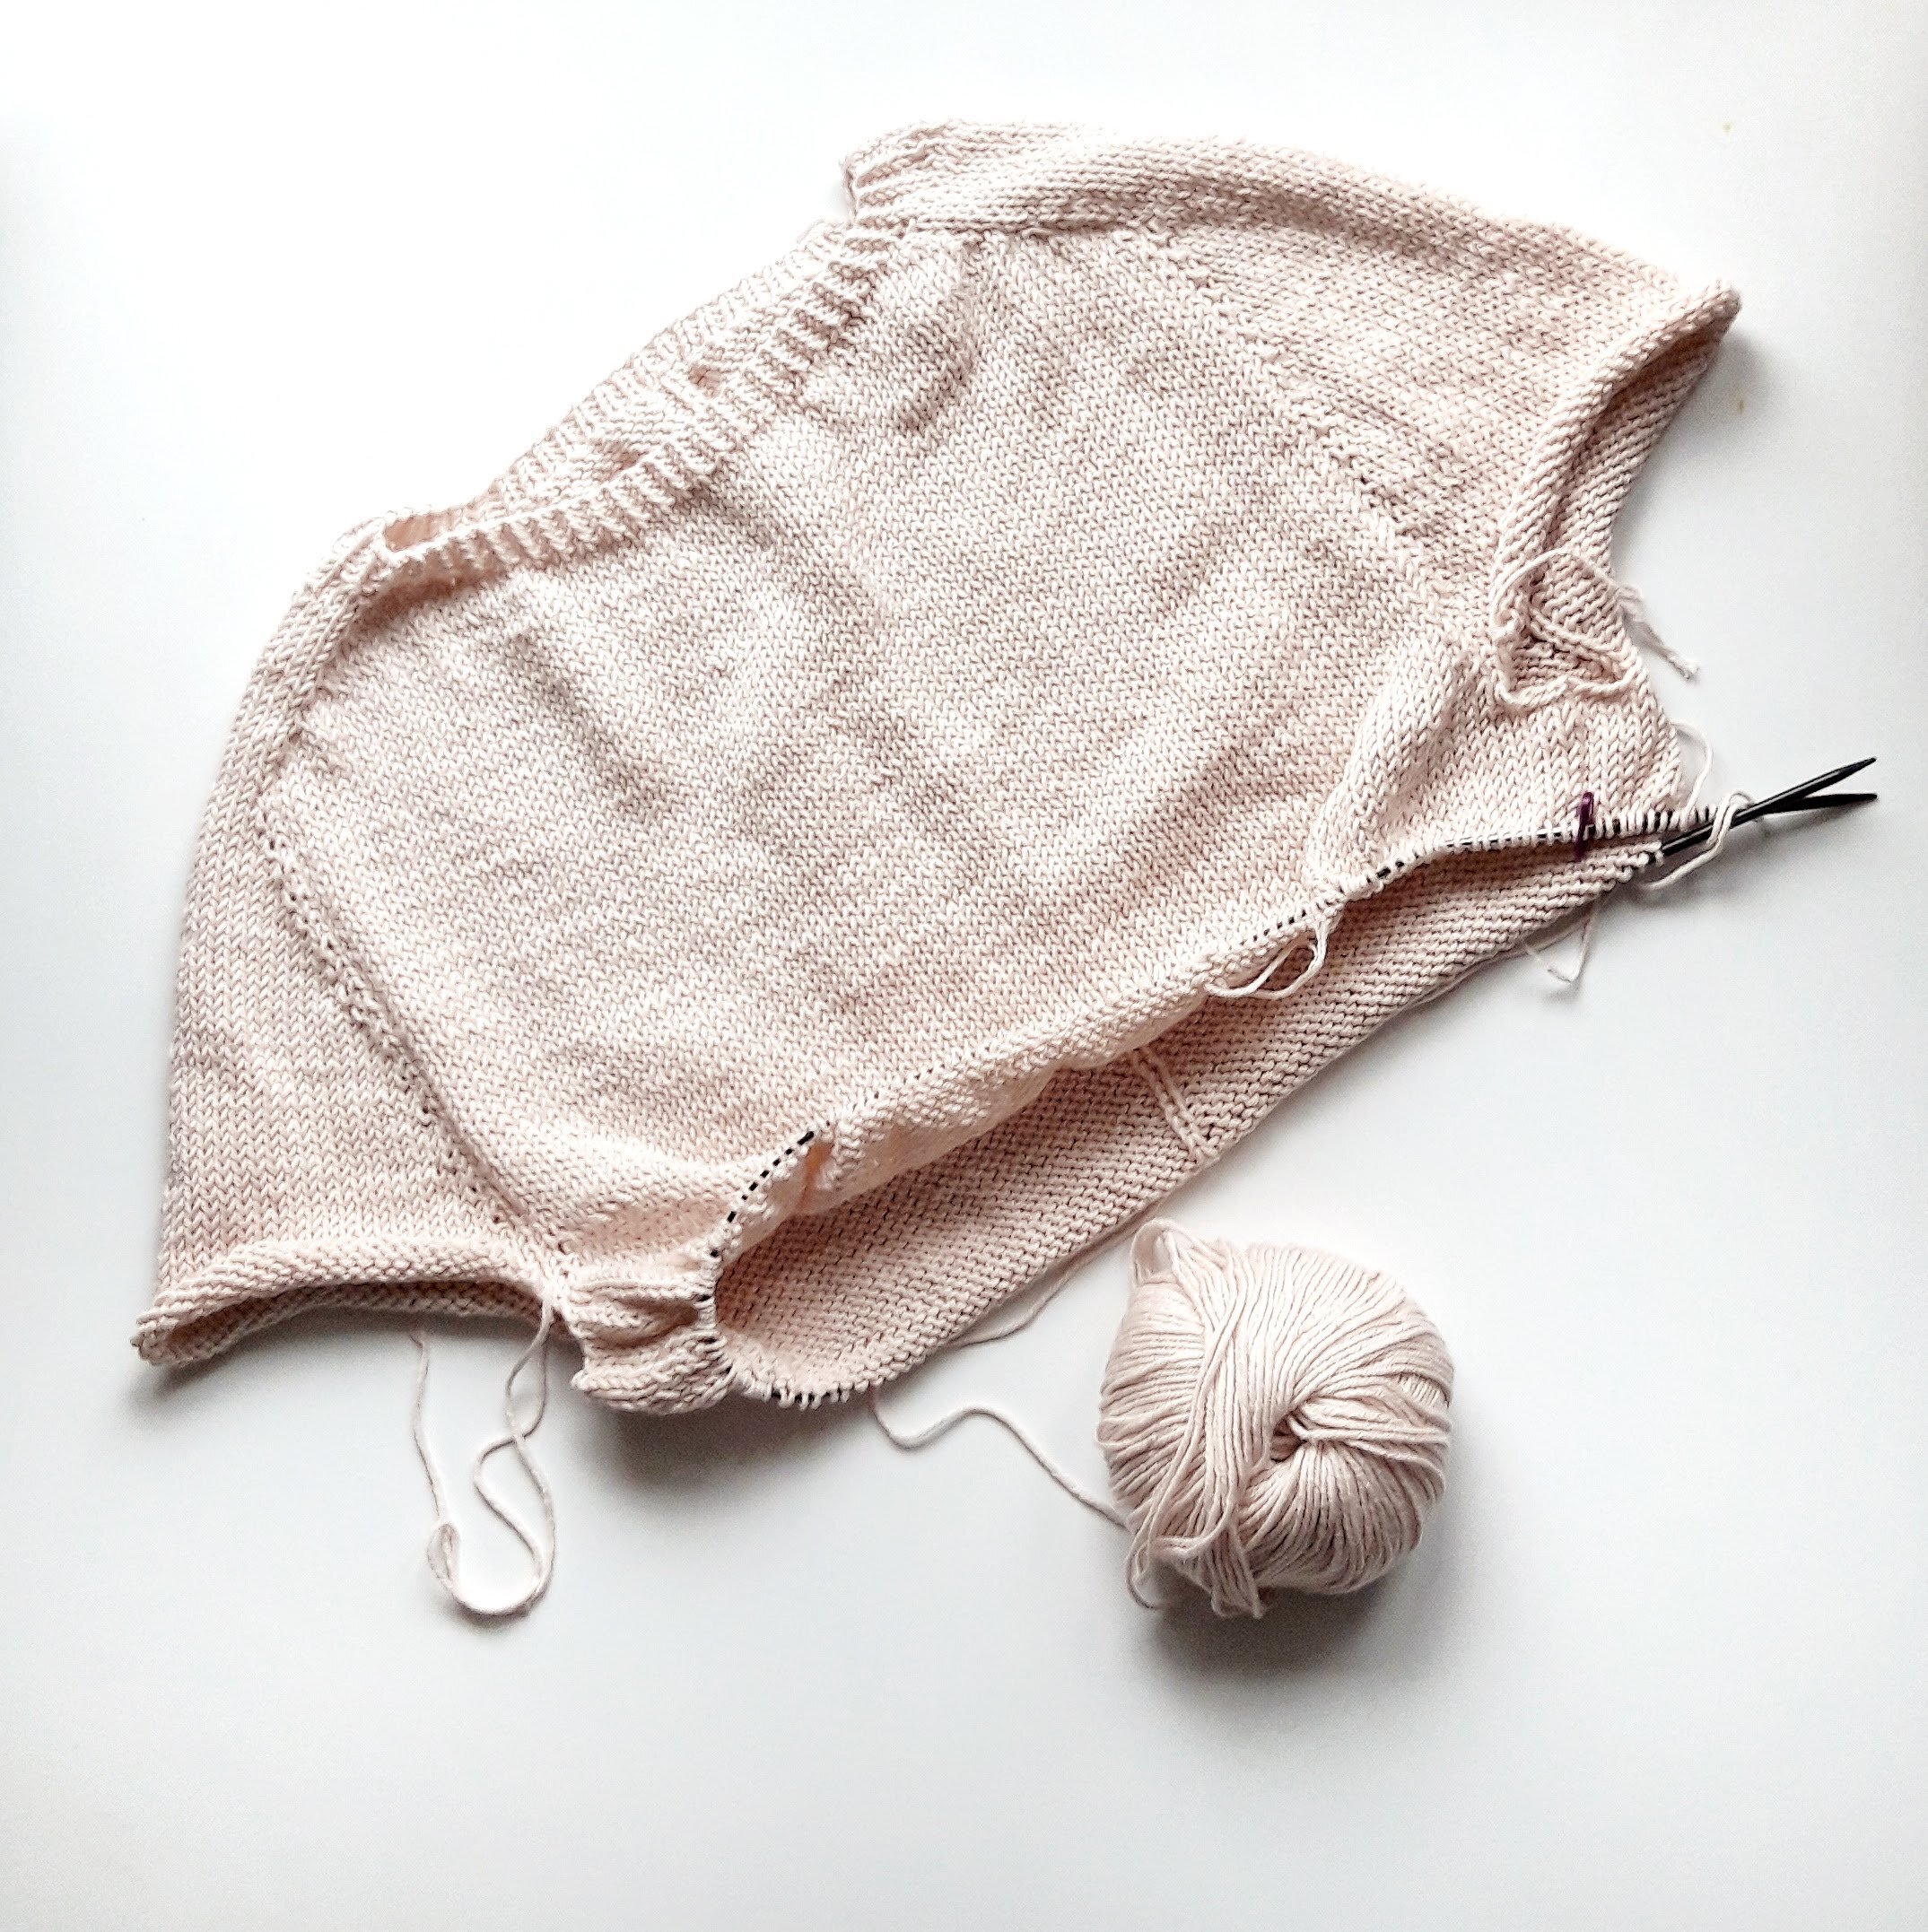
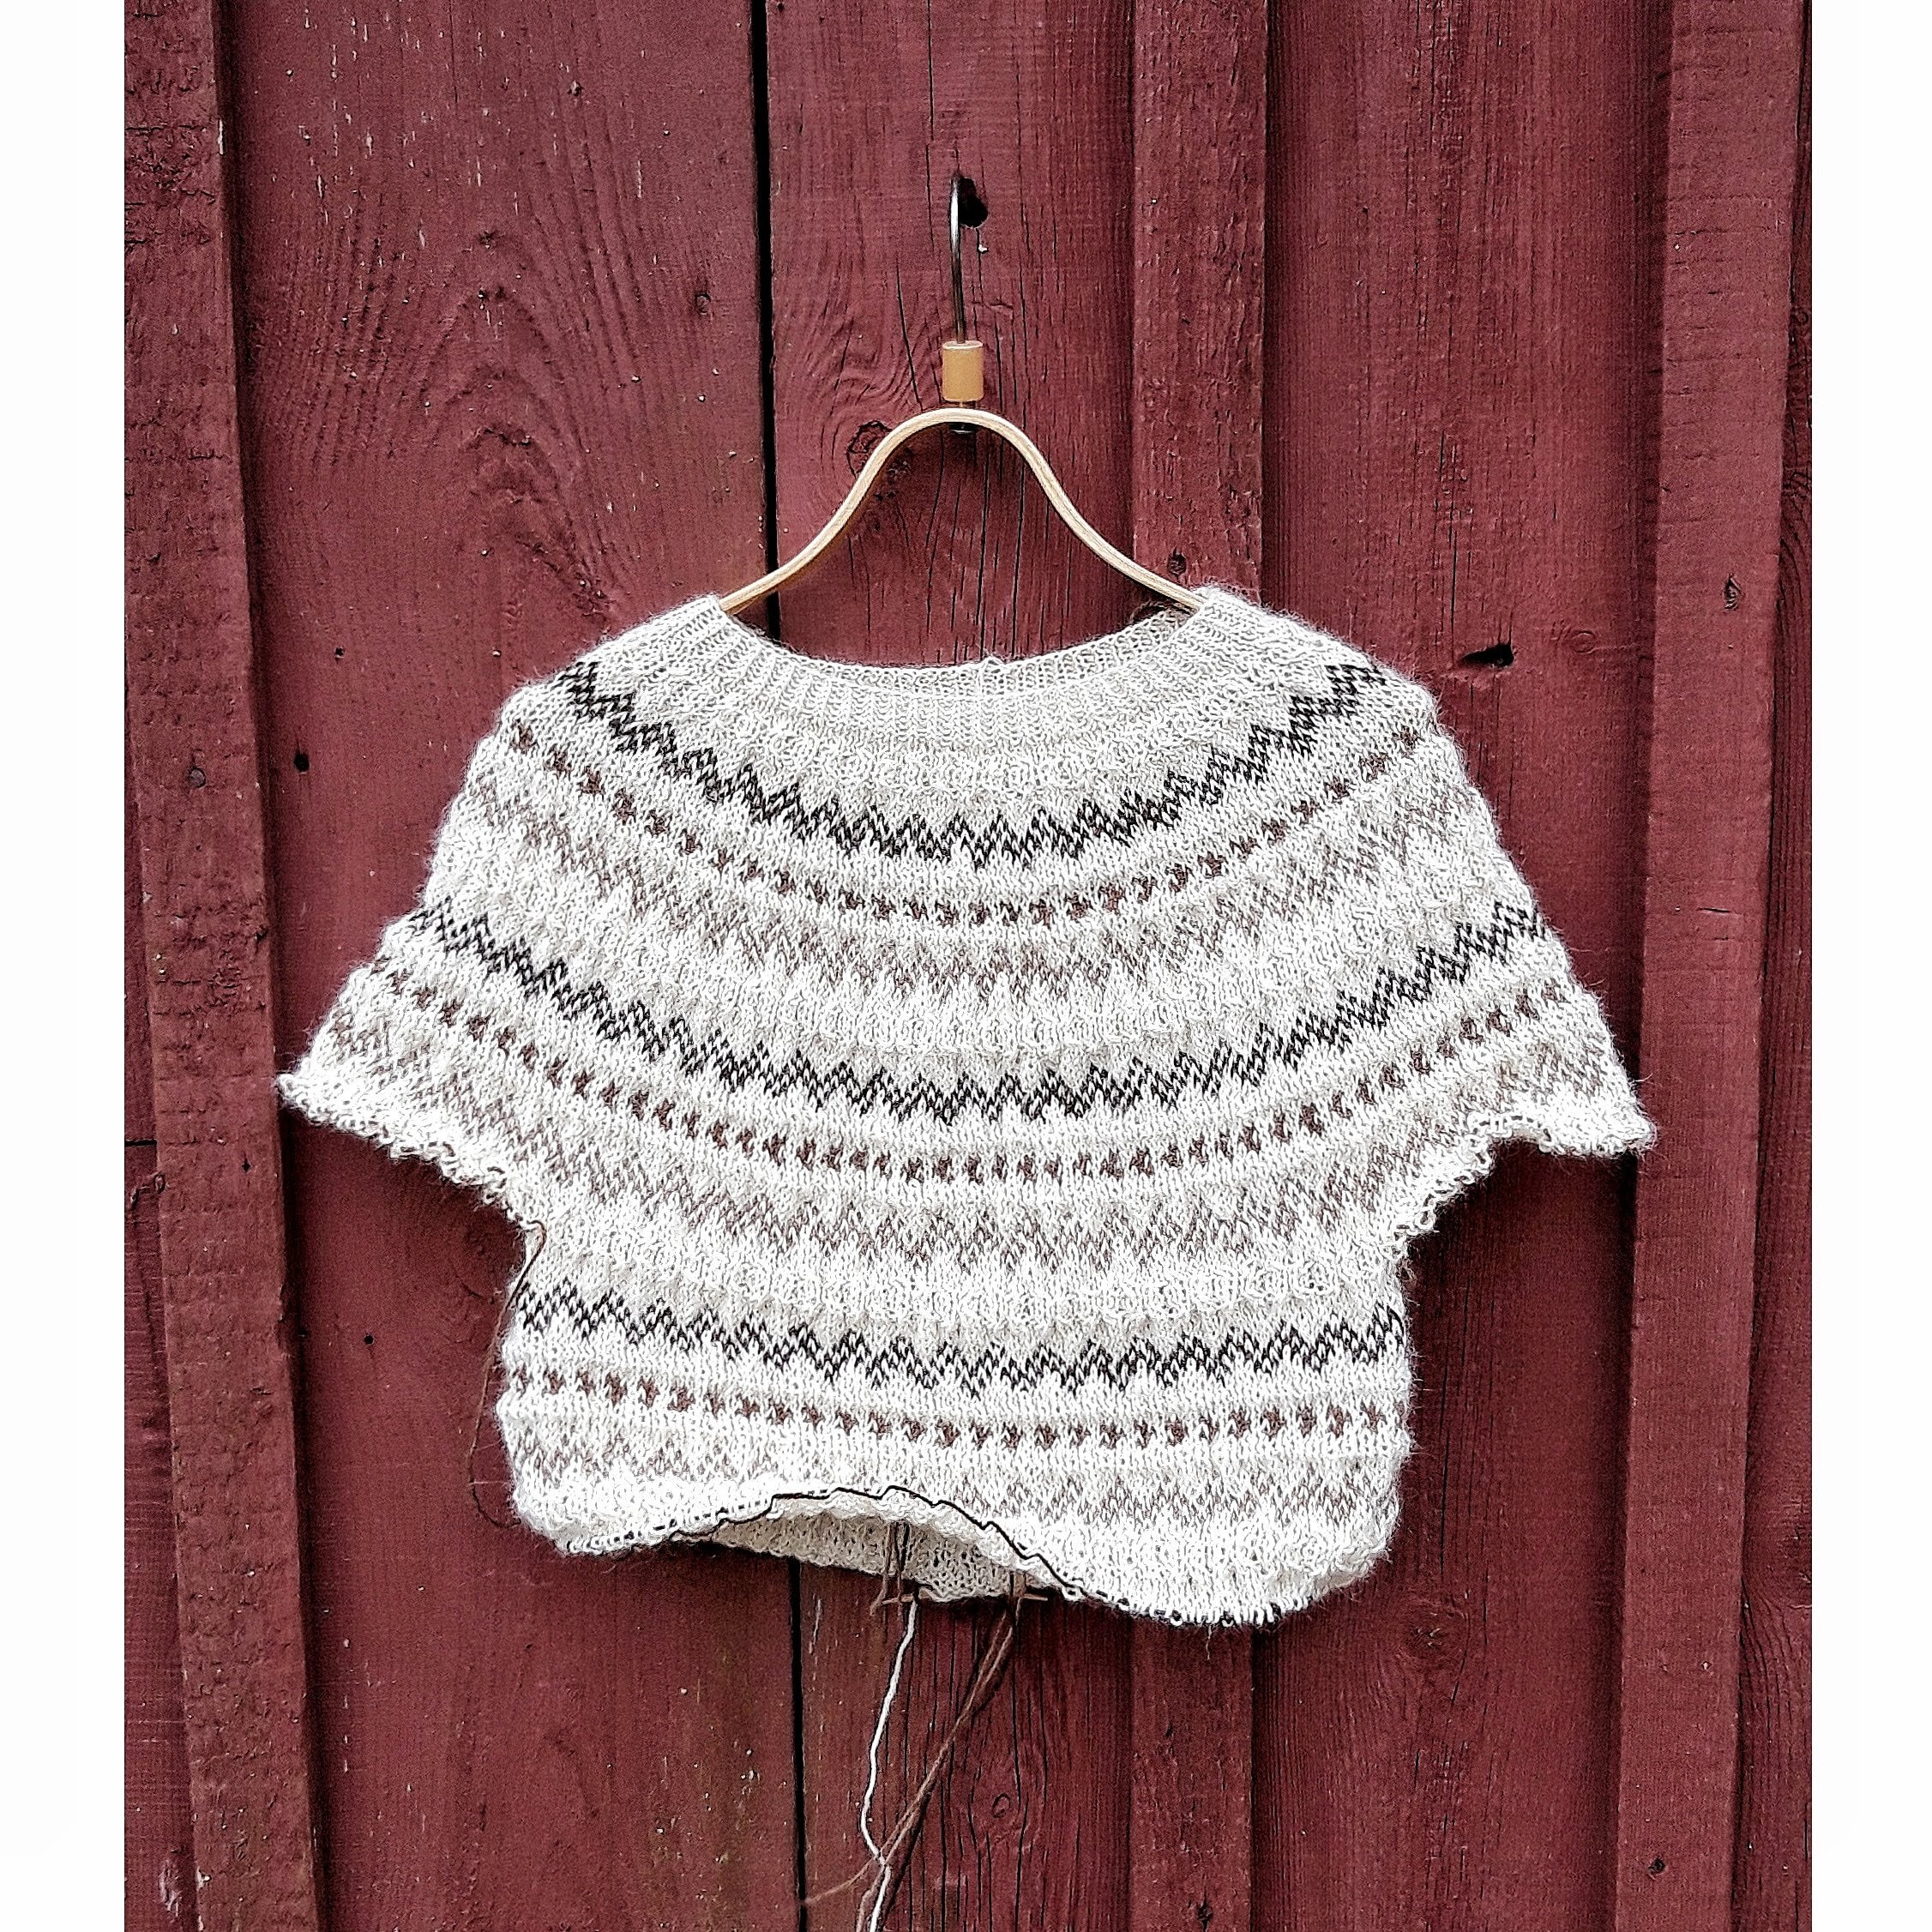
When I later saw the 5/2020 edition of Ottobre Design I knew I wanted to try out the wool jumper on the cover...annnnd as I had the same fabric that would be just great for this style in Madrid, I could now use it up! So I guess I don't have a fabric collecting problem after all, haha.

www.studiocostura.com

So, about this wool jumper...I guess I can call it a jumper? I saw the cover photo of the magazine and thought immediately that it would be a great layering piece for the winter. It could be something I could use over a long sleeve knit t-shirt when I’m at work and this way I could have a little variety from wearing sweaters every day too (but I’d still have the warmth I need so it would be a win-win situation!). You could of course wear it also outdoors when it’s not very cold.

www.studiocostura.com

I actually don’t have anything like this in my wardrobe so I was a bit hesitant about this really fitting my (very basic) style. But not so hesitant to NOT cut it out from the wool without a previous toile, haha. Luckily I really like the result!!!

www.studiocostura.com

From the cover photo I could tell that the high neck was really exaggerated and that it might be too much for me but I decided to try it out anyway. And as I suspected, it was really wide! The good thing was that it was easily fixable. I did lower the neck quite a bit and I also brought the shoulders in quite a bit to get a look I wanted. The rest was really easy as I then just pressed all the hems and hand stitched them under so the seams won’t be visible after all. In that sense boiled wool and similar fabrics are really great as it’s easy to hand sew them in a quite invisible way (I’m not a big fan of hand stitching actually, haha).

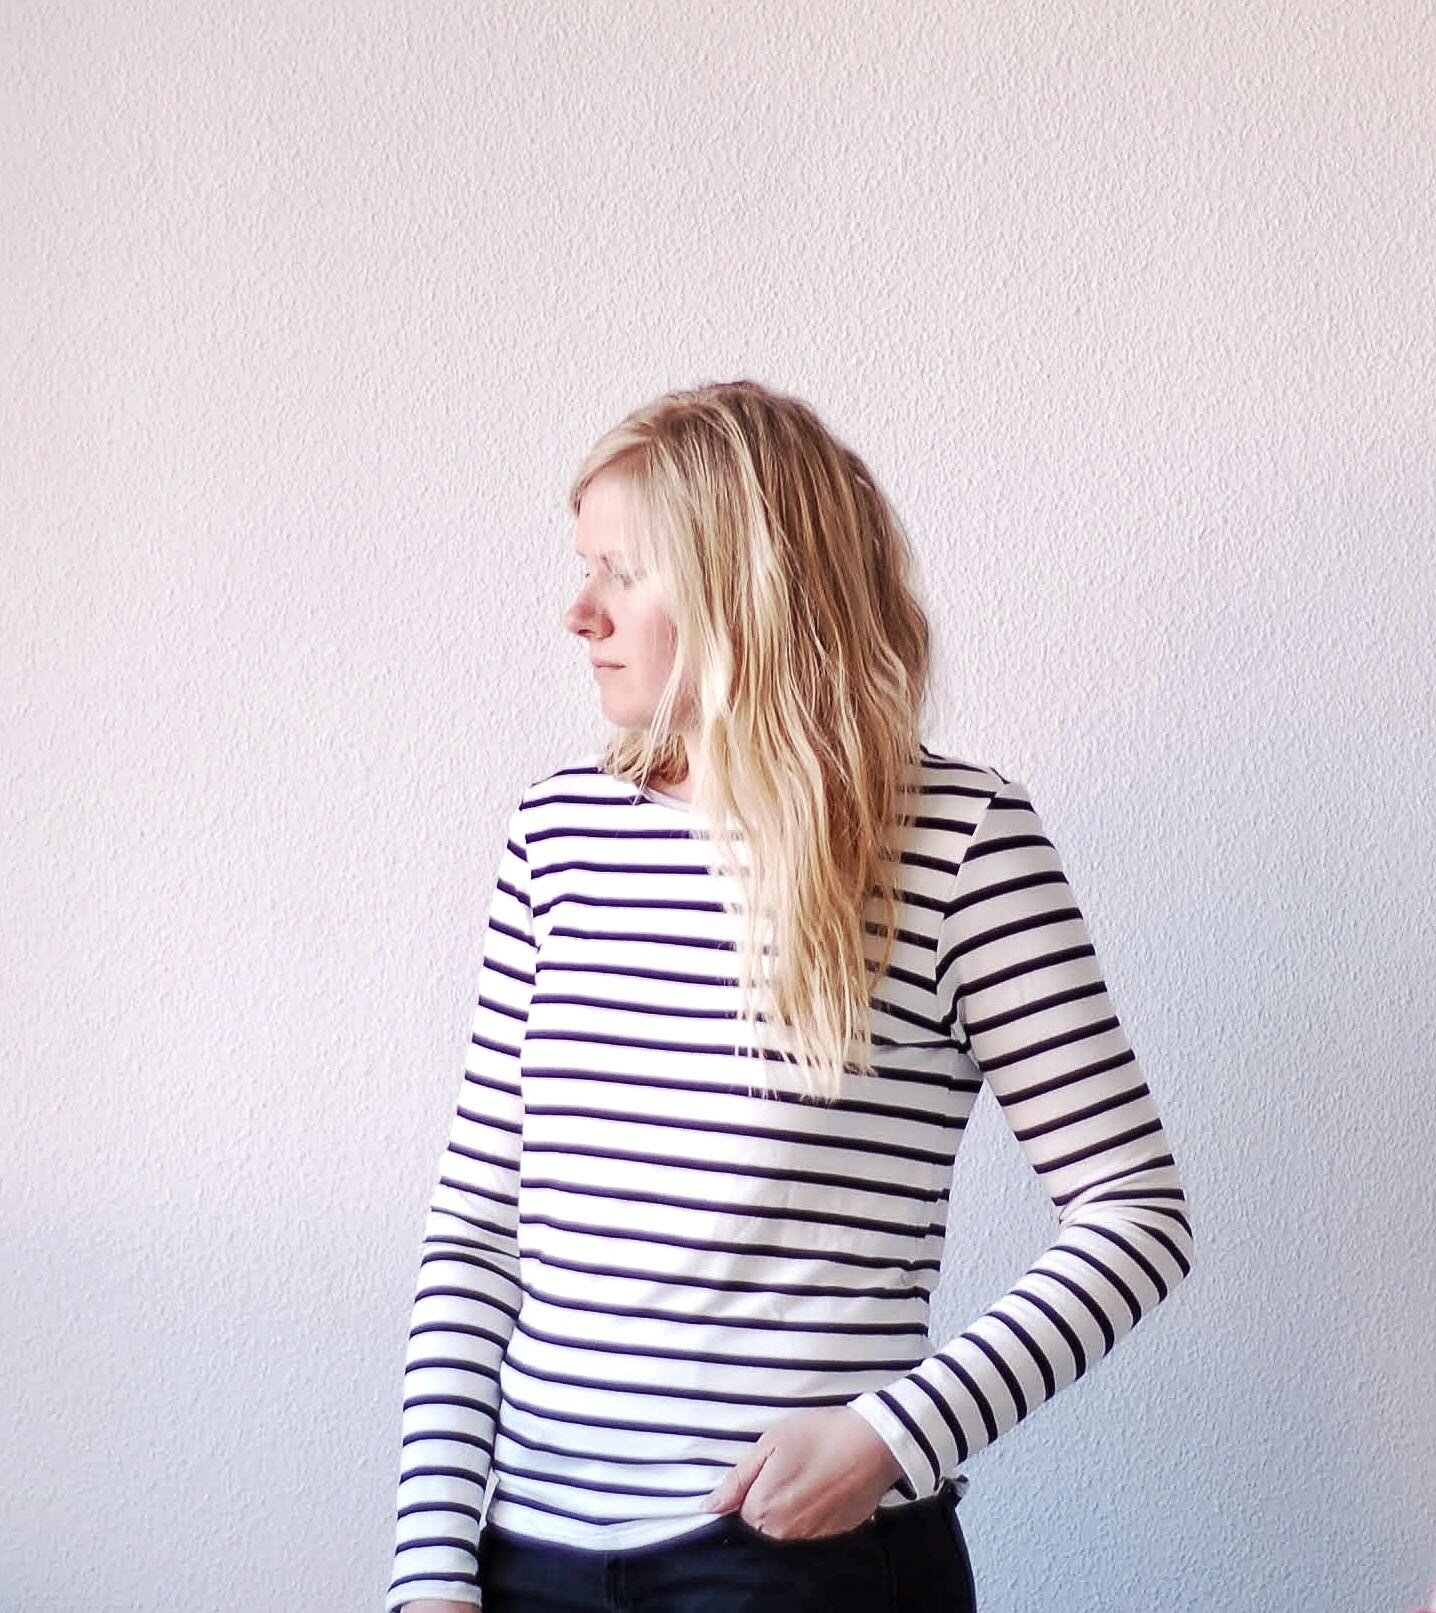
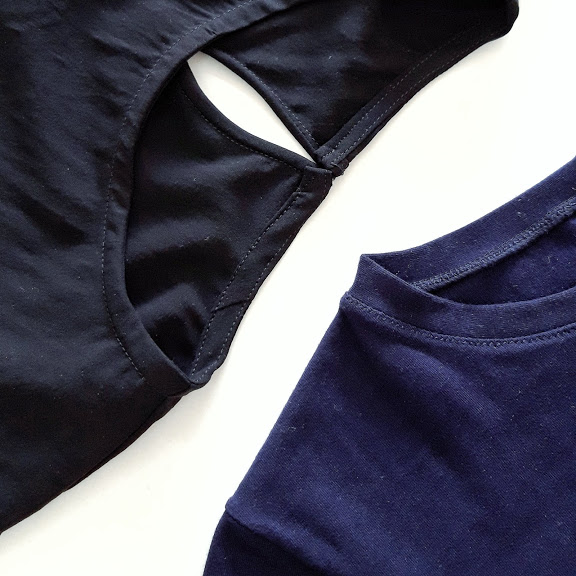
I paired it with a high neck long sleeve rib knit t-shirt I made recently too and the combination is perfect!

www.studiocostura.com

I already made a similar white t-shirt that I talked about on IG with a pattern from Ottobre Design 7/2017 so it was easy to repeat with the same pattern (I’m planning to make more!!!). 

www.studiocostura.com

The thing is that I always find the high necks that are sold in the stores super tight on my neck! I like how they look but I could never get myself any as they feel so uncomfortable. So what I did here is that I widened the neck piece quite a bit (I measured my neck roughly + added some more “breathing” room) and just used the new neck piece and the result is great, I feel good wearing it, haha. I didn’t make the neckline on the front and back bigger, as I was using a stretchy rib knit I just stretched the two layers enough to equally divide both circumferences.

www.studiocostura.com

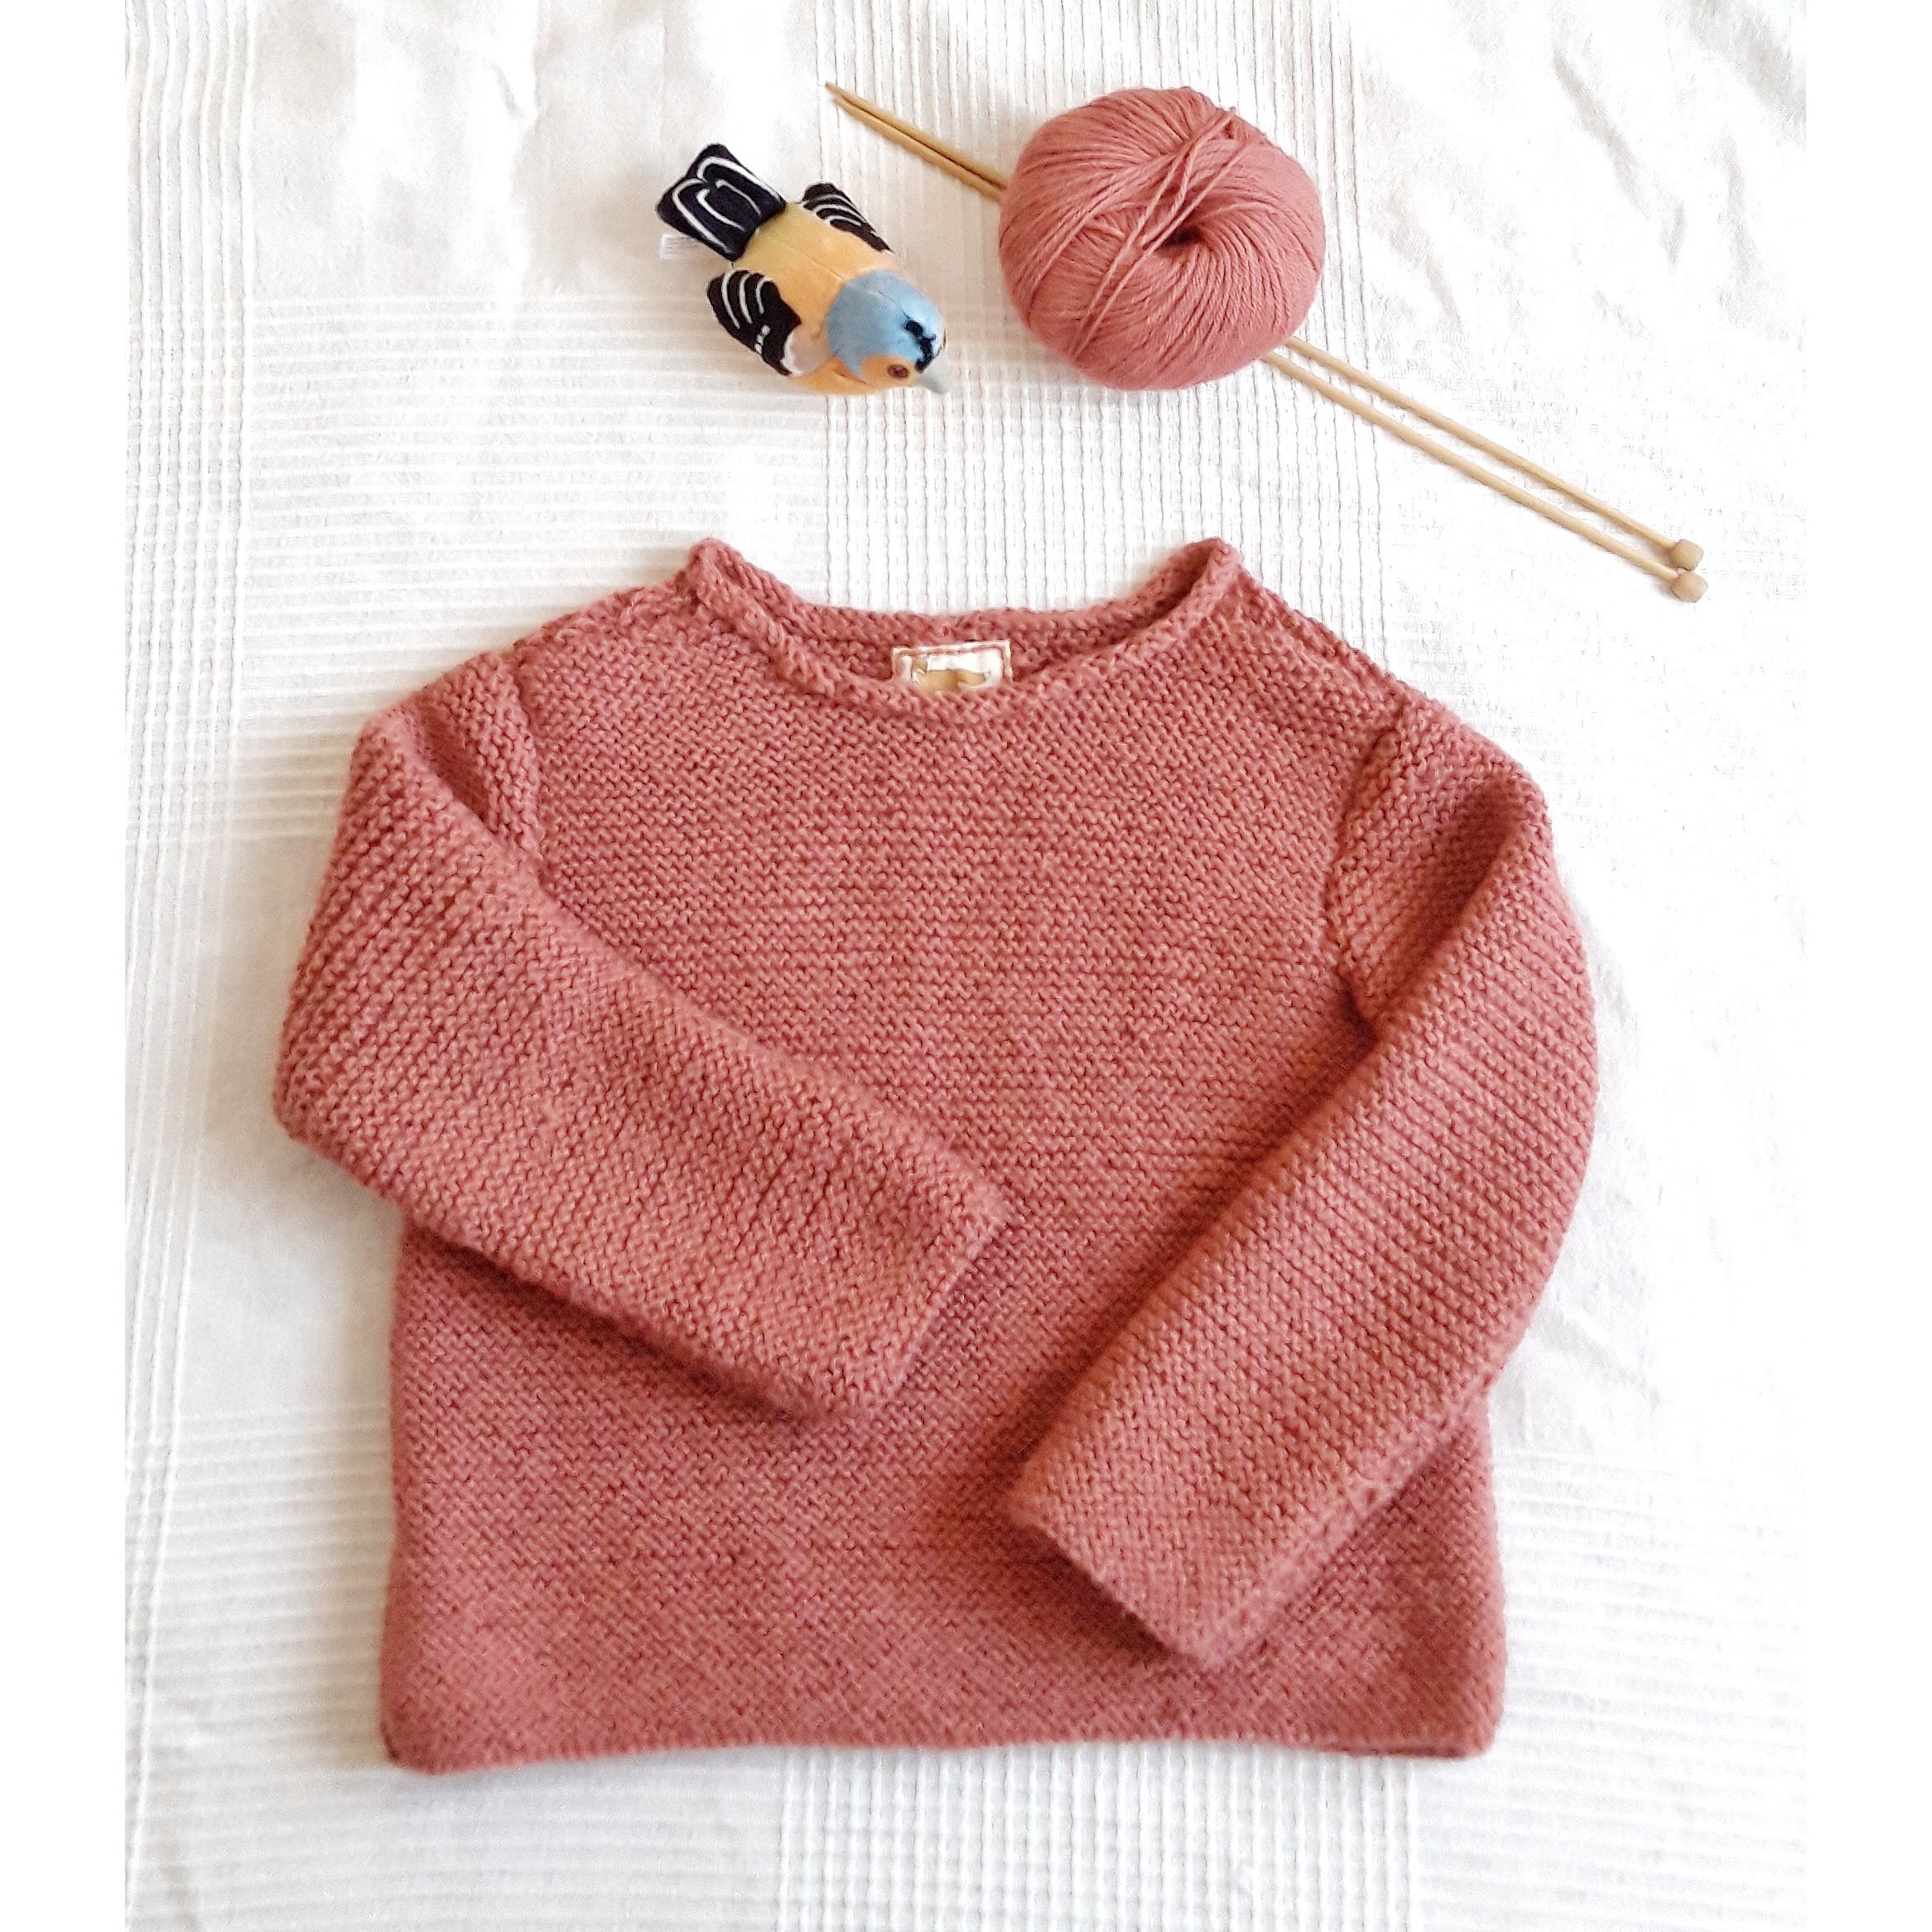
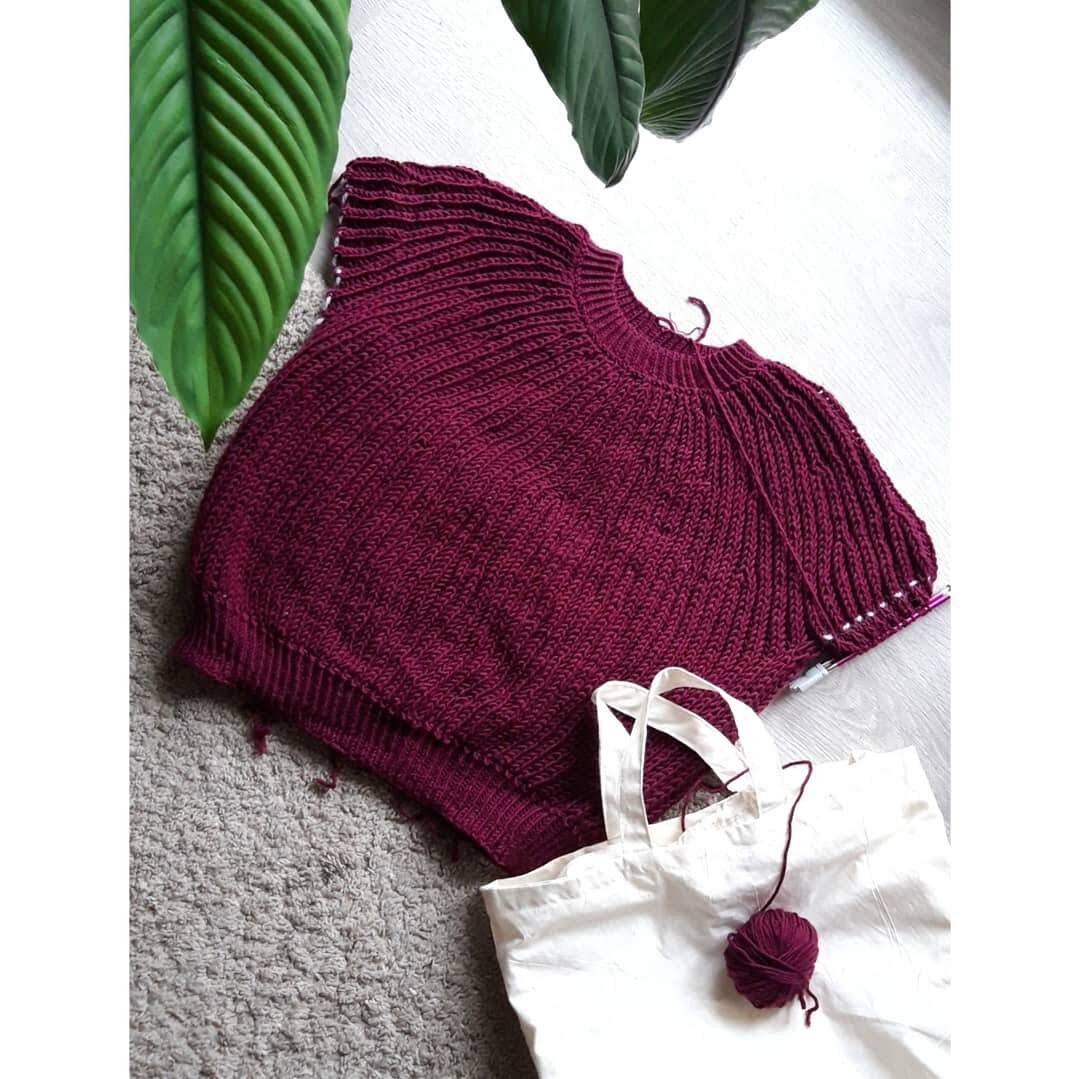
To end this post I wanted to also share this beautiful Cumulus blouse (pattern by Petite Knit) I made in September (also up on my Raverly page). I used a delicate mix of silk, alpaca and mohair and the result is amazing. I wasn’t sure if I’d like a V-neck and I love it!!! It’s by far the most delicate (and expensive) thing I’ve knit and I’m hoping to wear it a lot this winter!

I hope you liked this post and maybe got inspired to sew yourself something fall/winter appropriate too. The last edition of Ottobre Design from where I got the jumper pattern has many great patterns if you’re looking for new projects. I also made a pretty coat from there too but I’ll save the details about that one for a next blog post :)


My canvas jacket

 
www.studiocostura.com

A post about a personal make...or a unicorn?

Before writing about the jacket I wanted to point out that I’m trying out something new here and I’m writing this entry only in English and I’m not adding the Spanish translation as I usually do.

Writing blog posts takes a lot of time and many people have been moving away from writing blogs probably because you can use social media way easier to communicate what you have to say (although there are some really great bloggers who keep up the work, like Austin Kleon for example who just had his 15 years of blogging anniversary!). I like to write my blog and I like the thought of having this home of mine here on the internet where I can ramble about my sewing limitlessly and maybe someone even finds my project notes/tutorials/recap posts interesting. It’s waaay easier to post a sequence of photos on Instagram and call it a day but honestly, I think that blogs aren’t going away and maybe there are less people who actually read them but those people will appreciate the effort (YOU are reading this so I guess blogs are definitely not dead!).

As much as I like to post here, there’s this part that makes me soooo lazy about it. And it’s the translation part. You see, writing my notes about a certain project is an enjoyable process but when I think about translating everything it just takes all the joy away from the process, many times to a point that I won’t write at all. So, I thought that in order to create more posts and write about more projects I will only write in English as there are actually technologies that can translate the text and I don’t have to do it myself manually...because all that time can be spent by writing more blog posts, sewing, knitting….whatever things that make me happy basically, hehe.

I’ll see how that goes and maybe I’ll still write the tutorials in Spanish! I do send out two newsletters each weekend, one in English and one in Spanish where I share with you what’s going on here on the blog, at my shop and lately I’ve been also sharing links to sewing related topics I’ve found interesting. You can always get to my newsletter list for these weekly emails (+ there’s a free e-book about sewing panties for you when you subscribe!).

So yes, that’s about it, let’s go on to today's post. I have to say that I brought this canvas jacket with me to Estonia in the summer specifically to take photos and write about it over at the blog. And maybe also because I knew I’d give it away to my sister or a friend. You see, it’s one of these projects that can’t start well as you just don’t follow your plan based on your actual needs and just go on and sew, haha. But I still wanted to blog about that make, it’s a good one...maybe just not a good one for me!

3.jpg
2.jpg
1.jpg

Images from my Pinterest board

So going back in the memory lane...I started this jacket one year ago! I needed (and I still do, haha) a lined autumn jacket for these chilly days in Madrid when it’s not really really cold yet but you definitely need some warmth in the mornings. I had been using my beloved Kelly anorak, blogged here, for this purpose during the past years but the fabric already had some pilling so it didn’t look very good anymore. Also my first Kelly didn’t have a lining (I later made another for my sister, with lining, blogged here) so it was a really good looking and well worn piece in my wardrobe but it wasn’t as practical as I’d like as it didn’t really give me the warmth I wanted (I always had to wear a sweater underneath because otherwise there would be much sense to wear it on its own in my climate).

Last summer I made another jacket which has been really nice for autumn, the Sierra jacket in softshell fabric (blogged here)...but I needed something less sporty (and way more neutral...cos you know me!!!) so I actually just wanted to make another Kelly, this time lined but in the same cream-beige color. I thought I’d just go and get myself a better, sturdier fabric in the same color, I mean how hard can it be to find a neutral beige cotton canvas fabric in Madrid? Well you must know the answer: difficult. I was so annoyed that I couldn’t find a basic like this (I mean, it really isn’t so much to ask, right?), cursing on the local fabric shops that are unable to carry a good variety of basic dressmaking fabrics and wishing that Blackbird Fabrics would have a little shop in the center of Madrid (one can dream, haha).

So, I did find a fabric that had the structure I was looking for but it was a shade of brown. As I really didn’t want to go home with empty hands I just got the fabric. This was my first mistake...in a row of more mistakes. You see I thought: this brown is basically considered as a neutral, I’m looking for a neutral, this will be more or less a match to what I’m looking for. Nah...it’s just NOT my brown! I know, it really sounds like first world problems but hang in there with me. Clothes wise, I’ve grown in time to understand that there are things I like and then there are things I like too, but not for myself. So I’ve come to understand which colors and tones make me feel comfortable, in which I feel like myself and which colors I look for over and over again. Call it boring or whatever you want, but I want to be sure that I will feel like me so I really try to only buy/make stuff that has passed a test of “yes it’s me”. This doesn't mean that I don’t find beauty in vivid colors or bold prints (I looove prints, apparently I just don’t love wearing them), it just means that over time I’ve found out that there are certain things/colors/shapes that make me happy so I choose to acknowledge that and put this first even though a trendy cut or a cute print is caaaaalllllling me to sew them up (to be left hanging in the closet afterwards, no good!).

Ok, getting back to the brown. The brown wasn’t my brown, I knew deep inside when I got it but I still really wanted to make it work for me so I convinced myself that I will like it (to read more about how I actually think you should choose fabrics for your projects you can read these two posts about fabric composition and fabric drape, both of these posts are full of advice that actually works, haha). I also really needed a jacket so there were not so many options (buying one is an option, but I actually wanted to make one, haha). Basically I went against everything I was talking about in my previous text!


After washing the fabric I “knew” it wasn't my brown so I already knew I wouldn’t make a Kelly with it as I didn’t really picture it in my head anymore. But the fabric was really nice, it had this slight twill weave and I was still missing a jacket...so I headed over to my Pinterest board where I gather images of garments I find pretty. Canvas jackets got my eye! It’s something I did see myself wearing for autumn.

www.studiocostura.com

So a workwear inspired canvas jacket it was. I didn’t do much research on patterns as I found a shirt pattern in Ottobre Design (2/2019) that I thought I could hack a bit to get what I needed. After finishing my jacket I found out there actually was a pattern that would have probably saved me some construction issues, the Julien Chore Jacket by Readytosew, but oh well, hehe. The shirt pattern had more or less everything I needed collar wise. There was a yoke but I removed it by joining the back piece without the extra fold with the yoke directly. I also didn’t use the cuffs nor the original pockets. I drafted pockets that were sewn inside the side seams.

I don’t remember why exactly I decided to make the jacket without a lining. Seriously, it’s a big question in my head as it was one of the main things I NEEDED to have for my jacket as I explained before. Maybe it was because I thought that this style of jacket usually doesn't have a lining (great, but why did I choose it for myself, then?), maybe I was too lazy to think about lining the jacket (again, why did I start then?) or maybe I got the idea of using a super cute bias binding for all the raw edges which made me choose no lining (again, cuteness is not equal to warmth, so why?). Basically, I made a jacket with a fabric that didn’t have the right color for me + I made it unlined although I needed warmth, hahaha. Do you think it will be the next wardrobe staple of mine? No, oh why???

www.studiocostura.com

But let’s just forget about the fact that while sewing my pretty bias tape I already knew I wasn’t going to wear the jacket a lot in our climate. The bias binding on all the raw edges actually looks very nice. If you ever want to use longer strips of bias tape I’d highly suggest you to make your own, using this tutorial from Colette's blog for example (the blog itself is worth searching through, I learned so many good sewing tricks there when I started, Colette patterns were having a momentum then!). I also added the pretty “It has pockets” label by KTM.

www.studiocostura.com

I finished everything except the buttons probably back in autumn (see the above image with the softshell jacket for y kid next to it) but then the temperatures dropped and I couldn’t wear the jacket (remember the lack of warm lining, right?). I finally got the buttonholes done somewhere in June I think. Here are a flatlay with a kitty Mustikas and a mirror selfie so you can see it less wrinkly than my actual “blog shoots”, haha.

www.studiocostura.com

So the overall result. I actually really like the jacket, it has super nice and roomy pockets that are very practical. It does have a nice shape although I think I’d make it a size smaller if I could (I usually wear a 40 in Ottobre Design patterns so I sized up for the jacket and made it in 42 for more room), then again this way you can layer it comfortably over a wool sweater. I like the workwear look a lot. I like the jacket...but not for me, haha. 

Did I learn something with this project? Of course...that I shouldn’t rush into new projects, that I should actually make garments that work for my life, that I should use a lining for a jacket NO MATTER WHAT. I also wanted to blog about this make as I feel it wasn’t a total waste of time, it turned out nice, just not appropriate for me. Looking at the pictures actually makes me want to make a new one for myself! But in “right” color and with a lining, you guessed it!

www.studiocostura.com

Do things like this happen to you? I think I’ve certainly learned a lot in my sewing journey and I make mistakes like this waaay less than in the beginning...but I still do make them! But oh well, someone is going to have a nice jacket at least (it also begs for a scraf I think!)...and I will be on the lookout for a new fabric :)

www.studiocostura.com


5 summer dresses // 5 vestidos de verano

 
www.studiocostura.com

I’ve sewn a couple of summer makes in the past weeks so I thought it would be a good idea to write a post about a summer staple of mine: a strappy dress! Let me give you a little background information first, hehe. I live in Madrid where it’s really hot during the summer months (the heat begins depending on the year in mid May and lasts at least until the second part of September usually), the temperatures go between 30-40 degrees and it only cools down a bit very early in the mornings but usually you never need to carry a jacket around. So my summer staple garment is either a sleeveless top or dress. I do have short sleeve blouses too of course but let’s be honest, I sweat a lot during summer, and avoiding armpit stains is something I really try to do if possible. 

Remember the post about fabric composition? I wrote about which fabrics you should choose according to your habits, climate and other personal factors. So apart from the fabric composition it’s also really important for me to know my daily habits and the temperatures I’m dealing with to know which garments to choose/sew...that’s why strappy designs are my go to choice in summer. Dresses and tops like these let my skin breathe and I feel comfortable in them...well as comfortable you can feel when walking home from work when it’s 40 degrees in the shadow, haha.

So I’ve made a couple of dresses this summer and I now have a mini collection I really like. I’ve tried out a couple of different styles and I’ll give you the details about the patterns I’ve used.

Estas pasadas semanas he cosido un par de cositas veraniegas y pensaba que estaría bien hacer un post sobre mi gran básico del verano: el vestido de tirantes! Te cuento un poco de historia de fondo antes, jeje. Vivo en Madrid y aquí hace un calor sofocante durante los meses de verano (el calor empieza según el año más o menos a la mitad del mes de mayo y dura bien hasta la segunda parte de septiembre normalmente), las temperaturas suelen estar entre 30-40 grados y solo se refresca un poco más a la primera hora de la mañana pero casi nunca tienes que llevarte algo de manga larga. Así que mi básico de verano es desde luego el vestido de tirantes. También tengo blusas de manga corta pero vamos a ser sinceros, sudo mucho con este calor, así que suelo intentar evitar marcas de sudor en las prendas si es posible y voy mucho mejor con tirantes.

Recordáis del post sobre la composición en los tejidos? Escribí sobre qué telas deberías elegir según tus hábitos, clima y otros factores personales. Aparte de la composición de telas también es muy importante para mí saber cómo va mi día y a qué temperatura voy a estar a la hora de elegir la ropa que me pongo/coso...por eso las prendas de tirantes son mi básico en el verano. Vestidos y tops así dejan que mi piel respire y me siento cómoda al llevarlos...bueno, lo cómodo que puedas sentirte al andar a casa con los 40 grados en la sombra, jeje.

Así que este verano me he hecho un par de vestidos y ahora tengo una mini colección que me gusta mucho. He hecho un par de estilos diferentes y os daré los detalles sobre los patrones que he usado.

www.studiocostura.com

The first one is my latest make, the Calvin wrap dress. I had this pattern by True Bias on my sewing queue since last summer when it was published and I wanted to make a top. The other day I found this striped cotton linen blend fabric at Julián López and thought it would make the perfect dress version so I went ahead with the dress directly.

I really like wrap styles in general so this was not a disappointment of course.There are only two pattern pieces...and meters of bias tape, haha. I really like to use striped fabrics for bias binding as then you can combine different stripe directions as the bias comes in the 45 degree angle and creates a cool effect combined with the vertical stripes on the dress.

I made the dress a bit shorter than the original version so the hem is just below my knees. I usually don’t wear this length but I think it looks really good for this style. The pattern is drafted for C cup and I’m an A cup so I modified the side seam a bit, taking in aprox 1,5 cm on the side seam and this way it fits good. I already made a top version in linen too, I really like the result.

El primero es mi última costura, el vestido Calvin. Este patrón de True Bias ha estado en mi cola de proyectos pendientes desde el verano pasado cuando lo publicaron, quería hacerme el top cruzado. El otro día en Julián López encontré a esta tela de mezcla de lino y algodón de rayas y lo vi perfecto para el vestido así que con eso empecé.

En general soy muy fan de prendas cruzadas así que sabía que me iba a gustar. Solo hay dos piezas de patrón...y metros de cinta de bies, jeje. Me gusta mucho usar telas de rayas para bies porque así se puede combinar diferentes direcciones de rayas ya que el bies va a 45 grados y crea un ángulo diferente a las rayas verticales en el vestido.

Hice el vestido algo más corto que la versión original, el bajo me llega justo debajo de las rodillas. No suelo llevar este largo normalmente pero para este estilo creo que queda muy bien. El patrón está hecho para la copa C y yo soy A así que modifiqué un poco el lateral, le metí unos 1,5 cm desde la sisa para que el delantero me quede bien. Ya he hecho una versión del top, en lino también, y estoy contenta con el resultado.

 
www.studiocostura.com
 

The next dress is made with the Ogden cami pattern (another pattern by True Bias) and modified into a dress. I made this version last summer in a floral viscose fabric and I’ve been wearing it a lot. The modification is easy: I used the facing pieces and lengthened them a bit to get the bodice in my desired length. I then cut the new bodice pieces twice from the fabric and followed the same sewing instructions as you’d normally do. For the skirt I used a gathered rectangle with the regular fabric width (aprox 140-150 cm wide) and the desired length. I then just gathered the skirt into the same width as the bodice and joined all the layers. The result is a flowy cami dress that feels like nothing on! It’s just perfect for the hot summer weather as it barely touches the skin, hehe.

El siguiente es el vestido que hice con el patrón de top Ogden (otro patrón también del True Bias) modificado en vestido. Hice esta versión en viscosa el verano pasado y me lo he puesto un montón. La modificación es sencilla: he usado las piezas de las vistas y los he alargado al largo deseado del cuerpo. Después los corté dobles y usé el mismo orden de construcción como en el top. Para la falda usé un rectángulo de tela con el ancho normal de la tela (140-150 cm de ancho) y el largo deseado. Después fruncí la falda para que cuadre con el cuerpo y junté todas las capas. El resultado es un vestido con vuelo que es super cómodo porque parece que no llevas nada puesto! Es perfecto para el calor porque apenas toca la piel, jeje.

 
www.studiocostura.com
 

The next dress is the Claudia dress by Tessuti Patterns. I made this dress last summer using a rust colored linen that was gifted to me by my friend Ana. Linen is perfect for this style as the dress has straight lines that look good in a structured fabric like this. I have to say that I love the result but I didn’t wear it last summer as I wasn’t really convinced about the color on me (cold tones usually work better for me). This summer I tried it on again and I was actually surprised about how much I liked it now (a classic case with finished objects for me, haha). I usually wear this dress with a t-shirt underneath as I feel too “exposed” when wearing it solo, don’t ask why...I can wear the other strappy dresses as they are, it’s just this one that doesn't feel right, haha. The only negative side is the wrinkles...even when you iron the dress they still won’t go away but oh well…

El siguiente vestido está hecho con el patrón de vestido Claudia de Tessuti Patterns. Lo hice el verano pasado con un lino que me regaló mi amiga Ana. Lino es perfecto para este patrón ya que el vestido tiene líneas rectas que se quedan muy bien usando una tela con cuerpo como ésta. Tengo que decir que me encanta el resultado pero el verano pasado no me lo puse porque no estaba convencida del color (normalmente suelo llevar colores fríos). Este verano me lo volví a probar y me gusta mucho (un clásico con las prendas que termino, jaja). Normalmente lo llevo con una camiseta debajo porque me siento un poco expuesta si no llevo nada más abajo, no me preguntéis por qué...los otros vestidos de tirantes no me crean este problema, jaja. Lo único malo son las arrugas, incluso si lo planchas no salen del todo pero bueno...

 
www.studiocostura.com
 

Another make from this year is the Jessica dress by Mimi G. I had been seeing this dress around for a while but I wasn’t convinced about the gathers directly on my waist together with the fitted bodice (I was convinced about the Ogden cami dress that has gatherers but they just “float” around your body, haha). But after seeing all the cute versions I decided to give it a go with this pretty floral viscose in my stash. I actually made a mistake about the sizing: as I usually don’t wear very fitted garments I just cut the bodice according to my bust size ignoring the waist measurement (that falls in a bigger size than my bust measurement). When I tried on the bodice it fit juuuust right but there’s definitely no more room on my waist, haha. Luckily the overall bodice fit was good so I just cut the skirt again like I did for the Ogden dress using the width of the fabric instead of following the pattern measurements (that’s the volume of gathers I feel good in). 

I really like the result!!! I was worried that with the gatherers just around the narrowest part of my waist I wouldn’t like the overall look but I actually really like it. It feels really comfortable on and the fitted bodice looks really cute. I’ll definitely make more dresses with this pattern!

Otro proyecto de este verano es el vestido Jessica de Mimi G. Había visto este patrón por allí un montón pero no me convenció mucho el tema de frunce justo en la cinturilla junto a un cuerpo ajustado (estaba yo con el modo vestido Ogden con sus frunces “flotando” por allí, jaja). Pero después de ver tantas versiones bonitas decidí probarlo con una tela de viscosa floral que tenía por casa. Lo que me pasó es que hice un error de principiante con las tallas: como no suelo llevar prendas ajustadas corté el cuerpo con la medida de pecho ignorando por completo la medida de cintura (mi cintura cae en una talla más grande que mi pecho). Cuando probé el cuerpo me queda juuuuusta pero desde luego no puedo aumentar centímetros allí, jaja. Menos mal que en general el cuerpo quedó guay así que corté la falda igual que con el Ogden usando el ancho de tela en vez de seguir el patrón (este es el volumen de frunces que me gusta).

Me gusta mucho el resultado!!! Estaba preocupada por cómo me veía con los frunces justo en la parte más estrecha de mi cuerpo pero me gusta mucho cómo queda. Es muy cómodo y el cuerpo ajustado queda mono. Seguro que voy a hacer más vestido con este patrón!

www.studiocostura.com

And the last make is the other Ogden cami dress I made this summer. This time I used this pretty gingham cotton lawn fabric gifted to me by Laura. I added ties to gather the back a bit and it looks really cute that way and I can adjust the waist shaping as I like thanks to the ties. 

Y el último vestido es otro vestido Ogden que hice este verano. Esta vez usé la bonita tela vichy de algodón que me regaló Laura. Le añadí unas tiras para atarlas en la espalda para ajustarla un poco y así puedo decidir cómo llevarlo, si más ajustado o menos.

www.studiocostura.com

I also used these cute labels by Kylie and the Machine that we now have on sale at the academy, they are super soft, I was really surprised when I opened the package. They add a nice tough for my handmade garments and look really professional, hehe. 

También usé estas etiquetas de Kylie and the Machine que tenemos ahora en venta en la academia, son super suaves, estaba muy sorprendida al sacarlas del envoltorio. Las etiquetas añaden un toque bonito a mis prendas hechas a mano y así parecen profesionales y todo, jaja.

DSCF0756-01.jpeg

So this is my mini capsule summer dress wardrobe! If you’re into strappy dresses I’d definitely recommend you these patterns, all of them sew up beautifully and are perfect for summer. If you’re living in a climate where it’s not so hot you can always combine them with light jackets and they still look really cute!

Así que ésta es mi mini colección cápsula de vestidos de verano! Si te gustan vestidos de tirantes te puedo recomendar estos patrones, todos van genial y son geniales para verano. Si vives en un clima no tan cálido puedes combinarlos con chaquetas, también quedan bonitos así!


Me Made May 2020

 
www.studiocostura.com

Another year of Me Made May is almost over and I wanted to write a recap post here on the blog to gather all the photos together + add the links to the patterns I’ve used. So first off, many things were different this year...a strict lockdown due to the pandemic is the main thing of course. Luckily my health and my families health is good and for me the biggest thing that has changed is that I stayed at home almost all of the month, and only little by little we’ve started to go out for walks and now I’ve been able to go to work on my projects over at the academy too (no classes yet but my brain definitely appreciates changing the work environment and spending time out of house again). 

Clothing wise it was very different of course as I usually go out early in the morning, drop off my kid at school, go to work, pick her up, sit at the park/take her to the activities and I usually get back home quite late. Which means I always have to wear many layers as the month of May here in Madrid is crazy weather wise...it’s chilly in the morning and usually very warm (or directly hot as hell in the end of the month) in the afternoon, so I’m always out and about with my backpack on to carry everything with me. So this definitely wasn’t a thing during this month...and I’m actually happy about it. Lately the days were so stressful, I felt that I wasn’t at home at all, that all we did was just sleep there...and then life changed dramatically. These are big contrasts, I know, I’d be more than happy to just slow down a bit, not to live in an eternal lockdown, but I’m just leaving it there...it has been nice in that sense. Of course it has been a terrible time in the world, don’t get me wrong please!

So, there was no need to put on various layers but I didn’t enter the sweatpants/hoodie only land either...by following my makes during this month you can probably already see that my style is super casual and I actually don’t own any fancy clothes. That said, for me it’s important to put “real” clothes on even when I don’t / can’t go out. Especially during this lockdown when maintaining a healthy daily routine was one of my main goals to keep on functioning as well as I could. I know, you are at home, maybe even on the sofa a lot (or not, if you have kids, haha)...but I couldn’t live in PJs for two months, it’s just depressing in my opinion. Putting on my normal clothes, the ones I would use when I’d go to work, helps me to actually feel like working from home and getting things done (something that has been “very interesting” to make happen when trying to do it while homeschooling). So yeah, I’m of course not saying anything if you’re into lounging around your house with leggings on all the time, I’m just saying that for my mental health, I couldn’t do this (go figure, haha…). 

How does all of this affect this year's Me Made May for me and how did I feel participating in the “challenge” this year? Well, it has been easier and for various reasons:

  • I wasn’t in a rush to go out in the morning which means I had more time to see what I’d like to wear. 

  • As another year has passed by I actually have more memades to put on! Especially sweaters as you’ll see below...I’m super proud of my handknit sweater collection, I really do wear them a lot and they bring me so much joy (and turns out that May is a sweater month which means I wear wool sweaters more than 6 months a year, haha!).

  • I had more time to take photos and document the month. Yes, this part is the worst, it’s my 5th year and I’m very aware of how I really don’t want to take selfies after the first week or so. The good thing was that this year I had more time to actually document my makes which made the whole process better.

  • I knew I wasn’t going to post a photo on my feed every day which meant that I didn’t stress about participating. I think that many people haven’t really understood the event in that sense: this event does not require you to post a picture of you EVERY DAY. You can do it if you feel like it but you can also do just one day, once a week or whatever feels right to you. I’ve been reading comments like “I’m not participating in Me Made May this year as I can’t/don’t want to post pictures of myself every day” or “I don’t have enough clothes to participate”. But this is not at all the point of it all! For me the point is to see inspiring makes through the hashtag, no one is going to count your photos! Have you sewn one garment and you’re wearing it and you actually feel like posting a photo? Well, do it! That’s the magic of this community event...sharing what you have made, one, two or thirty times. If you’re new to sewing you can’t possibly have a different memade garment for every day but that’s totally OK, you should be comparing your sewing practice with people who have been doing this for years, maybe even decades! Anyway...sorry about the rant but I just wanted to write about it to express my opinion. I also think that many people “burn out” after the first week because they set really high standards and this really isn’t a race. It’s just an opportunity to share with your community and get inspired! I just find it sad that people think that if they don’t participate every day they shouldn’t participate at all...we will miss your cool makes (or your one, first make) that way!

So, all in all, this year the documenting part has been quite easy for me. But the past ones I guess weren’t because I searched through my blog archives and I’ve only written one other recap post and it was in May 2016, my first year doing it, haha. So let’s see what I wore, which patterns were used and all that stuff.

Otro año de Me Made May está acabando y quería escribir un post de recopilación aquí en el blog para juntar todas las fotos + añadir enlaces a patrones que he usado. Primero decir que la situación era muy diferente este año...el confinamiento estricto por la pandemia era lo que más afectaba a todo, claro. Por suerte mi salud y la salud de mis familiares está bien y lo que más afectó a mi vida era quedarse en casa casi todo me les, solo hace poco que podemos salir poco a poco y ahora he podido ya venir a la academia para trabajar con mis proyectos (no hay clases todavía pero mi cerebro aprecia bastante el hecho de poder cambiar de ambiente de trabajo para variar de nuevo).

El tema de ropa era muy diferente también porque en mi vida normal suelo salir temprano de mi casa, dejar la niña en el cole, ir a trabajar, recogerla, parque/actividades y normalmente llego a casa tarde. Eso significa que siempre tenía que llevar diferentes capas de ropa ya que el mes de mayo es un poco loco aquí en Madrid hablando del tiempo...hace fresco pro la mañana y normalmente hace muy buen tiempo (o directamente hace un calor que flipas en el final del mes) por la tarde, así que siempre voy con la mochila puesta para llevar todo lo necesario conmigo. Así Que desde luego esto era muy diferente este me...y la verdad que yo me alegro. Últimamente mis días estaban llenos de prisas, me sentía que nunca estaba en casa, que solo íbamos a dormir allí...hasta que la vida cambió muchísimo. Son contrastes muy grandes, lo sé, me encantaría simplemente que todo vaya un poco más lento, no vivir en un confinamiento obviamente pero lo dejo allí...en mi caso fue bueno poder parar un poco, en este sentido. Por supuesto ha sido un tiempo muy difícil en el mundo, no quiero quitarle importancia a ese hecho!

Así que no había que llevar varias capas pero tampoco entré en el mundo de solo llevar chándal/sudadera tampoco...si me has seguido durante este mes habrás visto que la ropa que llevo es super informal y realmente no es que tenga tanta ropa. Dicho eso, para mí es importante vestirse “normal” aunque no quiero/puedo salir de casa. Especialmente durante el confinamiento necesitaba mantener una rutina diaria saludable para poder seguir funcionando lo mejor que podía. Ya sé, estás en casa, quizás incluso pasas más tiempo en el sofá (o no, si tienes niños, jaja)...pero yo no podría vivir en pijama dos meses, para mí personalmente es deprimente. Llevando mi ropa normal, lo mismo que me pongo cuando voy a currar, me hace sentir que estoy preparada para currar en casa y realmente conseguir adelantar cosas (algo que ha sido “muy interesante” cuando lo juntas con las tareas de cole en casa). Así que sí, no digo nada si estás por casa en leggings, todo bien, pero para mi salud mental yo no podría hacerlo (todo normal no, jaja…).

Cómo afectó todo eso a Me Made May de este año para mí y cómo me sentí al participar en “el reto” este año? Pues ha sido más fácil por varias razones:

  • No tenía prisa por las mañanas, cosa que hacía más fácil el proceso de elegir la ropa que me ponía.

  • Como ha pasado otro año, tengo más ropa que he hecho para ponerme! Especialmente los jerseys como verás más abajo...estoy super orgullosa de mi colección de jerseys tejidos a mano, me los pongo un montón y me hacen muy feliz (y resulta que el mes de mayo sí que es un mes de jerseys así que yo me pongo jerseys de lana durante más de 6 meses al año, jaja).

  • Tenía más tiempo de sacar fotos y documentar el mes. Sí, esta parte es la peor, es mi quinto año y entiendo totalmente como no apetece sacarte más selfies después de la primera semana o así. Lo bueno de este año ha sido que tenía más tiempo para sacar las fotos que hizo todo el proceso más fácil.

  • Sabía que no iba a publicar una foto cada día en mi feed así que no me estresé por participar. Creo que mucha gente no ha entendido bien de qué va este evento en este sentido: el evento/reto no consiste en subir una foto de ti CADA DÍA. Lo puedes hacer si te apetece pero también lo puedes hacer solo un día, una semana o lo que sea que te venga bien. He leído comentarios como “ no participo este año porque no quiero/puedo subir fotos de mí todos los días” o “no tengo suficientes prendas hechas por mí para participar”. Pero si no va de esto el Me Made May! Para mí el sentido de todo esto es ver fotos de ropa que te inspiran a través de este hashtag, nadie va a contar cuántas fotos has subido! Has cosido una prenda, lo estás llevando un día y te apetece subirlo a tu cuenta? Pues hazlo! Allí está la magia de este evento en nuestra comunidad de costura...compartir lo que has hecho, una, dos o treinta veces. Si acabas de empezar a coser no es realista que tengas una prenda diferente para cada día del mes y eso está bien, no deberías comparar tu hobby con el hobby de la gente que lleva años, incluso décadas, haciéndolo! De todas maneras...perdonad por la chapa pero quería escribir sobre mi opinión. Creo que mucha gente “se quema después de la primera semana porque se ponen un nivel muy alto y esto no es una carrera para nada. Solo es una oportunidad para compartir cosas con tu comunidad e inspirarte. Me parece muy triste que por pensar que si no participas todos los días, no lo haces ningún día, y no vamos a ver tus prendas (o esa primera prenda) nunca!

Así que este año no me costó mucho. Pero en los últimos años parece que sí porque rebusqué en los archivos del blog y solo he hecho la recopilación una vez, en el 2016 que fue mi primer año, jaja. Así que vamos a ver qué ropa me ponía y qué patrones he usado.

www.studiocostura.com

First, the sweaters. May is a super weird month here in Madrid because it’s kind of nice already outside but it can be cold too and the houses are not warmed up yet but you don’t really want to pay for the heating anymore...so the first weeks are definitely still sweater friendly if you ask me, hehe. Again, as I stayed inside I could wear my sweaters just like that...if I knew I had to pick up my kid at school I would have probably changed into something less warm as once you go out at 4 o’clock in the afternoon it’s really warm. All my sweaters are up on Raverly if you want to see the details, I’ll be naming the patterns and designers separately here.

Primero los jerseys. El mes de mayo es super raro en Madrid porque hace bueno fuera pero puede hacer frío también (cuarenta de mayo) y las casas todavía se mantienen frescas pèro no quieres poner la calefacción...así que para mí las primeras semanas desde luego son de jerseys todavía. De nuevo, como estuve en casa me ponía mis jerseys, si hubiera tenido que salir a por mi hija al cole por la tarde no hubiera podido ir así porque hace más calor según qué hora. Todos mis jerseys están en Raverly si queréis ver los detalles, pongo aquí los nombres de los patrones y los diseñadores.

www.studiocostura.com

Stonecrop Pullover by Andrea Mowry // Aldous by Isabell Kraemer.

www.studiocostura.com

No Frills Sweater by Petite Knit // Balloon Cardigan by Petite Knit.

www.studiocostura.com

Pink Velvet by Andrea Mowry // My own invented pattern.

www.studiocostura.com

Long sleeve t-shirts: striped viscose French terry with a pattern from Ottobre Design and some weird blend French terry with the Mandy Boat Tee free pattern by Tessuti Patterns. I really like these two and I don’t wear them too much actually because there’s no time for mild weather here where I live, you’re either wearing a wool sweater or a t-shirt, haha. But….now that I actually made a cardigan (the Balloon Cardigan is a recent make) I figured these types of t-shirts can be layered under a wool cardigan and then I could wear them a lot more (I know, genius right, haha?). But I do always take them with me when I go to Estonia, they are perfect for the summer in the North. 

Camisetas de manga larga: viscosa de rayas tipo French terry con el patrón de Ottobre Design y una mezcla rara de tejido, también tipo French terry con el patrón gratis de Mandy Boat Tee, de Tessuti Patterns. Me encantan estas dos camisetas pero no me las pongo mucho porque no hay casi entretiempo donde vivo yo, o me pongo un jersey de lana o tirantes, jaja. Pero...ahora que he hecho mi primer cardigan (el Balloon Cardigan lo terminé hace poco) he visto que este tipo de camisetas van muy bien para poner debajo de los cardigans (ya sé, qué idea genial de mi parte, no, jaja). Pero eso sí, siempre las llevo a Estonia porque para el verano del norte van genial.

www.studiocostura.com

Short sleeves. First up one of my most worn garments ever, the Donna blouse by La Maison Victor. Pair it with a geometric viscose print and you’ve got me hooked. It’s a couple of years old and I wear it like once a week during the summer. The black viscose sleeveless top is from Ottobre Design and it’s  a great basic (should make it in every color).

Manga corta: Primero una de mis blusas que más me he puesto en todos los tiempos, la blusa Donna de La Maison Victor. Combinalo con un estampado geométrico de viscosa y me tienes ganada. Ya tiene un par de años y me lo pongo mínimo una vez a la semana en el verano. El top sin mangas en viscosa negra es de Ottobre Design y es un buen básico (que debería hacer cada color).

www.studiocostura.com

Not a good photo but a cute one of me and my kid on one of our first walks outside after two months! This wrap top is one of my favourites, I made it last summer out of a ribbed knit and I really like it (better photo here). Next up is another work horse from my summer wardrobe, the Ogden cami by True Bias in floral viscose print (+ now obligatory mask). I have four Ogdens and two Ogden dresses so I guess you can say that I like the pattern, haha. 

No es una foto muy buena pero me gusta mucho porque es del primer paseo que di con mi hija después de dos meses! Este top cruzado es uno de mis favoritos, lo hice el verano pasado con un punto de canalé y me encanta (aquí se ve mejor). Lo siguiente es uno de mis básicos de verano, el top Ogden de True Bias en viscosa floral (+ la mascarilla ahora obligatoria). Tengo cuatro Ogdens y dos vestidos con el mismo patrón así que se puede decir que me gusta bastante el patrón, jaja.

www.studiocostura.com

Another Donna blouse, another lovely viscose print. And the black woven t-shirt is made using a knit pattern, I wrote about the difference between knits and wovens in this post. Also wearing the Moss skirt by Grainline Studio in black stretch corduroy. This is the ONLY skirt that actually fits me in my wardrobe (my wardrobe is small, haha) and sadly the color has worn out a bit in the sun...but I’m still wearing it, you can’t see the color problem from far away, haha. I really need to make another because this style (sitting just below my natural waist) together with a slightly stretchy fabric is a life saver, it’s both comfortable and forgiving when you lose/gain (:D) a bit of weight.

Otra blusa Donna, otro estampado bonito de viscosa. Y la camiseta negra está hecha con una tela plana también pero el patrón es de tela de punto. Escribí sobre las diferencias de punto y tela plana en este post. También allí va la falda Moss de Grainline Studio en micropana elástica negra. Esta es la ÚNICA falda que me cabe en todo mi armario (que es pequeño, jaja) y por desgracia el color ya se está yendo un poco por el sol...pero yo me lo pongo igual, que de lejos no se ve el problema de color, jaja. Necesito hacerme otra porque este estilo (que se queda justo debajo de mi cintura) junto a la tela ligeramente elástica es un salvavidas, es igual de cómodo si pierdes/ganas (:D) un poco de peso.

 
www.studiocostura.com
 

And this t-shirt with viscose bananas, another basic Ottobre Design pattern. I made a matching one for my kid back when I sewed this one but she has already outgrown hers I think. But yeah, can’t leave a banana print at the fabric shop, am I right?

Y esta camiseta de punto de plátanos en viscosa, otra camiseta básica de Ottobre Design. Hice otra a juego a mi hija pero la suya ya le va pequeña creo. Pero sí, quién puede no llevar a casa un estampado de plátanos cuando lo ve en la tienda, verdad?

www.studiocostura.com

Jackets. Another department that wasn’t really shown during this month because I mainly went out during the day and I didn't need a jacket! But I did get two photos. This Nenuphar kimono style jacket by Deer and Doe Patterns is a really cute one. I made it in linen and the fabric really shows well the design elements like the cut out details on the collar and the pockets (I’ve also made it in viscose and loved the completely different flowy result).

Now there are two things with this jacket. First of all I really like how it looks because it gives me the Elizabeth Suzann vibe which I really like and the color and the shape are very pretty in my opinion (the fabric actually has tiny stripes in two neutral tones, it’s a real winner). Then again I love seeing linen on Instagram photos worn by other people but I can’t really fit it into my own wardrobe!!! Because it wrinkles like hell...maybe?! Because the shapes are too structured...something I love seeing on the photos but can’t really see on myself...maybe?!

Anyway, I like this jacket, but I don’t wear it a lot, apart from the linen thing I’ve mentioned, there’s the weather issue too. There are like two days in a year when I’d wear it here in Madrid, it’s either too cold or too hot. I think it is a good garment to have when you work in an office with lots of AC so you can throw it over a sleeveless garment while you’re sitting at your desk in summer. But in my reality where this is not happening (keeping that AC on the minimum to not waste energy over at the academy, read: to not waste money, haha)...so sadly I don’t wear this jacket a lot. I’m telling you all this just to mention that it’s something to think about before making a garment. It might look cute, you might make a great job at sewing it, the drape is right, the fabric is right...but is your life right for the garment, haha?! I wrote about this topic in these two posts about choosing fabrics, fabric composition and drape, if you’re into reading more about how to make good choices fabric and lifestyle wise.

The only real outerwear piece that made its way to Me Made May is my softshell jacket, the Serra jacket by Pauline Alice. I wear it a lot during fall and spring, you can read more about it in this post. I actually hoped to finish and photograph another jacket during this month but I didn’t make it happen (probably because I wasn’t wearing any jackets…), this improvised canvas jacket only needs buttonholes!!!

Chaquetas. Otra “sección” que no salió mucho durante este mes porque como solo salía de día no solía ponerme chaquetas. Pero saqué dos fotos. Esta chaqueta tipo kimono es el Nenuphar de Deer and Doe Patterns y me gusta mucho. Lo hice en lino y esta tela realmente resalta bien los detalles del diseño como los cortes triangulares en la solapa y en los bolsillos (también lo tengo en viscosa y queda muy diferente con una tela que tiene mucha caída).

Pasan dos cosas con esta chaqueta. Primero me gusta mucho cómo queda porque me recuerda a Elizabeth Suzann y el color y la forma son muy bonitos en mi opinión (la tela hasta tiene unas mini rayas en dos colores complementarias, es ideal!). Me encanta ver prendas de lino en las fotos de otra gente en Instagram pero no consigo adaptarlo a mi armario!!!Quizás porque se arruga mucho? Puede ser… Porque tiene una forma muy definida...algoq ue me encanta en las fotos pero cuando me la pongo simplemente “no me veo” con ella?

O sea me gusta mucho la chaqueta pero la verdad es que no me lo pongo mucho, está allí el tema de lino pero también cuestión de tiempo. De nuevo, en Madrid hay como dos días al año cuando me lo puedo poner, luego o hace demasiado frío o demasiado calor. Creo que podría molar mucho si trabajas en el verano en una oficina con mucho aire acondicionado y te lo pones encima de un top y así vas bien. Pero en mi vida eso ahora mismo no está pasando (en la academia está el aire bajito para no gastar energía...bueno y el dinero, jaja)...así que al final no me la pongo mucho. Os cuento todo eso porque quiero decir que es importante pensar en cosas así antes de hacerte una prenda. Puede que sea bonito, lo hayas cosido bien, la caída va bien, es la tela correcta...pero va bien con tu vida, jaja? He escrito sobre este tema en los dos posts sobre cómo elegir telas, composición de tela y la caída, si os interesa leer más sobre cómo elegir bien las telas que también vayan acorde con tu vida diaria.

La única chaqueta de primavera que sale en mis fotos de Me MAde May es esta chaqueta de softshell, la Serra de Pauline Alice. Me lo pongo mucho en la primavera y en el otoño, puedes leer más sobre ella en este post. Quería también terminar y fotografiar otra chaqueta este mes pero no lo conseguí (probablemente porque ya hace calor…), esta chaqueta de lona con el patrón improvisado necesita solo los ojales!!!

www.studiocostura.com

Dresses. I don’t have many dresses in my wardrobe...I have made quite a lot of dresses but none of them fit me anymore, haha. But I made two Ogden cami dresses (pattern by True Bias) last summer and I was living in them so I think I’m getting back to the dresses again! I love how this shape is perfect for hot summers around here, it feels like nothing on. Basically it’s the top but shorter (mine measures about 20 cm from the V neck on the front if I remember correctly) with a gathered rectangle for the skirt (the width of the rectangle is the width of the fabric, I found that this is the exact amount of volume I like for the skirts). Both versions are made in viscose.

Vestidos. No tengo muchos vestidos en mi armario...he hecho bastantes vestidos pero ninguno me queda bien ya, jaja. Pero el verano pasado hice dos vestidos de Ogden cami (patrón de True Bias) y vivía en ellos así qeu creo que estoy volviendo a los vestidos! Me gusta mucho su forma, es perfecto para los veranos calurosos de aquí, es como llevar nada. Básicamente es como el top pero más corto (si no recuerdo mal, mide 20 cm desde el pico de escote en el delantero) con un rectángulo fruncido para la falda (el ancho de tela es el ancho de rectángulo, es justo la cantidad de vuelo que necesito para mi gusto). Las dos versiones están hechas con viscosas.

www.studiocostura.com

And my latest make here and also the only thing I’ve sewn for myself during the last months!), which actually is not finished yet, haha, is the Jessica dress by Mimi G. I had been seeing this dress around the web and a couple of students from the academy had been sewing them too so I gave in and made myself one. I was a bit concerned that the gathers exactly on my waistline wouldn’t be something I like but the result is cute! Again I used the width of the fabric for the width of the skirt and this is the amount I feel comfortable with. I really love this floral viscose print!

For the last dress make here’s the Roberts Collection dungaree dress by Marilla Walker. I can’t believe I haven’t worn this dress already this season, it’s 100% me style wise. Well, actually I know why I didn’t, I was too lazy to iron it, haha. The fabric I used is a super soft tencel twill and I love this fabric as it has nice drape but it also has a nice body which means you can make patterns with straight lines like this one beautifully.

Y aquí mi más reciente costura (y también lo único que he cosido para mí en los últimos meses!), que realmente no está terminado todavía, jaja, el vestido Jessica de Mimi G. Había visto este vestido en las redes y un par de chicas de la academia también lo habían cosido así que decidí también hacerme uno. Estaba un poco indecisa ya que nos uelo llevar frunces justo en la cintura pero el resultado ha quedado guay! De nuevo usé el ancho de tela para el rectángulo de la falda, así se crea la cantidad de frunce que me gusta a mí. Me encanta este estampado floral!

Para lo último aquí está el vestido peto de Roberts Collection, patrón de Marilla Walker. Me cuesta creer que es la primera vez que me lo pongo en este mes porque es 100% mi estilo. Bueno, realmente sé por qué...que me daba pereza planchar la falda, jaja. La tela que usé es una sarga de tencel super suave y me encanta esa tela ya que tiene una caída muy buena pero también tiene cuerpo así que va bien para líneas rectas como en este patrón.

www.studiocostura.com

Loungewear and lingerie. It’s kind of weird that lingerie didn’t pop up on my feed more as I am sewing a lot of it as you can imagine but there’s the modelling question of course, haha. Also there’s something weird for me about showing my underwear out in public in daily basis, don’t ask, haha. I did wear my Suki robe by Helen’s Closet every day, it’s such a nice piece and I’m so glad I have it in my wardrobe (you can read about this make in this post). Underneath I’m also wearing my summer lux PJs: a silk Ogden cami and silk PJ shorts (long story, I don’t usually wear fancy silk PJs but this is a happy exception, haha)!

I only posted one lingerie pic as I accidentally took a shot of this set the day I put it on, it’s a self drafted foam cup bra with no underiwires (a pattern I’ll try to publish soonish...I really want to make a bra specifically for small cup sizes) and Stella panties with a lace hack (this tutorial is available in my e-book about sewing panties, get it for free when you subscribe to my newsletter). I didn’t post any other lingerie makes but you can be sure I was wearing something memade every day obviously, haha.

Ropa de estar por casa y lencería. Es un poco raro quizás que lencería no ha salido más en mis fotos ya que coso mucho de eso pero claro, quién iba a ser la modelo, jaja. También me parece algo raro enseñar las bragas que me pongo a diario, jaja. La bata Suki de Helen’s Closet me lo he puesto todos los días, es una prenda muy guay y estoy feliz por poder tenerlo en mi armario (puedes leer más sobre ella en este post). Debajo también llevo mi pijama de verano de seda, puro lujo: Ogden cami de seda junto a un pantalón corto en la misma tela (una historia larga, normalmente no tengo pijamas de seda pero es una excepción muy buena, jaja).

Solo subí una foto de lencería ya que por casualidad le saqué la foto un día antes de vestirme, es el sujetador con un patrón propio, sin aros pero con foam ( un patrón que me gustaría publicar en el futuro, especialmente pensado para copas pequeñas) y las braguitas Stella con la modificación de encaje (el tutorial viene en el libro electrónico sobre coser braguitas que es gratis si te apuntas a mi newsletter). No subí más fotos de lencería pero algo de lo mío me lo llevo todos los días, jaja.


And that’s it for this years Me Made May for me. As I mentioned earlier, it was easier this year so I might be motivated for documenting for the next year too, haha. I definitely had a lot of fun seeing other peoples makes and they have been very inspiring. I already wrote a post about seamstresses who inspire me with their projects this spring but I’ll add some more photos here specifically about Me Made May so you can take a look too!

In case you haven’t seen I’m running a sale during this weekend over at Studio Costura Shop so if you’ve been inspired to make yourself some lingerie you can check my patterns out!

Y ya está para este año de Me Made May para mí. Como dije antes, este año ha sido más fácil así que igual me animo documentarlo bien el año que viene también, jaja. Me encantó ver lo que subía otra gente, me he inspirado mucho al ver sus prendas. Ya escribí hace poco el post sobre las costureras que me inspiran esta primavera pero voy a añadir por aquí también más fotos específicamente de Me Made May que podéis ver!

Si no lo habéis visto todavía, en Studio Costura Shop tenemos ahora el descuento en todos los patrones por si os habéis inspirado para coser algo de lencería!


2019 en costuras // 2019 in sewing

 
2019.jpg

Hoy, en el último día de 2019 quería hacer una recopilación de mi año costuril y poner aquí los proyectos que he cosido durante el año. Como de costumbre lo he dejado para el último momento así que no voy poder escribir mucho sobre los proyectos sino termino el año detrás del ordenador. Y si me conocéis este no va a ser el sitio donde quiero estar esta noche….mucho mejor si puede ser en el sofá haciendo punto, jaja. Así que vamos con los proyectos:

Today, on the last day of 2019 I’d like to recap here all my sewing this year. As always I’ve left it for the last minute so I’ll just name the patterns and get over with it, haha, otherways I’ll be here in front of the computer until the end of the year. And if you know me you should know that this is NOT a place I’d like to be tonight…instead I want to be on the sofa knitting, haha. So let’s go with the projects:

Para mí // for me

IMG_20190218_165849_991.jpg

Tamarack jacket, pattern by Grainline Studio

DSC_0282.jpg

Burda Style coat in boiled wool, blogged here.

IMG_20190212_204134_794.jpg

Viscose button up shirt, pattern from Ottobre Design.

IMG_20190317_193839_872.jpg

Viscose French terry knit t-shirt, pattern from Ottobre Design.

IMG_20190430_164736_635.jpg

Odgen cami, pattern by True Bias.

IMG_20190411_194742_849.jpg

Tencel chino pants, pattern from Ottobre Design, cotton twill pants, pattern Ginger Jeans by Closet Case Patterns.

20190612_161138-01-01.jpeg

Cotton knit dress, pattern by Le Maison Victor, blogged here.

IMG_20190617_161318_173.jpg

Dawn jeans by Megan Nielsen Patterns and viscose blouse by La Maison Victor, blogged here.

IMG_20190708_181915_336.jpg

Ogden cami dress, pattern by True Bias (there’s another one, basically lived the whole summe rin these two!).

DSCF7479-01.jpeg

Cottesloe swimsuit by Megan Nielsen Patterns.

www.studiocostura.com

Viscose knit t-shirt, pattern from Ottobre Design.

www.studiocostura.com

Self drafted rib knit wrap top.

IMG_20190909_194117_555.jpg

Softshell Serra jacket, pattern by Pauline Alice Patterns, blogged here.

www.studiocostura.com

Viscose knit dress, self drafted.

IMG_20190928_175851_711.jpg

Linen Claudia dress, pattern by Tessuti Fabrics.

www.studiocostura.com

(Still needs buttons) self drafted work jacket in cotton canvas.

www.studiocostura.com

Boiled wool Berlin jacket, pattern by Tessuti Fabrics (I did take this one apart later on and I’m almost done putting the lining in for it).

www.studiocostura.com

Indigo dress in viscose twill, pattern by Tilly and the Buttons.

Para Lia // for lia

www.studiocostura.com

All patterns from Ottobre Design (and there are matching PJ pants for me too with the same fabric).

www.studiocostura.com

Cutom printed fabric + waterproof lining, self drafted snack bags.

www.studiocostura.com

A gym bag for judo, self drafted.

www.studiocostura.com

Some fabric bins for the academy, craft bag in colaboration with Donna Telas.

IMG_20190319_201118_795.jpg

Pincushion for the academy, pattern by Noodlehead.

www.studiocostura.com

Backpack for my sister, self drafted pattern.

www.studiocostura.com

Backpack for a little friend, self drafted pattern.

Acolchados // Quilting

Este año por fin probé quilting y me ha encantado. Espero poder seguir con más proyectos en el 2020. Hasta ahora hice un par de colchas para bebés, todas iban para regalos, pero tengo planeado una grande para mi cama!

This year I finally started to learn quilting and I’m loving it. I hope I will continue making more quilted projects during 2020. Until now it has been mostly baby quilts, all gifted, but a big bed quilt for me is definitely in my plans!

www.studiocostura.com

Pillow inspired by Modular Bocks Quilt by Purl Soho.

www.studiocostura.com

Baby blanket, pattern Little Peaks Quilt by Purl Soho.

www.studiocostura.com

Craft pouch, my own pattern (you can use the free zipper pouch pattern available here).

www.studiocostura.com

Baby quilt, pattern Modular Blocks Quilt by Purl Soho.

www.studiocostura.com

Wall hanging for Lia, my own pattern.

www.studiocostura.com

Yuba Crib Quilt, pattern by Vacilando Quilting.

muestras de lencería // Lingerie samples

Este año he publicado tres patrones de lencería: el bralette Mara y las braguitas tipo bikini Vera y tipo tanga Lili. Aquí se ven algunas muestras y ejemplares cosidos para los coseconmigos. También han sido un par de encargos, muestras de los materiales de la tienda y muestras para las actualizaciones de los patrones.

This year I’ve published three lingerie sewing patterns: Mara bralette, Vera bikini cut panties and Lili thong cut panties. Here you can see some samples of the patterns and other pairs made for sewalong posts. There have been some custom orders and shop samples + renewing the existing patterns so I’ve been making new samples.

tejer // knitting

Algo que empecé en el final del año pasado y nunca llegué a publicar por aquí: todo el punto que ha conquistado mi vida, jaja. Desde que empecé no he parado y ya llevo bastantes cositas hechas. Para los detalles puedes ver mi página de Raverly. Aquí están las cosas que he tejido desde el noviembre 2018, algunas los he vuelto a tejer, algunos me los pongo todos los días y algunos están todavía a medias :)

Soemthing I started in teh end of 2018 but I never published here: how knitting has taken over my free time, hehe. Since I started I haven’t really stopped so there are quite many things I’ve finished during the past year :). To read about the details you can visit my Raverly page. Here are the things I’ve finished since November 2018: some I’ve unraveled to knit them again, some of them are worn on repeat and soma are still works in progress!

Así ha sido mi año en “labores”. La verdad es que estaba posponiendo este post un poco ya que en las últimas semanas no me he sentido muy motivada, aparte de que si hay que hacer algo con alguna fecha concreta siempre consigo dejarlo al último momento. Quizás ha sido el fin de un año intenso y ya necesitaba desconectarme de mi día a día para poder recuperar la energía necesaria para seguir.

Este año ha tenido de todo para mí…muchas cosas muy grandes de los cuales lo más grande seguramente ha sido poder trabajar con un proyecto tan inspirador como es la academia Historias Hiladas Madrid. Este año 2019 ha sido cuando más he trabajado en mi vida, cuando más horas he estado enseñado y cuando más me he reído en compañía de nuestras alumnas. Me paso más horas en este sitio que en mi propia casa y estoy feliz de poder trabajar en algo que me llena profundamente.

Mi propia marca de patrones ha crecido y las nuevas publicaciones de patrones han gustado, tengo más ideas para el año que viene y he podido compartir mi trabajo con muchas personas tanto en mis clases como viendo lo que hacéis en vuestras casas a través de redes como Instagram. Cada vez que veo que alguien ha cosido algo con algún patrón de Studio Costura Patterns me da una alegría muy grande.

Pero no todo en la vida es como lo que vemos en Instagram (bueno, y menos mal también!), hay muchas cosas que nos pasan, cosas que compartimos entre gente cercana…no soy muy de compartirlo todo en redes sociales, jaja. Empezar el proyecto de academia ha sido muy duro económicamente y me ha hecho cuestionar toda mi trayectoria laboral porque llevo ya varios años viviendo de costura, poco a poco haciendo crecer mi proyecto, y este año 2019 es el que más me ha costado con diferencia. Piensas que ya has llegado a una cierta estabilidad, aunque sea muy poca, y entonces tomas unas decisiones y le das la vuelta a todo, vuelves a empezar y apuestas por una oportunidad que puede salir bien o puede superarte, todavía no lo sabes pero mientras tanto hay que vivir y hay que comer. Hubo momentos durante este año cuando tenía muy muy claro que no cambiaría todo esto por nada en el mundo…también hubo momentos cuando lo único que quería hacer era coger mis cuatro cosas e huir o inventar una máquina de tiempo para volver a aquel entonces cuando tenía 18 años y hacer otro tipo de elecciones para no estar en una situación de incertidumbre como lo de ahora.

En fin…cuando me puse hacer este post hoy, sin muchas ganas la verdad, me di cuenta al pasar por todas las fotos del 2019 que he hecho muchas cosas. Aunque las últimas semanas me han hecho sentir un poco de bajón y por eso tampoco he visto mucho progreso en mi trabajo (cosa que automáticamente me hace sentir que no hay progreso NUNCA, lógico, no??), hoy he vuelto a ver lo importante que es mirar el plano grande y no quedarte todo el rato en los detalles de día a día. Porque hay días mejores y luego hay días no tan buenos…pero creo que en general vamos bien si hacemos balance, supongo que la palabra que resume este año ha sido “extremos”. Así que aquí lo dejo y espero que 2020 traiga más costura, más punto y no me importaría un poco más de estabilidad, jaja. Gracias por estar aquí! Espero que vuestro año también ha sido lleno de cosas buenas que recordar (y que por lo menos las cosas buenas han superado las cosas no tan buenas!), nos vemos en el 2020!!!


So this has been my “craft year”. I was postponing this post as I haven’t been very motivated during the past weeks…and of course I’m an expert in doing things once there’s literally no more time left. Maybe it has been the end of a very intense year and I needed a break to recharge in order to continue.

This year has had lots of big things for me and certainly the biggest has been the opportunity to work in the sewing academy Historias Hiladas Madrid. 2019 has been the year when I’ve worked the most in my whole life, I’ve never been teaching more hours and I’ve never laughed so much as I did in these classes. I litearlly spend more time there than in my own house, I feel very lucky to be able to work on something that really fills up my soul.

My own pattern line has been growing and people have been liking the new patterns. I have lots of plans for the coming year and I’ve been able to share my work with many students and it hs been wonderful to see people sewing with my patterns through social media like Instagram. Every time I see someone who has chosen Studio Costura Patterns I feel very proud!

But not everything in life is like we see it on Instagram (and that really is a good thing!), there are many things we only share with the closest to us. I don’t really feel comfortable with sharing all of those moments on social media, hehe. This year with starting the academy project has been financially so difficult. I’ve been questioning my whole professional career (this sounds more professional than it is actually, haha)…I’ve been working full time with sewing for the past years, little by little growing my project, and this 2019 has been the most difficult year so far to be honest. You think you’ve made it into some kind of stability, even if it’s just a little bit, you then make some decisions and turn things over, start again and you don’t know if it will be OK or it will be too hard…and you still have to live and you still have to eat while you figure all that out. There were moments during this year when I knew I wouldn’t change my life for anything…and there were moments where I really wanted to run away or invent a time machine to go back to when I was 18 so I would have made other decisions and I wouldn’t be in this unstable postion right now.

So…when I started to pass through all the photos from 2019 to write this post today I saw that I actually have made quite some stuff happen. Altough I’ve been feeling a bit low during these past weeks and I have felt that I haven’t progressed on my work (which obviously means that I feel that I NEVER make any progress, haha), writing this post has made me remember to look at the big picture again. Because it’s so easy to get stuck in a day and forget that it’s all way bigger than today and it’s all way bigger than todays feelings. Because when I see the balance I see that we’re pretty good…it’s just that the word for this 2019 has been “extremes” for me. So for the 2020 I hope there will be more sewing, more knitting and let’s just say I hope there will be more stability :) Thanks for reading! I hope your year has been full of nice things to remember (or at least I hope that these nice things will be more memorable than those not so nice things)! See you over here in 2020!

www.studiocostura.com
 

Chaquetas de softshell // Softshell jackets

 
www.studiocostura.com

Justo para cuando ha llegado el otoño…o bueno, de hecho para hoy ya parece que ha llegado el invierno, jaja…he terminado la chaqueta de softshell para mi niña. Además no he publicado aquí las fotos de mi chaqueta, también de softshell, que hice este verano así que aprovecho ya ya escribo sobre los dos.

Just in time for fall…or well, today it seems like for the winter, hehe…I finished the softshell jacket for my daughter. I also haven’t posted the photos of my own softshell jacket I made in August so here goes a post about both.

www.studiocostura.com

Para empezar: el primero que hice, mi chaqueta de softshell. Por una parte hace tiempo que quería hacerme una chaqueta con este tejido ya que no tenía en mi armario un modelo así más deportivo pero al mismo tiempo calentito para el entretiempo (después de hacer esta chaqueta para Lia que me encantó!). Por otra parte cuando Pauline Alice publicó su patrón Serra Jacket sabía que quería hacerlo sí o sí. Pauline fue tan generosa y nos mandó varios patrones en formato papel a la academia cuando tuvimos la inauguración y me mandó también a mí este patrón, así que estaba de suerte para completar el proyecto. Al principio pensaba usar otro tipo de tela para este patrón, algo más como tipo "plástico” en el sentido que fuera como cortavientos ligero…o quizás algodón encerado para un poco más de forma. Pero este verano en Estonia encontré este softshell que tiene un estampado muy bonito…un poco con aires africanos pero aún así geométrico, de colores pero los colores justos, demasiado llamativo para mi estilo pero aún así lo elegí, jaja.

First off: the first one I finished, my softshell jacket. I wanted to make myself a jacket with softshell fabric for some time already, a sporty style with warm lining like this was missing from my closet (and after making this jacket for Lia I knew I wanted to make one for myself!). So when Pauline Alice published the Serra jacket pattern I knew I wanted to make one for sure. Pauline was so generous when she sent us paper copies of her patterns for the sewing academy opening event, she even specifically sent me the Serra pattern so I was prepared to make this project happen. At first I was thinking about using another type of fabric for this jacket, something more like a “plastic” for a windbreaker look…or maybe a waxed canvas for a sturdier look. But this summer in Estonia I found this pretty softshell print…it has a bit of African vibes while still being geometric, it’s slightly colorful but just enough for me, probably it’s too “wild” for my neutral closet but I bought it anyway, haha.

www.studiocostura.com

Este patrón en la versión 3 realmente está hecho con forro y pensado más para telas algo más ligeras que softshell diría yo, o por lo menos si esperas el resultado como en las fotos del patrón. Pero se puede hacer con softshell perfectamente y yo estoy muy contenta con el resultado. De los cambios que hice voy a intentar recordar qué eran exactamente porque lo cosí en agosto y como no apunté nada…así vamos, jeje. Lo primero que no corté el forro porque softshell ya es una tela con dos capas (está como directamente forrada con un polar finito). El bajo lo hice un poco con forma aunque se ve muy poco, lo dejé un pelín más largo en la espalda. Las mangas creo que las hice algo más largas porque eso lo hago siempre y usé el puño de punto para rematarlas de la forma que no entre frío allí.

Version 3 of this pattern is drafted with a lining in mind and I’d say that you should use drapier fabrics in order to make a jacket like the one shown on the photos that illustrate the pattern. But you can use softshell and I’m very happy with how this jacket came out. I will try to remember the modifications I made to the pattern but as I sewed it back in August I won’t remember everyting, hehe. I didn’t cut the lining pieces as softshell is lined (there’s the interior light fleece lining directly attatched to the fabric). I left the hemline slightly longer on the back, you can barely see it actually. I probably lenghtened the sleeves as this is what I always do and I used knit ribbing for the cuffs to make the sleeves extra warm.

www.studiocostura.com

En la capucha en vez de la vista le puse bies que me sirvió también de “tunel” para poner el cordón elástico. No tenía las partes metálicas que suelen llevar este tipo de prendas para los cordones así que hice ojales a máquina, dos en un lado de la capucha y dos en el otro lado.

Instead of using facings for the hood I used a bias tape which also worked well for the “tunnel” I needed to create in order to instert the elastic cord. I didn’t have the metallic parts that these type of jackets usually have to insert the cords so I just made buttonholes instead, two on one side of the hood and two on the other side.

www.studiocostura.com

Lo mismo con el bajo, en el dobladillo del bajo puse el cordón elástico para poder ajustar el bajo en el caso de querer hacerlo e hice ojales también en la parte de los costados para sacar el cordón. Por una coincidencia encontré la cremallera del color que quería, de marca Barbour (será resto de stock), así que confiamos que sea de una calidad muy alta, jaja. También está el pequeño detalle de etiqueta esta vez, el patrón de Pauline venía con esta etiqueta que cosí en la parte del cuello.

Estoy muy contenta con esta chaqueta porque soy muy friolera así que con la chaqueta + un jersey fino abajo he estado muy a gusto en estos días de “entretiempo”…que ya sé, que son dos días en Madrid. Para mí no es algo que me voy a poner en el invierno pero quizás para la gente que tiene menos frío vale incluso para el invierno con un jersey bueno debajo.

The same thing with the hemline: I made buttonholes close to the side seams to insert the elastic cord, this way I can adjust the fit of the hem. By a coincidence I found a matching color Barbour zipper (probably dead stock from manufacturing), hopefully it has the best quality, hehe. There’s also this little label detail, Pauline had sent this label with her sewing pattern.

I’m very happy with the jacket as I feel cold all the time so I’ve been using it with a light pullover underneith and it has been perfect for this fall…which unfortunately lasts only a couple of days here in Madrid, haha. I wouldn’t use this jacket in the winter but someone who isn’t that afraid of cold could get away with using it with a good pullover underneith.

www.studiocostura.com

De talla elegí la S según mi medida de pecho, yo normalmente soy más bien un M o un 40 de talla. Y el modelo a mí me va muy bien, tiene el ancho exacto que quería en este tipo de chaqueta. La única cosa que no me convence 100% en la capucha…es muy grande y me tapa los ojos cuando me lo pongo! Y mira que yo soy muy pro capuchas grandes y lo veía genial cuando lo corté…pero me resulta un poco grande, tengo que ajustar bien los cordones y apretarlo contra la cabeza para ver algo, jaja.

Más sobre chaquetas: ahora estoy terminando la chaqueta de “lona” tipo work jacket, me faltan los botones (se ve en la foto de abajo) y también voy a hacer el Berlin jacket con lana hervida…este otoño es de chaquetas para mí, a ver si termino todas para tenerlo ya hecho para el año que viene, jeje. Aunque hay que decir que las chaquetas tienen algo para mí que siempre me llaman, por ejemplo me encantaría hacer este cortavientos en algodón encerado y este nuevo patrón reversible de Pauline Alice me está llamando también muchísimo!

I chose the size S according to my bust measurement, I’m normally an M or 40. The sizing is perfect for me, it’s exactly as loose as I need it to be and as I’ve used the elastic cords on the hem I can also asjust the fit. The only thing I’m not so happy about is the hood…it’s very big and when I wear it, it covers my eyes! And I’m definitely team big hoods and I really liked the idea when I was cutting out the pieces…but it’s definitely too big for me, I have to adjust the elastics to get it to “sit” on my head in order to see where I walk, haha.

More about jackets: at the moment I’m finishing a canvas jacket, only the buttons left, and I’ll also sew a Berlin jacket with a boiled wool I have in my stash…this fall is defintely about jackets for me, hopefully I’ll finish all of them and this way I’ll have everything ready for the next year, hehe. But I have to admit that there’s something about jackets that always makes me want to sew them, for example I’d like to make this windbreaker in waxed canvas and this new reversible jacket pattern from Pauline Alice looks just beautiful!

www.studiocostura.com

Por otra parte entonces la chaqueta de Lia. En la primavera pasada se puso las últimas veces esta chaqueta de softshell que era monísimo pero ya le quedó pequeño! Así que yo ya tenía una tela comprada para hacerle la siguiente talla pero resulta que una de mis alumnas, Elena, había cortado una para su hijo y no le valía de talla así que me dio el cuerpo unido y la tela para que lo termine…medio trabajo hecho! Ella había usado el patrón de sudadera del Ottobre Design 4/2018 pero al no darle suficiente margen extra no le valía a su hijo. Yo normalmente prefiero usar patrones específicos de chaquetas para hacerlos con softshell pero podéis usar también patrones de sudaderas…lo que pasa es que estos patrones son para telas de punto (normalmente elásticas) y no tienen tanto desahogo así que puede que el resultado es una prenda demasiada pequeña para usarlo como chaqueta (donde normalmente quieres poner algo de manga larga debajo también), me pasó con esta primera chaqueta de softshell que le quedó pequeño muy rápido. Así que nada, esta chaqueta lo rescaté yo para Lia. La tela es de Cal Joan y me gusta mucho el estampado…para hacerlo un pelín más alegre le añadí los detalles en amarillo mostaza ya que tenía puño de este color.

And about Lias jacket. She wore her other softshell jacket for the last time this past spring, it was so cute but she grew out of it! So I already had another fabric prepared for this project when one of my students, Elena, made a jacket for her son and when trying the bodice pieces on she saw that it was too small for him. So she gave me the sewn body and sleeves + the fabric to finish the jacket. She used the hoodie pattern from Ottobre Design 4/2018 but she didn’t add enough ease and it was too small for her son. I usually try to use speficic jacket patterns when working with softshell but you can also use hoodie patterns…the thing is that these patterns are made for knit fabrics (usually with spandex) and you need to add ease or go up at least 1-2 sizes, otherwise the result is a garment that will be too close fitted to wear it over other long sleeved garments (like a jacket), it happened to me with this first softshell jacket I made, she grew out of it so fast!

So I rescued this jacket for Lia. The fabric is from Cal Joan and I really like the print…to make it a bit brighter I used the details in mustard yellow as I had a rib knit for the cuffs in this color.

www.studiocostura.com

Esta chaqueta está terminado de la manera muy similar como la mía. No le puse el cordón elástico en el bajo ya que no creo que lo use y en la capucha usé un cordón normal porque en Pontejos no había uno elástico en este color. Debajo de la cremallera igual que en mi chaqueta lleva una tapeta extra que es simplemente tela doble a la medida de la cremallera, con los dos extremos cortos previamente cosidos entre sí. Todas las costuras están abiertas y les hice pespunte encima en los dos lados desde el derecho para que se queden más planos y la única costura tapada es la de unión de cuello con la capucha donde usé cinta de bies y de paso también hice una tira para poder colgar la chaqueta. Esta vez no usé bies en la parte de la capucha donde puse el cordón porque no tenía suficiente bies así que corté vistas del mismo softshell y allí es donde metí el cordón.

This jacket is made in a way that is very similar to my other jacket. I didn’t use the elastic cord on the hem as I thought I won’t use it anyway. The hood is adjusted with a normal cord, not an elastic cord as there wasn’t a suitable color available here. Like on my jacket, the zipper has a placket sewn under using a double layer of the fabric (with the short ends prviously sewn together). All the seams are openend up and topstitched on both sides from the right side of the garment. The only seam that is covered with bias tape is the union of the neck and the hood, I also used a strip of bias to make a loop for easy hanging.. This time I didn’t use bias tape for the hood “tunnel” as I didn’t have enough tape, I instead cut the facings according to the hood pattern pieces and put the cord inside there.

www.studiocostura.com

Ha quedado super mono y de talla perfecta, espero que puede ponerlo por lo menos durante este año escolar y con suerte tiramos hasta el otoño que viene, jeje.

The result si super cute and the size is perfect, I hope she can wear it at least during this school year and hopefull also next fall if I’m lucky, hehe.

www.studiocostura.com

Esta niña se me está haciendo super grande ya…esta semana cumple 5 años!!!

This girl is getting so big already…it’s her 5th birthday this week!!!

www.studiocostura.com

Quería aprovechar que las dos llevamos nuestras chaquetas para hacer una foto las dos juntas pero entre todas las fotos no hay ni una donde las dos salimos con una sonrisa y ojos abiertos a la vez, jaja. Así que aquí va una con Lia muy bonita y yo con cara de “ pero qué estás haciendo loca?”.

I wanted to get some photos of both of us wearing our jackets together this weekend but there were none that would feature both of us either smiling or with eyes open at the same time, haha. So here goes one with Lias pretty face and my “what are you doing you crazy kid?”expression.

www.studiocostura.com

Ah y para terminar ya el post voy a aprovechar y subo esta foto del jersey que también terminé este finde para Lia…hecho con alpaca y mucho amor, los detalles están en mi página de Raverly :)

Oh and to wrap this post up I’ll also show you this sweater I made for Lia and finsihed this weekend…made with alpaca and lots of love, you can find the details on my Raverly page :)


Telas de punto, telas planas - se puede usar un mismo patrón?

 
www.studiocostura.com

Hola, hola. Hoy vengo con un post y dos prendas…de un mismo patrón. En al academia tenemos la suerte de que Wendy de CoserCosas nos manda la revista La Maison Victor, así que estamos al día con los últimos modelos de esta revista. Si todavía no la conoces, es una revista francesa que tiene un estilo muy bonito y moderno, suele tener patrones de mujer, hombre y niño y normalmente aparte de costura tiene siempre también algo de punto u otras manualidades. Yo llevo comprando esta revista desde hace tiempo y he hecho varias prendas con sus patrones (entre ellas como cinco blusas Donna que nunca he llegado a subir al blog, jaja), me gusta el estilo de ropa que tiene y las instrucciones tienen dibujos paso a paso que están muy bien para principiantes (nada que ver con las típicas revistas que solo tienen texto descriptivo). En España no lo venden en los kioscos pero en CoserCosas lo tenéis siempre disponible y allí es donde lo suelo comprar yo.

Entonces, con que Wendy ahora nos manda la revista para tenerlo en la academia habíamos quedado que nosotras a cambio hacemos algo de la revista para enseñaros....buena excusa para coserme algo a mí misma, jeje. En el número de mayo/junio 2019 había varias cosas que me llamaron la atención pero este vestido de punto era lo que más me gustaba.

Hace poco me fui a las tiendas en busca de algún vestido que me guste...con la intención de probar diferentes cortes y así saber qué coser y qué tipo de patrón buscar. Es una “técnica” que suelo usar bastante para saber qué corte elegir ya que me cuesta a veces entender antes de coser la prenda si realmente a mí me quedaría bien o no (veo fotos de prendas que quedan de maravilla a otras personas pero no sé si me veo realmente yo en ellas). Así que voy a las tiendas, pruebo de todo independiente de los precios y estampados, realmente solo me concentro en cortes y caídas...para elegir la tela y el patrón. La última vez probé un par de vestidos así, tipo camiseta larga y me gustaron bastante así que me pareció buena idea probar el mismo patrón de la revista.

www.studiocostura.com

Lo que me gusta de este patrón es que tiene un cuello bastante cerrado y buen largo de mangas, últimamente me atrae este tipo de silueta, así que perfecto. Sabía que un vestido largo no me lo voy a poner así que acorté el patrón hasta llegar un poco encima de la rodilla y le di un poco de forma en curva en los costados. La idea de hacerlo azul marino como en la revista me gustó así que busqué una tela de punto de algodón en el mismo color. Realmente estaba entre coger un punto de algodón o un punto de viscosa (las dos son naturales y traspiran bien) pero opté por el algodón porque es algo más rígido y para acentuar las líneas rectas del patrón me pareció buena idea. Si haces este patrón con punto de viscosa quedaría bien también pero será algo con más caída y resultado varia un poco. Aquí podéis ver que hasta ahora lo que llevamos de buen tiempo no he salido mucho al sol o si eso he llevado un pantalón porque este tono azul blanco de mis piernas no hay que un filtro lo arregle, jaja.

www.studiocostura.com

Después de coser el vestido en punto pensaba probar lo mismo en tela plana para la versión de camiseta. Si ya coséis con los dos tipos de telas probablemente sabéis que normalmente las telas planas tienen un tipo de patrones y las telas de punto tienen otros distintos. Pero qué diferencia tienen realmente? Pues la base del cuerpo es lo mismo, lo que pasa es que telas planas tienen una base de cuerpo con pinzas de pecho y entalle (si es un modelo ajustado) para adaptarse a las curvas del cuerpo. En patrones de telas de punto por norma general no hay pinzas porque como son telas elásticas pueden adaptarse al cuerpo sin la necesidad de moldear la tela con pinzas, además normalmente la elasticidad de la tela de punto ya está calculado dentro del patrón y puede que incluso esté la base más estrecha para tener el efecto ceñido. Eso significa que si tú usas un patrón ajustado de tela de punto en telas planas sin elasticidad la cosa va mal porque no podrás ponerte esa prenda...como no se da de sí, probablemente no te va a entrar por la cabeza o por las caderas. El típico patrón de tela plana lo podrías usar en telas de punto cosiendo pinzas pero en general estas costuras no quedan demasiado bien...a ver, se puede hacer pero queda mucho mejor usar un patrón específico de punto sin pinzas.

 
www.studiocostura.com
 

Usando telas de punto se hace el cuello elástico cosiendo una tira en circulo doblado y en general no necesitas ni botones ni cremalleras, en telas planas tendrás que rematar el cuello con vistas o bies y si es un cuello cerrado necesitas una abertura de algún tipo para poder ponértelo.

Así que en principio no es buena idea intercambiar patrones....pero hay excepciones y te contaré un poco mi experiencia por si os sirve para ideas de cómo usar patrones de punto para telas planas haciendo camisetas.

www.studiocostura.com

Aquí la cuestión es qué tipo de corte tiene el patrón, si es un patrón no ajustado estás probablemente de suerte y puedes usarlo para telas planas también. Hay dos cosas que normalmente tienes que ver: que el corte de la prenda no sea muy ajustado y que tú no tengas copa muy grande. Primero obviamente porque al usar el patrón de tela de punto, ese no tiene pinzas y para que quede bien una prenda sin pinzas en telas planas tiene que ser amplia. Otra cosa es tu copa...las que tienen copa pequeña no suelen en general tener problemas con tener o no las pinzas (en prendas amplias). Las pinzas realmente están pensadas para crear espacio para el volumen, así que si tienes bastante copa, necesitas ese volumen...si quitamos las pinzas en una prenda para una persona con más copa el resultado no queda bien.

Este modelo de mi vestido en concreto tiene un corte ligeramente acampanada en el costado, eso significa que ya de por sí hay más espacio para el pecho dentro de este patrón (sea de punto de tela plana), si sabéis algo de traslado de pinzas en patrones veis que en este patrón la pinza de pecho se ha llevado para dar volumen en el bajo. En resumen: es un buen punto de partida para usar el patrón en telas planas también.

Si el patrón de punto que usas tiene un cuello amplio es muy probable que no tienes que pensar en ningún cierre, solo rematas el cuello con bies o vistas si te cabe la cabeza. En mi caso con esta camiseta negra el cuello sí que es bastante cerrado así que opté por crear una abertura de lágrima en la espalda que se cierra con un botón, toda la zona de cuello está rematado con el bies de la misma tela. En la clase las chicas han usado por ejemplo la camiseta Odette de la Maison Victor (mayo 2017) que tiene un corte recto y el cuello más abierto y no hemos añadido abertura extra en el cuello.

www.studiocostura.com

Aparte de eso ya los remates van como siempre en telas planas así que sin mucho más misterio. Quizás si parece que la camiseta puede quedar demasiado ceñido una vez hecha en tela plana, puedes subir de talla antes. Según el patrón y su forma puede que tengas que modificar algo de manga, ver las curvas etc pero en este caso no lo he tenido que hacer.

Quizás preguntas que si merece la pena estar allí cambiando el patrón por si puedes directamente buscar alguno que te guste para telas de punto y ya está? Pues sí...pero a veces tienes justo ese patrón que te gusta y una tela plana que quedaría bien...por qué no hacerlo entonces! Me gusta la forma de camiseta pero al hacerlo en tela plana me parece que tiene un aspecto como más “refinado” y creo que mola mucho!

www.studiocostura.com

Por otra parte ya que estoy con el post y en las fotos también se ven los vaqueros, aprovecho para contar sus detalles también. Este par me lo hice hace un mes o más creo, usando el patrón Dawn de Megan Nielsen Patterns. La primera vez que hice vaqueros usé el patrón Ginger y hasta hay una entrada en el blog si lo queréis ver. Ha pasado bastante tiempo desde entonces, he usado el mismo patrón para hacer varios pares de pantalones con telas que no sean vaqueros pero no me había dado por hacerme otro par de “vaqueros de verdad”.

Pues este patrón lo tenía en mente desde que lo publicaron pero allí estaba con otras cosas...hasta que esta primavera vi que tenía una tela apropiada en casa y quería probar qué tal me quedarían unos vaqueros con tela rígida (los Ginger son de tela elástica) y con tiro alto.

Así que un día de estos que por algún curioso motivo tenía toda la tarde para mí (quizá era la Semana Santa?) me puse las manos a la obra aquí en el taller y con el subidón hice todo en un mismo día de maratón, desde pegar el patrón, hacer una prueba en retor hasta cortar tela y coserlo todo. Esta vez como no quería sorpresas probé primero el patrón en retor para ver qué tal me quedaba y por mi sorpresa estuvo muy bien desde principio. Elegí la talla 12 en todo el pantalón (aunque de cintura yo sería creo que 14 o un poco más) y sin modificaciones me quedan bien...es realmente alucinante porque normalmente en los pantalones siempre tienes allí arrugas raras en la parte de la entrepierna etc. La parte de costura todo bien, las instrucciones están muy bien, especialmente la parte de la cremallera y bragueta, me gusta mucho el método que enseñan. Al tener dos máquinas, una con hilo normal y otra con torzal la cosa iba rápido! Ya me he puesto este par un montón y estoy muy feliz con el corte y con el hecho de tener un buen par de vaqueros con la cinturilla alta. A ver si encuentro más telas apropiadas para este patrón, un par de vaqueros negros también me apetece.


Así que me toca hacer más vaqueros...y más camisetas tanto en punto como en telas planas porque me he dado cuenta que he cosido bastantes tops y blusitas de flores de verano en el pasado pero lo que quiere mi yo interior frío y neutro, jaja, es una buena colección de colores lisos (blanco, negro y gris, jaja) y formas simples, qué le vamos a hacer?!


Upcycling de ropa // Upcycling some clothes

 
www.studiocostura.com

Hola, hace mucho que no me paso por aquí para escribir un post pero hoy sí que toca! Jenni de Naturtelas nos invitó a Laura y a mí para que participemos en el proyecto de reciclaje de ropa que está organizando en su blog y la verdad es que tengo una buena pila de ropa guardada para este propósito. Estaba mirando qué cosas podría rediseñar y encontré un pantalón y un vestido…las dos cosas las había comprado ya de segunda mano pero no me las ponía nunca.

www.studiocostura.com

El pantalón vaquero verde me iba bien de tamaño pero tenía un largo raro así que nunca me lo puse. Pensé que lo mejor sería hacer una falda ya que la parte de arriba me va bien.

www.studiocostura.com

Y el vestido lo compré obviamente por este estampado bonito! En su momento ha tenido un cordón para ajustar la cinturilla pero eso ya estaba roto. Me gustaba como vestido pero me pasaba lo mismo que con el pantalón…y con la mayoría de los vestidos de verano que venden en las tienda de aquí, me queda demasiado corto para mi gusto. Así que allí mi idea era hacer una blusa, lo más fácil imposible, y seguramente me lo pondré más.

www.studiocostura.com

Para cambiar de pantalón a falda hice lo típico de recortar las piernas y descoser la entrepierna. Después puse el trozo de la pierna recortada debajo de la abertura que tenía y lo coloqué bien con los alfileres siguiendo bien la caída normal de la parte de arriba. Después cosí directamente encima de las mismas costuras que tenía antes el pantalón. Hice lo mismo con el trasero pero allí tenía que descoser un poco más hacia arriba para quitar la curva de tiro del pantalón. El resto lo mismo. Y después me lo probé para ver el largo que quería, le hice el dobladillo y punto!

www.studiocostura.com
20190516_141532-01.jpeg

Probé el vestido y marqué qué largo quería y recorté el exceso. Un dobladillo y listo! Me quedé con un trozo bastante amplio con el bajo ya hecho y se me ocurrió ya el plan máximo de aprovechar la tela: le puse un elástico en la cinturilla y ahora Lia tiene una falda de verano también!

www.studiocostura.com

La verdad es saber coser te puede facilitar la vida muchísimo porque muchas veces es solo recortar y hacer dobladillos y puedes hacer una prenda “nueva”. Quitar mangas o hacerlas más cortas, añadir otras telas para alargar la prenda, poner elásticos…hay miles de maneras de darle un toque nuevo a estas prendas que ya no nos ponemos. Me gusta mucho comprar cosas de segunda mano por eso, porque ya en la tienda las miro pensando que si puedo usar la tela para otra cosa…o si tienen posibilidad de modificaciones para que me queden bien ya que su precio muchas veces es baratísimo y de paso reuso algo que ya existe en vez de consumir productos nuevos. Otra cosa que me gusta también de la ropa de segunda mano es que ya ves cómo es la calidad de la tela, si ya ha tenido un ciclo de vida y se le ve bien…qué mejor que darle una nueva oportunidad sabiendo lo que tienes en las manos :)

Gracias Jenni por organizar el proyecto…necesitaba este empujón para terminar estas prendas, jaja!