El abrigo Burda Style 6987 // Burda style 6987 Coat

 
www.studiocostura.com

Hola! Acabo de volver de Estonia, allí me hice este abrigo nuevo y no quiero olvidarme de los detalles así que dejo aquí estas fotos y comentarios sobre el patrón. Desde otoño sabía que quería hacerme un abrigo este año pero no había encontrado un patrón que me llame mucho la atención y no estaba muy segura sobre el corte que quería, tenía ya una lana gris comprado desde hace un par de años pero aún así no había empezado nada. Además el tema de tejer vino en noviembre con tanta fuerza, así que no estaba buscando nada en concreto tampoco. Pero el otro día probé en Benetton este abrigo y me gustó mucho el corte y el tono camel también. La verdad es que hubiera comprado el abrigo y punto, pero claro…los automáticos estaban mal cosidos, tenía algún que otro defecto más y así no se puede, jaja, enseguida sabía que tenía que hacerlo yo misma. Me gustó cómo me quedó el abrigo, el corte recto pero con pinzas en el pecho, el cuello simple me parecía guay para poder llevar alguna bufanda (y así de paso sumar proyectos para tejer, jaja). Ese mismo día cuando vine a casa me puse a rebuscar entre mis patrones para ver si había algún patrón sencillo pero no encontré nada que no hubiera tenido que modificar mucho. Tampoco encontraba nada en internet…todos los patrones tenían cosas que no cuadraban con mi idea. Así que como mi viaje estaba ya cerca, decidí hacer el abrigo allí y buscar el patrón en la biblioteca de mi pueblo (allí puedes consultar todas las Burdas desde los 90 en la biblioteca y sacar patrones!).

Hey! I just came back from Estonia where I made myself this new coat so I thought it would be nice to write about the details of making it here, this way I’ll also remember myself. Since autumn I knew I wanted to make a coat this year but I hadn’t found a pattern that would be the exact match and I wasn’t too sure about the style I even wanted to make. I actually had a grey wool coating already in my stash but I hadn’t started anything yet. Also, my knitting phase started in November so I wasn’t really in sewing mood anyway. But the other day I tried on this coat in Benetton and I liked the style and the fit a lot on me, and the camel tone was flattering too. To be honest, I would have bought the coat then and there, but of course…the snaps were not well sewn on, there were other details that were wrong so it was pretty clear to me, hehe, I knew I needed to make a coat like that myself. I liked the fit on me, the straight lines with bust darts, a simple collar seemed like a good idea for wearing a pretty scarf (and this way I could add a knitting project to my list too, hehe). The same day when I came home I looked trough my patterns but I didn’t see any simple patterns similar to this style that woldn’t requier too many modifications. I also couldn’t find anything on the Internet…all the patterns had things that didn’t match with my idea of a minimal style. As my trip was close I decided to sew the coat there and look for a pattern in my local library (you can borrow Burda Style magazines there to use the patterns, they have stuff from the 90s up until the most recent issues!).

www.studiocostura.com

Al final mi plan cambió porque en vez de biblioteca, encontré un patrón de Burda Style ya en formato de papel en mi tienda de tejidos. El Burda Style 6987 tiene un look sencillo, el corte como me gustaba pero no tiene el cuello que yo quería. De todas maneras la idea de capucha también me pareció graciosa así que opté por usar ese patrón (y cortar directamente mi talla en el papel de patrones, sin calcar piezas ni pegar papeles, así sí, jaja). Hice algunos cambios en el patrón: alargué las mangas por 3 cm, es un ajuste que suelo hacer porque soy más alta/con brazos más largos que la media. Luego vi que hubiera podido dar incluso 2 cm más, no me quedaron las mangas cortas pero tuve que sacrificar un poco de margen de costura. Quité la costura horizontal en el cuerpo que tiene la versión original, no me interesaba y lo que hice fue simplemente unir las piezas de cuerpo de la parte de arriba ya de la parte de abajo con celo.

In the end my plan changed as instead of getting my pattern from the library, I found a Burda Style pattern in paper version in my local fabric shop. The Burda Style no 6987 has a simple look, I liked the style lines but it didn’t feature the collar I wanted. Anyhow the hood idea wasn’t bad either so I decided to use this pattern (and to cut my size directly from the pattern sheet, without tracing or taping paper, hehe). I made some adjustments: I made the sleeves 3 cm longer, something I always do as I’m taller/I have longer arms than average size person. Later I saw that I could have added aprox 2 cm more actually, the sleeves didn’t end up too short but I had to sacrifice a bit of the sleeve hem allowance for that. I took away the horizontal seam that the original version of this coat had, I didn’t like it and it was as easy as just taping the upper and lower body parts together.

www.studiocostura.com

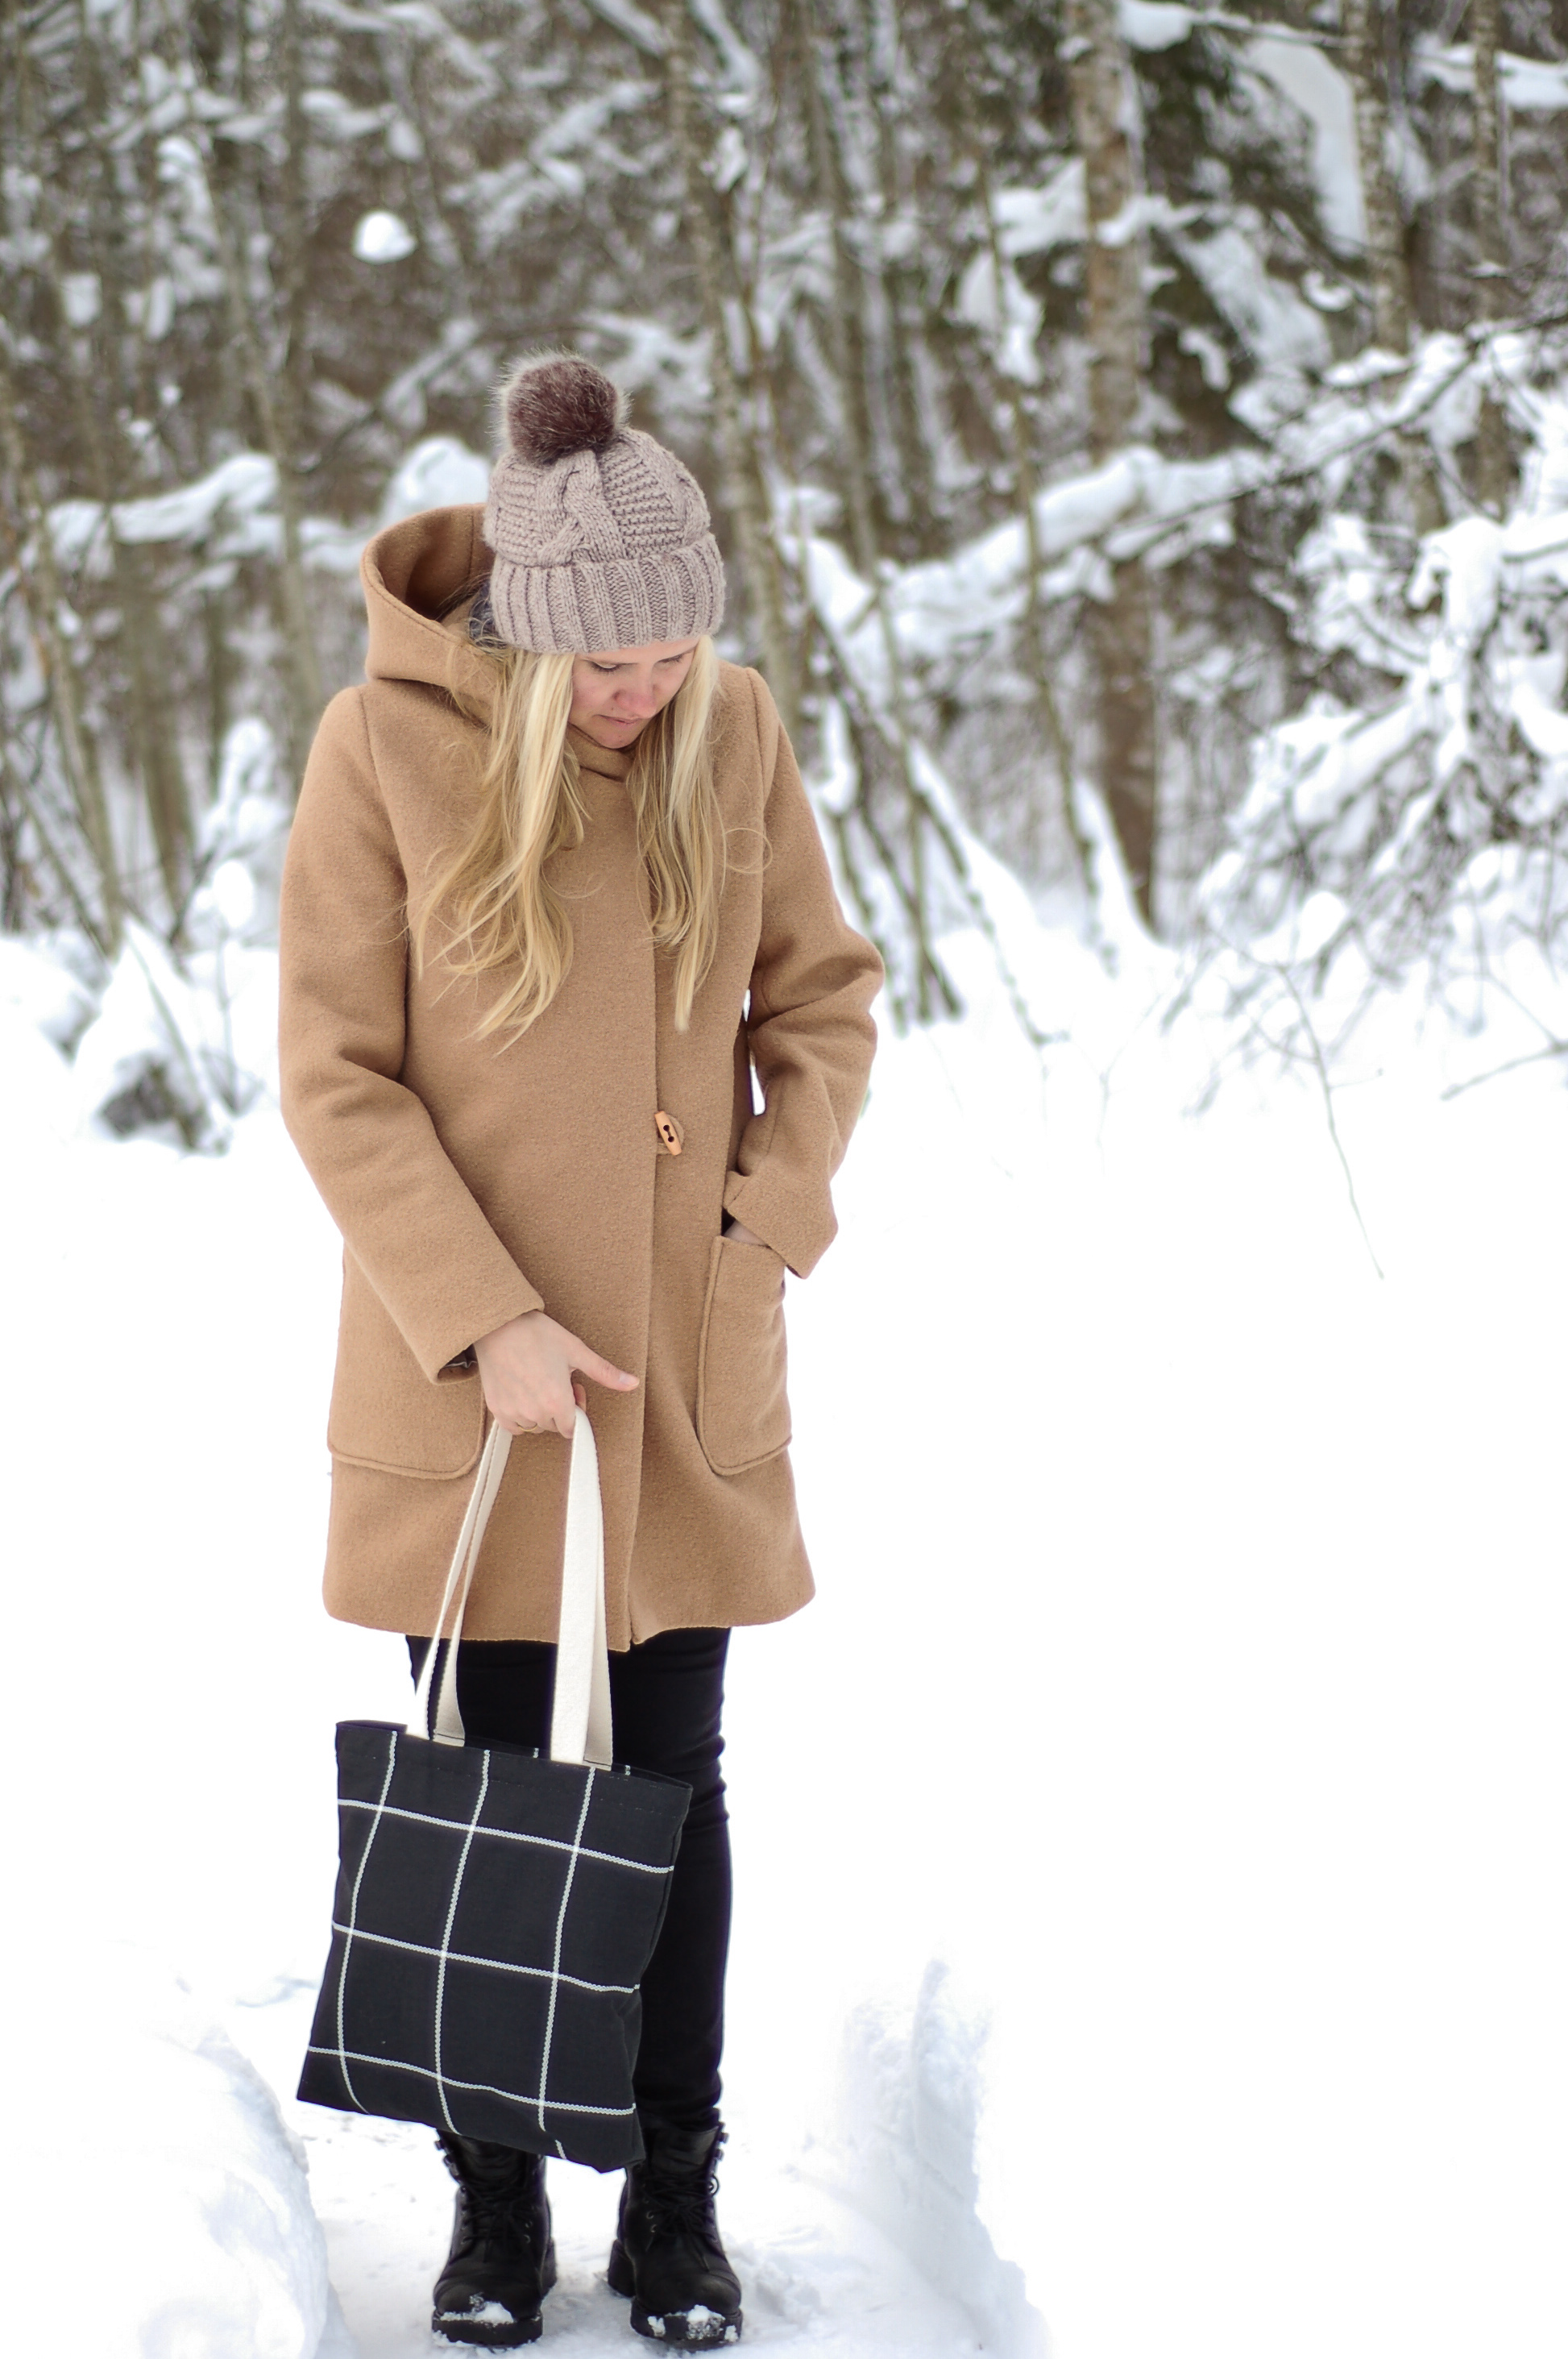
Usé una lana 100% tipo boiled wool para el exterior y forro de viscosa para el interior. Hice la talla 38 en versión B pero con el largo de la versión A (la diferencia es de unos 15 cm aprox). El patrón requiere para esta versión 3,1 metros de tela pero había comprado 2,5 y me cabían las piezas juuusto haciendo un poco de tetris. De forro usé unos 2 metros. En el patrón te indica las zonas que tienes que entretelar pero yo entretelé más, lo consulté con mi madre (ella tiene la formación de modista) y al final puse entretela a los bajos, en el cruce delantero (más o menos la mitad de las piezas), en los hombros delanteros, hombros traseros, la parte superior de la manga, donde los bolsillos, bajos de las mangas, toda la vista delantera…creo que es todo, jeje.

I used a boiled wool for the exterior layer (100% wool) and a rayon lining (100% viscose). I made a size 38, using the view B but with the length of the view A (the difference is about 15 cm aprox). The pattern instructions say you need 3,1 meteres of fabric but I had bought 2,5 and with a bit of tetris I cut everything out quite nicely. I used aprox 2 meters of lining too. There are instructions about where you should apply interfacing but I used it in more areas. I consulted with my mom (who has a diploma in tailoring) and I used interfacing in hems, in about half of the front pieces, in the shoulder areas for both front and back pieces, in the upper part of the sleeve, in the pocket areas, sleeve hems, all the front facings…I think that’s it, hehe.

www.studiocostura.com

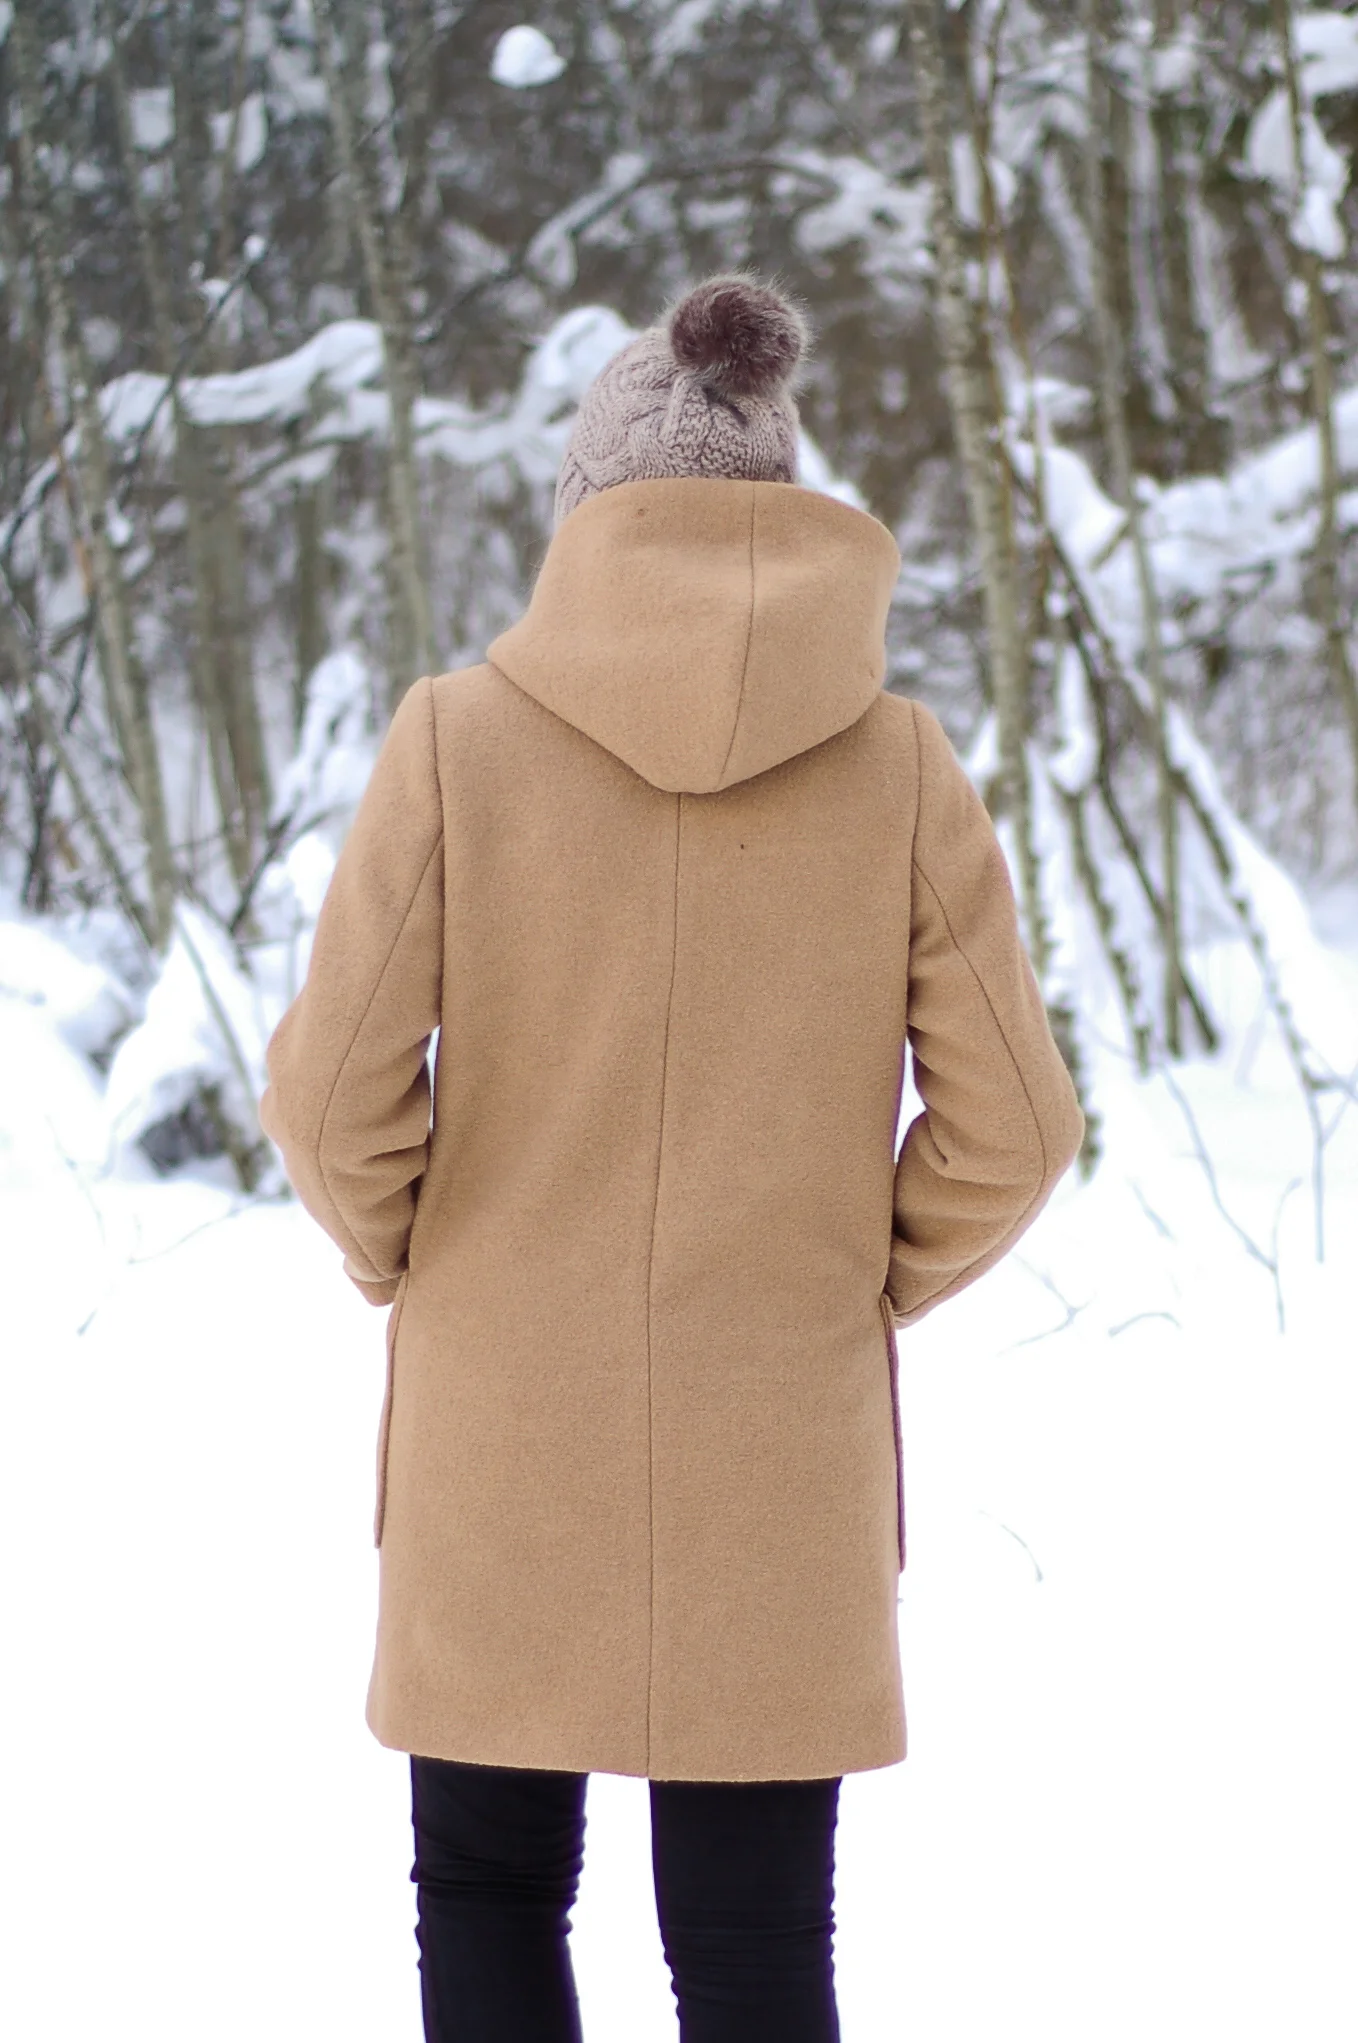
Seguí las instrucciones para coser la parte de los hombros y capucha que era una cosa un poco distinta y el resto lo hice ya según lo he hecho otras veces, así que no seguí del todo el paso a paso. Coser el abrigo no es difícil, yo pienso que la parte que requiere ayuda es el tema de las mangas: lo mejor es que alguien te ayuda a poner las mangas con alfileres para poder adaptarlas bien a tu cuerpo. Como casi siempre, tuve que reducir el largo de hombro, pero en general la manga ha sido fácil de coser. He usado también unas hombreras finitas para tener mejor forma. La tela es gruesa y especialmente la parte que se une con la vista genera mucho bulto, lo he cosido con la máquina industrial, no sé si mis máquinas domésticas podrían pasar la parte de las costuras donde se juntan prácticamente cuatro capas de lana gruesa en algunas partes.

I followed the instructions for the shoulder and hood part as it was a bit different and for the rest of the coat I followed a method I’ve used for other pieces like this, so I didn’t follow the step-by-step instructions. Sewing a coat is not difficult, I’d say that setting the sleeves is the most complicated part: it would be great if someone can help you with pinning the sleeves on so they will fit with your body. As almost always I had to reduce the shoulder length but in general sewing the sleeves was easy this time. I also used lightweigth shoulder pads this time to get a nice shape. The fabric is heavy and there’s a lot of bulk in some parts, for example where the front meets the facing. I used an industrial sewing machine to sew it, I’m not sure if my domestic machines would handle these layers so well as there are parts where there are practically four layers of wool together.

www.studiocostura.com

Otra cosa que sí que me resulta más complicado es el planchado correcto, me ha salido más o menos, pero es fácil arruinar el bajo si tiras demasiado de la tela. Yo estaba consciente de eso porque me había pasado con el otro abrigo que hice hace dos años con el patrón Cascade Duffle Coat de Grainline. Este abrigo no tiene entrada aquí en el blog porque lo terminé pero nunca me lo puse porque al final (también por la culpa de la construcción que es algo rara en mi opinión: el patrón tiene vistas para bajos en vez de hacerlo con doblar el margen de costura hacia arriba) el bajo no me quedó bien y se hacía ondas. Por cierto, saqué ese abrigo de hace dos años y lo vi con “ojos nuevos” esta vez así que lo que haré (no este invierno, pero quizás el año que viene) es hacerlo más corto y así arreglar el tema del bajo. En fin, según mi madre la buena plancha hace toda la diferencia, hay que tener mucho mucho cuidado. Y claro, otra cosa: la lana se plancha muy bien y a pesar de ser un tejido muy grueso se deja manejar fácilmente pero qué suele ocurrir…que es un tejido más caro y muchas veces las que solo empiezan pues no quieren gastar ese dinero sin saber que van a tener un abrigo que realmente les guste (posibilidad real ya que puede que no te guste el corte, no te quede bien etc). En mi opinión allí está el tema: si compras un tejido sintético, lo más probable es que sí, te sale algo más barato (y no siempre tanto!) pero es más complicado de planchar, puede perder su forma rápidamente (pelotillas), obviamente no tiene las calidades de lana (te da calor pero respira y se adapta según la temperatura de ambiente a tu cuerpo) y al final, me parece que cuesta más trabajar con tejidos así. Así que si piensas en el tiempo y esfuerzo que vas a poner en un proyecto como un abrigo…merece la pena un tejido bueno. Tanto para trabajar con ella como para llevarla luego. Con esta lana he podido usar mucho vapor y bastante calor (a través de un paño), así que todo el rollo de planchar ha sido mucho más placentero. También he usado un trozo de madera para apretar bien las costuras y conseguir que se queden bien planos (no llego a niveles de industria ya que no cuento con la plancha buena de vapor que suelen tener en los talleres pero bueno, algo es algo!).

Another thing that I do think is a bit complicated is the correct pressing of the seams, this time I got it more or less right, but it’s easy to mess the hem up if you distort the fabric when pressing it. I was aware of this as it happened to the Cascade Duffle Coat by Grainline that I sewed two years ago. This coat doesn’t have a post in this blog as I finished it but I never wore it as the hem didn’t turn out great, it was wavy due to the pressing error (and I also think it went wrong because of the weird construction: facings for the hem instead of turning the hem seam allowance up, but who knows…). By the way, I looked up this coat and saw it with “new eyes” so I guess I’ll try to fix it (not this year, but next year I think) with shortening the whole thing to make a new hem. So anyway, as my mom says, the correct pressing makes all the difference and you rellay need to be very very careful. And there’s the other thing: wool fabrics are easy to press and even when it’s a heavy fabric you can do it easily…but it’s generally a more expensive fabric and when you are making your first ever coat you normally don’t want to invest too much as you don’t know how it all will turn out (and there is a real possibility that you won’t like the style, it doesn’t fit well etc). I think that here’s the deal: yes, you can buy a less expensive synthetic fabric (which often aren’t cheap either!) but it’s more difficult to press, it can lose it’s quality fast (pilling), obviously it won’t have the same advantages as wool (it gives you warmth but it also breathes, adapting your body depending on the exterior temperature) and I just think it’s more complicated to work with this kind of fabrics. So if you think about the time and effort you put into a project like a coat…a good fabric really is worth it. Both for sewing and later for wearing it. With this wool I could use a lot of steam and quite high temperatures when pressing (with a pressing cloth) so all this process was way better. I also used a piece of wood to press the seams well after the steam and make them as flat as I could (I can’t get to the industry level as I don’t have a super steam iron they usually have in ateliers but well, I did what I could!).

www.studiocostura.com

El abrigo es un proyecto que me da mucho respeto porque coser, lo puede coser todo el mundo, pero que quede bien y que se note el buen trabajo…pues eso no viene así sin más. Yo reconozco que no soy nada experta en eso, me gusta experimentar y suelo hacer uno al año, y cada vez pues voy aprendiendo más. Pero soy consciente de lo poco que sé y cuando sale bien me alegro mucho, jaja. Además lleva tiempo y esfuerzo, es mejor hacerlo sin prisa (siempre lo pienso, pocas veces lo hago!), en tramos, porque puede saturar, por lo menos a mí. Esta vez corté un día, otro día puse la entretela, luego empecé a coser etc. Tardé varios días haciendo un par de horitas cada día, pero la verdad es que no me sentí agobiada esta vez. Así que nada, el año que viene haré otro y seguiré aprendiendo! Espero que os haya sido útil esa larga historia :)

Sewing a coat is a big thing in my opinion as everyone can make one but to get this professionl result that we are looking for…this means more than just making it one time. I know that I’m by no means an expert in this topic, I like to experiment and I try to make one coat every year. Every time I learn new stuff but I’m very aware how little I still know and when things do turn out nicely I’m pretty pleased, hehe. Apart from this project taking time and effort, you also need to think about it as a slow process. Dividing the work in chunks is a good idea as this way you won’t be saturated by it all. This time, the first day I cut out the pieces, the second day I interfaced and then started to sew etc. It took me a couple of hours during various days to complete the coat but I dind’t feel saturated this time. And that’s it…I hope I’ll be making another coat next year and hiopefully I’ll keep on learning this craft! I hope this long post has been interesting to you :)


2018 en costuras // My 2018 makes

 
www.studiocostura.com

Hola! Aquí estamos, casi al final del año. Pensaba que estaría bien hacer un resumen de mis costuras ya que estuve contando y este año solo he publicado tres entradas sobre mis proyectos personales en este blog. Todo lo demás ha sido patrones, tutoriales y otro tipo de información sobre costura. Este año me parece que he cosido menos que nunca para mí, pero aún así han sido varias cosas. Algunas prendas me las he puesto un montón, algunas nunca…pensaba que en este punto ya sé antes de empezar un proyecto si me vale o no, pero resulta que no es así. En general soy una persona práctica a la hora de elegir mis proyectos, coso cosas que sé que me voy a poner, suelo elegir telas que ya conozco y sé que me gustan. Pero aun así, como todo en esta vida, la costura y especialmente la elección de proyectos es un proceso de aprendizaje…hay errores y hay aciertos, eso sí, siempre aprendes. Así que revisé mis fotos de Instagram para sacar las prendas y cosas que he hecho, allí suelo subir más o menos todo, aunque hay varias cosas que faltan también.

Hey! Here we are, almost done with this year. I thought that it would be nice to write a little recap about my sewing projects this year as I was counting and I’ve only published three personal sewing projects this year over here at the blog. It has been all about patterns, tutorials and other information about sewing. I think I’ve been sewing for myself very little this year, less than ever, but turns out there have been some projects. Some garments I’ve been wearing a lot, some of them never left the house…I thought that at this point I’d already know before starting a project if I like it or not but the reality is other. In general I’m a quite practical person when choosing sewing projects, I sew stuff I know I’m going to wear, I choose the fabrics I already know and love. But despite that, as with other life things, it occures that sewing and especially choosing the projects is a learning process…there are mistakes and there are wins, the thing is, you always learn. So I revised my Instagram feed to get some photos as I usually post there what I make but there are also some stuff I don’t have a photo of.

www.studiocostura.com

El Ogden Cami, uno de mis favoritos! La versión con flores me he puesto un montón, la de rayas verticales lo regalé a mi hermana y lo de rayas horizontales me lo he puesto, pero no mucho (la viscosa esa es bastante ligera y se arruga demasiado). También hice uno blanco con doble capa en una tela de crepe para una boda en el verano.

The Ogden Cami, one of my favourites! The floral version has been getting tons of wear, the one with vertical lines I gave to my sister and the one with the horizontal lines has got some wear, but no too much (the viscose fabric is quite lightweigth and wrinkles too much). I also made a double layer one with a poly crepe for a wedding I attended.

www.studiocostura.com
78c3191814f6cc88572471f481c45d6b.jpg

El vestido peto/pichi de Roberts Collection me encantó. Primero hice el beige en una tela más tiesa y hasta ahora no tiene botones (o sea, nunca más me lo he puesto después), sin embargo el negro me lo puse un montón. Lo hice con tencel y me encanta que es ligero pero aun así tiene una caída estupenda y suficiente cuerpo. Es un modelo ideal para el verano, te deja moverte y no da calor, un buen descubrimiento!

The bib dress / dungaree dress from Roberts Collection is amazing. First I made the beige version in a stiffer fabric and it still doesn’t have buttons (as in I’ve never really worn itafter finishing it), but the black one has gotten tons of wear. I made it with tencel fabric and I love it as it’s super light weight but has a good structure and drape. It’s the perfect style for summer, it lets you move and it’s easy to wear in heat, a great find!

www.studiocostura.com
a7af376e145b560f30fa0e71053d1d6c.jpg

Básicos aburridos: la sudadera azul marino me lo pongo toooodo el tiempo. Usé el patrón de Ottobre Design (será del número de verano de 2018) con una tela de sudadera que tiene como pelito por dentro, perfecto para no pasar frío…si no está en la lavadora me lo llevo puesto! La camiseta de plátanos (el patrón es de algún Ottobre también) lo hice porque me hizo gracia el tejido, el estampado mola mucho. También le hice la versión mini a mi hija y las dos prendas han tenido mucho uso.

Boring basics: I’ve been wearing this navy blue sweatshirt sooo much. I used a pattern from Ottobre Design (I guess it’s from the 2018 summer edition) with a really nice sweatshirt knit witha fur lining. It’s perfect for winter and honestly, if it’s not inside my washing machine I’m probably wearing it! The banana T-shirt was made purely because I found this super cute print (the pattern is from some Ottobre too). I also made my kid a matching mini versions and we’ve worn those a lot.

www.studiocostura.com
dfd79b0e3005c22c12c8c56733902e8e.jpg

Nénuphar Jacket: en el verano vi este patrón y me gustó mucho el estilo kimono con un corte de manga más sencilla. Hice primero la versión en blanco roto con un lino muy bonito de pequeñas rayas. La espalda lo hice sin frunces porque soy así de aburrida. Enseguida hice otra con una viscosa de medio grosor que tiene una caída super bonita. Después de coser estas dos chaquetas me di cuenta de lo obvio: en Madrid o hace mucho calor y no te pones nada que no sea de manga corta o luego ya de un día para otro se bajan las temperaturas y me tengo que cubrir con algo más que una chaqueta tan ligera como ésta. Gran descubrimiento después de…8 años? Así que la chaqueta de lino que en fotos me gusta mucho, pues en la vida real me lo he puesto dos veces. La chaqueta de viscosa lo usé más en septiembre cuando por la mañana al salir de casa necesitaba un algo encima pero a las 10 ya hacía un calor que te morías. Me sirve muy bien cuando voy en transporte público y hace frío por el aire acondicionado…pero en general, creo que debido por donde vivo y por mis propias preferencias, pues lo veo muy bonito pero no tengo muchas ocasiones para ponerme algo así.

Nénuphar Jacket: I saw this pattern in summer and I really liked the kimono style with a simple sleeve. I first made the off white version in a beautiful striped linen. I didn’t add the ruffles for the back because you know: I’m boring. Just after finishing this one I made another one with a medium weight viscose that has a beautiful drape. After sewing these two jackets I saw the obvious problem: in Madrid when it’s hot, it’s super hot and you can’t wear anything but short sleeves and when the temperatures drop I really need something more than just a lightweight jacket like this one. It’s a great discovery after…8 years? So yes, I really like the linen jacket on photos but I’ve been actually wearing it like two times. I’ve been wearing the viscose version more, especially in Spetember when in the morining when I leave the house I’d like to have an extra layer but at 10 o’clock it’s already hot as hell. It’s great to use in public transport to protect me from the cold of the air conditioner…but in general I think that I don’t have too many opportunities to wear this type of garments altough they are beautiful, as the climate is as it is and my personal preferencies have a big role too.

www.studiocostura.com

Hice las camisetas para mí y para la pequeña con los patrones de Megan Nielsen, y de esto sí que hay post. La de ella muy bien, la mía un poco demasiado ajustada por mi gusto, se lo di a mi hermana. Y los pantalones cortos son del patrón Lander pants. Hice estos que quedaron bastante bien y luego otro par más en un vaquero más claro (que hasta ahora todavía no tiene botones…). Me los puse un par de veces pero no sé si el largo del tiro me quedó del todo bien, habrá que mirar qué pasa con ese patrón. También es que he subido de peso y ahora tengo que mirar bien el largo que tiene el pantalón corto para que no tenga este efecto de que al andar mis piernas rozan entre sí y me resulta super incómodo si el pantalón es demasiado corto y “se me sube” (ya sé que no es muy glamuroso pero es que molesta un montón y por eso pasé a mejor llevar faldas porque no tenía este problema).

I made thses T-shirts for me and my kid with Megan Nielsen patterns and there actually is a post about it. Hers is great, mine a bit too snug for my taste so I gave it to my sister. And the shorts are made with the Lander pants pattern. I made these that turned out quite well and then I made also another pair with a ligther color denim (the ones that still don’t have buttons on…). I wore those a couple of times but I’m not so sure about the crotch length there, I’ll have to see those pattern pieces again. Also I’ve put on some weigth and I really have to check the length that the shorts have before hemming them, I find it super uncomfortable when my thights rub against each other when I walk and the shorts “climb up” (I know it’s not very glamorous but this really sucks and that’s why I’ve chosen to wear more skirts as I usually don’t have this problem with them).

7831c6ea8330e62f63a59e2833db8627.jpg
www.studiocostura.com

Desde luego el ganador de prendas que más me he puesto es el Suki Kimono, y éste sí que tiene post para más detalles, estoy super contenta con el modelo y me lo pongo todos los días. La única pieza de lencería que me hice para mí (sí sí, este año me hice UNO para mí) ha sido este sujetador Boylston con el encaje de color carne. Al principio me lo puse bastantes veces, ahora me parece que está en el fondo de mi caja de sujetadores, creo que no queda tan tan tan cómodo como me gustaría…y nada, es proceso, solo el proceso…

The first prize winner for this year is of course the Suki Kimono, I’ve been wearing it every day, there’s also a post about it actually. The only bra I made for myself (yes, yes, it’s the ONE bra I made this year for myself) is this Boylston bra in nude lace. I wore it several times when I finsihed it but now it’s somewhere in the bottom of my lingerie drawer, I think it’s not just right for me, the fit needs more tweaks…process, it’s just a process…

www.studiocostura.com

Hice un par de bolsos también (aparte de todas las muestras para Daily Tote, claro). La mochila quedó muy bonito pero le falta estructura para quedar bien del todo, lo tengo en mi lista de cosas para arreglar. El bolso azul me lo llevo muchísimo, cabe todo y es cómodo. El bolso grande lo hice en un momento cuando efectivamente necesitaba un bolso donde quepa bastante ropa etc y lo he usado algunas veces. Y el bolso negro con asa beige ha tenido mucho uso también (y el de melocotón con blanco y negro era un encargo).

I also made some bags (apart from the Daily Tote samples of course). The backpack really turned out nice but it needs more structure to be firmer, I have it on my list of things to unpick. I’ve been wearing the blue bag a lot, it fits all mu stuff and it’s very comfortable. The big bag was made when I actually needed a big bag to fit lots of clothes etc and I’ve been using it a coulple of times. And the black tote with beige straps has been in a lot of use too ( the peach and black and white one was a custom order).

www.studiocostura.com

En el verano en casa de mi madre le hice este alfiletero que también tiene varios bolsillos para llevar todas las cositas pequeñas, el patrón es del libro Handmade Style de Noodlehead. Yo también tengo uno y es super útil.

In the summer I made this pincushion for my mother, it also has many different pockets to fit all the small stuff. The pattern is from the book Handmade Style by Noodlehead. I have one myself and it’s super practical.

www.studiocostura.com

Para mi hija: pocas cosas, ya ves… crece con una rapidez que sinceramente prefiero hacer alguna cosa así más especial y ya está, sino en dos meces le queda corto y no lo puede llevar más. En el verano le hice el bañador y la braguita del bañador, para su cumple la túnica de sudadera y en la primavera el bomber de puntitos (todos los patrones de Ottobre Design). También gorros de verano y alguna cosita pequeña más.

For my kid: not so much really…she’s growing bigger so fast that honestly I prefer making only some special garments and that’s it, otherwise everything is too small for her in two months time. I made her the baithing suit and ruffled panties in the summer, the sweatshirt tunic for her birthday and the bomber in spring (all patterns are from Ottobre Design). there were also some summer hats and other small stuff.

www.studiocostura.com

También le hice su vestido/pichi especial de Halloween con la tela muy mona de calaveras con flores. Desde luego el proyecto más laborioso de este año fue el abrigo Tosti Utility Jacket que hice para mi novio…ha quedado muy bien y el proceso molaba mucho. Tardé un buen rato pero el resultado mereció la pena. Mi idea era después hacerme un abrigo para mí también pero la verdad es que el frío ya estaba aquí y no tenía muchas ganas así que me fui y me compré uno. Me sentí algo mal…pero también me sentí bastante humano, jaja.

I also made her this Halloween bib with a really cool print fabric. Without doubt the most complicated project of the year was this Tosti Utilty Jacket that I made for my boyfriend…it looks great and the process was very interesting too. It took me time to sew but the result is worth it. My initial idea was to sew myself a coat after that but the cold days were already here and I wasn’t so much in the mood either so I just went shopping and bought myself one. I felt a bit bad…then I also felt quite human, haha.

www.studiocostura.com

Y para mi madre y mi hermana les hice para su cumple también estos sujetadores, el primer patrón es de Madalynne y el otro es el bralette Hanna.

Seguro que faltan más cosas, ahora mismo recordándolo hice también dos pares de pantalones, unos con el patrón de vaqueros Ginger y otro del patrón calcado del pantalón que ya tenía. Dos vestidos que me puse una vez…este año me di cuenta que ahora sí, hay que ser honesta: no me pongo los vestidos! Y también empecé proyectos que no he terminado…y que tengo pocas ganas de terminar, jaja. Así que éstos son mis proyectos personales de este año, que a ver, pocos no son, muchos tampoco…en un año caben bastantes cosas. Como ya os conté hay cosas que me pongo un montón, cosas que me pongo menos y otras que nada. No me gusta acumular prendas sin usar y suelo regalar casi todo que sé que no me pongo, me da más pena una prenda hecha a mano sin usar que el hecho de separarme de una prenda que seguramente ha sido fruto de bastante trabajo y esfuerzo.

El resto del tiempo estaba cosiendo muestras de patrones que saqué este año: bralette Hanna, braguita Stella, braguita Mia, el estuche con cremallera y el Daily Tote. Tengo una caja de muestras bastante grande que de vez en cuando saco para buscar regalos a mis amigas, jaja. Abajo tienes una selección de ellas:

I also made bras for my mother and my sister for their birthdays, the first one is a pattern from Madalynne and the second one is the Hanna bralette.

I’m sure there are things that I’ve missed, actually I just remembered that I also made two pairs of pants: one with Ginger jeans pattern and another one I copied from a rtw pair I own. There were two dresses I wore once…this year it was time to say it out loud: I just don’t wear dresses! I also started projects that I didn’t finish…and that I don’t feel like finishing, haha. So these are my personal sewing projects from this year, lets see, there’s not soooo much, also not very little…you can make a lot in a year. As I told you before, there’s stuff I wear a lot, stuff I wear sometimes and things I never wear. I don’t like having garments I don’t use in my closet so I usually give away everything I don’t wear: yes, giving away garments you have put hours and effort in kind of hurts but I feel worse seeing a handmade garment without anyone wearing it.

The rest of the time I was sewing samples for the patterns I launched this year: Hanna bralette, Stella panties, Mia panties, zipper pouch and Daily Tote. I have a pretty big box of samples that I use from time to time to find presents for my friends, haha. Here’s a selection of those:

Y para lo último…algunos encargos. De varios no tengo fotos porque los entregué sin sacar fotos, faltan muchos bolsos de este verano ahora que lo pienso.

And the last things…some custom orders. There are many that I didn’t take pictures of, actually there are many bags I made in summer now that I think about it.

Y con esto termino mi entrada de costuras del 2018. Estos días estoy todavía cosiendo algunas cosas que me han pedido para regalos pero espero muy pronto alejarme de la máquina y ponerme a…tejer. También espero escribir todavía una entrada de este año contando sobre mis proyectos con lana porque la verdad es que de los proyectos personales de costura fuera del trabajo no tengo mucho: llevo dos meses sin coser nada…supongo que son épocas y ahora es la época de tejer :)

Os deseo felices fiestas y gracias por leer este blog, por apoyar a mi pequeño negocio y en general…por estar allí!

And that’s the end for this 2018 recap post. I’m still sewing some gifts that my friends have asked me for but I hope that I can leave the machine soon to start to…knit. I also hope I manage to write a post about my knitting journey as I haven’t really been sewing for myself at all during the last two months. It’s all about phases and my phase is at the moment full of yarn and knitting :)

I hope you’ll have a wonderful holdiay season and thank you for reading this blog, for supporting my small business and in general…for being there!


Megan Nielsen Patterns: Rowan + Mini Briar

 
www.studiocostura.com

Hola! Hace unas semanas Wendy de CoserCosas me escribió para hacer una colaboración y hoy os cuento sobre ese proyecto. Me mandó una tela de punto orgánico muy bonita de su tienda y los patrones Rowan y Mini Briar de Megan Nielsen Patterns para que haga unas camisetas a juego para mí y para la pequeña. Normalmente no suelo hacer prendas con la misma tela para las dos pero sé que a la niña le iba a encantar y me animé ya que la tela es preciosa.


Hey! Some weeks ago Wendy from CoserCosas wrote me about a collaboration and today I'm telling you about this project. She sent me a beautiful organic knit fabric and two patterns from Megan Nielsen, the Rowan and the Mini Briar, so I could sew something for me and my little one. I usually don't make garments for both of us with the same fabric but I knew she was going to love the idea and as the fabric is so prettyI was in.

www.studiocostura.com

Primero hablaré sobre Mini Briar. Es un patrón de camiseta para niños que tiene dos largos de cuerpo (versión crop y la versión normal) y posibilidad de hacer la manga corta o larga para las edades 2-12 años. Yo elegí hacer la versión de camiseta corta y con la manga corta también. El corte es ancho y el patrón lleva un montón de plantillas para poder customizar la camiseta.


First I'll tell you about the Mini Briar. It's a t-shirt pattern for kids with two bodice lengths (crop top and regular length) and short/long sleeve variations for kids 2-12 years old. I chose the crop top with short sleeves. The pattern has a loose fit and it comes with lots of templates to customize your t-shirt.

www.studiocostura.com

Elegí la talla 2/3 años y ese tamaño le va muy bien a la pequeña por el ancho (ella tiene ahora 3 años y medio). Como la versión 1 que hice es tipo crop top el largo del delantero es bastante más corto que la espalda, me gusta pero creo que en su edad que todavía tiene bastante barriga de bebé me gustaría hacer el siguiente un pelín más largo para que quede mejor. La espalda tiene un largo ideal para ella ahora. Eso dicho la versión de largo "normal" de esa camiseta (la versión 3) sería ya en su caso más como túnica creo.


I chose the size 2/3 years and this size is great for my girl regarding to width (she's 3 and half years old). As I made the version 1, crop top, the front length is way shorter than the back. I like how it looks but I think that in her age when she still ha some baby belly I'd like to make it just a bit longer in the front. The back length is perfect for her now. Saying this I think that the regular length of this t-shirt (version 3) would be almost like a tunic for her at least.

www.studiocostura.com

Es un patrón básico muy fácil de coser y me parece perfecto para estampados infantiles divertidos. Me ha gustado la manera de poner la tira de cuello: te enseñan un tipo de acabado que no necesita la remalladora.


The pattern is a basic t-shirt really easy to sew and I think it's perfect for using up all those pretty kids prints. I liked the way they show how to attatch the neck binding in the instructions: you get a neat finish on both of the sides without using a serger.

www.studiocostura.com

"La sesión de fotos" ha sido más o menos como lo esperaba así que mucho no hemos sacado, jaja, pero ella sí que sabe como mejor enseñar la espalda de una prenda... Ese corte ancho me encanta y ya tengo pensado un par de ellas más para este verano!


"The photo session" was more or less as I expected so we didn't get lots of good material out of it, hehe, but at least she's very convincing when showing the back of the garment... I really like the loose fit of this pattern and I've already tought about more t-shirts I'd like to make her for this summer!

www.studiocostura.com

El patrón para la camiseta de mujer es el Rowan. Es un patrón que tiene versiones para hacer la camiseta con tres tipos de cuellos y largos de mangas diferentes + el patrón de body. Según mi medida de pecho debería ser la talla S en este patrón pero no confiaba mucho ya que veía la prenda muy ajustada así que por si acaso corté un M. Cuando estaba viendo las piezas ya lo sabía...iba a ser muuuy ajustada, jaja. Así que en vez de coserlo con los margenes de 1.5 cm que lleva el patrón directamente sólo usé 0.6 cm de remalladora. Eso me dio el extra margen que necesitaba para poder caber dentro de la camiseta, jaja. La construcción era fácil y las instrucciones claras. Lo único que cambié era abrir un pelín el cuello para hacerlo de otra forma.


The womens t-shirt pattern is the Rowan. The pattern has three neckline finishing options and three sleeve lengths + a version to make a bodysuit. According to my bust measurement I should be a size S in their chart but I was a bit sceptic about that seeing the cut of this garment very close fitting. Just in case I cut the size M. Once I saw the pattern pieces cut out I saw it clearly...it was going to be veeery close fitting, hehe. So instead of using a 1.5 cm seam allowances that come with the pattern I serged the edges using only 0.6 cm. This extra fabric made it possible to fit myself inside this garment, haha. The construction was easy and the instructions were very clear. The only thing I changed was to widen the neckline a bit to change its form.

www.studiocostura.com

Me quedó demasiado pequeña? Pues no, según los gustos claro...está ajustada tal como  está patronada así que bien pero con este patrón hay que ver muy bien qué telas usar. La tela de punto que he usado tiene 50% de elasticidad y el patrón requiere "por lo menos 40% de elasticidad". Creo que para mejor comodidad estaría bien usar telas con más elasticidad y más finas, especialmente hablando de bodys. Me gustaría probar a hacer el body por ejemplo con un punto de viscosa que tiene un poco más de elasticidad y es más finita.


Did it end up too small? Well no, it really depends on your likes too...it is close fitted as the pattern is drafted this way so you really have to pay attention on using the right fabrics. I used a knit with a 50% stretch and the pattern says you should use a knit with "at least 40% of stretch". I think that stretchier and finer knits would give better results, especially when talking about sewing a bodysuit. I'd like to make a bodysuit with a viscose spandex knit for example as these usually are finer and a bit stretchier.

www.studiocostura.com

Así que aquí estamos con nuestras camisetas iguales iguales. Ya tengo pensado hacerle a la niña más camisetas con este patrón y para mí un body. Hace seis meses dije que nunca voy a llevar un body. Y hoy pienso que igual para el invierno podría ser una perfecta capa protectora contra el frío, jaja. Ya os contaré!

Podéis ver todas las telas bonitas que tiene CoserCosas en su tienda online!


So here we are with our matching t-shirts. I've already tought about making several t-shirts for my girl with this pattern and a bodysuit for myself. Six months ago I said I'd never wear a bodysuit. Today I'm thinking about making one to have a protective layer of clothing against the cold in the winter, haha. I'll keep you updated about that!

You can see all the pretty fabrics that CoserCoses has in her online shop!


Suki Kimono by Helen's Closet

 
www.studiocostura.com

Hola! Ha sido taaanto tiempo desde que cosía algo para mí y por fin puedo publicar otra cosa que no sea lencería. Después de terminar mi nuevo patrón de la braguita Stella decidí que era la hora de coser algo que no incluya encajes y elásticos. Tenía ganas de hacerme una bata kimono desde que hice esta otra el verano pasado. Como la otra se quedó en la casa de mis padres en Estonia estaba casi un año deseando de tener una aquí en mi armario también y por fin la tengo!


Hey! It's been for sooo long since I made something just for me and finally I can post something else than lingerie here. After finishing my latest pattern Stella panties I decided that it was about time to sew something that wouldn't include lace and elastic trims. I wanted to make myself a kimono robe since I made this other one last summer. As I left the previous one in my parents house in Estonia I've been wanting to make a new one for almost a year now and it's finally here!

www.studiocostura.com

El patrón que he usado es el Suki Kimono de Helen's Closet. Cuando en el verano pasado salieron varios patrones de kimonos en el mundo costuril yo todavía no estaba muy convencida de hacerme uno. La verdad es que pensaba que como había miles de tutoriales para hacerte kimonos sencillos por Pinterest que no valía la pena comprarme un patrón específico. Pero después de ver cuánto me ponía el primer kimono que hice y lo cómodo que era para andar por casa sabía que quería coser otro. Este patrón ya lo tenía visto desde que salió y me llamaba la atención que tenía muchos detalles prácticos y también bonitos así que me hice con él y tenía ya una tela preparada para la ocasión. No ha sido una decepción porque el patrón es muy completo y lleva el tema de kimono a otro nivel.


I used the Suki kimono pattern from Helen's Closet. Last summer many kimono patterns were launched in the sewing pattern world but I wasn't very convinced yet to make myself one. I saw so many DIY kimono tutorials over at Pinterest and thought that I shouldn't bother buying a specific one. But after seeing how much I wore the last kimono and how comfortable it was to lounge around the house I knew I needed to make another one, this time a bit more complicated maybe. I had my eye on the pattern since it launched and all the practical and beautiful details really caught my attention so I got it to try it out, I already had just the perfect fabric for this project too. It wasn't a deception as the pattern has very complete instructions and takes the kimono sewing to a next level.

www.studiocostura.com

El patrón mola mucho...tiene un montón de detalles que lo hacen muy completo. En mi versión solo he usado una tela y no he hecho la solapa y las mangas en otra tela de contraste así que quizás no se ven tan bien en mis fotos, pero están allí y te dan un montón de posibilidades de jugar con el diseño de este corte. Las instrucciones son muy detallados y no le ha faltado ningún paso para que todo sea lo más práctico posible: tiene bolsillos, un acabado de solapa muy bonito y se cierra por dentro con un lazo pequeño y luego por fuera con otro más grande.


The pattern is beautiful...all the small details really make the difference. In this version I only used one fabric and I didn't use contrasting fabric for the front band and the sleeve cuffs so you maybe can't see the details so well but I think that there's so much room to play around with this design. The instructions are very detailed and there are all the practical parts in there: it has pockets, a beautiful front band finishing and it closes inside with a small bow tie and on the outside with a bigger one.

www.studiocostura.com

La tela que usé es una viscosa con un grosor medio, en inglés sería un viscose twill. La tela aparte de ser muy bonita es bastante fácil de trabajar porque tiene cuerpo y no resbala al cortar. La caída es perfecta y el tacto también. Era un retal que encontré en uno de mis viajes a Estonia.


I used a medium weight viscose twill fo this kimono. Apart from having this beautiful print the fabric is great because it's quite easy to work with as it has body and doesn't move too much when cutting the pieces out. The drape is perfect and it's so soft! I got it from a random sale during one of my trips to Estonia.

www.studiocostura.com

Cosí el kimono en bastante poco tiempo aunque sí que tiene allí sus detalles y no es un proyecto super rápido...pero mola tomar el tiempo para tenerlo todo cuadrado. Desde el domingo me lo he puesto todos los días y me encanta. Justo por eso me parece una prenda genial para coser porque le das mucho uso. Además me parece un regalo muy bueno por si tienes que hacer algo para tu madre, hermana, amiga etc...como el corte es amplio no hay mucho riesgo de no acertar con la talla.

Yo hice la versión corta pero aún así lo quería un poco más corta y le quité 9 cm del bajo, aparte de eso no hice cambios en el patrón. He usado la talla M y lo bueno de este patrón PDF es que también tiene la opción de capas así que puedes imprimir solo tu talla y así lo recortas más fácilmente.


I sewed up the kimono in short time altough it does have its details and it's not a super quick project...but it's definitely worth to take time to make everything match perfectly. Since I finished it last Sunday I've been wearing it every day and I love it. That's the main reason I think it's such a good project, you really wear it a lot. Also I think it makes a great present for your mother, sister, friend etc...as the style is loose fitted you don't have to worry too much about sizing.

I made the shorter version but before hemming I wanted it to be even shorter so I took away 9 cm from the hemline, apart from that I didn't make any modifications. I used the size M and the good thing about this PDF pattern is that you can print only your size if you prefer as it has the layers separately, so much easier to cut the pieces out.

www.studiocostura.com

En la siguiente foto se ve un poco el interior y el lazo que tiene dentro. Eso hace que el kimono no se abre y es un detalle muy práctico. Los bolsillos que al principio pensaba que no serían de mucho uso sí que lo son...vamos, que los bolsillos molan en cualquier prenda!

Como esta tela es algo rara ya que de fuera tiene el fondo negro y por dentro es blanco usé en la máquina el hilo negro (para que no se vea si la costura se estira etc) y en la remalladora el blanco como el interior, por eso se ve así de dos colores. No sé si realmente lo hubiera podido hacer todo en blanco y quizás no se nota nada...


On the next photo you can see a bit the inside of the garment and the small bow tie. This makes the kimono stay on well, it won't open once you move around, I find it very practical. At first I didn't think I would use the pockets a lot but you know how it goes...all the garments are better with pockets!

As this fabric is a bit weird with its black print on the outside and the white color on the inside I used a black thread on my machine ( so you can't see the stitching if the seams are pulled etc) and a white thrad on my serger, that's why you can see two different colors. I'm thinking that maybe I could have just used white all over and it wouldn't have shown on the outside...

www.studiocostura.com

Me ha encantado el resultado y el patrón y ya estaba mirando el blog de Helen porque tiene allí varios posts sobre variaciones que me gustaría hacer también algún día: este de blusa kimono y este de vestido tienen muy buena pinta! Espero poder coser algo más para mí este mes...tengo una falda cortada y muchas telas lavadas para blusas de verano, estoy esperando que llegue ya el buen tiempo que este año se hace esperar!

Espero que os haya gustado este modelo y que os animáis a coser uno porque es tan bonito y tan cómodo!


I'm in love with the result and I was already looking around Helen's blog because she has some great hacks on this pattern I'd like to try out someday: this kimono cover up and the kimono dress look really tempting! I hope to sew more stuff for myself this month...I've got a skirt cut out waiting and I've prewashed a bunch of fabric for summer tops. I'm waiting for the weather to warm up as this year it's taking so long!

I hope you liked this kimono and I really think you should give it a go as it's so pretty and so comfortable!

www.studiocostura.com
 

La chaqueta bomber // The bomber jacket

 
bomber jacket www.studiocostura.com

Hola! Hace tiempo que no había cosido nada para mi niña y estos días me animé para hacer un par de cositas. También tengo que reconocer que no estoy ahora pensando mucho en coser para mí porque paso tanto frío todo el rato que me cuesta imaginar cosas que podría coser para ahora, jaja. Parece que da igual qué me pongo de ropa por la mañana, sí o sí luego van tres capas de lana encima para no tener frío. Y sí, soy del norte y blablabla pero aún así muy friolera. En fin, podría coser pensando en la primavera peeero...yo no funciono así, jaja. Así que va un proyecto para ella.


Hey! It has been some time since I've sewn something for my girl and I've finally made some new things for her. I also have to say that I'm not really thinking about sewing for myself at the moment as I'm so cold all the time and I can't really imagine what to sew, haha. Looks like it doesn't really matter what kind of outfit I choose in the mornings as I then put like three woollen layers on my clothes anyway. And yes, Im from the North and blablabla but I'm such a sucker for warm weather anyways. I could sew stuff for the springtime buuuut...I just don't seem to function that way, hehe. So here goes a project for her.

bomber jacket www.studiocostura.com

Cuando Auxi me dejó el último Ottobre Design 1/2018 y vi el bomber de la niña dije enseguida que eso lo quiero coser yo. El modelo mola porque es reversible y queda muy bonito en los dos lados. En la versión original usan snaps para que realmente esté reversible pero yo al final opté por la cremallera porque pienso que para mi niña es más fácil abrir y cerrar la cremallera en vez de los snaps.


When Auxi showed me the latest issue of Ottobre Design 1/2018 and I saw the bomber jacket I immediately said that I want to make one. The pattern is quite cool as it's reversible and looks great on both sides. In the original version they use snaps for the front closure but I used a zipper instead as I think my girl can open and close it more easily than the snaps.

bomber jacket www.studiocostura.com

La tela que usé para el exterior es un retal de punto encontrado en una tienda que antes no conocía y está cerca de mi casa, se llama Tejidos y Retales Antonio Meco. La valiosa información me la dio de nuevo Auxi y allí me fui a ver qué tal. Si normalmente las tiendas de telas de los barrios no suelen tener telas de punto pues allí hay una selección pequeña pero guay que van aumentando cada poco, casi todo es de temática infantil pero hay estampados chulos. Justo ayer volví allí para ver las novedades y compré una variedad de algodones tipo patchwork de estampados super bonitos y modernos (y de muy buen precio). Espero que sigan trayendo más telas de punto para sudaderas y estampados más “adultos” en el futuro (igual si todas que vais allí les dais la lata con este tema conseguimos algo, jaja). Muchas telas son restos de stock (de marcas como Hilco) así que se venden rápido, hay que estar pendiente de si entra algo que mola mucho, jaja.


The exterior fabric is a small piece I found in a store I didn't know about until now. It's called Tejidos y Retales Antonio Meco and it's located quite close to my home. Auxi told me about the store and I went there to check it out myself. Normally the small shops out of the city center don't really carry knit fabrics over here but this shop has a small but cute collection of knits that gets bigger little by little. Most of the prints are for children but I found cute stuff for myself as well. Yesterday I went back there and bought some patchwork fabrics in really pretty and modern prints that had great prices too. I hope they will stock some sweatshirt knits and more "adult" prints too in the future (maybe if you all go there and ask for them we'll make it happen, hehe). A lot of the fabrics are bolt ends (for example from Hilco) so they sell out very quickly, I'll have to keep my eye on cool stuff that might pop in, hehe.

bomber jacket www.studiocostura.com

Volvemos a la chaqueta. Por dentro lo forré con otra tela de punto pero algo más gordita así que las dos juntas hacen que la chaqueta abrigue bien. En este sentido me parece muy guay el patrón porque los estampados bonitos suelen venir en telas finas y así combinando con otro grosor por dentro el resultado mola mucho y se puede aprovechar esas telas más finas para proyectos que en principio son para telas más gorditas. El puño y la cremallera los puse negros para dar un poco de contraste ya que la chaqueta es muuuy rosa-morado-bastante loco.


Back to the jacket then. I lined it with another knit fabric that has a bit more weight so both of the layers together make the jacket nice and warm. That's why I think that the pattern is cool as you can use those lightweight prints together with medium weight ones that usually don't have cool prints and combine them to make thicker garments for winter time. I used black ribbed knit and a black zip to give a little contrast to this overall pink-purple-crazy color theme.

bomber jacket www.studiocostura.com

Como el bomber es reversible no se ve ninguna costura y está todo bien rematado tanto por dentro como por fuera. Usé la puntada recta para coser las costuras y luego las rematé por fuera con una de las puntadas decorativas que parece un poco a recubridora en la máquina doméstica. Este tipo de modelos molan ya que no hace falta tener remalladora para hacer acabados bonitos.

Los bolsillos que lleva el patrón quedan muy monos. No había hecho este tipo de bolsillos en punto antes y resultaron ser muy fáciles. Estaba acostumbrada de coserlos en telas planas y allí hay que estar pendiente de cada milímetro, sin embargo en punto no es tan complicado.


As the jacket is reversible no seams are visible and everything is finished off neatly both on the inside and on the outside. I used a straight stitch for the seams and I then topstitched the seams with a decorative stitch similar to a coverstitch on my domestic machine. This kind of patterns are great as you don't actually need an overlocker to get neatly finished seams.

The pockets on this pattern are cute. I hadn't tried this kind of pockets on knits before but they turned out easy to sew. I've used to sew them on woven fabrics where every millimeter counts so it really was way quicker on the knit fabric.

bomber jacket www.studiocostura.com

La verdad es que me encanta el resultado y estoy pensando en hacerle más de estos usando los estampados que tengo en casa. Coser chaquetas y sudaderas para ella es lo que más me gusta creo porque sé que duran un tiempo y se ven muy bonitas. Ahora mismo también estoy haciendo una cadena de trabajo para hacer varios pares de pantalones de pana porque alguien ha decidido crecer muy de prisa, jaja.


I'm very pleased with the result and I'm already thinking about using more prints I have at home for another one. Sewing jackets and sweatshirts for her is one of my favourite things as they actually last some time and look very cool. At the moment I'm binge sewing some pairs of velvet pants for her as someone has decided to grow so fast all of a sudden, hehe.

bomber jacket www.studiocostura.com

Hablando de sudaderas recordé que nunca hice la entrada con otra que le hice en el otoño, es ésta con las orejas de conejo que quedó también muy mona. El patrón es de Ottobre Design 6/2016. La tela verde mint es un punto con un lado liso y otro como con pelito, lo compré en Ribes y Casals. El forro de la capucha es un punto de algodón con estampado geométrico que tenía por casa. Mirando esta foto tengo que reconocer que tengo un tema con los puños en contraste creo, jaja.


Talking about sweatshirts I actually haven't shown this other one I made back in last autumn, it has the cutest rabbit ears. The pattern is again from Ottobre Design 6/2016. The mint fabric is a knit with a plush back on one side, I bought it from Ribes y Casals. The lining for the hoodie is made with a cotton knit I had in my stash. Looking at that photo I actually have to say that I think I have a thing with contrast ribbing, hehe.

bomber jacket www.studiocostura.com

Y otra cosa que le hice era el vestido para su cumple en octubre. El patrón es de Ottobre Design (uno del 2017 pero no recuerdo el número) y la tela es un punto muy bonito que encontré el verano pasado en el viaje por Lituania por casualidad. Alargué el patrón de túnica para hacer el vestido pero al final no me gustó mucho el resultado realmente. Quedaba como fuera de proporción con esa parte del escote tan pequeño y el cuerpo largo de vestido. A ella le gustó y lo llevó pero hace un tiempo le corté el bajo y lo dejé cómo túnica y me gusta más así.

Another garment I made for her was this dress for her birthday back in October. The pattern is from Ottobre Design (I don't remember which issue, but it's from 2017) and the fabric is this cute cotton knit print I bought on my trip to Lithuania last summer. I made the tunic pattern longer to make it into a dress but in the end I actually didn't like the result so much. I found that the proportions didn't go so well after all, the upper part seemed too small for the larger skirt part. She liked it and she wore it a couple of times but some weeks ago I cut it back to a tunic length and I like it way better now.

bomber jacket www.studiocostura.com

Pues eso, tengo un par de cosas más pensados para ella cuando termine los tres pares de pantalones de pana, jaja. Últimamente estoy intentando sacar adelante proyectos de costura aunque “nunca tengo tiempo”. Mi clave ha sido hacer algo con ratos de tiempo que en principio parece que no dan para mucho pero si por lo menos avanzas aunque sea un poco ya has hecho algo. Normalmente no solía ponerme a coser si sabía que no iba a tener por lo menos un par de horas libres y eso hacía que no empezaba nada porque ahora mismo sinceramente no tengo estos ratos libres. Lo que sí tengo son media hora allí y otra por allá, un poco todos los días...tardo mucho mucho más para terminar prendas pero al final voy sacando cosas y eso es lo que importa. Hacer lo que puedes con lo que tienes ahora mismo. En fin, gracias por leer esto y hasta la próxima :)


So I have some more things on my mind for her when I'll finish those three pairs of velvet pants, hehe. I'm really trying to get projects done even tough "I never have time" lately. My key to success has been trying to make something even when you have small amounts of time that seem to not be enough but even if you just make one seam or cut one piece you're still closer than you were before. I usually never started to sew if I knew I didn't have at least a couple of hours for myself which means I didn't start anything at all. At this moment of my life I don't have these hours, they just are not there...but I have half an hour here and there and well those are the times I will use for my projects. It does take a lot longer to finish stuff but I still finish at one point and that's what matters. Do what you can with what you have right now. Sooo...thank you for reading this and see you around here :)


2017 en costuras // 2017 in my sewing life

 
2107

Hola - hola. Ha llegado el tiempo de resumir este año 2017. Y bueno, escribir un post por aquí de vez en cuando tampoco viene mal, verdad? El último es de 16 de octubre y el anterior de 26 de agosto...no he estado activa por aquí en mucho tiempo la verdad. De hecho descubrí ayer que tenía la pagina desactivado y todo, jaja. Todo eso porque el otoño ha sido un poco de locura con trabajo y la vida en general.

2017...por donde empezar, ha sido un año de muchas cosas nuevas. De trabajo, oportunidades, aprendizaje, nuevos contactos, el fin de ciertas cosas y el comienzo de otras. 

Durante la primera parte del año trabajé en casa y daba clases en mi taller. En la primavera conocí a María, la mujer detrás la marca de lencería Le Bratelier. En su momento ella me contactó para que colabore con su línea de lencería hecha a medida para novias. De ese encuentro surgió luego la idea de que trabaje con ella en su tienda. A mí me vino muy bien porque sabía que iba a cambiar de casa y necesitaba otro sitio para dar clases.

Desde septiembre trabajo en su tienda en el barrio madrileño Chueca y estoy muy contenta con este cambio. Empecé con las clases continuas donde cada alumno hace los proyectos según su nivel y preferencias y también imparto talleres específicos de lencería: braguitas, bralettes y sujetadores con aros. He tenido suerte a conocer mucha gente muy divertida y ayudarles con sus proyectos costuriles.


Hey-hey. It's time to recap that 2017. And well, writing a post over here from time to time doesn't hurt too bad either, right? The last one is from 16th of October and the one before from 26th of August...I really haven't been active around here at all. I actually discovered that my site had expired since one week, haha. This autumn has been kind of crazy both on work and personal front so that's the main reason I haven't been showing up here.

2017...where should I even start, it has been a year of many new things. Work, oportunities, learning, new contacts, the end for some things and the new beginning for others.

During the first half of this year I was teaching classes at my atelier at my home. In the spring I met María, a woman behind the lingerie brand Le Bratelier. At the time she reached out to me to see if I could work with her for her custom lingerie orders for brides. Later on came the idea that I could work with her in her new shop. It was a perfect timing because I knew back then that I had to move and I didn't have a new place to teach classes.

Since September I work in the shop in the center of Madrid and I'm really happy with that change of plans. I started out with regular sewing classes where the students work on the proyects according to their likes and level of knowledge and I also teach specific lingerie workshops: panties, bralettes and bras with underwires. I've been very lucky to meet a lot of amazing people in those classes.

2017

También estoy en la tienda cosiendo las pequeñas colecciones que van sacando, estas navidades hicimos una con bodys y conjuntos de sujetadores con braguitas y quedaron realmente bonitos. Esta parte de mi trabajo me gusta mucho y aunque también es un continuo proceso que muchas veces incluye muuucho descoser y rehacer para llegar a la mejor manera de confeccionar las prendas, también es un gran aprendizaje en el campo de lencería para mí. Estoy aprendiendo mucho y cada vez me apasiona más este mundo de piezas pequeñas.

Otra cosa es que estoy ahora mismo trabajando con un patrón de bralette que quiero sacar en el formato pdf. Es un camino largo, empecé al principios de este año pero pasaron tantas cosas que lo iba dejando por meses. En el verano retomé el proyecto pero es realmente ahora que estoy haciendo un progreso y viendo los resultados. Espero que pronto os puedo enseñar el patrón definitivo y convenceros a las que todavía tenéis miedo a empezar a probar coser lencería que no es tan difícil y con un poco de ayuda y unas buenas instrucciones todo es posible. Estoy muy ilusionada con ese proyecto y espero que sea un comienzo de algo nuevo para largo plazo.


I also work on the production/sewing side of the small collections that the brand is releasing, this Christmas we made a little capsule collection with bodysuits and lingerie sets that turned out really pretty. I really like that part of my work and altough it's a big learning curve that includes looots of unpicking and redoing things in order to achive the best way to sew a garment, it's also a perfect way to dig very deep into the lingerie construction and how things are made. I'm learning a lot and I'm really enjoying this world of little pieces of fabric. 

The other proyect I'm currently working on is a bralette pattern I want to release in pdf format. It's a long process, I actually started out with the idea in the beginning of this year but as there have been so many things going on I've been postponing it for months. In the summer I started again but it's only now when I actually see some real results. I hope that I can show you the pattern soon and convince the ones who are still afraid of sewing something like lingerie that with a little helping hand and good instructions everything is possible. I'm really excited about that proyect and I hope it's a beginning of something for a long run too.

2107

También quiero retomar este blog y volver a mi ritmo de posts que mantenía antes, me da mucha pena que se ha quedado en el segundo plano por tanto tiempo. También ha sido así porque apenas he cosido cosas para mí, casi todo ha sido para el trabajo. No sabéis cuánto echo de menos poder tener ratos libres para hacer proyectos personales, pero supongo que hay épocas cuando no se puede tener de todo. También tengo que reconocer que ahora no estoy tannn obsesionada con costura como hace unos años, ya no me quedo todas las noches hasta altas horas cosiendo. Eso no significa que no siga siendo mi gran pasión obviamente, quiero pensar que como en todas buenas relaciones con el tiempo cambias un poco la cantidad por calidad y aprecias más lo que haces y realmente disfrutas al máximo una vez que tienes la posibilidad de tener ese rato haciendo algo que te gusta mucho.

Aunque en mi vida personal este año ha sido muy difícil estoy contenta de que puedo trabajar de algo que realmente me apasiona y llena. Aún así son muchas horas, llegar a casa tarde, trabajar cuando el resto del mundo está descansando y como en casi todo trabajo creativo (desgraciadamente) nunca tienes la certeza de qué va a pasar o qué tal te va a ir económicamente. Pero espero seguir este camino y este proyecto, espero que mucho trabajo "invisible" hecho durante el 2017 tendrá sus frutos en el año que viene.

Espero que mi 2018 llegue con muchos proyectos nuevos, más tiempo para crecer (y descansar) y que pueda aprender mucho más. A vosotros os deseo que tengáis tiempo para coser todo lo que tengáis en mente y conquistar proyectos que todavía os parecen difíciles. Prometo más contenido en este espacio y un patrón muy bonito en breve. Gracias por leer esto y feliz fin de año!


I really hope to get back to posting more often over here at the blog too, it's really sad that this part has been on hold for so long. The reason is also that I have been doing very little selfish sewing lately, it has been almost all work related. You can't imagine how much I miss those moments of sewing time in my life but I guess there are times you just can't have it all. I also have to confess that I'm not sooo obsessed with sewing like I was some years ago, I don't do late night sewing every day anymore. It doesn't mean that it's not my big passion anymore, I'd like to think that as in all the great relationships you change the quantity for quality a bit and actually cherish the momenths you have when you can do that something you really love.

Altough in my personal life this year there have been many difficult things I'm grateful that I can work doing something I really love and feel pasionate about. Unfortuantely it includes long hours, arriving home late, working when other people have the time for themselves and almost never knowing what's next or how your economic situation will be. But still I hope to continue this path I've chosen and that this creative proyect will continue too, I hope that a lot of this "invisible" work that I've done during this year will bring great things next year.

I hope my 2018 will bring new proyects, more time to grow (and rest) and that I can learn a lot more. To you I wish you'll have time to sew all the things you have in your sewing list and that you can tackle the proyects you still think are difficult for you. I promise more content over here and a very pretty pattern soon. Thank you for reading this and happy holidays!


Kelly anorak con forro // Kelly Anorak with Lining

 
Kelly anorak with lining www.studiocostura.com

Hola! Por fin he tenido un rato para poder escribir sobre el abrigo Kelly que terminé la semana pasada. Más que nada tenía también prisa porque sabía que lo iba a olvidar todo si no me ponía ya, jaja.

Así que para empezar, ya hice una vez el mismo abrigo con el patrón de Kelly de Closet Case Patterns, lo puedes ver en este post. Más tarde en la primavera sacaron también el extra patrón de forro para el mismo abrigo y tenía ganas de probarlo porque así esta prenda tan bonita puede convertirse en algo aún mejor y más práctico.

Mi idea realmente es hacer dos abrigos, uno para mi hermana y otro para mí. Al principio pensaba hacerlos a la vez pero entonces vi este patrón de Ottobre Design también de anorak y estaba pensando que quizás me haga el mío con el otro patrón. En busca de muestras vi este muy bonito en el blog de Ana. Después cambié de opinión simplemente porque me da tanta pereza calcar el otro patrón después de imprimir-pegar-cortar-modificar el Kelly y como tampoco el resultado final tiene tantísimas diferencias pues me quedo con este.

Hey! I finally have time to write about my latest Kelly anorak I made last week. I wanted to record the process here quickly as otherwise I'm sure I'd forget it, hehe.

So to start with, I already made an anorak with the same Kelly pattern from Closet Case Patterns, you can check it out in that post. Later this year they also put out the expansion pack for the lining which I really wanted to try out as this would make this beautiful garment even better and more practical for me.

My original idea was to make two jackets, one for my sister and the other one for myself. First I thought about making them at the same time but then I saw this Ottobre Design pattern for an anorak too and thought about using that one for my version. I was looking around to see some samples and this one from Ana's blog is looking really good. Some time after I still changed my mind basically because I'm too lazy to trace another pattern after printing-assembling-cutting-modifying the Kelly and as the end result is not so different I'm just staying with Kelly.

Kelly anorak with lining www.studiocostura.com

La tela que usé para esta versión es una micropana en color mostaza, es de algodón con un poco de elastán. Lo elegimos no porque sea pana pero por el color y la verdad es que ha quedado guay. Hay que tener en cuenta que con pana hay que recordar que no se puede voltear las piezas de los patrones al cortarlos para aprovechar mejor el tejido porque al cambiar la dirección se cambia el brillo...así que por si acaso hay que comprar un pelín más de tela. El forro es raso de viscosa en color gris claro que tenía por casa.

En mi primer Kelly usé el patrón en talla 8 y me hubiera gustado que las mangas estuvieran un pelín más anchas. Mi hermana usa talla más grande y para ella corté el patrón en pecho de 10, en la cintura de 12 y de cadera en 14, gradualmente uniendo las tallas. Los cambios los hice sólo en el delantero y en la espalda, el largo del cuerpo lo dejé como en la talla 10. Las mangas las hice en talla 10 y 2 cm más largas. La tapeta delantera donde van los snaps la hice 1 cm más ancha (en doblez) porque la última vez me pareció que los snaps se quedaron demasiado al borde.

Como no tenía aquí el patrón que usé la última vez me tocó imprimirlo todo otra vez. Si me preguntáis qué prefiero, que si imprimir y pegar o calcar del patrón impreso pues la respuesta es que siendo un patrón de tantas piezas (25 creo) es igualmente coñazo de las dos formas...o sea, un rollo, jaja. Cuando haces el Kelly con forro tienes que mirar bien qué piezas usar, en las instrucciones viene la lista de piezas que necesitas del patrón original y luego la lista con las piezas del forro. La manga se ha cambiado y ya no tiene puño, así que son nuevas tanto las piezas del forro como del exterior. Había un error que vi después de cortar: la vista de forro de la capucha (R2) lo han puesto como si se cortase de la tela de forro pero realmente es de la tela exterior.

I used a mustard colored thin striped corduroy for this version, it's a cotton fabric with a bit of elastan in it. We decided on that fabric not because of it would be corduroy but just because of the color and it turned out great. Using a fabric like corduroy means that you can't flip the pattern pieces to save up on fabric as there's the directional sheen on the fabric that shouldn't be mixed up on pattern pieces...so I bought a bit more fabric than required just in case. The lining is a rayon satin fabric I had at home.

On my first Kelly I made a size 8 and I later would have liked the sleeves to be a bit wider. My sister uses a bigger size so I cut this one in size 10 in bust, 12 in waist and 14 in hips, gradually joining the sizes on the pattern pieces. I only made these changes on the body pattern pieces and left the length like in size 10. I made the sleeves in size 10 and made them 2 cm longer. The placket where the snaps go seemed a bit too narrow for me on my first Kelly so I widened it by 1 cm (on the fold) to make more room for them.

As I didn't have my old pattern here I had to reprint everything. If you ask which method I like more, printing and assembling or tracing from a printed pattern, well my answer is  that if you're working with a pattern that big (I think it's 25 pattern pieces) it's a pain in the ass both ways, haha. When you make a lined version of Kelly you need to read well the instructions to see which pattern pieces you need from the original version and which ones from the lining extension, there's a list there. The sleeve has been changed and now comes without the cuff so both the sleeves exterior and lining pieces are new. I saw an error after cutting too: the hood lining facing (R2) is on the lining fabric list but you need to cut it from the exterior fabric.

Kelly anorak with lining www.studiocostura.com

Sobre la construcción. Hay partes que son similares a la versión sin forro pero luego hay bastante más de curro por delante. Esta vez cosí las costuras de unión de piezas sin rematarlos por dentro (por fuera se ven iguales) ya que la prenda lleva forro, eso sí que fue más rápido que la primera vez. Las instrucciones que me confundían la primera vez se habían mejorado mucho. La primera vez corté mal el tema del delantero (que son dos iguales y luego tienes que quitarle una parte a uno de ellos) y esta vez lo vi mejor explicado, especialmente eso de que cuando se refieren al lado derecho de la prenda, eso significa que el lado derecho cuando tú tienes la prenda puesta. No tenía mucho sentido pero si está hecho así, pues así lo hacemos. Mientras no me confundo en el camino…

No había grandes problemas a la hora de coser el abrigo. Las piezas encajan y todo va bastante bien. A la hora de coser la cremallera y las vistas hay que leer las instrucciones paso a paso y seguir cumpliendolos, luego se ve el porqué de los pasos...o sea, parece complicado al principio pero luego la cosa se soluciona. Donde me quedé con la duda es en la parte de abajo donde se une el forro con el exterior, ese cachito donde la vista de la cremallera, se quedó medio raro, es difícil de explicar si no tienes la prenda adelante. Pero de alguna manera doblé la vista para que no se quede con el borde sin rematar allí fuera y luego lo cosí a mano para unir al forro como en las instrucciones. No sé si lo hice bien, pero cerrado está.

Cómo dije, hice la tapeta 1 cm más ancha y me gusta el resultado así, me parece que hay más espacio para los snaps. Ahora, ya en la parte de unir la capucha, no sé cómo lo hice que me cuadró, pero pensé que realmente si la tapeta es más ancha, me faltaría también 1 cm de la capucha...así sería lógico, no? Pero igual por mi tela ligeramente elástica o vete tú a saber por qué...pues me cuadró esta vez.

Realmente la parte donde más descosí era la última: para fijar el túnel de cordón al abrigo, tanto a la capa exterior como al forro a la vez. Primero se engancha el túnel sólo al exterior y luego se cose a través de las dos capas pero el forro se me movía y me quedé sin espacio y mil movidas más hasta que lo hilvané todo a través de las dos capas de nuevo y sólo entonces conseguí que quede medio bien. Además lo malo de esta tela es que al tener un poco de elasticidad se me cambiaba de largo de vez en cuando y las cosas no siempre encajaban a la primera.

About the construction process. There are similar parts as in the non lining version of the pattern but there's also lots of work ahead after that. I didn't sew the proper flat fell seams this way, I just left the insides of those seams raw as there's lining there anyway (they look the same from the outside) and this made the process faster. The instructions that confused me the first time were better written this time. On my first Kelly I cut out the front piece wrong (they are both cut out the same and later you cut away one part) and this time I saw that this part is explained better, especially the part where they refer to the right side of the garment which means the right side when you are wearing the jacket. It didn't make too much sense to me but as it's how the instructions are written well I'll follow them as they are as long as I don't get something wrong...

There were no big problems when sewing the jacket. The pieces go well together and the process is smooth. When sewing the zipper and it's facings you need to really do it step by step and carefully read the instructions, it makes sense when everything is set finally...it might seem complicated at first but you'll see how it comes together in the end. The part I didn't understand was the part where the lining and exterior facing meet where the zipper is, inside the jacket. I did fold the facing so it wouldn't be there on the way with its raw edge and then later sewed it by hand as the instructions said but I'm not sure if it's the correct way. Also it's kind of hard to explain that part when you don't have the garment in your hands...

As I said I made the placket 1 cm wider and I like the result that way. When I was attatching the hood I realized that when I made the placket wider I should have made the hood piece wider too to fit them both. the funny thing is that everything still fit without changes this time, it might have been also because of the slight stretch in my fabric, not sure about that happy coincidence there. 

The place I unpicked the most was actually in one of the last steps: when attactching the drawstring casing on both the exterior and lining pieces. First you only attatch it to the exterior and then in the end when the lining is in place you topstitch it through both layers. Well the lining shifted like crazy and I was left with no fabric until I basted everything in place through both layers and only then I could sew it well. The bad thing about my stretchy fabric was that it cahnged it's lenght sometimes so it made things a bit unpredictable.

Kelly anorak with lining www.studiocostura.com

Así que los cambios entre la primera versión sin forro y ésta con forro son de fuera que las mangas no llevan puños y el túnel de cordón está cosido por fuera y no por dentro. Y por dentro obviamente el forro. No sé decirlo con 100% de exactitud pero me parece que ahora las mangas son más anchas que en otra versión (que sería lógico para dar espacio para el forro también…), porque la talla 8 antes me pareció de manga un poco estrecha como comenté antes pero la talla 10 con forro es bastante amplio, o sea, creo que para mi abrigo con forro voy a volver a la talla 8 después de todo.

Los snaps que he usado son de tipo Anorak de Prim y la verdad es que me gustan más los que pude poner con la prensa industrial porque son más “suaves”, estos de Prim son fuertes y aunque funcionan y todo, me parecen un poco demasiado “cerrados”, no sé si me explico. Al principio pensaba ponerle un cordón amarillo pero la verdad es que este gris que encontré por casualidad en casa le queda muy bien junto con los snaps y el forro, me parece un detalle de color bonito para romper toda la mostaza un poco.

So the main differences between the non lining and the lining versions are that the sleeves don't have cuffs and the drawstring casing is on the outside now. And the lining itself of course. I'm not 100% sure but I think that the sleeves are wider now than in the first version (I guess it's logical as the lining needs more space...), because as I mentioned before I found the size 8 sleeve a bit tight but the size 10 with lining is quite roomy, so I probably return to the size 8 with my lined jacket.

I used Anorak type snaps from Prim and to be honest I like the industrial snaps I could put on my first version a lot more. They are way "softer" than the Prim ones. I mean these ones work well but I find them a bit too "strong" and "closed" if you know what I mean. At first I wanted to add a mustard color drawstring but then found this grey one at home and I really like the combination that all the grey/silver elements bring to the overall mustard look.

Kelly anorak with lining www.studiocostura.com

Qué más? Que aunque quería hacer los dos abrigos a la vez y luego pensé terminar uno y entonces directamente otro, pues ahora necesito un descanso. A veces me olvido que este tipo de proyectos llevan mucho tiempo y energía, jaja. Ahora necesito algo más ligero...una blusa, algo de lencería quizás, así me animo seguir ya que además la parte de preparar el patrón está hecho, lo único que lo voy a cortar a mi talla y ya está.

Espero que te animes a coser este abrigo porque a mí sí que me gusta mucho y el primero lo he usado un montón y el que haré seguro que también. Es un proyecto largo y necesita paciencia en mayúsculas pero merece la pena y mucho! Para el siguiente he pensado un par de cambios que ya os contaré más en detalle una vez que lo haya terminado. Gracias por leerme como siempre!

So what else? I thought about making both jackets at the same time or at least one after another but now I need a break. Sometimes I forget how time and energy consuming these projects could be, hehe. Now I need something easy as a top or lingerie or something like that, that way I'll be more motivated to continue with the second one as the pattern is already prepared, I will only reduce it to my size and that's it.

I hope you'll try out sewing that jacket because I really like it and I've used my first version a lot and hopefully will do the same with the second one too. It's a long project that needs lots of patience but it's really worth the effort! I thought about some changes for the second one and I'll tell you all about it when it's ready. As always, thanks for reading this!


Ropa de otoño para este verano // Autumn clothes for this summer

 
ottobre makes www.studiocostura.com

Hola! Ya lo sé...este post empieza con un abrigo! En pleno mes de julio! Pues así estamos aquí en el polo norte...con una media de 15 grados y viento todo....este..."verano". Si lo lees en Madrid te va dar un calor sólo en pensar en esta tela de softshell que he usado, jajaaa. Pero aquí vamos...porque no todo el mundo tenemos la suerte de estar en la playa. Pensando en positivo...por lo menos no hay que sudar todo el rato, jajaa. (Estoy practicando muy bien lo de pensar en positivo porque hay una cosa sobre mí que igual no sabéis: siempre prefiero antes el calor que el frío, jaja)

Hey! I know...this post starts with a jacket! In July! Well, this is how we roll here at North Pole...an average of 15 degrees and wind during all...the..."summer". If you're reading this post in Madrid it must make you feel bad even to think about that softshell fabric I've used for this project, hahaa. But here we go...because not everyone's so lucky to be at the beach now. And well...positive thinking: at least you don't have to sweat here all the time, haha. (Really practicing that positive thinking because here's a fun fact about me: I always choose hot weather over the cold one, hahaa).

ottobre makes www.studiocostura.com

Así que cuando llegué a mis "vacaciones en el norte" me di cuenta que la niña no tiene ropa adecuada para poder estar fuera jugando como tiene que ser, me había olvidado que hacía tanto frío. Otra vez. . Así que antes de cualquier cosa me puse a hacer un pequeño conjunto "capsulo" para ella (ya lo sé...igual lo normal sería ir a H&M pero os recuerdo que estáis leyendo a un blog de costura, escrito por una loca de costura, jaja). Para empezar hice este gorro y bufanda, los dos son del Ottobre Design 4/2015 y se hacen muy rápido. La tela es punto de algodón con 5% de elastán, comprado en Tallinn, el estampado es monísimo!

So when I arrived to my "vacations in the North" I saw that my kid didn't have proper outerwear clothes to play outside...I had forgot that it's that cold. Again. So before sewing other stuff I made a little capsule wardrobe for her (I know...the normal thing would be to go to the H&M but let me remind you that you are reading a sewing blog, written by a sewing nerd, haha). To start with I made this beanie hat and a scarf, both of them are from Ottobre Design 4/2015 and they are very fast makes. The fabric is a cotton knit with 5% elastan, bought in Tallinn and the print is so cute!

ottobre makes www.studiocostura.com

Segundo proyecto: pantalones para poder sentarse en el cesped o en la arena sin mojarse el culo...así tal cual. En casa tenía un softshell negro por fuera y gris por dentro y decidí hacer un par muy sencillo con esa tela. Usé el patrón "Up and Run" del Ottobre Design 1/2017 ya que está hecho para telas sin elasticidad. No hice los bolsillos ni la falsa bragueta como en la versión original y la cinturilla la hice añadiendo 4 cm a las piezas para poder doblarlo y meter allí directamente la goma elástica. Los puños son también de un puño-tubo que tenía por casa y aunque en azul marino, le vale para este pantalón. 

The second project: pants to be able to sit on the grass and sand without getting your butt wet...quite straight forward, right. I had this softshell fabric at home in black and grey on the inside so I made a very easy pair with it. I used the "Up and Run" pattern from Ottobre Design 1/2017 as it's made for fabrics without elasticity. I didn't sew the pockets nor the mock fly as in the original version and I made the waistband casing adding 4 cm on the upper edge to be able to turn it under and put the elastic tape directly in there. The cuffs are made from a cuff tube I had at home and altough it's navy blue it does the job anyway.

ottobre makes www.studiocostura.com

Y ahora por la chaqueta. Ya sé que lo hice yo y blablabla, pero es tannn bonita, jajaa!!! Igual os suena esa tela porque la usé ya antes para otra chaqueta, se puede ver en este post. Lo que pasó la última vez es que realmente el patrón que usé era para una prenda más ajustada, una sudadera. Y no tenía mucha holgura y con lo rápido que crecen los niños...esa chaqueta por desgracia se quedó pequeña en nada de tiempo. 

And now the jacket. I know it's me who made it and blablabla but it's just soooo cute, hehe!!! Maybe you remember that fabric because I used  it before for another jacket, you can see it in that post. What happened the last time was that the pattern I used was actually for a closer fitting garment, for a hoodie. It didn't have a lot of ease and as children grow so fast...unfortunately this jacket ended up beaing too small really quickly.

ottobre makes www.studiocostura.com

Esta vez fui más inteligente (lee: usé mi cerebro) y usé un patrón diseñado para telas de softshell, el "Warm Inside" de Ottobre Design 4/2015. Quiero decir gracias a Auxi quien me mandó las instrucciones en castellano porque mi revista está en ruso y el gorro y la bufanda, pues vale, pero este proyecto no lo iba a adivinar así tan fácil. Qué bueno es tener amigas costureras para ayudarte en apuros así!!

Hice todo según las instrucciones menos unas tiras en las mangas que no me parecieron ni útiles ni bonitos. Como ya dije, la tela es un softshell muy bonito con estampado por fuera y rosa por dentro (comprado en Tallinn). Para las vistas había que usar algodón pero para combinar mejor los colores tenía una loneta azul-verde mint que me gustó más y opté por usarla. Los puños son de punto de puño verde mint. 

This time I was more intelligent (read: I used my brain) and used a pattern designed for softshell fabrics, the "Warm Inside" from Ottobre Design 4/2015. I'd like to thank Auxi for sending me Spanish instructions as I only had the magazine in Russian and well the hat and the scarf were OK, but this project needed some more in depth instruction reading. How nice it is to have sewing friends for these occasions!! 

I made the jacket according to the instructions apart from the part of the bands on the sleeves that din't seem very practical nor beautiful to me. As I said before the fabric is a pretty softshell with print on the outside and pink color on the inside (bought from Tallinn). Tha pattern called for a cotton fabric for the facings but I had a light weight canvas type of fabric that matched better with the color so I used that one instead. The cuffs are made from a rib knit in mint.

ottobre makes www.studiocostura.com

Otra cosa que hice diferente era no ponerle cremalleras para estos bolsillos ya que mi niña es demasiado pequeña como para darles mucho uso...ya sabes, las llaves, el movil... Pero en general me gusta mucho como han quedado los bolsillos con ese toque de color. Además hay que decir que softshell es una tela muy agradecida para coser porque como no deshilacha, todo es mucho más cómodo y rápido sin remallar. Ahora sí, lo que coses se ve, al descoser tienes los agujeros, así que...cuidado con estos pespuntes vistos!

The other modification I made was to not put zippers on those pocket openings as my kid is too small to actually use them...you know for keys and a cellphone and that stuff... But in general I like a lot how the pockets turned out, this pop of color is really cute. And also just to mention in my opinion the softshell fabric is really good for sewing as it doesn't fray and everything is easier and faster without serging the seams. The downside of course is that when you need to unpick you'll have permanent holes...so be careful with that visible topstitching!

ottobre makes www.studiocostura.com

Al principio cuando empecé a coser la chaqueta estaba pensando si podría unir la capucha directamente con el cuello ya que sabía que de todas maneras sería muy raro que lo quitase y realmente no necesitaba todo el tema de automáticos de presión allí. Pero luego recordé que igual no merece la pena modificar un patrón que no has usado antes (gracias, experiencias malas del pasado) y hacerlo por una vez tal cual está escrito y después vemos qué pasa, jaja. Pues estoy muy contenta porque aparte de que parece todo más profesional, no sé cómo describirlo pero de esa manera se queda la capucha mucho mejor. De hecho, lo he notado con mi Kelly anorak, que me gustaría que esa zona de cuello y el cierre etc fuera de otra manera, igual así con los automáticos. Así han hecho por ejemplo en el último Ottobre Design 4/2017 un abrigo de chicas...se podría copiar de allí la capucha "para mayores". Los automáticos de presión son de Prim, del tamaño "Anorak". 

At first when I started to sew the jacket I was wondering if I could directly put the hood and the collar together as I knew I'd hardly ever take it away so all the snap action there would be a bit unnecessary. But then I remembered that maybe it wouldn't be very wise to alter a pattern you've never used before (thanks bad memories from the past) and I should do as I'm told and later see how it goes, hehe. Well, I'm happy I did it so as apart from looking more professional, also I'm not sure how to describe it but the hood sits way better that way. Actually I noticed this on my Kelly anorak too, I'd like that collar and hood zone there to be sewn in some other way, maybe with snaps like these ones. For example in the latest Ottobre Design 4/2017 there's a girls coat that's made like this...maybe I can copy the "grown ups" hood from there. The snaps are Prim Anorak style.

ottobre makes www.studiocostura.com

Así que creo que eso es todo sobre los detalles de la chaqueta. Normalmente no publico aquí fotos de la pequeña pero está tan mona con su nuevo abrigo que esta vez haré una exepción, jeje. Del tamaño esta vez la cosa ha salido muy bien, hay espacio para este verano nordico y el otoño de Madrid que nos espera también.

Espero que os ha gustado tanto como a mí! Ahora voy a empezar a juntar las telas y demás para algún abrigo para mí también...

So I think that's it abut the jackets details. I normally don't put up photos of my girl but she looks so cute in it and I just have to share, hehe. The size this time is perfect with ease and there's enough room for this Nordic summer and for the upcoming autumn in Madrid.

I hope you liked it as much as I did! I'll be preparing the fabrics now to sew myself a jacket too...