
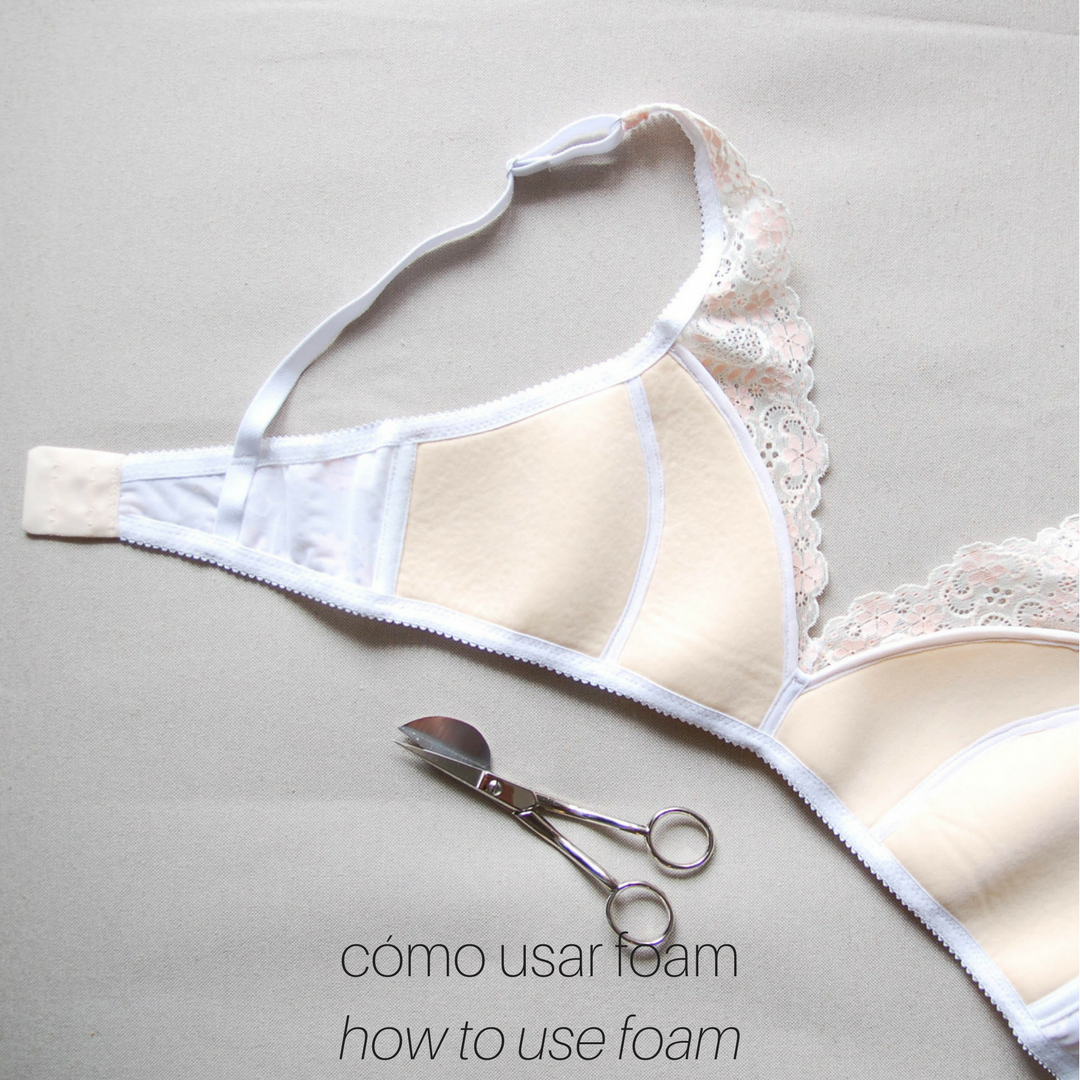
Hola! Hoy os traigo el tutorial que muchas me habéis pedido: cómo usar foam en el bralette Hanna. Para empezar quiero contaros un poco más sobre cuando se puede y cuando no se puede usar foam en los sujetadores.
Si me preguntan si se puede usar foam en este patrón la respuesta en principio sería que no. Por qué? Porque el patrón está diseñado para telas de punto y encajes elásticos y el foam no es elástico en general. Usar un material no elástico en las copas afecta a como queda la prenda. Ahora sí, se puede experimentar, y por eso va aquí el tutorial. Ya sabéis que este modelo ya que está hecho para tejidos elásticos se da de sí y adapta bastante bien. Dicho eso si tú no tienes mucho pecho puedes aprovechar y usar el foam porque lo más probable es que te quede bien. Pero hay riesgo que al no ser tan elástico como el encaje solo pues se te aplasta el pecho.
Yo he usado el foam que compré en Tailor Made Shop y éste es el que más me ha gustado porque sí que tiene un poco de elasticidad a lo ancho así que te deja un poco de margen ya que no es tan rígido. En el pasado también he usado el foam de Make Bra pero éste sí que no tiene nada de elasticidad.
Editado octubre 2019: ahora tenemos también foam en Studio Costura Shop!
En mi caso hice la misma talla M que uso normalmente en el patrón Hanna y usé foam y me queda bien. También es porque soy copa A y tengo poco pecho. Igual tú eres copa C pero igualmente has usado la talla M porque se da de sí y si intentas usar el foam notas que te aprieta, eso es porque no tienes tanto margen para "jugar". Una solución sería probar usar una talla más en las copas dejando la banda en la misma talla que usas normalmente. De verdad, es cuestión de experimentar y no te puedo garantizar que va a quedar bien, aún así te recomiendo probar porque a mí personalmente me gusta mucho el resultado. De todas maneras te recomiendo antes que nada hacer este patrón tal como está sin foam para ver cómo te sienta. Si después quieres probar el foam pues adelante. Así ya sabes qué esperar y además ya sabes cómo coserlo y las siguientes modificaciones que te voy a contar no te resultan tan difíciles de entender.
Hey! Today I'm sharing a tutorial that many of you have been asking for: how to use foam for the Hanna bralette pattern. I'd like to start with telling you abit about when you can and when you can't use foam on bras.
If you ask me if you can use foam with this pattern the short answer would be no. Why? Because this pattern is designed for knit fabrics and stretch laces and foam in general has no stretch. Using a non stretch material in the cups does affect how the garment fits. But you can experiement and that's why here's the tutorial. You already know that this pattern is made for stretchy fabrics that have give and it fits quite well for different sizes. Saying that means that if you don't have a large bust you can try out foam and it probably will fit well. But there is the risk that as the foam does not stretch that much as the lace it can flatten your breast.
I have used a cut and sew foam that I buy from Tailor Made Shop and that's the one I like the most because it has a bit of give in one direction so it gives you a bit wiggle room as it's not so rigid. I have also used other type of foam from Make Bra in the past but this one does not have any give in it.
Edited: we now also carry foam at Studio Costura Shop!
In my case I made the same size M as I usually use for the Hanna pattern and used foam which turned out great. This is mainly because I'm an A cup and I have a very little bust. Maybe you are a C cup and you also used the M size in this pattern and it fit well but when using the same size with foam you'll see that it's too small because you won't have that much room "to play with". One solution might be using a bigger size in the cups and maintain the same size in the band. It really is about experimenting and I can't guarantee that it will fit well. I still recommend you to try it out as I really like using foam in this bralette. Anyhow I recommend you to first try out this pattern without foam as in the original version and see how it fits. If you then want to try foam you can absolutely do it. Then you'll already know what to expect and also you'll know how to sew the bralette so the modifications I'll explain in this tutorial won't be so confusing.

Dicho todo eso vamos a hablar de los materiales extra que necesitas. Necesitas foam y un poco de cinta de recubrearos. El foam como te dije puede variar y a veces he encontrado en las tiendas materiales que se le parecen y me han dado buenos resultados aunque no están pensados específicamente para esto. Una vez usé un neopreno gordito y estaba muy bien, es cuestión de probar.
El recubrearos que normalmente se usa en los sujetadores con aros lo vamos a usar aquí en la parte de la unión de la banda con copa. Ya que este patrón es un poco ancho en esa parte y el foam da más forma puede pasar que luego se forma como una "curva" en esa parte, es difícil de explicar. Si cosemos allí el trozo de recubrearos, lo va a estabilizar y le da más rigidez y así el problema se suele quitar. Igual lo habéis visto también en otros sujetadores en las tiendas, a veces llevan de hecho dentro una parte metálica o de plástico similar a los corsets. En mi caso no ha hecho falta poner nada dentro pero eso también es una opción si el problema persigue.
After the introduction I'd like to tell you a bit about the materials you need. These would be the foam and some underwire channeling. As I told you the foam can vary and sometimes I've found similar materials in normal fabric shops that have given me good results altough they are not specially made for this purpose. Once I found a thick scuba fabric that worked out well, you'll need to try them out of course.
The underwire channeling is a tape used in underwired bras and we'll use it here on the seam that joins the cup with the band. As this pattern is wider in that part and foam gives more body to the garment you might see that a "curve" appears once you finish your bralette, it's a bit difficult to explain. If you sew a piece of channeling there it will stabilize the area and make it more rigid usually avoiding this issue. Maybe you've also seen it in the rtw bras, sometimes it also has a metal or plastic boning inside, similar to the corsets. In my case I didn't put the boning inside but it is an option if the problem persists.
El método que te voy a enseñar es específico a este patrón ya que es un poco distinto a otros sujetadores con foam, principalmente porque el forro de la copa no cubre la parte interior del todo y vamos a hacerlo un poco distinto. Anteriormente he hecho otro tutorial sobre cómo poner foam al sujetador Watson y allí lo hice de otra manera por si le quieres echar un vistazo.
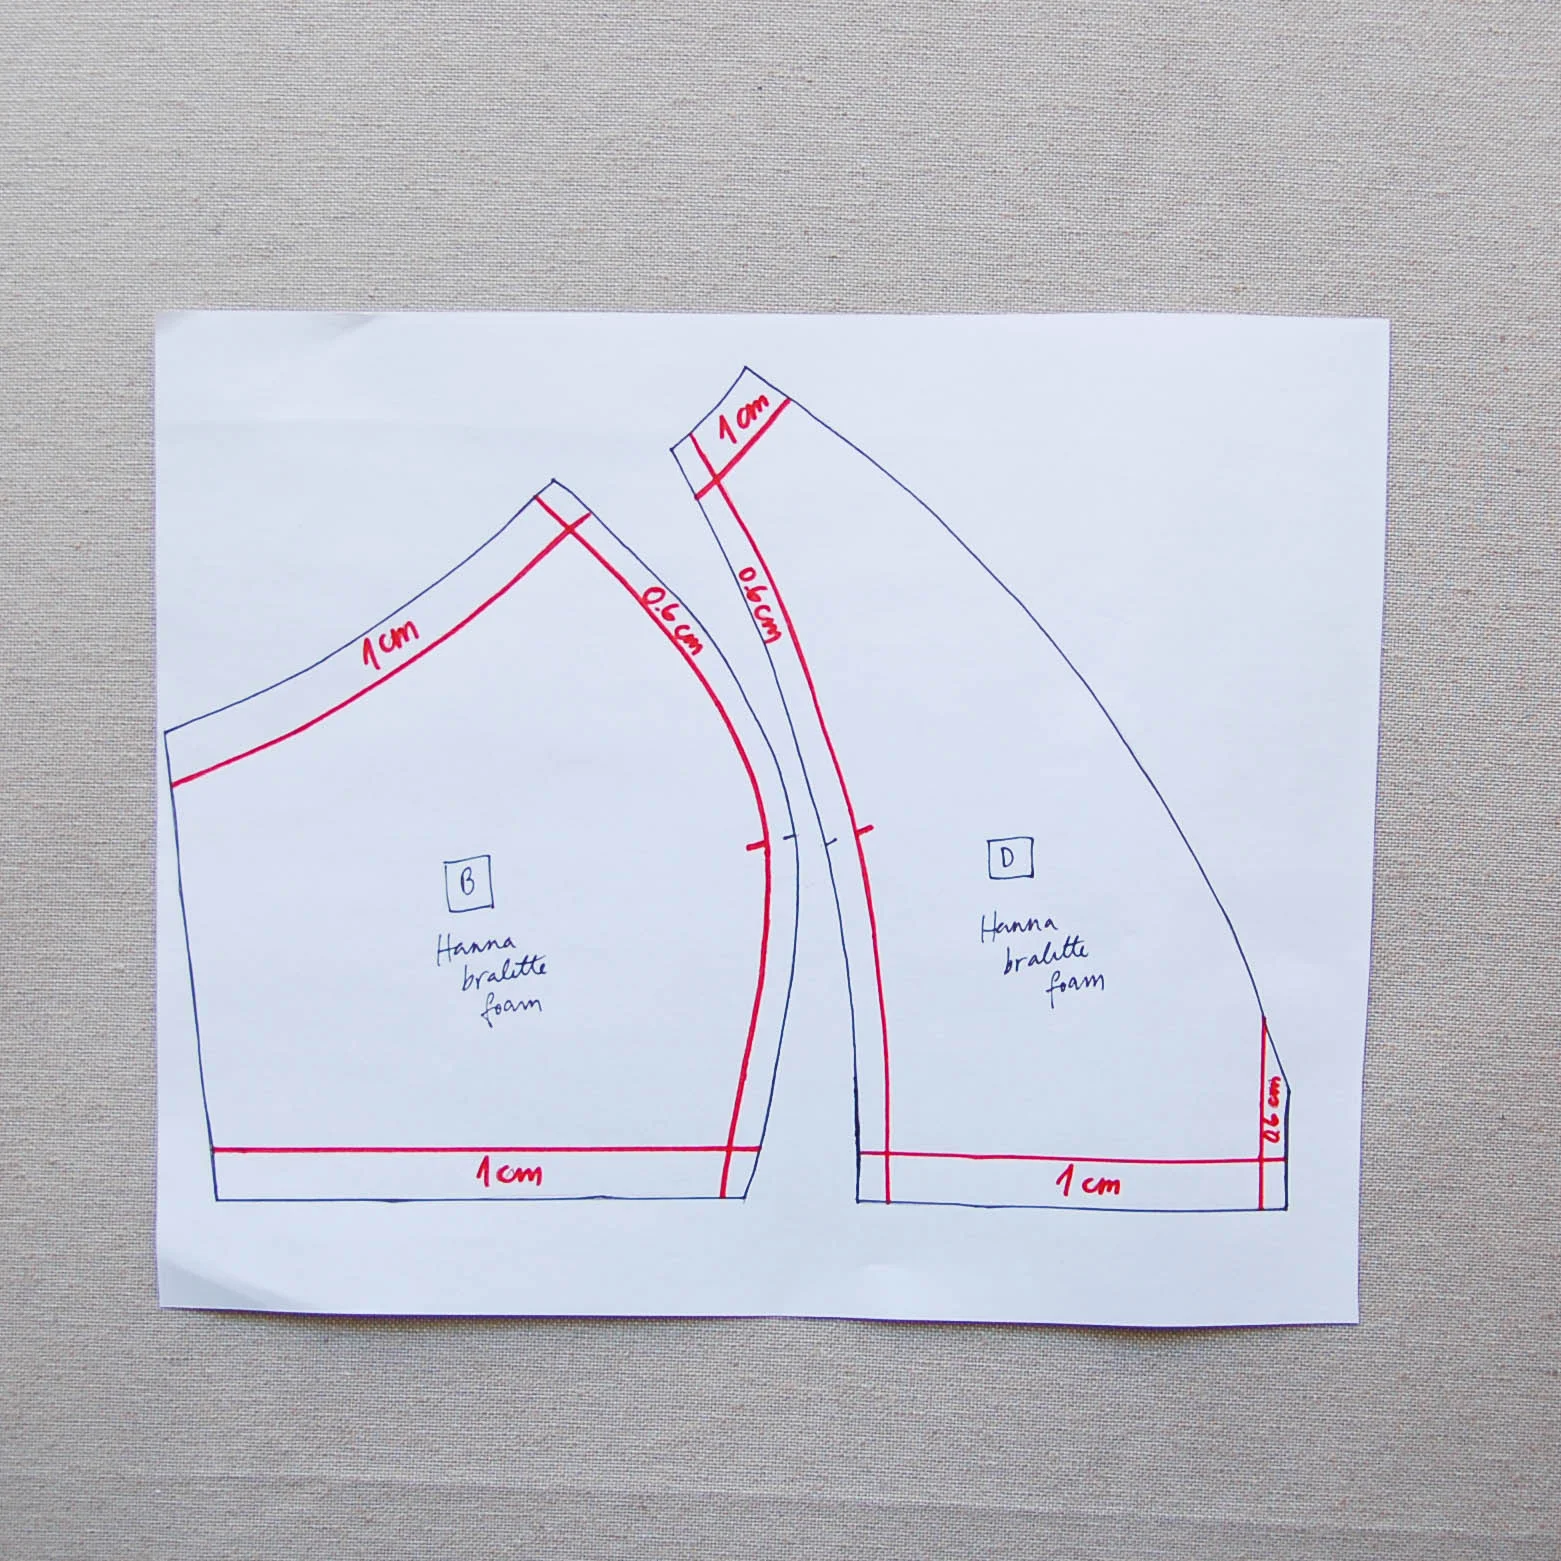
Para las piezas de foam hay que modificar las piezas de patrón de la copa que normalmente usamos para el forro (B y D). Hay que modificar por dos partes: por un lado donde el foam se une entre sí y por otra parte donde se cose el elástico. Las piezas de foam se unen entre sí con un zig-zag y no necesitan margen de costura de 6 mm que lleva el patrón así que se lo vamos a quitar en los bordes que se unen entre sí. Serían en B el lado derecho y en el D tanto el lado derecho como el izquierdo (la costura central). Luego hay que quitar el margen de costura para coser el elástico. Eso lo hacemos porque el foam no se dobla encima de sí mismo porque se abulta demasiado. Luego te explico más pero lo que se hace es que la primera pasada de zig-zag se hace sólo en el encaje y la segunda pasada de zig-zag de poner el elástico ahora sí se dobla encima del foam y se cose allí. Como ese patrón tiene margenes de 10 mm para los elásticos se lo vamos a quitar tanto en la parte de arriba como abajo en las piezas B y D. Donde no se va a tocar el patrón es en el lado izquierdo de la pieza B porque ese margen lo necesitamos para unirlo con la banda y en la curva en el lado derecho de la pieza D porque este no tiene margen.
Así que copia las dos piezas en un papel separado y quita estos margenes, luego marca los patrones para que sepas que son de foam para no mezclarlos con los de encaje.
The method I'm showing in this tutorial is specific for this pattern as the style lines are a bit different than other foam cup bras, basically because the inner cup lining does not cover the whole cup piece and we'll sew it differently. I've made another tutorial about how to add foam to the Watson bra in the past if you'd like to check out the other method too.
For the foam pieces you need to modify the pattern pieces we normally use for the lining (B and D). You need to alter two parts of the pattern: first where the foam pieces are sewn together with each other and second where the elastics will be sewn in. The foam pieces will be sewn together using a wide zig-zag and you don't need the 6mm seam allowance included in the pattern there. Take away the seam allowance on the right side of the piece B and both the right and left side of the piece D (in the center seam). Then you need to take away the elastic seam allowance. We do it because foam does not fold on itself as it would generate too much bulk. I'll give you a detailed explination when we get there but basically the first row of zig-zag will be sewn only on the lace layer and the second row of zig-zag stitching will be then sewn on both layers. As this pattern has 10 mm seam allowance for elastics you need to take this amount away on the both pieces on the upper and lower edges. You don't modify the pattern on the left side of the picece B because you need that seam allowance to be able to sew the cup together with the band and you also leave the right side curve of the piece D as it is as this piece does not have seam allowance.
Copy the cup pieces onto a separate paper and take away the indicated seam allowances, then mark them as foam pieces in order to not get confused and use them for the lace.

Corta dos piezas tanto del B como del D.
Cut two pieces from both B and D.

Ahora vamos a unir las copas. Me encanta este paso porque como foam tiene más forma que la tela es muy fácil ver cómo una pieza en 2D se convierte en 3D una vez que se unen las curvas. Usando un zig-zag ancho y corto (yo use 5 de ancho y 1.5 de largo) y juntando bien las piezas de foam uno justo al lado del otro cose de la manera que zig-zag va a pillar las dos piezas. Con las manos junta las piezas mientras coses uniendo el comienzo, los piquetes y el final.
Now let's sew the cup pieces together. I love this step as foam has more body and you can see how something in 2D converts into a 3D format once you join the curves. Using a wide and short zig-zag stitch (I used 5 width and 1.5 length) sew both pieces together putting them side by side so that the zig-zag will join both of them. Use your hands to maintain the pieces together while you join the beginning, the notches and the end.

Así es como queda una vez unido con el zig-zag. Para el siguiente paso yo voy a cubrir esta costura con una tira de tul elástico pero si no quieres hacerlo puedes obviar el paso, a mí sí que me gusta el resultado porque me parece más limpio.
This is how the zig-zag stitch looks like. For the next step I'll cover this seam with some stretch mesh tape but if you don't want to do it you can skip this step. I like doing it because it will give a neater result.

He usado tul elástico porque luego también voy a cubrir la parte de la curva de la pieza D en modo similar a bies y así como el tul es elástico corto la tira en cualquier dirección y listo. También puedes usar el forro de lencería (sheer lining) cortandolo en bies. Si quieres un efecto de más contraste incluso puedes usar alguna tela fina de colores, he visto ejemplos muy guays con eso también. Yo suleo cortar la tira con el ancho de unos 3.5 cm pero si crees que te costará coser algo fino lo puedes hacer más ancho. El largo pues aproximadamente lo que necesitas para las dos copas, el centro y los bordes de curva en la pieza D.
I used stretch mesh because I'll use the same tape to cover also the curve on the piece D in a way like using a bias tape. As the mesh is stretchy I can cut it on any direction and use it for all the seams. You can also use sheer lining cut on bias for that purpose. If you want a more contrasting effect you can actually use any lightweight fabric for this purpose, I've seen many cool versions out there. I usually cut a strip of mesh with aprox 3.5 cm width but if you feel that a narrow tape will be harder for you to work with you can cut it wider. The length would be aprox what you need for both of the cup seams, the center and the curves on both pieces D.

2. Dobla la tira de tul en tres partes, así no se va a ver el borde de la tira sin rematar y colocalo justo encima del zig-zag que acabas de hacer en la copa. Cose con una puntada recta encima de los dos bordes.
2. Fold the tape in three parts so once you sew it the raw edge won't be visible. Put it exactly on top of the zig-zag stitching you made and sew with a straight stitch over both of the edges.

Así queda una vez terminado.
This is how it looks when done.

3. Otro paso que me gusta hacer es también rematar el borde de la pieza D que no tiene luego elástico con bies de tul. De nuevo, ese paso no es obligatorio porque el foam no se deshilacha. Sino también se puede remallar por dejalo más limpio y ya está. Yo prefiero hacer lo de bies porque luego veis que dejo ese borde de foam libre sin juntarlo con la copa de encaje y de esa manera aunque se mueve un poco se ve igualmente bonito en los dos lados. Coloca la tira de tul en el revés de la copa de foam y cose a 0.5 cm del borde con puntada recta.
3. The other step I like to do here is to cover the curved edge of the piece D as it doesn't have any elastic on later. Again you can skip this part as foam does not fray. You can also just overlock this edge. I prefer this bias tape method as you can see later on that I won't join the foam piece together with the lace layer so using bias makes it pretty on both sides in case the foam moves a bit and you can see the reverse side of the piece. Put the mesh tape on the wrong side of the cup piece and on the curved edge sew the tape with a straight stitch 5 mm from the border.

Así queda la primera pasada.
Here's the first pass.

4. Después gira el bies al lado derecho y cose doblando el margen hacia abajo para que no se vea nada. Queda como un bies normal.
4. Then fold the bias tape on the right side and sew it on folding the raw edge under. Looks like a regular bias tape finish.

5. Una vez que has hecho lo mismo en la otra copa junta el centro y coselo con el zig-zag ancho y corto igual como hicimos en las copas.
5. Once you've done the same things with the other cup, join the center seam with zig-zag as we did on the cup pieces.

6. De nuevo cose encima la tira de tul doblandolo en tres partes. Yo suelo dejar arriba un margen y luego doblo un poco hacia el revés y doy unos pespuntes para que se quede allí firme, luego corto la tira que me sobra.
6. Again put the mesh tape on top of the zig-zag and sew on both edges while folding it in three parts. I usually leave a small part of the tape on the upper part of this seam and then fold it back on the wrong side and stitch it in place to make everything neat.
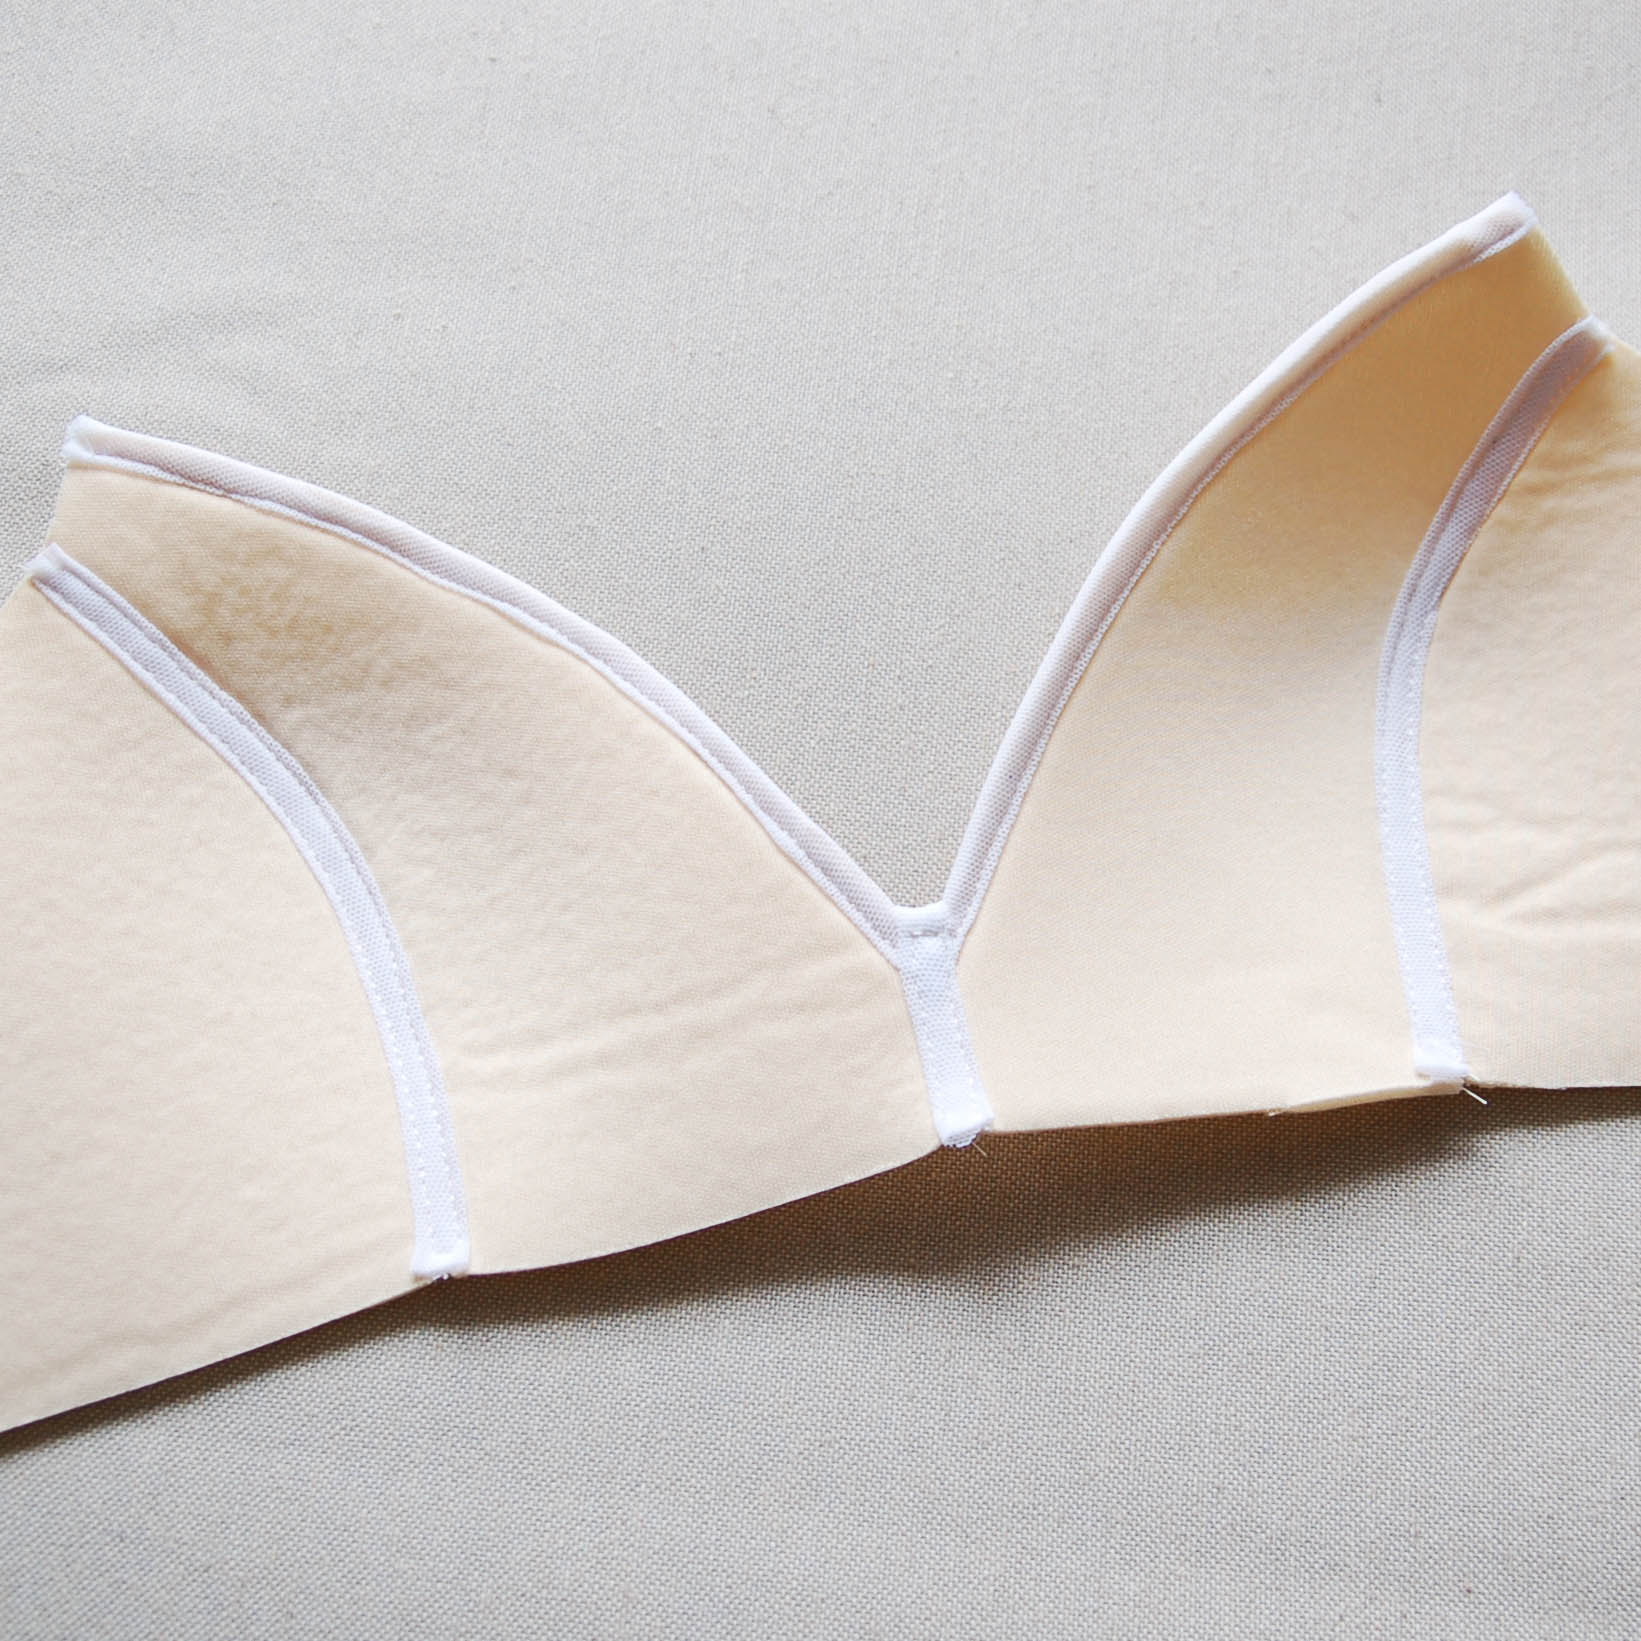
Así queda la pieza de foam terminada. Ahora vamos a juntarlo con el encaje.
This is how the foam piece looks like. Now we'll join it with the lace layer.

El resto de las piezas se cortan con el patrón original: A, B y C de encaje y el C de forro también. Prepara las copas igual que normalmente usando elástico transparente. Esta vez solo juntas las piezas A y B derecho con derecho porque no tienes forro, para eso hicimos ya el foam. Haz el pespunte en las copas y une el centro igual que en la versión original.
The rest of the pattern pieces are cut as in the original version: A, B and C form lace and another C from lining. Prepare the cups as usually using the clear elastic on the neckline. This time as there is no lining (we'll use foam for that) you only need to join A and B with right sides together. Sew a row of topstitching on the cup seams and join the center seam as always.

Coloca la capa de encaje con el derecho hacia abajo y la capa de foam encima de ella con el derecho hacia arriba. Ves que el foam es más pequeño en la parte de abajo y arriba pero tiene el ancho igual que el encaje, eso es como tiene que ser.
Put the lace layer with the right side facing down and the foam layer with the right side facing up. You'll see that the foam layer is smaller both on the upper and lower part but the general width is the same. This ishow it should be at that point.

La banda se junta de la misma manera que en la versión original, sólo que la pieza B que antes era de forro ahora es de foam. Fijate que el foam es más corto por 10 mm tanto abajo y arriba pero el resto de las piezas cuadran. Remalla o cose con una puntada recta a 6 mm (ya que el foam es estable no hace falta usar zig-zag aquí) uniendo todas las piezas.
The band pieces will be sewn together with the cup in the same way as in the original version, just that the cup lining piece is now made from foam. You'll see that the foam piece is 10 mm shorter both on the upper and lower part but the rest of the pieces will match up. Overlock or sew a straight stitch (as it's with foam you don't need to use a zig-zag stitch here) to join all the pieces.

Así queda la banda ya unida a la copa.
This is how the band piece looks once joined with the cup.

Es el paso de añadir la cinta recubrearos. Yo prefiero hacerlo ahora porque me gusta luego doblar el elástico encima de él para que no se vea ningún borde suelto por allí pero hay otros patrones que te indican que cosas el recubrearos en esta parte lo último. Será para reducir el bulto y si prefieres también puedes hacerlo al final de todo (una vez que el bralette está terminado) especialmente si tu máquina resiste en coser cosas gordas. Yo te cuento cómo coserlo ahora porque me gusta más como queda. Corta la pieza igual de largo que el foam en la parte de la copa donde se una con la banda (ya que de nuevo doblamos luego el elástico encima y para que no abulte).
It's time to add the channeling tape. I prefer to do it now as then later on I'll fold the elastic on top of it and there won't be any visible raw edges on the inside of the bralette. There are other patterns that indicate you to add the channeling in the end after you've finished sewing your bralette probably because you'll have less bulk in this area. This is helpful if your machine also doesn't like to go on top of bulky seams. I'll show you how to do it in a way that it goes under the elastic as I find it prettier on the inside. Cut a piece of channeling with the length of the foam piece that is inside the seam where the cup and band meet (as we'll fold the elastic on top of the cahennling you don't want it to be too long in a similar way as we cut down the foam).

Colocando el recubrearos justo encima de la costura de unión cose con la puntada reta en los dos lados de él para sujetarlo.
Put the channeling exactly on top of the band and cup joining seam and sew it in place with a straight stitch on both of the edges.

Repite en el otro lado y ya tenemos listo el bralette para coser los elásticos.
Repeat on the other side and the bralette is ready for the elastics to be sewn in.

Como ya dije antes, la idea de hacer las piezas de foam más pequeñas era porque ahora vamos a hacer la primera puntada de zig-zag solo en la capa exterior de encaje. Empiezas con coser el elástico de bajo y al principio empezando en la banda sí que tienes todo normal como en la versión original porque allí no hay foam pero una vez que llegas a las copas tienes que apartar un poco el foam para no pillarlo. Cómo el margen de costura de 10 mm lo quitamos antes deberías justo tener tu espacio para poder coser con facilidad.
As I told you before we took the elastic seam allowances away from the foam pieces so we can now sew the first pass of zig-zag on only the lace layer of the bralette. Start with sewing the band elastic in place as you normally do, starting in one end of the bralette where everything will be as usual. Once you arrive to the cup part you need to push the foam away a bit in order not to sew on top of it. That's why we took away the 10 mm and you should have exactly the room to do so.

Una vez hecho la primera pasada ves que el encaje tira más que el foam. Eso pasa porque a la hora de coser el elástico había que tirarlo ligeramente y ahora se nota la diefrenecia. No pasa nada de eso, para tener todo en su sitio sujeta con alfileres las costuras de copa en encaje y en el foam entre sí, haz lo mismo con los centros. Así sabes que ahora en la segunda pasada se coloca todo en su sitio.
Once you finish the first zig-zag you'll see that the lace part is smaller than the foam as it's shirred a bit when using the elastic. This is normal as we need to pull the elastic when we sew it, you'll now adapt it to the foam. Put some pins in to match all the parts: pin the cup seams on both lace and foam pieces and the center front too. This way you'll know how much to pull once we sew on the second pass of the zig-zag.

Engancha también los tirantes como siempre y empieza coser la segunda puntada de zig-zag en el revés. El comienzo es igual porque no tienes foam y caundo llegues a la copa sujeta el elástico justo encima de foam. Ya que tienes los alfileres puestos sabes cuánto tienes que tirar de elástico para que todo quede bien plano y las dos capas estén en su sitio.
Put the straps in place and start sewing on the second pass on the wrong side as you always do. The beginning is the same, once you arrive to the foam part just fold the elastic directly on top of the foam. You have the pins in place so you'll know how much you need to pull the elastic in order to match both layers.

Así queda el elástico de bajo puesto. Ahora vuelve a hacer lo mismo en la sisa y ya está, a seguir con los pasos como en la versión original.
This is how the band elastic looks like once sewn in. Now sew the elastic in the same way in the underarm area and finish the bralette in the same way as in the original version.

Eso sería casi todo. Igual te parece raro que el foam no vaya unido en la parte de arriba con la copa de encaje porque en la versión original sí que unimos el forro de la pieza D con un zig-zag. Después de coser este bralette con foam decidí no juntar las capas porque de nuevo, los materiales son distintos, uno se da de sí y otro casi no. Así que vi que si dejo el foam en la parte de arriba libre, se ajusta mejor al cuerpo porque el foam no obstaculiza la copa de encaje. Desde luego si tú quieres unir las copas puedes probar y hacerlo. Lo que sí hago es para que no esté del todo libre, luego hago unas puntadas a mano en la parte del centro donde se acaba el foam para unirlo con encaje. De esa manera cuando lo lavas etc no se abre tanto. Luego estaba pensando que se podría también dar unas puntadas en el centro de la costura de la copa para unir las capas entre sí pero voy a darle un par de vueltas para ver.
This would be almost it. Maybe you find strange that the foam part is not joined with the lace on the upper part of the inner cup (like we do with the lining piece D, using a zig-zag). After sewing the bralette with foam I decided not to sew the layers together as the materials are different, one has give and the other one doesn't. I saw that when I leave the curved edge of the piece D free it fits better with the body and leaves the lace layer in its place and allows it to stretch. Of course you can join the layers together if you want and try it out. To finish the bralette off I do make some handstitches on the upper part of the center front seam where the foam ends to join both the foam and the lace layers. That way it's not so open and when you wash the bralette etc the foam layer stays n place. I was thinking about some stitching also on the cup seam in the center for example to join the layers but I'll check it out when wearing the bralette to see if that's necesary.

Pues eso, ya está terminado...vaya tutorial más largo me ha salido, jaja. Espero que te ha sido útil y que incluso usando otros patrones puedes aprovechar los trucos de aquí. Esta es una versión de hacerlo y seguramente existen muchas más posibilidades, experimenta y ve cómo te gusta más hacerlo. Vuelvo a repetir que este patrón realmente no está pensado para foam pero con algunos trucos puedes probar a hacerlo. Los patrones que están realmente pensados para foam son los que tienen las copas patronadas para materiales no elásticas como por ejemplo el sujetador Boylston que yo también he hecho (puedes ver el post aquí).
Espero ver vuestras versiones en breve y si tenéis cualquier pregunta dejadlo aquí en los comentarios! En esta versión de bralette Hanna usé este kit de la tienda.
We'll that's it, it's finished...what a long tutorial it was, hehe. I hope it was useful for you and you can use these tricks for making other patterns as well. This is only one version how to do it, I'm sure there are many more so you can experiment and find your favourite way. I want to repeat again that this pattern is not directly designed for foam but you can give it a try with some modifications. The patterns that are designed for foam are the ones with rigid materials in the cups, for example the Boylston bra that I have also made (you can see a post here).
I hope to see your versions and if you have any questions just leave them on the comments! Iused this kit from my shop for that version of the Hanna bralette.
