

Hola! Hoy os muestro un nuevo sujetador con un nuevo patrón que no había usado antes. Es Simplicity 8229, patrón de sujetador y braguitas diseñado por Madalynne. Me imagino que todo el mundo quien tiene un mínimo interés en coser lencería ha oído hablar de ella...y no es ninguna sorpresa porque lleva mucho tiempo cosiendo lencería realmente bonita y en su blog hay un montón de trucos, inspiración, tutoriales etc. Ahora se puede realmente considerar que es una famosa en el mundo de costura ya que para que te fiche una marca como Simplicity me parece un súper éxito total.
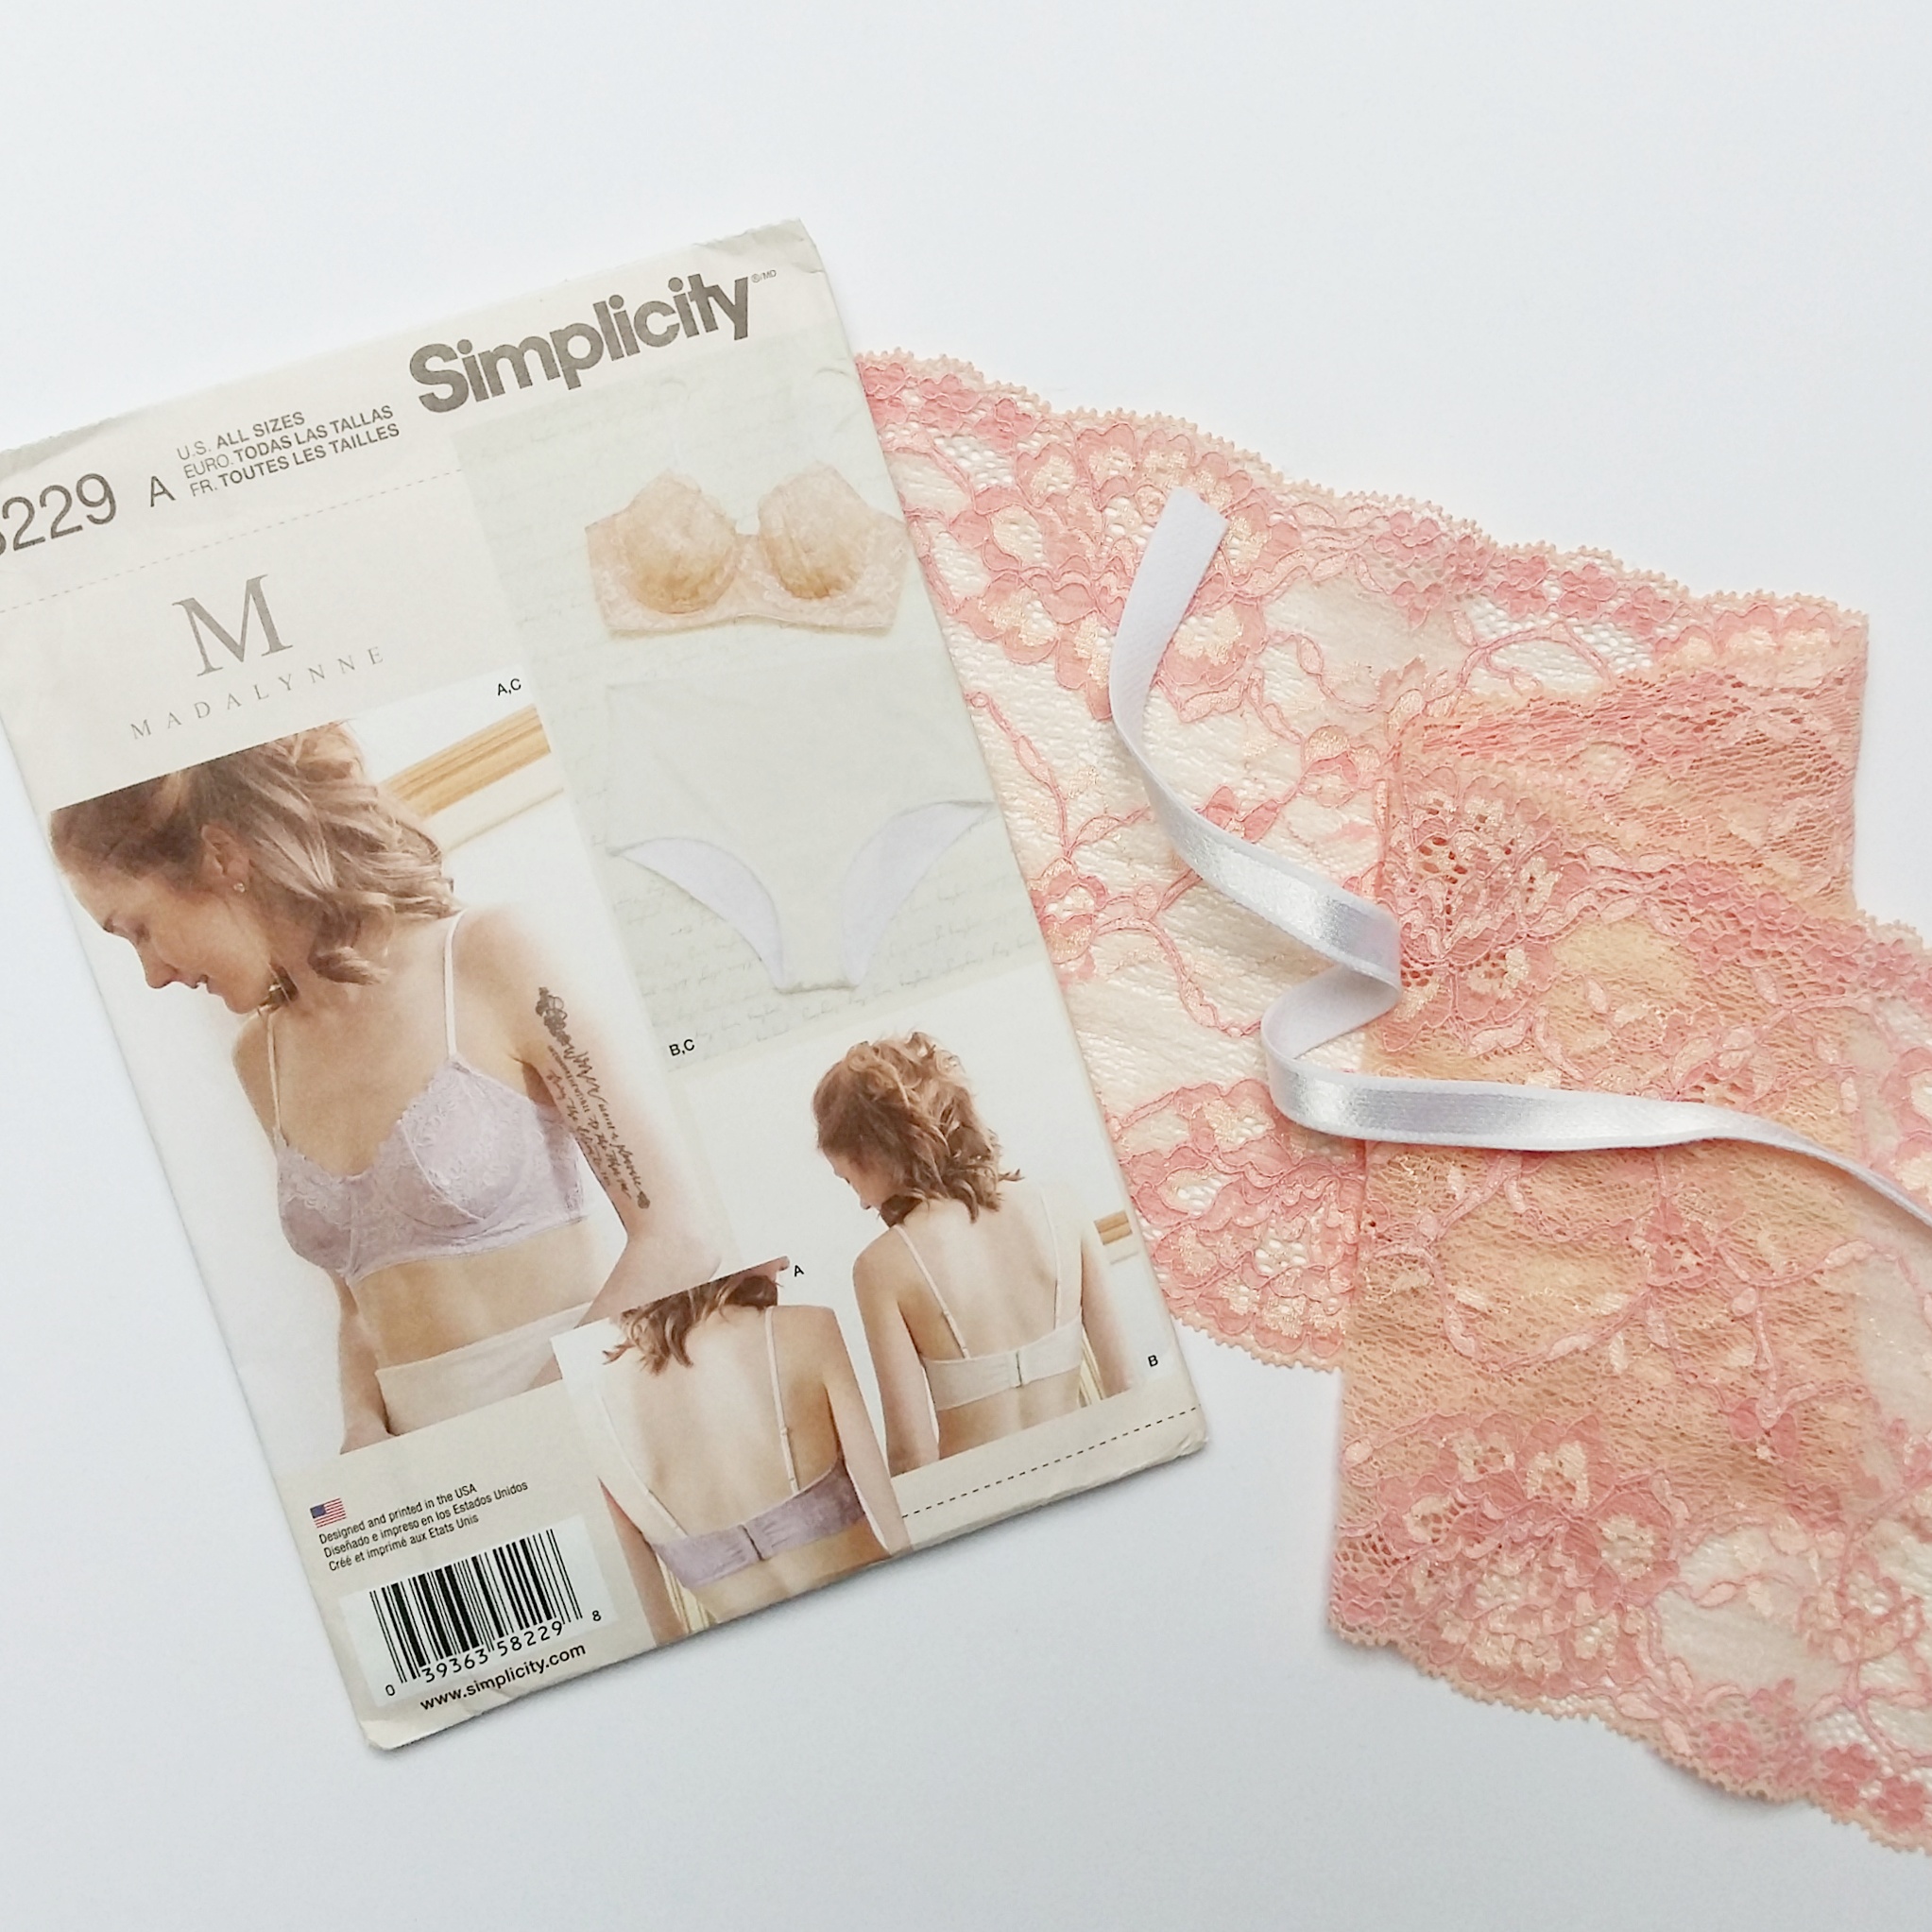
Hey! Today I'm bringing you a new bra with a pattern I haven't used before. It's the Simplicity 8229, an underwire bra and panties pattern designed by Madalynne. I guess that anyone who is slightly interested in bramaking has heard of her...and it's no surprise as she's been sewing beautiful lingerie for a while now and on her blog there's so much inspiration, tips, tutorials etc. You can really consider her as a celebrity in the sewing community now as working with a company like Simplicity really is a major success in my oppinion.
El modelo que hice yo es uno de sus dos primeros patrones que sacaron, ahora también tiene un body y dos nuevos sujetadores. Entonces, a ver qué cosas me llamaron la atención a la hora de coserlo. Si alguna vez has usado los patrones de marcas como Simplicity, Vogue etc sabes que vienen en un sobre donde tienes las instrucciones y luego en papel tipo papel de seda los patrones. Como quería ver cómo está explicado cada paso leí bien las intsrucciones, como si fuera la primera vez...tengo esa tendencia de intentar valorar las instrucciones siempre desde el punto de vista de novata total, así luego cuando enseño en mis clases, sé donde tengo que dar explicaciones extra según mi opinión.
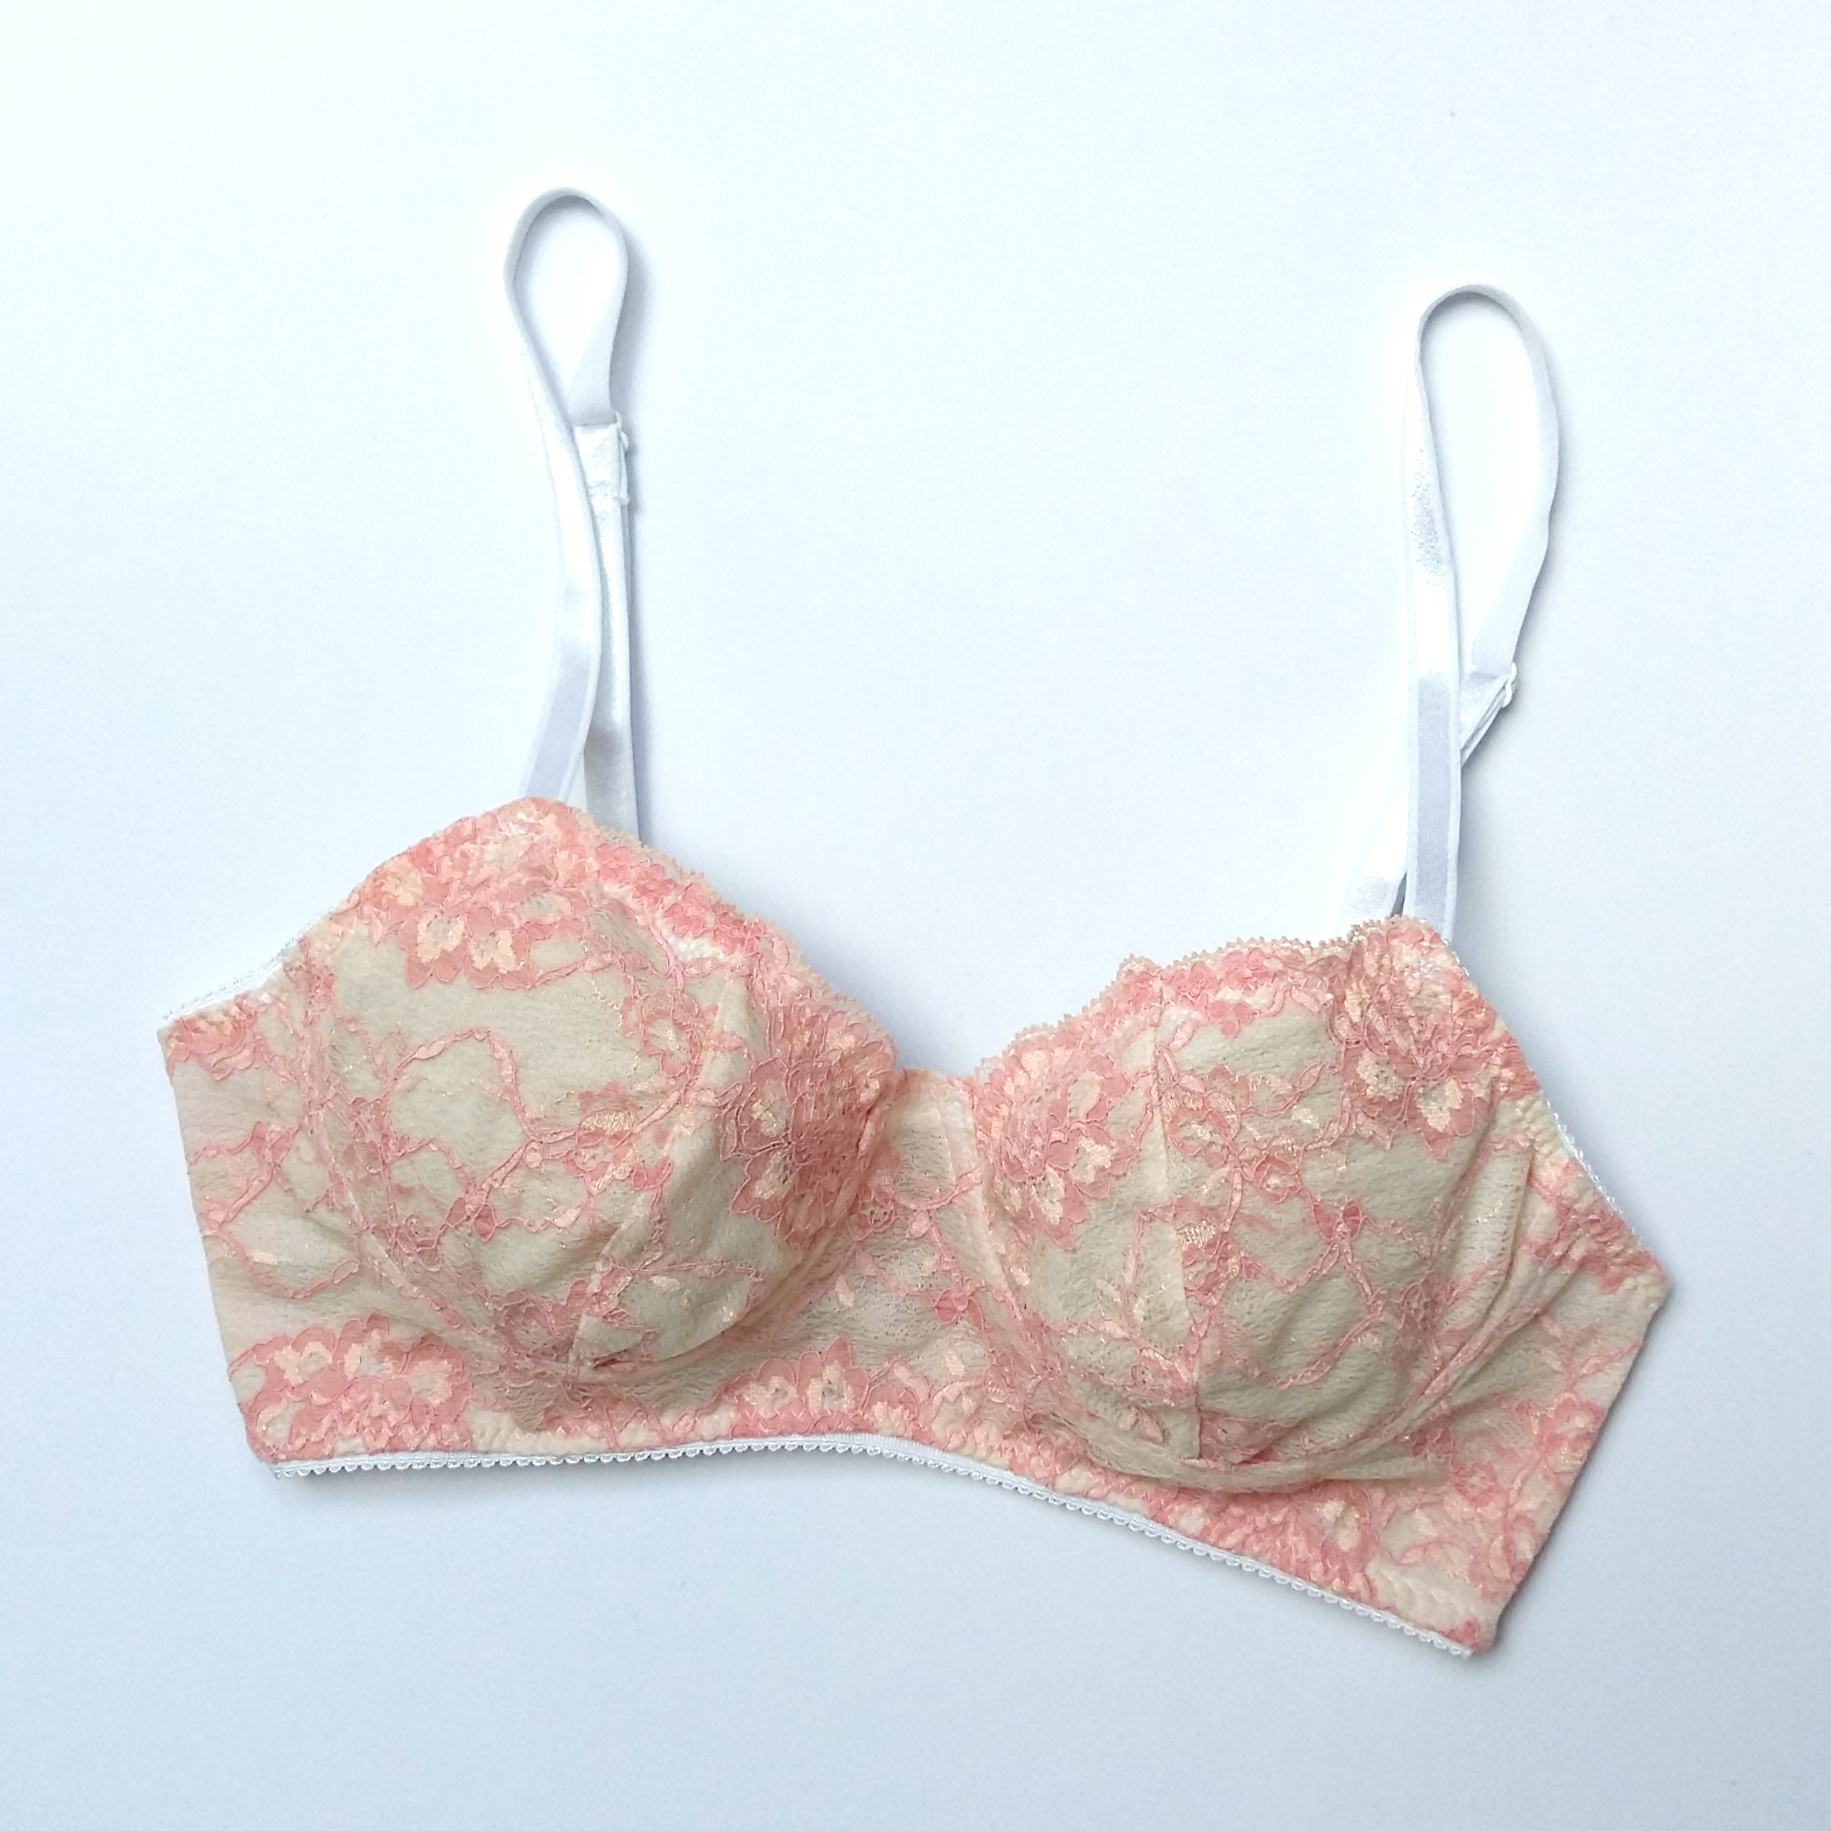
Para empezar, la manera de calcular la talla como está explicado allí puede ser un poco confuso si trabajas en cm en vez de pulgadas. Así que saqué mi talla habitual, 36A y me funcionó bien. Sobre los materiales: usé el encaje en color melocotón y rosa con el forro y los elásticos blancos (igual que en este kit de mi tienda). A diferencia de los otros patrones de sujetadores con aros (y Watson también) que he usado, en este modelo la parte central abajo de las copas no lleva el forro de lencería (sheer lining) para hacerlo estable y sin movimiento. En vez de eso todo está forrado con tul elástico (stretch mesh). Eso en mi caso da un poco igual porque con talla tan pequeña de copa no necesito mucho soporte. No sé si en copas más grandes eso puede cambiar el asunto. Sin embargo el túnel de los aros sí que mantiene allí la estabilidad de esas costuras.
The pattern I used is one of the first ones they released, now there's also a bodysuit and two new bras too. So, let's see what are the things that got my attention when sewing this bra. If you have used the paper patterns from Simplicity, Vogue or other companies like that you know that the patterns come in an envelope where there are instructions and patterns on a tissue paper. As I wanted to see exactly how the instructions were made I read everything as it was my first time...I tend to do it because I try to put myself in a beginner role to see if everything makes sense to "new" eyes, that's how I can then give better and extra information when I teach.
To start with, the way they explain the sizing and how to measure yourself can be a bit difficult to understand when you work in cm and not in inches. So I just got my usual 36A and it worked out well. About the materials: I used a peach and pink color lace with white notions (as in this bramaking kit in my shop). The difference with other underwire bra patterns (and Watson too) that I've used is that the bridge part of the bra is not stabilized with sheer lining. Instead everything is lined with stretch mesh. In my case it's not so different as I don't need much support . I'm not sure if that might be different in bigger cup sizes. Anyhow there is the channeling that keeps the seams stable.

Así que dicho eso, como todo el encaje está forrado por tul elástico, en las intrucciones te recomiendan usar el pegamiento en spray para temporalmente unir encaje con el tul y así cortar las dos capas a la vez para facilitar el trabajo luego. Ya sabía de antes que mucha gente lo hace pero mis experiencias no han sido tan buenas. De todas maneras quería seguir las intrucciones bien y lo hice. Eso significa que tienes que cortar una pieza de encaje con un tamaño aproximado para que quepan las piezas y unirlo con otro trozo igual de tul, poniendo este al borde de la parte inferior de la puntilla en un lado de encaje. De esa manera no sobresale el forro del encaje ya que en la parte de las copas se ve el lado bonito de encaje.
Pues sigo pensando que me gusta más cortar las piezas por separado y eso por dos razones. Primero porque así puedo coser el forro a las copas dejando todas las costuras ocultas (finales del post ves una vista del interior donde se ve el remallado en la copa, eso normalmente no lo coso así), poniendo las capas en un orden concreto. Al estar pegadas, no se puede hacer. Y por segundo, así puedo aprovechar mejor el encaje. Al no estar pegado al tul, puedo usar luego incluso las piezas más pequeñas de encaje que me qedan del corte y usarlo por ejemplo para braguitas etc. Entiendo que para empezar, tener las piezas pegadas puede resultar más fácil para manejar...pero quizás yo sólo pegaría la parte central y el resto no.
So as I said, all the lace is lined with stretch mesh, in the instructions they recommend using the temporary adhesive spray glue to put both layers together and that way make the working process easier later on. I knew before that many people do it that way but my own experiences haven't been so positive. But as I wanted to do it according to the instructions I did glue the alyers together. This means you need to cut an estimated size of lace where your pattern pieces will fit and glue it to the same size stretch mesh layer leaving one side of the mesh leveled with the lowest scallops of one side of teh lace. That way you can't see the mesh in the part where the pretty scalloped edge will be visible on the cups.
I still think that I prefer cutting the pieces separately for two reasons. First, that way makes it possible to sew the cup pieces together in a way that you can't see any seams (later in the post you can see the interior view with the serged seams on the cups that I usually don't sew this way), sandwitching them between other layers. And second because when cutting the lace alone it leaves me small scraps of lace that I can later use for panties for example. I understand that for the first time sewing that prepared double layer might be easier to work with...but I think that if I'd do it, I'd use it only for the bridge part.
Ok, seguimos. Una cosa que me hizo dudar mucho era que en las instrucciones generales te decían que el margen de costura es de 1.5 cm y luego el otro lado te decían que cosas las costuras a 6 mm y las dobles a un lado. Normalmente casi siempre en sujetadores el margen es de 6 mm, así que lo de 1.5 cm me extrañó mucho cuando lo leí. Entiendo que estas instrucciones de marcas tan grandes siempre tienen una parte general que es lo mismo para cualquier patrón y luego se añaden las instrucciones particulares de cada diseño. Todo eso tiene lógica, pero desde luego puede ser muy confuso para las novatas...
Sobre el método de costura. Todo era más o menos como siempre lo había hecho menos unas cosas. El centro entre las copas se remata también con elástico, no simplemente uniendo el forro con el exterior. Y la parte del borde de la puntilla en las copas también se remata con un elástico abajo.
Ok, let's continue. I was vey confused because the general instructions said that the seam allowance was 1.5 cm and then on the other side it said "stitch in 6 mm seams and press all seams..." In general there are 6 mm seams in lingerie so I was very confused by the 1.5 cm when I read it. I understand that these companies use the general instructions for every single pattern and then add the specific instructions for the particular pattern. This makes sense and all but I think that the beginners can be confused by this...
About sewing process. Everything was more or less as always exept some details. The cradle seam was finished with a elastic not just joining the lining with an exterior layer. The scalloped edge of the cups were also finished with the elastic on the inside.
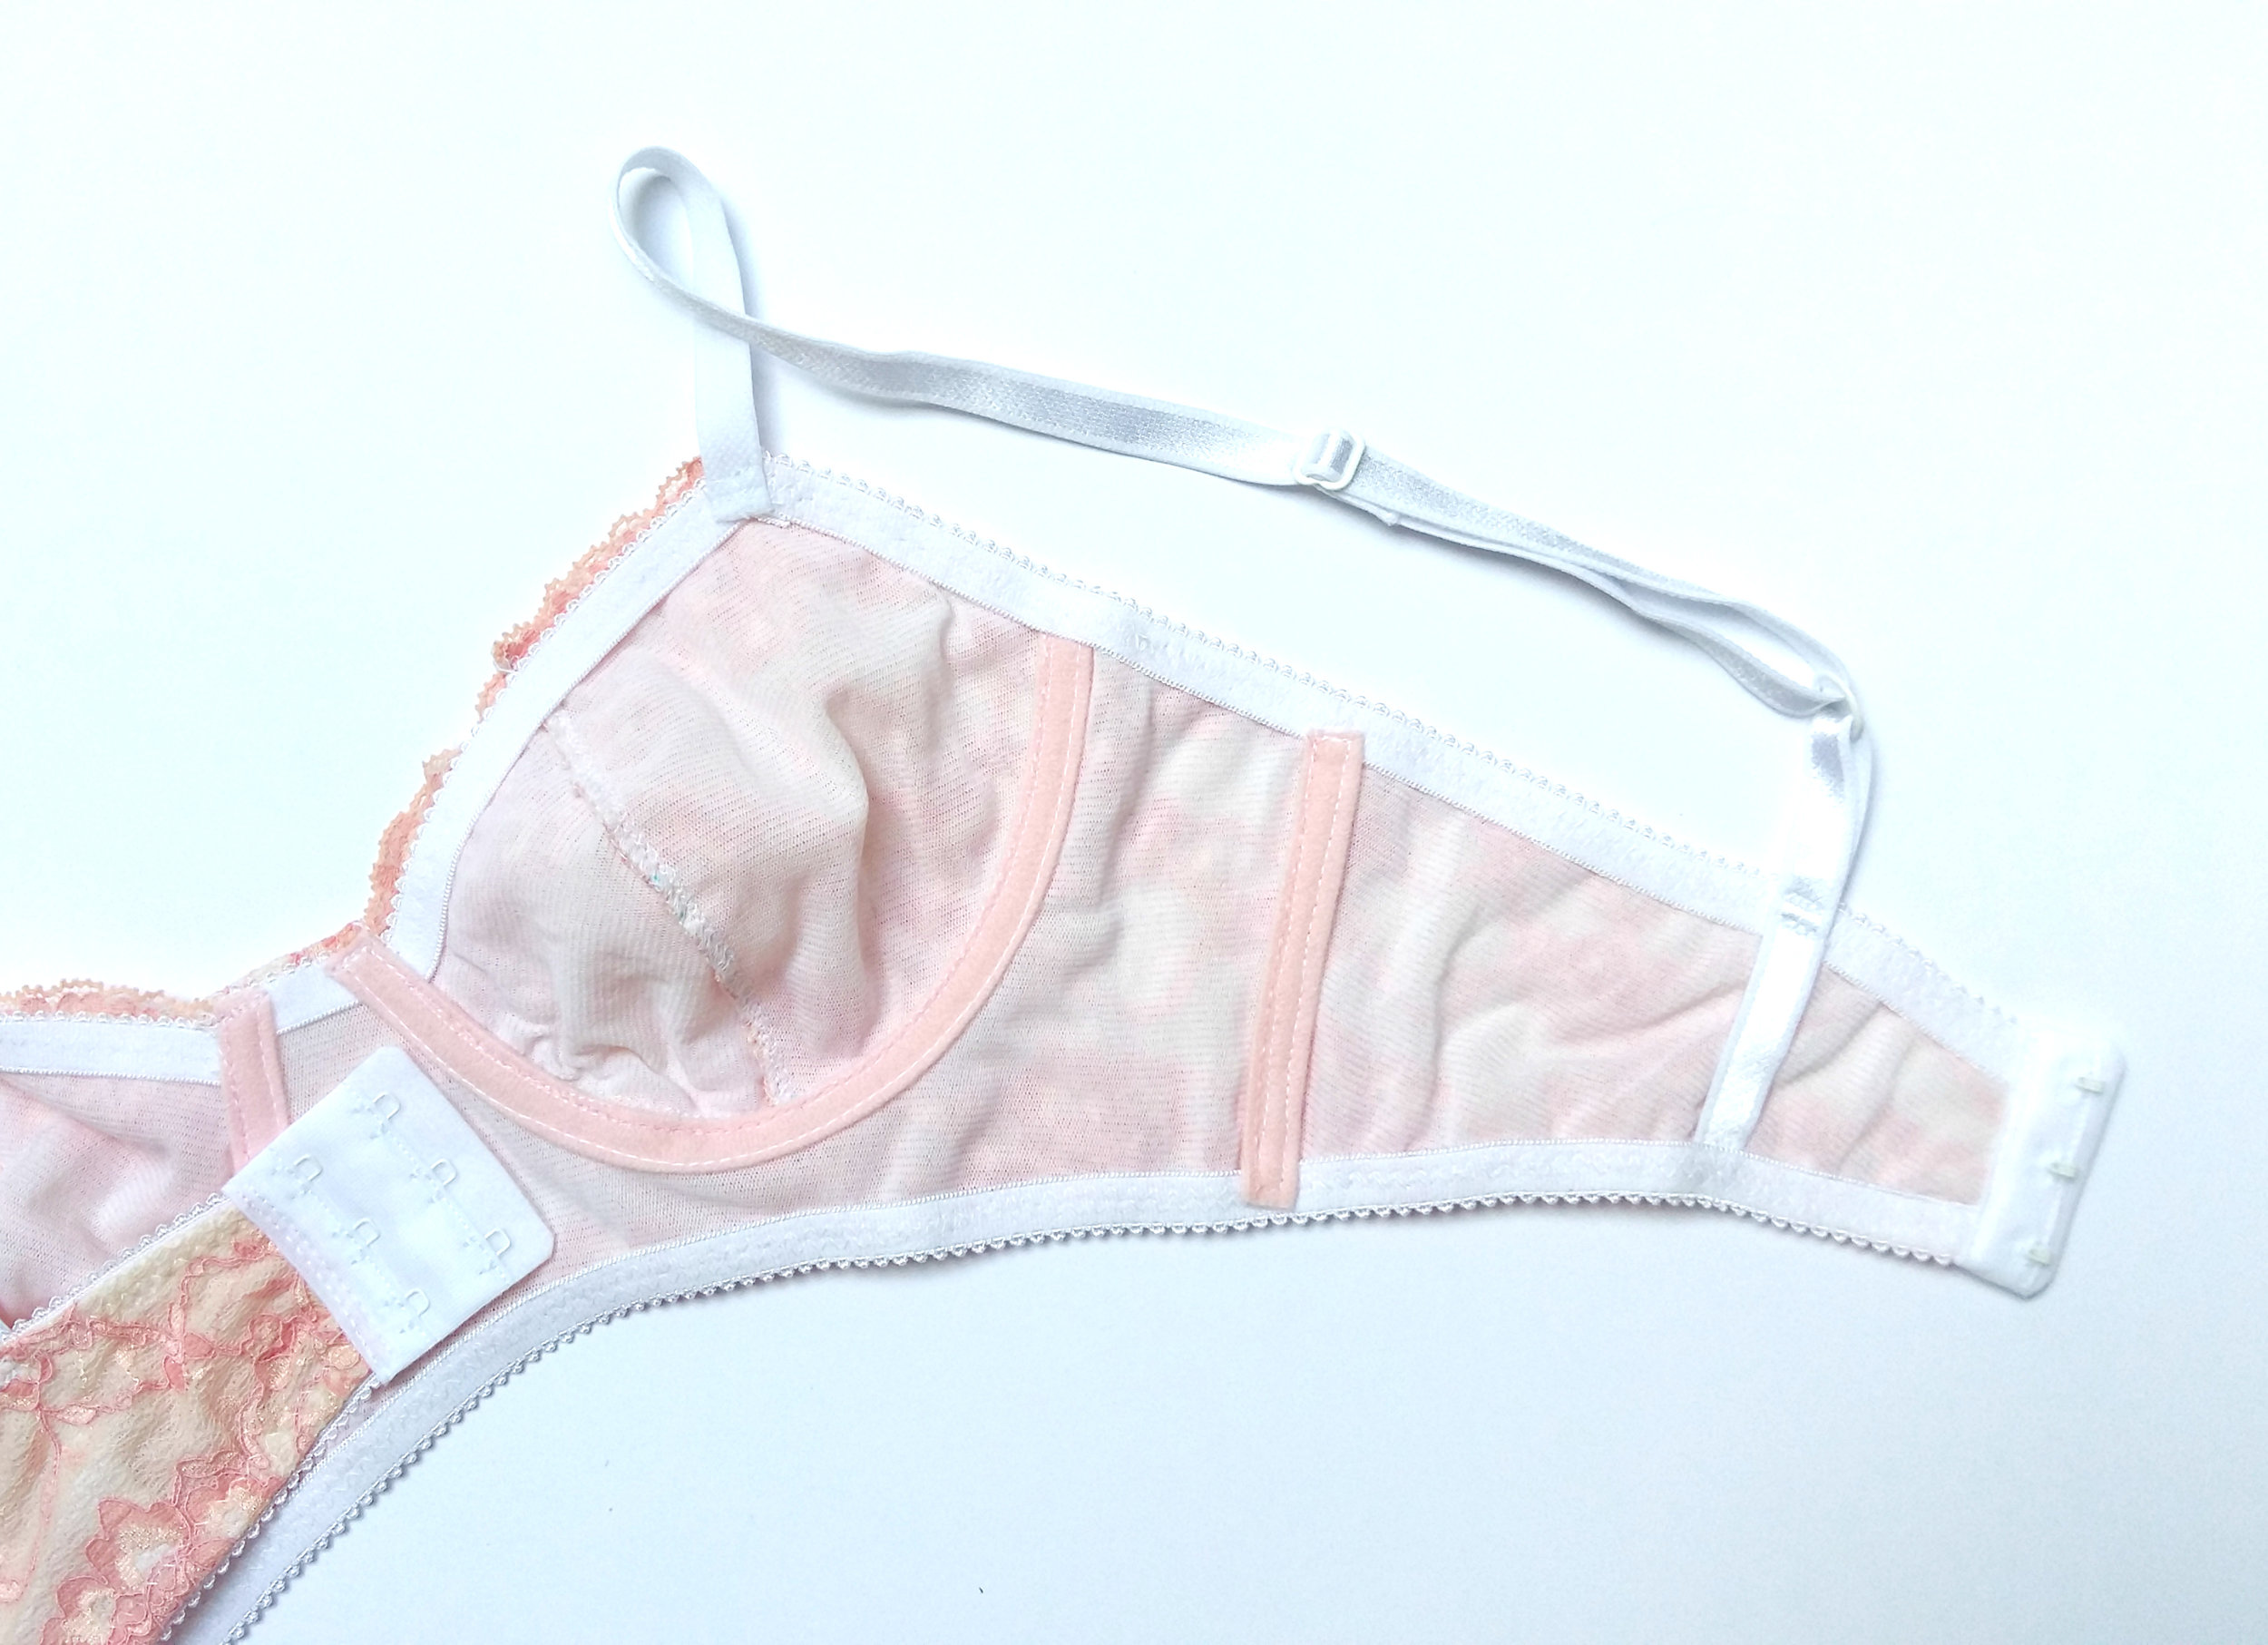
Aunque en las instrucciones te indican que pongas antes el elástico en la parte de la sisa y después cierres el túnel de los aros encima, yo lo hice como de costumbre dejando el túnel abajo y así me parece que queda más bonito. Ahora, también se remata la costura lateral con el túnel y allí seguí las instrucciones y lo dejé allí encima y me parece que de nuevo yo lo cosería antes y pondría elástico encima, quedaría mucho más limpio. Lo que pasa es que no lo preveía y ya no iba a descoser el elástico.
Los tirantes también los cambié un poco porque aunque efectivamente me gusta más la espalda así, que los tirantes salgan directos y no con la curva como en otros patrones (de nuevo, eso se hace muchas veces por el tema de soporte y yo no lo necesito), prefiero que se enganchen ya en el elástico de abajo y tengan otra costura arriba, en vez de engancharse sólo arriba como en las instrucciones. Así es más seguro en mi opinión, para eso hay que alargar la pieza y ya está.
Although the instructions tell you to first sew on the underarm elastic and then apply the channeling, I did it the other way leaving the channeling end under the elastic as I think it looks neater that way. The side seam is also covered by channeling and again they indicate that you sew it after attaching the elastics. I did it that way but I'd prefer to sew it before and finish the edges covering them with elastic...this time I didn't as the elastic was already sewn and I wasn't going to unpick anymore.
I changed the straps a bit too. I like this kind of T-back more than the U-shape I've used on the other patterns (again, many time it's used for the support that I don't really need), but I prefer to atatch them on the band elastic and then secure them on the upper elastic too, not just only on the upper elastic as the instructions say to do. I find it more durable that way and it's quite easy to do, just make the piece longer and that's it.

Y para último un poco sobre la forma. Al estar hecho completamente de telas elásticas me parece que es muy cómodo! De hecho, para empezar a coser sujetadores con aros, está muy bien que tenga esas copas con algo de elasticidad, así hay más espacio de prueba y error digamos, mucho más que en las copas rígidas. Por cierto, no le puse aros a este en concreto porque no tenía en el momento en casa y como quedaba muy bien así, lo dejé tal cual.
Una cosa que me gusta mucho es que tiene suficiente espacio entre las copas. Yo con mi copa A lo necesito y muchas veces no tengo suficiente cuando he usado otros patrones o he comprado en las tiendas. Ahora, curiosamente el patrón está hecho con el mismo espacio entre las copas en todas las tallas de copa. Eso ya no sé si funciona igualmente bien porque al crecer el tamaño del pecho y con eso la copa, lo normal es que se disminuye el espacio entre los pechos. Como en todo, hay que hacer una prueba para verlo. Lo bueno es que el cambio de esta parte del patrón es bastante fácil y se puede adaptar bien para que sea cómodo para ti. Y de eso se trata al fin y al cabo.
Para último y muy último también os quería contar que voy a dar cursos este otoño en Madrid para aprender a coser este mismo sujetador con el patrón de Madalynne! Vamos a hacerlo paso a paso para que te lleves el sujetador puesto (o en el bolso, como quieras, jaja) y sepas hacer mil más en casa. Voy a anunciar los detalles, horarios, plazas etc muy pronto (creo que la semana que viene...) aquí en el blog y pondré la información también en el apartado de clases en mi web. Si quieres recibir una notificacion, puedes rellenar el formulario y te lo mando directo a tu bandeja de entrada (si ya has rellenado el formulario para las clases/cursos también te lo mandaré porque ya estás en la lista). Os voy contando!
To finish it off, a little about the fit. As it's made only with stretch materials I find it very comfortable! Actually I find it very positive when you start out sewing underwire bras as this stretch factor makes fitting the cups way easier than in the rigid fabric cups. By the way, I didn't put underwires in that bra as I didn't have them at home and as it was really comfortable as is I left it that way.
I really like that there is enough room between the cups, the bridge is wide. My A cups need that and it hasn't been easy to find before when sewing with other patterns or buying ready to wear. Now the thing is that there is the same width as the cups grow bigger. I'm not sure how that works out with bigger cups as the space between the breasts tends to get smaller when the cup volume grows. As always you need to make a toile to see the fit. The good thing is that this pattern alteration is fairly easy to do and what matters is that it would be comfortable to your body.
For the last thing I wanted to tell you that I'll be teaching how to sew this Madalynne bra this autumn and the dates will be anounced later this month. I'll tell you all the details soon!