
Hola, parece que mis posts van intercambiando entre lencería y costura infantil jeje...(y efectivamente el siguiente es algo sobre lencería otra vez). Hoy os escribo un poco sobre las dos prendas que hice para mi pequeña por su cumple!
Quería hacerle algo que ella pueda poner en la guarde el día de su cumple y como los vestidos no son del todo cómodos allí, pensaba en algo como sudadera o blusa. Encontré esta tela gris que ya había usado el año pasado para hacerle un mono que no ha salido por el blog pero quedó super bien y el invierno pasado lo usó mucho en el parque. Yo soy muy friolera y siempre le quiero poner ropa que no se le destape la espalda y me horroriza ver niños pequeños con sus abrigos cortítos enseñando el ombligo en pleno enero...por eso la mía iba con el mono, el gorrito y esta bufanda redonda hecha a mano que me regaló una alumna muy maja.
Hello, looks like my posts interchange between lingerie and sewing for kids, hehe (and the next one by the way is about lingerie, oh well...). Today I'm going to tell you about two little pieces I made for my girl for her birthday!
I wanted to make her something she could wear at the daycare on her birthday and as the dresses aren't really the most comfortable things to wear there I was thinking about maybe a blouse or a sweatshirt. I found this grey fabric that I used for an overall (not blogged) for her the last year, it was so cute on her and she used it a lot. I'm really not a cold wather person and I always try to dress her the way she wouldn't have her back exposed and that she wouldn't get gold out there and I kind of panic with those kids with their short winter clothes and their bellies out there in the wind in the middle of the winter...so my kid was going out with her jumpsuit, a beenie and a scarf that is a handmade gift from one of my nice students.

El patrón del mono es de Ottobre Design (no recuerdo ya el número...uno del año pasado probablemente). El gorro también es de Ottobre.
The pattern for the jumpsuit is from Ottobre Design (I don't remember the number anymore...but from last year I guess). The beenie is also from Ottobre.

Así que se me ocurrió la idea de hacerle una sudadera con el "2" para su cumple. El patrón es el mismo que usé para las sudaderas que hice este verano, pero esta vez sin capucha. Le quité 1 cm a las piezas en la parte del cuello para que quepa mejor por la cabeza. De hecho es una talla 80 pero bastante grande.
So it occured to me that I could make a sweatshirt with a "2" on it for her birthday. The pattern is the same one as the hoodies I made this summer, but this time I took away the hood. I cut away 1 cm or so in the neck parts of the patterns so it's not so snug there. It's size 80 but it's kind of big anyway.

Hacer la aplicación realmente es muy fácil y así puedes hacer cualquier cosa que se te ocurra con la tela: números, letras, simbolos. Yo vi esa técnica en el blog de Grainline Studio y voy a hacer un pequeño tutorial aquí también para que lo veáis.
Sewing the appliqué is actually really easy and you can use it in so many ways: for making numbers, letters, symbols. I saw this tutorial in Grainline Studios blog and I'm just going to recap a little bit here about the process too.
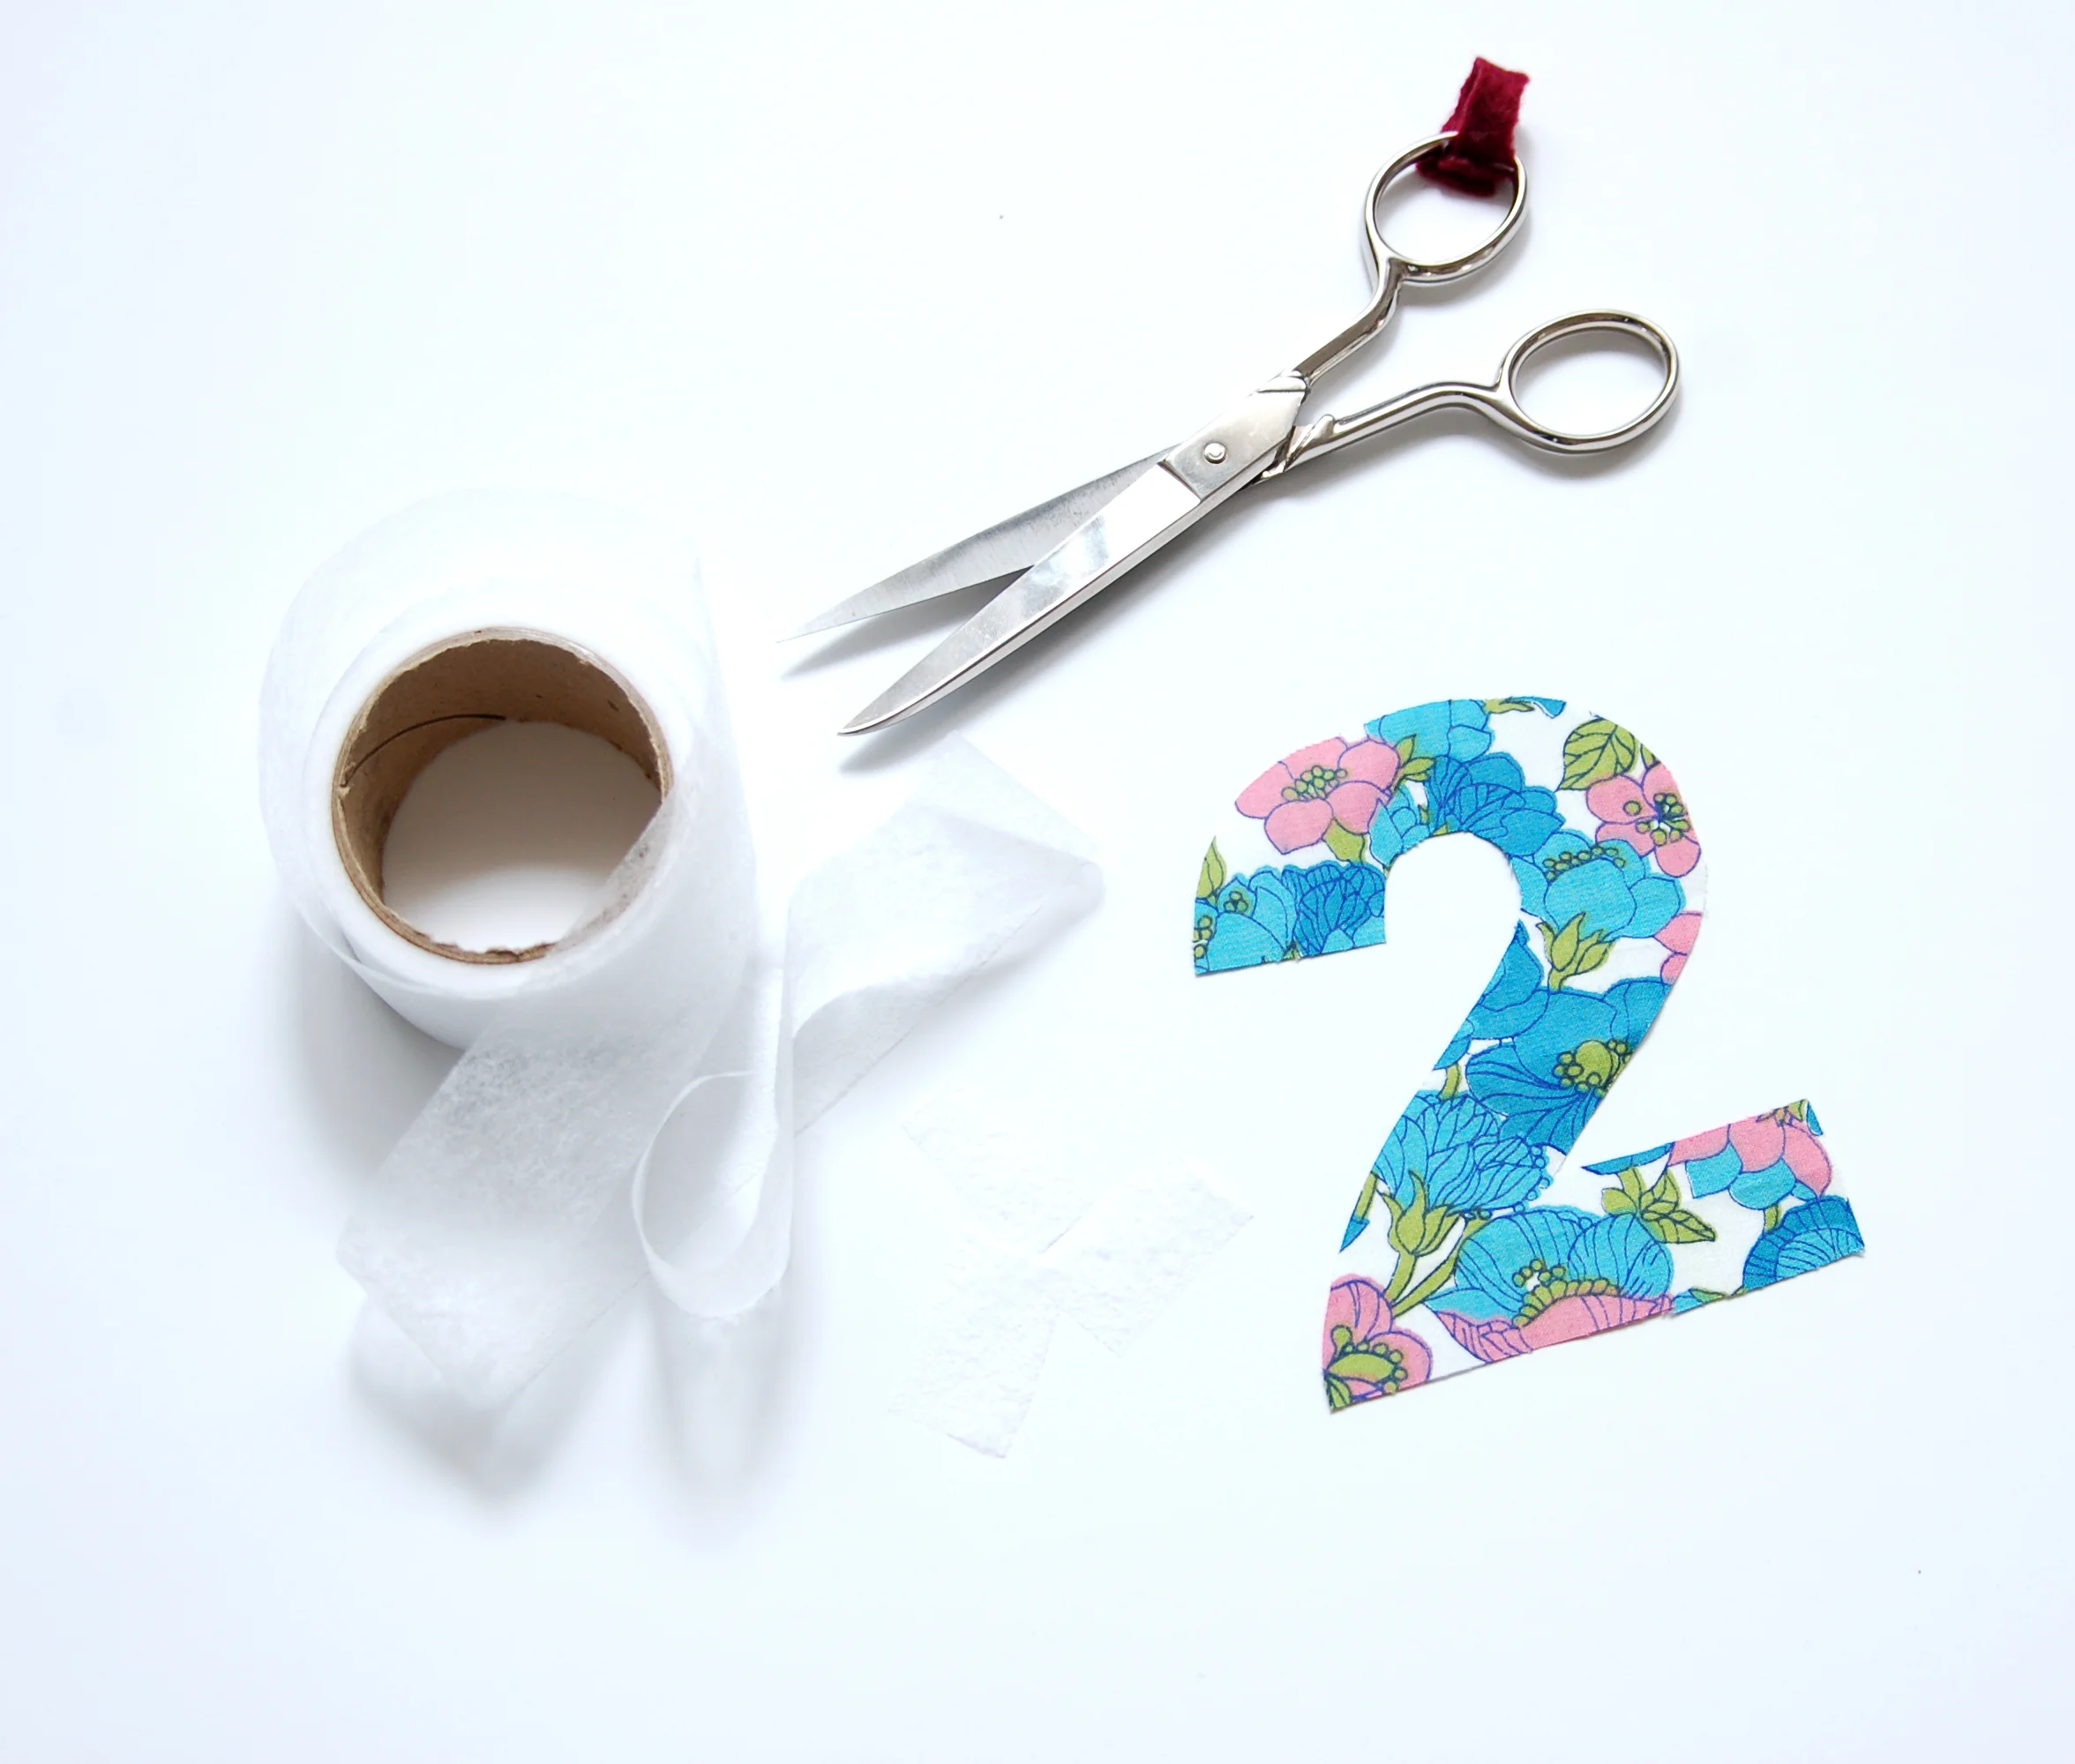
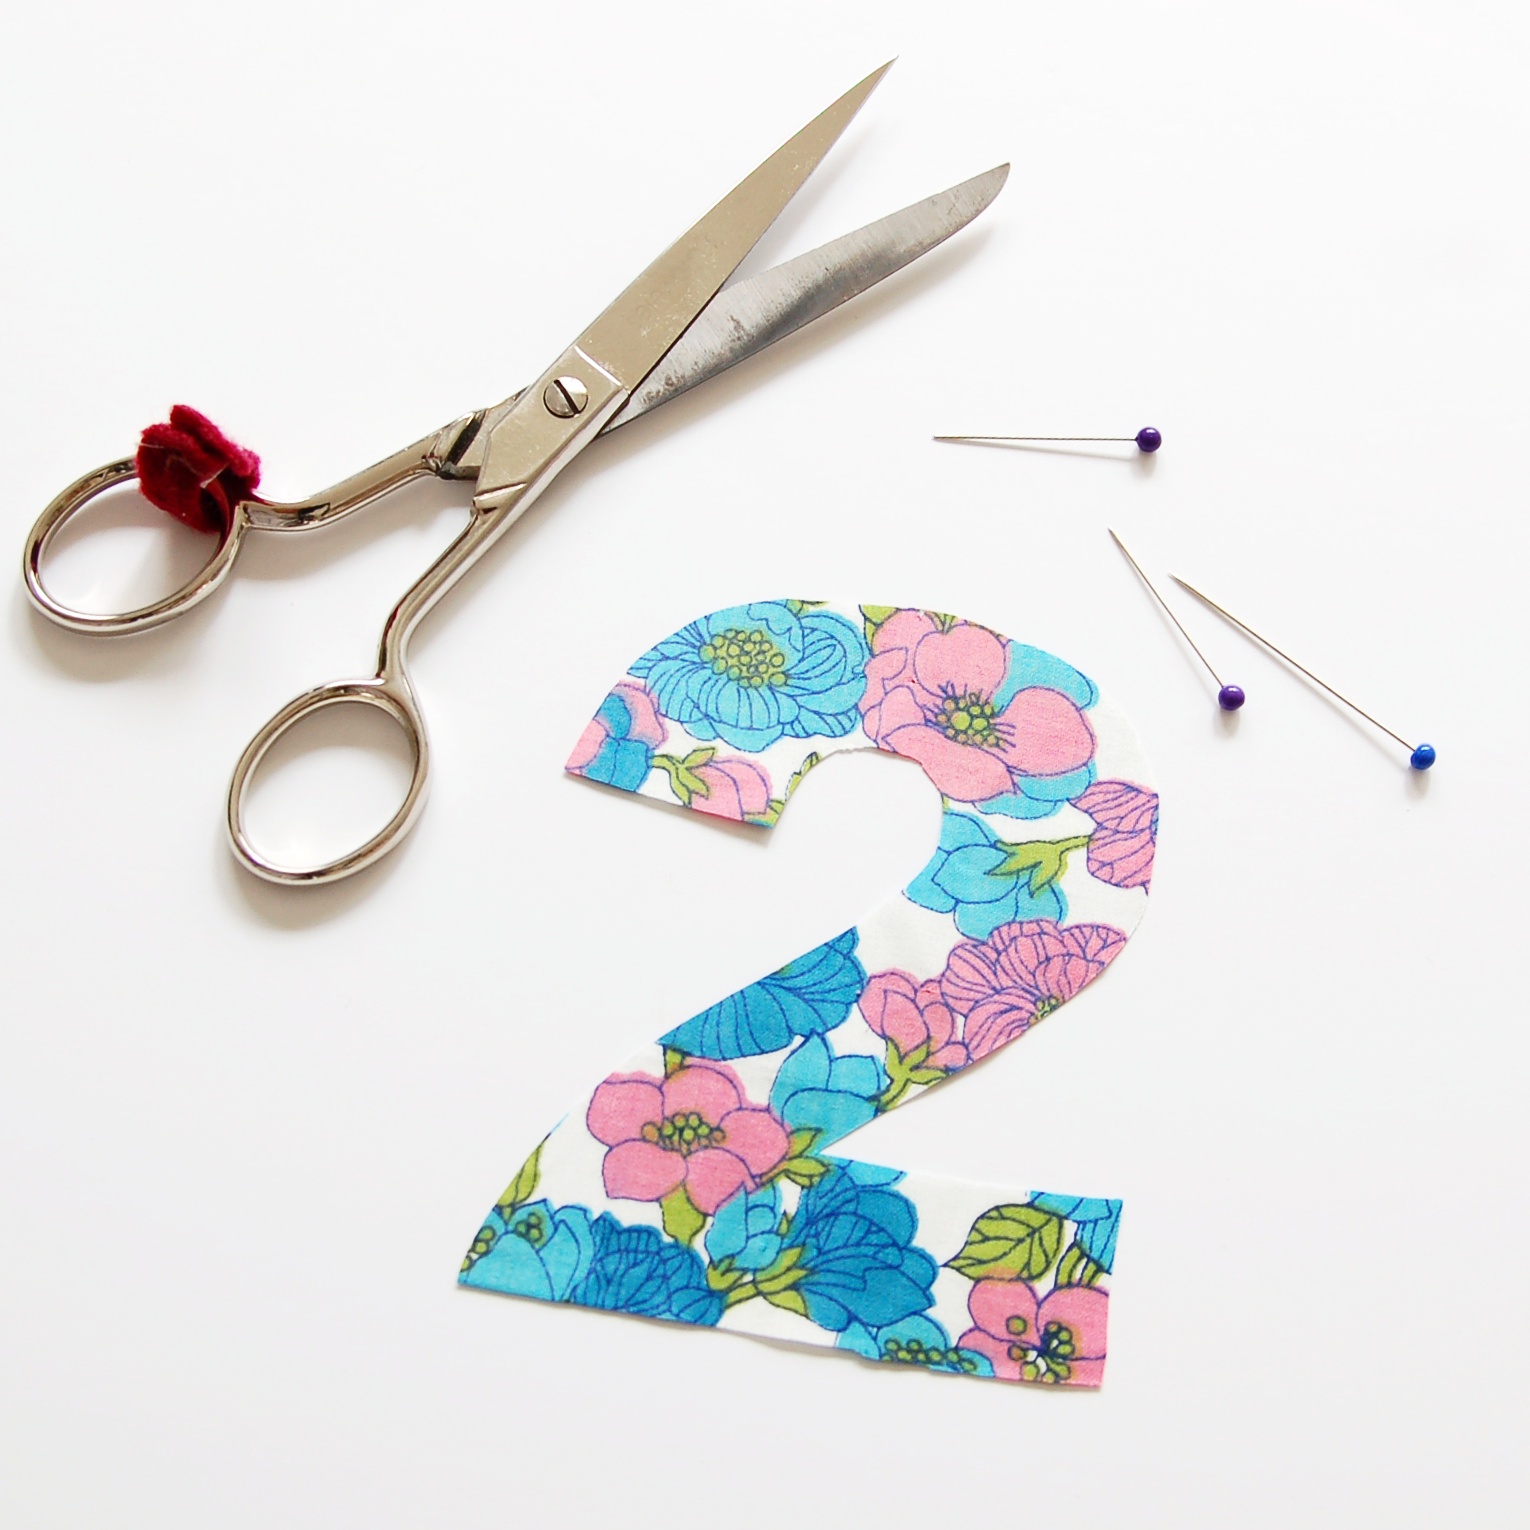
Lo primero es cortar la pieza que vas a usar para tu aplicación. Puede ser tanto de telas planas como de punto. Yo imprimí en papel un 2 grande y lo usé como patrón. Recuérdate de cortarlo al revés, si no se te queda luego con el estampado al revés. El primer paso que hago es cortar un poquito de Fliselina en trozos pequeños para pegar la aplicación a la tela para que no se mueva mientras coso. El que ves en la foto viene en formato de tira y es como entretela pero de dos lados, así se pega entre las dos telas y tienes tu pieza fija.
Puedes encontrar Fliselina como tela por metro y así podrías directamente cortar la misma pieza sin tener que usar trocítos como yo. También lo he visto en formato con papel en una cara, así primero lo pegas a tu aplicación y luego con las dos capas ya juntadas lo pegas a donde quieras que vaya. Y por último ahora parece ganar popularidad también un producto que se llama Wondertape o una cinta que cumple la misma función pero luego desaparece con el lavado. Lo que tengas a mano vale para este proyecto.
The first thing to do is to cut out the piece you are going to use for your appliqué. It can be done both in normal fabrics and knits. I printed out a big 2 on paper and then used it as a pattern. Remember to cut the pieces out mirrored, otherwise you'll have the print on the other side. First I cut out some Fliseline stay tape in small pieces so I can fix my piece in place and it won't move when I sew. The one you see on the photo comes in a tape version and it's like a interfacing but with the two sides that can be glued on the fabric, you just iron it between your pieces and that's it.
You can also find Fliseline per meter like fabric and then you just cut out your appliqué piece and you don't have to use scraps like I did. I also saw it in a verison with one side having like a paper layer on it so you can first iron one side, then tear off the paper and iron the other side too. And one more version that you can use is the Wondertape that does the same thing but later dissapears when you wash your garment.

He colocado el 2 en su sitio y le puse pequeños trozos de Fliselina abajo, no muchos, pero suficiente como para que se quede más o menos fijo.
I've put the 2 in the place I want it to be and then added some Fliseline scraps between the two layers, not too many, but enough for it to stay where I want it to be.
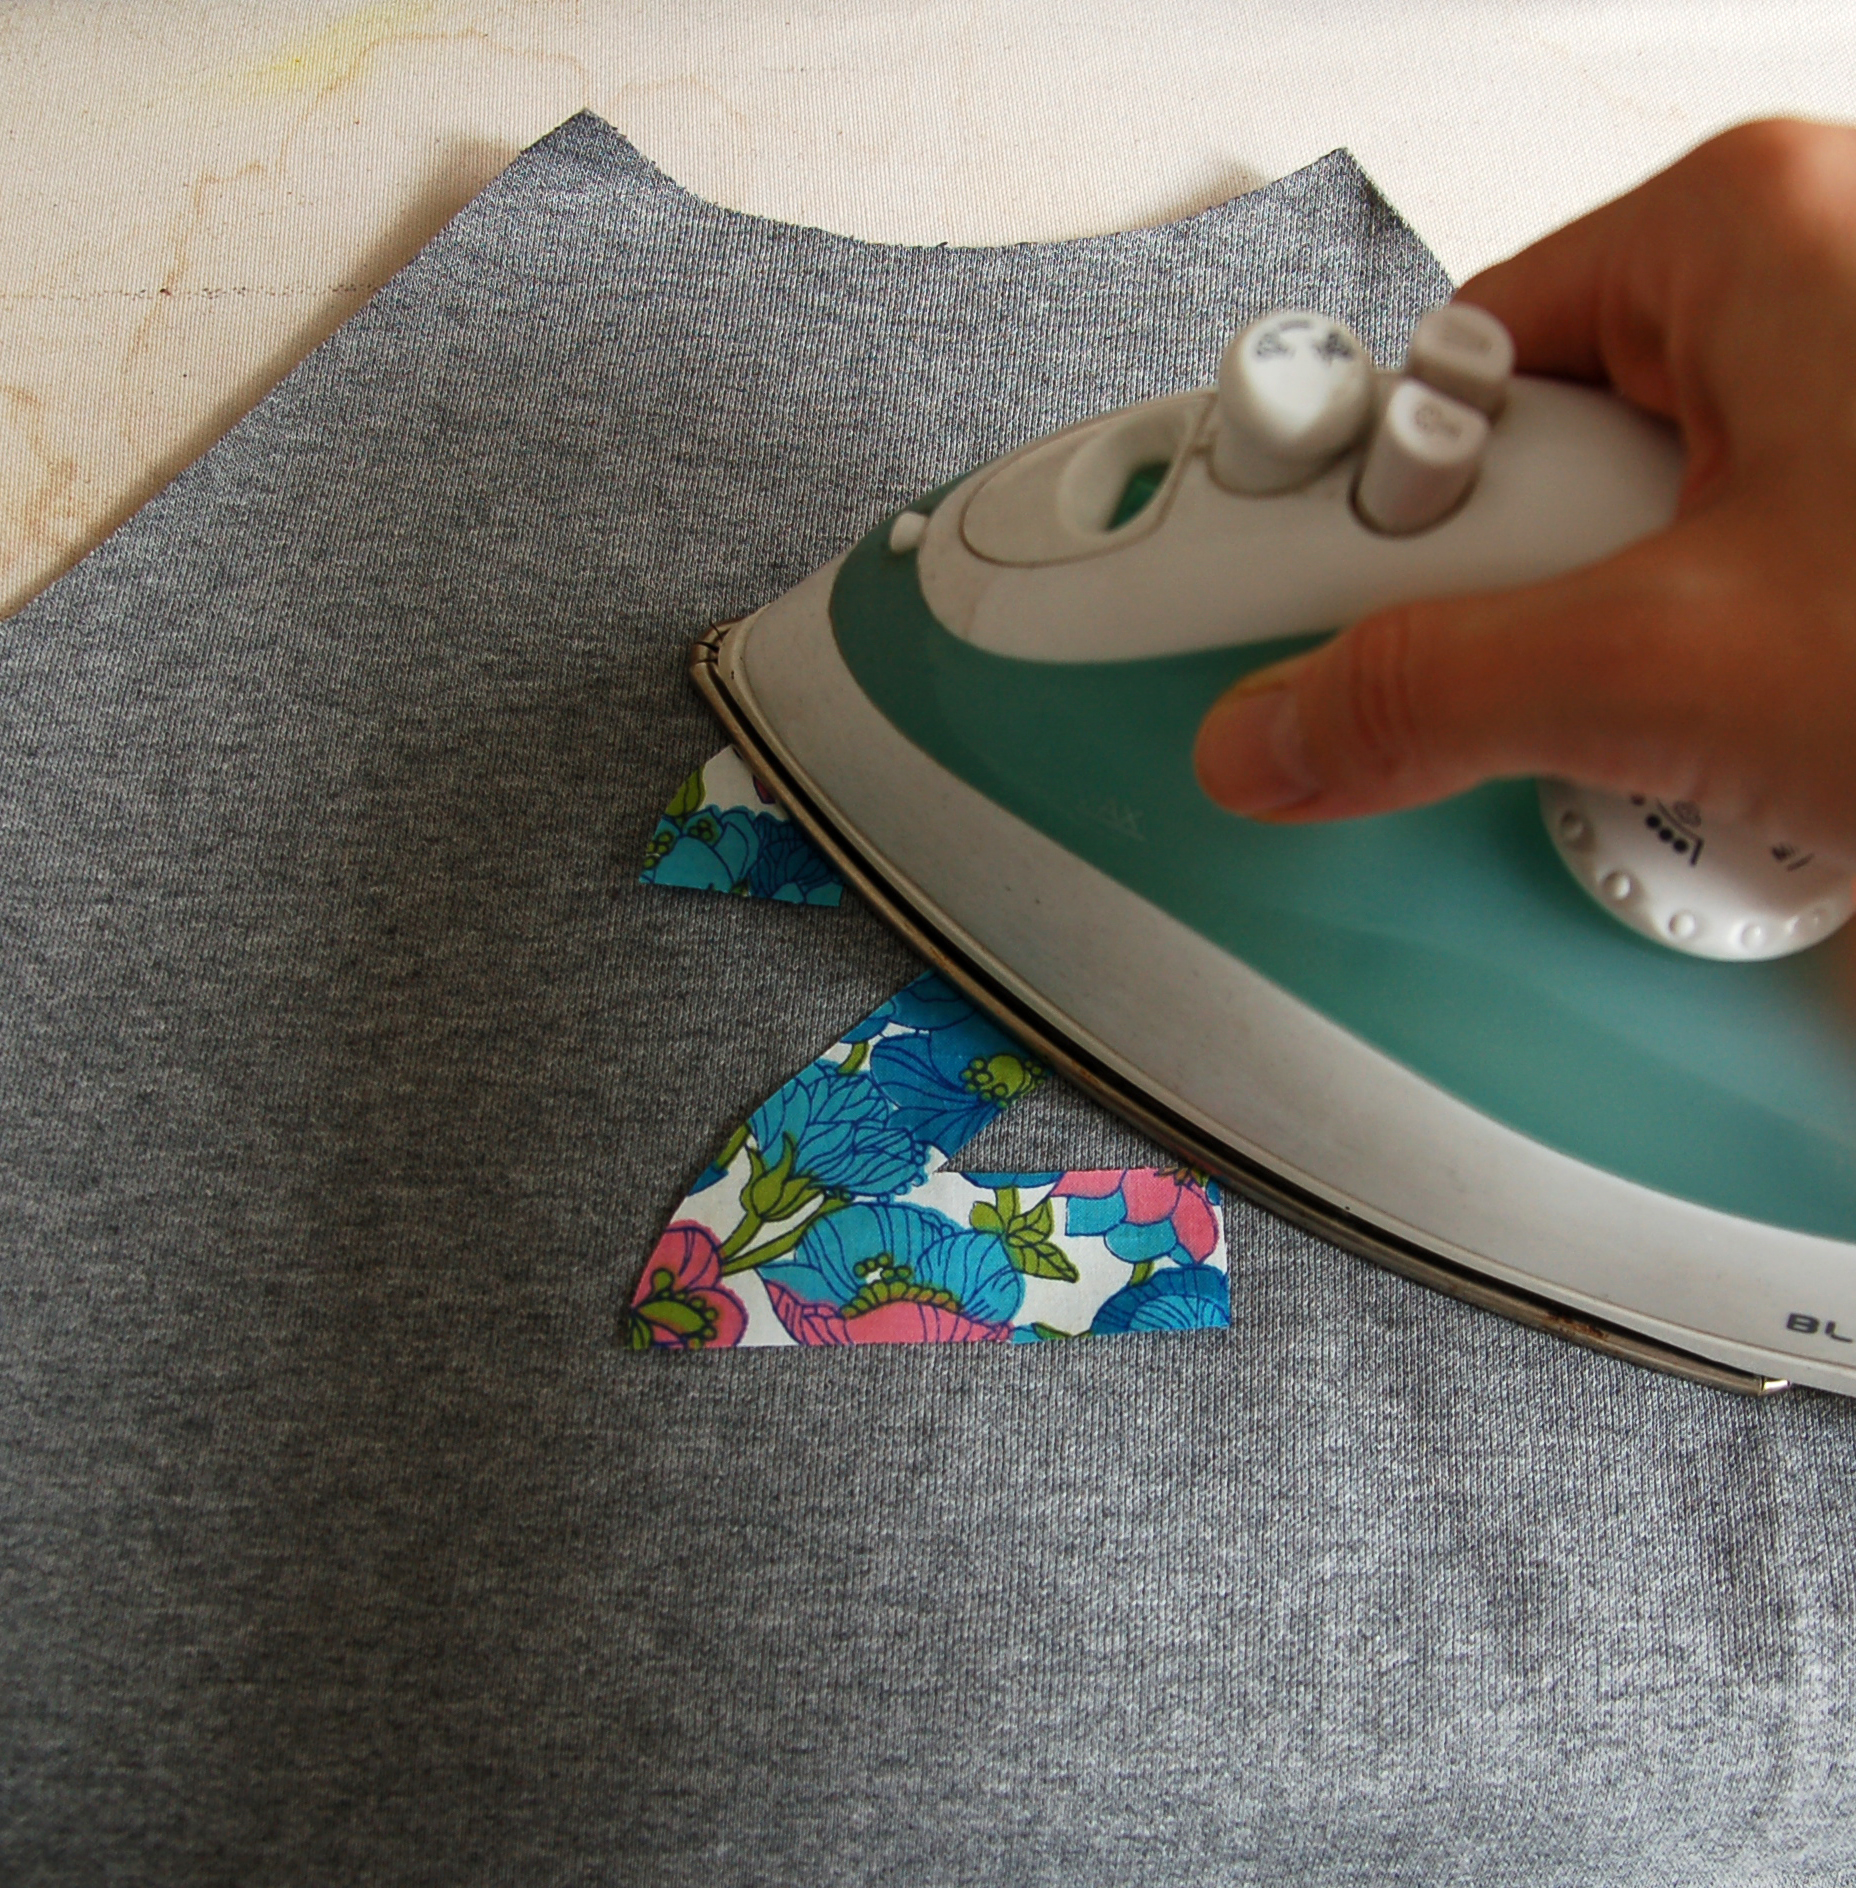
Un poco de plancha para que se peguen entre sí.
Press a little and the layers glue together.

Y ahora a coser. Lo que hago es que le paso puntada de zigzag todo alrededor de los bordes, estando segura de pillar bien la orilla de la pieza. Yo usé un zigzag de 0.5 largo y 3 de ancho. Básicamente es la puntada de ojal si en tu máquina no puedes controlar el ancho directamente. Mi tela de sudadera es algo gruesa y no tuve problemas de que la máquina no quiere coser, pero si usas punto tipo camiseta puede que te pase que la tela se engancha en los dientes de la máquina. Pues no pasa nada, para eso hay un truco: pon entre tu trabajo y los dientes trozo de papel de seda o similar y la máquina va mucho mejor teniendo como una barrera para no "comer" tu tela.
Now the sewing part. I just sew a narrow zigzag stitch all the way around the pattern piece, making sure I catch the borders of it well. I used a zigzag with 0.5 lenght and 3 wide. Basicaly it's a buttonhole stitch so if your machine doesn't have so many different ones just use your buttonhole setting. My knit fabric is medium weight so I didn't have any problems when sewing it but if you use lighter weight knits you might have problems with fabric getting stuck between the feed dogs. No worrys, there's a trick for that: put some tracing paper between your sewing project and the feed dogs and the machine goes way better having something to block the feed dogs from "eating" your fabric.

Ahora toca rodear toda la pieza con el zigzag teniendo un poco de cuidado en las esquinas para que quede bonito. Lo que hago es seguir un poquito más después de llegar a la esquina de la aplicación, entonces clavo la aguja y giro para ver si tengo bien el ancho para que quede una esquina correcta. Nada más: así de fácil es coser este tipo de cosas y la verdad es que las posibilidades son infinitas!
En algunas telas de punto que tienen más elasticidad te conviene usar algo para estabilizar esa zona, hay entretelas que se pegan primero en el revés de la tela y después de coser la aplicación se quitan tirando las partes que no pillaste con tu costura, así se queda más reforzado. En mi caso no lo he usado porque mi tela es bastante estable pero sería una opción con telas más finas. Tengo para probar también un producto que es como plástico pero pensado también para bordar a máquina...ya os contaré.
Now you just have to stitch all the way around your piece making sure you sew beautiful corners. I just sew a bit past the corner and then put the needle down, turn the work to the next direction and see if I'm on a right width from my previous stitching line. That's it: it's quite easy to sew this kind of things and you have so many possibilities!
In some stretchier knits it's a good idea to use tear away stabilizer in that area, it's like a intercafing that is applied on the wrong side of the fabric before sewing and you tear away the parts that you didn't sew on after making your appliqué. In that case this area will be more stable. In my case I haven't used it as my fabric is quite stable, but it's sure a good option for light weight knits. I also have some clear elastic like product here for machine embroidery that I haven't tried out yet but I'll tell you when I do that.

Mis puntadas no son perfectas porque al ir a veces más despacio y a veces más rápido al girar en las curvas pues es lo que tiene, igual si vas más despacíto tus puntadas salen más uniformes. Pero a mí me vale...normalmente la gente no anda con la lupa mirando las costuras, jaja.
My stitches aren't perfect because I went in some parts slower and the other ones faster when turning the curved sides, when you go slowly all the way around it sure is more beautiful. But I'm OK with that...normally people don't observe your appliqué stitching too much, hehe.

Otra cosíta que cosí es este vestido en punto. Era para el día del cumple familiar. Descubrí que había que coser un vestido la noche anterior y aunque estaba muerta de cansancio decidí esforzarme por la buena causa (y para que en el futuro tenga fotos de todos los cumples de ella con los vestidos, claro, qué te crees, jaja). Dos horas desde sacar el patrón, modificarlo, cortar y coser. Remalladora, eres mi mejor amiga! Nada especial, pero algo así quería: que lo pueda llevar día a día pero que sea bonito también.
En el día del cumple se tiró encima un vaso de agua así que durante la fiesta su vestido estaba secando. No digo nada...
The other garment I made was this knit dress. It was for the family birthday party. I found out I had to sew a dress the night before and altough I was very tired I made an effort for the good cause (and that I would have photo of her in all her birthday dresses in the future, of course, hehe). It took me two hours to copy the pattern, alter it, cut the fabric and sew it up. Serger, you really are my best friend! Nothing special but it's as I wanted it to be: so she can wear it daily but that it would be pretty too.
At that day she spilled a glass of water on the dress and during the party the dress was drying out there. No comments...

El patrón es de Ottobre Design 1/2015 (ojo con el ruso, jaja) y lo que cambié es que hice un corte bajo la sisa y aumenté el el ancho del patrón para tener esa falda con frunce. Usé elástico transparente para fruncir y me encanta porque hace un frunce muy uniforme. La tela es suave punto de algodón con 5% de elastán y muchos corazones.
Esto es todo por hoy, te animo a probar lo de aplicaciones, que queda muy bonito!
The pattern is from Ottobre Desing 1/2015 (Russian in your face, haha) and my alteration was to cut the bodice and widen the skirt so it would have some ruffle. I used clear elastic tape to shir the skirt and I love it as it makes really pretty shirring. The fabric is soft cotton and 5% spandex knit with lots of hearts on it :)
That's it for today, I recommend you to try out sewing appliqué, it's really pretty!