2018 en costuras // My 2018 makes

 
www.studiocostura.com

Hola! Aquí estamos, casi al final del año. Pensaba que estaría bien hacer un resumen de mis costuras ya que estuve contando y este año solo he publicado tres entradas sobre mis proyectos personales en este blog. Todo lo demás ha sido patrones, tutoriales y otro tipo de información sobre costura. Este año me parece que he cosido menos que nunca para mí, pero aún así han sido varias cosas. Algunas prendas me las he puesto un montón, algunas nunca…pensaba que en este punto ya sé antes de empezar un proyecto si me vale o no, pero resulta que no es así. En general soy una persona práctica a la hora de elegir mis proyectos, coso cosas que sé que me voy a poner, suelo elegir telas que ya conozco y sé que me gustan. Pero aun así, como todo en esta vida, la costura y especialmente la elección de proyectos es un proceso de aprendizaje…hay errores y hay aciertos, eso sí, siempre aprendes. Así que revisé mis fotos de Instagram para sacar las prendas y cosas que he hecho, allí suelo subir más o menos todo, aunque hay varias cosas que faltan también.

Hey! Here we are, almost done with this year. I thought that it would be nice to write a little recap about my sewing projects this year as I was counting and I’ve only published three personal sewing projects this year over here at the blog. It has been all about patterns, tutorials and other information about sewing. I think I’ve been sewing for myself very little this year, less than ever, but turns out there have been some projects. Some garments I’ve been wearing a lot, some of them never left the house…I thought that at this point I’d already know before starting a project if I like it or not but the reality is other. In general I’m a quite practical person when choosing sewing projects, I sew stuff I know I’m going to wear, I choose the fabrics I already know and love. But despite that, as with other life things, it occures that sewing and especially choosing the projects is a learning process…there are mistakes and there are wins, the thing is, you always learn. So I revised my Instagram feed to get some photos as I usually post there what I make but there are also some stuff I don’t have a photo of.

www.studiocostura.com

El Ogden Cami, uno de mis favoritos! La versión con flores me he puesto un montón, la de rayas verticales lo regalé a mi hermana y lo de rayas horizontales me lo he puesto, pero no mucho (la viscosa esa es bastante ligera y se arruga demasiado). También hice uno blanco con doble capa en una tela de crepe para una boda en el verano.

The Ogden Cami, one of my favourites! The floral version has been getting tons of wear, the one with vertical lines I gave to my sister and the one with the horizontal lines has got some wear, but no too much (the viscose fabric is quite lightweigth and wrinkles too much). I also made a double layer one with a poly crepe for a wedding I attended.

www.studiocostura.com
78c3191814f6cc88572471f481c45d6b.jpg

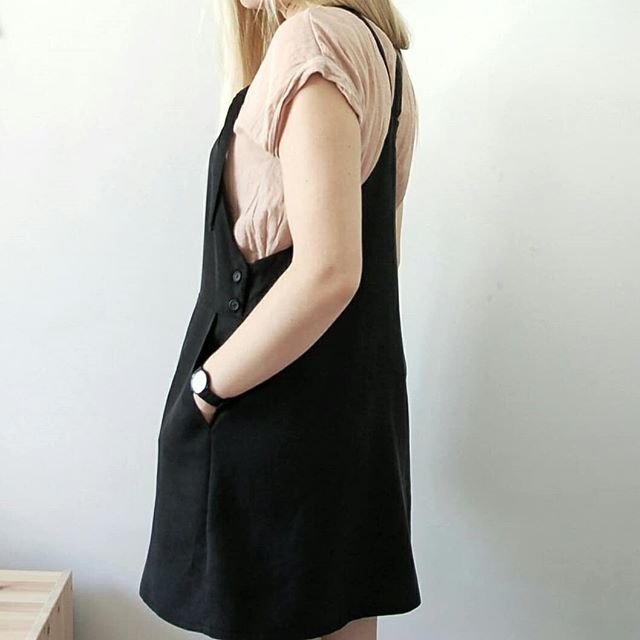
El vestido peto/pichi de Roberts Collection me encantó. Primero hice el beige en una tela más tiesa y hasta ahora no tiene botones (o sea, nunca más me lo he puesto después), sin embargo el negro me lo puse un montón. Lo hice con tencel y me encanta que es ligero pero aun así tiene una caída estupenda y suficiente cuerpo. Es un modelo ideal para el verano, te deja moverte y no da calor, un buen descubrimiento!

The bib dress / dungaree dress from Roberts Collection is amazing. First I made the beige version in a stiffer fabric and it still doesn’t have buttons (as in I’ve never really worn itafter finishing it), but the black one has gotten tons of wear. I made it with tencel fabric and I love it as it’s super light weight but has a good structure and drape. It’s the perfect style for summer, it lets you move and it’s easy to wear in heat, a great find!

www.studiocostura.com
a7af376e145b560f30fa0e71053d1d6c.jpg

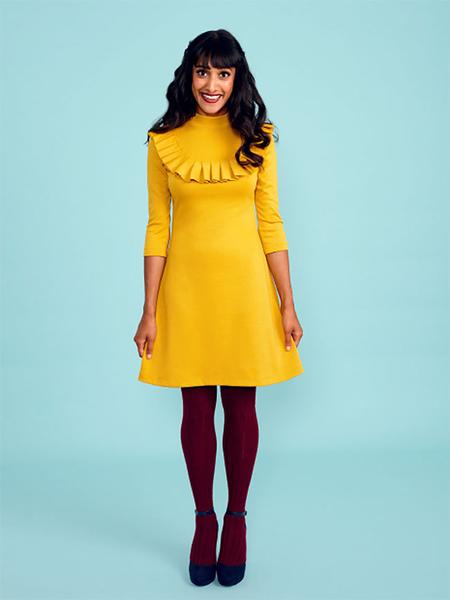
Básicos aburridos: la sudadera azul marino me lo pongo toooodo el tiempo. Usé el patrón de Ottobre Design (será del número de verano de 2018) con una tela de sudadera que tiene como pelito por dentro, perfecto para no pasar frío…si no está en la lavadora me lo llevo puesto! La camiseta de plátanos (el patrón es de algún Ottobre también) lo hice porque me hizo gracia el tejido, el estampado mola mucho. También le hice la versión mini a mi hija y las dos prendas han tenido mucho uso.

Boring basics: I’ve been wearing this navy blue sweatshirt sooo much. I used a pattern from Ottobre Design (I guess it’s from the 2018 summer edition) with a really nice sweatshirt knit witha fur lining. It’s perfect for winter and honestly, if it’s not inside my washing machine I’m probably wearing it! The banana T-shirt was made purely because I found this super cute print (the pattern is from some Ottobre too). I also made my kid a matching mini versions and we’ve worn those a lot.

www.studiocostura.com
dfd79b0e3005c22c12c8c56733902e8e.jpg

Nénuphar Jacket: en el verano vi este patrón y me gustó mucho el estilo kimono con un corte de manga más sencilla. Hice primero la versión en blanco roto con un lino muy bonito de pequeñas rayas. La espalda lo hice sin frunces porque soy así de aburrida. Enseguida hice otra con una viscosa de medio grosor que tiene una caída super bonita. Después de coser estas dos chaquetas me di cuenta de lo obvio: en Madrid o hace mucho calor y no te pones nada que no sea de manga corta o luego ya de un día para otro se bajan las temperaturas y me tengo que cubrir con algo más que una chaqueta tan ligera como ésta. Gran descubrimiento después de…8 años? Así que la chaqueta de lino que en fotos me gusta mucho, pues en la vida real me lo he puesto dos veces. La chaqueta de viscosa lo usé más en septiembre cuando por la mañana al salir de casa necesitaba un algo encima pero a las 10 ya hacía un calor que te morías. Me sirve muy bien cuando voy en transporte público y hace frío por el aire acondicionado…pero en general, creo que debido por donde vivo y por mis propias preferencias, pues lo veo muy bonito pero no tengo muchas ocasiones para ponerme algo así.

Nénuphar Jacket: I saw this pattern in summer and I really liked the kimono style with a simple sleeve. I first made the off white version in a beautiful striped linen. I didn’t add the ruffles for the back because you know: I’m boring. Just after finishing this one I made another one with a medium weight viscose that has a beautiful drape. After sewing these two jackets I saw the obvious problem: in Madrid when it’s hot, it’s super hot and you can’t wear anything but short sleeves and when the temperatures drop I really need something more than just a lightweight jacket like this one. It’s a great discovery after…8 years? So yes, I really like the linen jacket on photos but I’ve been actually wearing it like two times. I’ve been wearing the viscose version more, especially in Spetember when in the morining when I leave the house I’d like to have an extra layer but at 10 o’clock it’s already hot as hell. It’s great to use in public transport to protect me from the cold of the air conditioner…but in general I think that I don’t have too many opportunities to wear this type of garments altough they are beautiful, as the climate is as it is and my personal preferencies have a big role too.

www.studiocostura.com

Hice las camisetas para mí y para la pequeña con los patrones de Megan Nielsen, y de esto sí que hay post. La de ella muy bien, la mía un poco demasiado ajustada por mi gusto, se lo di a mi hermana. Y los pantalones cortos son del patrón Lander pants. Hice estos que quedaron bastante bien y luego otro par más en un vaquero más claro (que hasta ahora todavía no tiene botones…). Me los puse un par de veces pero no sé si el largo del tiro me quedó del todo bien, habrá que mirar qué pasa con ese patrón. También es que he subido de peso y ahora tengo que mirar bien el largo que tiene el pantalón corto para que no tenga este efecto de que al andar mis piernas rozan entre sí y me resulta super incómodo si el pantalón es demasiado corto y “se me sube” (ya sé que no es muy glamuroso pero es que molesta un montón y por eso pasé a mejor llevar faldas porque no tenía este problema).

I made thses T-shirts for me and my kid with Megan Nielsen patterns and there actually is a post about it. Hers is great, mine a bit too snug for my taste so I gave it to my sister. And the shorts are made with the Lander pants pattern. I made these that turned out quite well and then I made also another pair with a ligther color denim (the ones that still don’t have buttons on…). I wore those a couple of times but I’m not so sure about the crotch length there, I’ll have to see those pattern pieces again. Also I’ve put on some weigth and I really have to check the length that the shorts have before hemming them, I find it super uncomfortable when my thights rub against each other when I walk and the shorts “climb up” (I know it’s not very glamorous but this really sucks and that’s why I’ve chosen to wear more skirts as I usually don’t have this problem with them).

7831c6ea8330e62f63a59e2833db8627.jpg
www.studiocostura.com

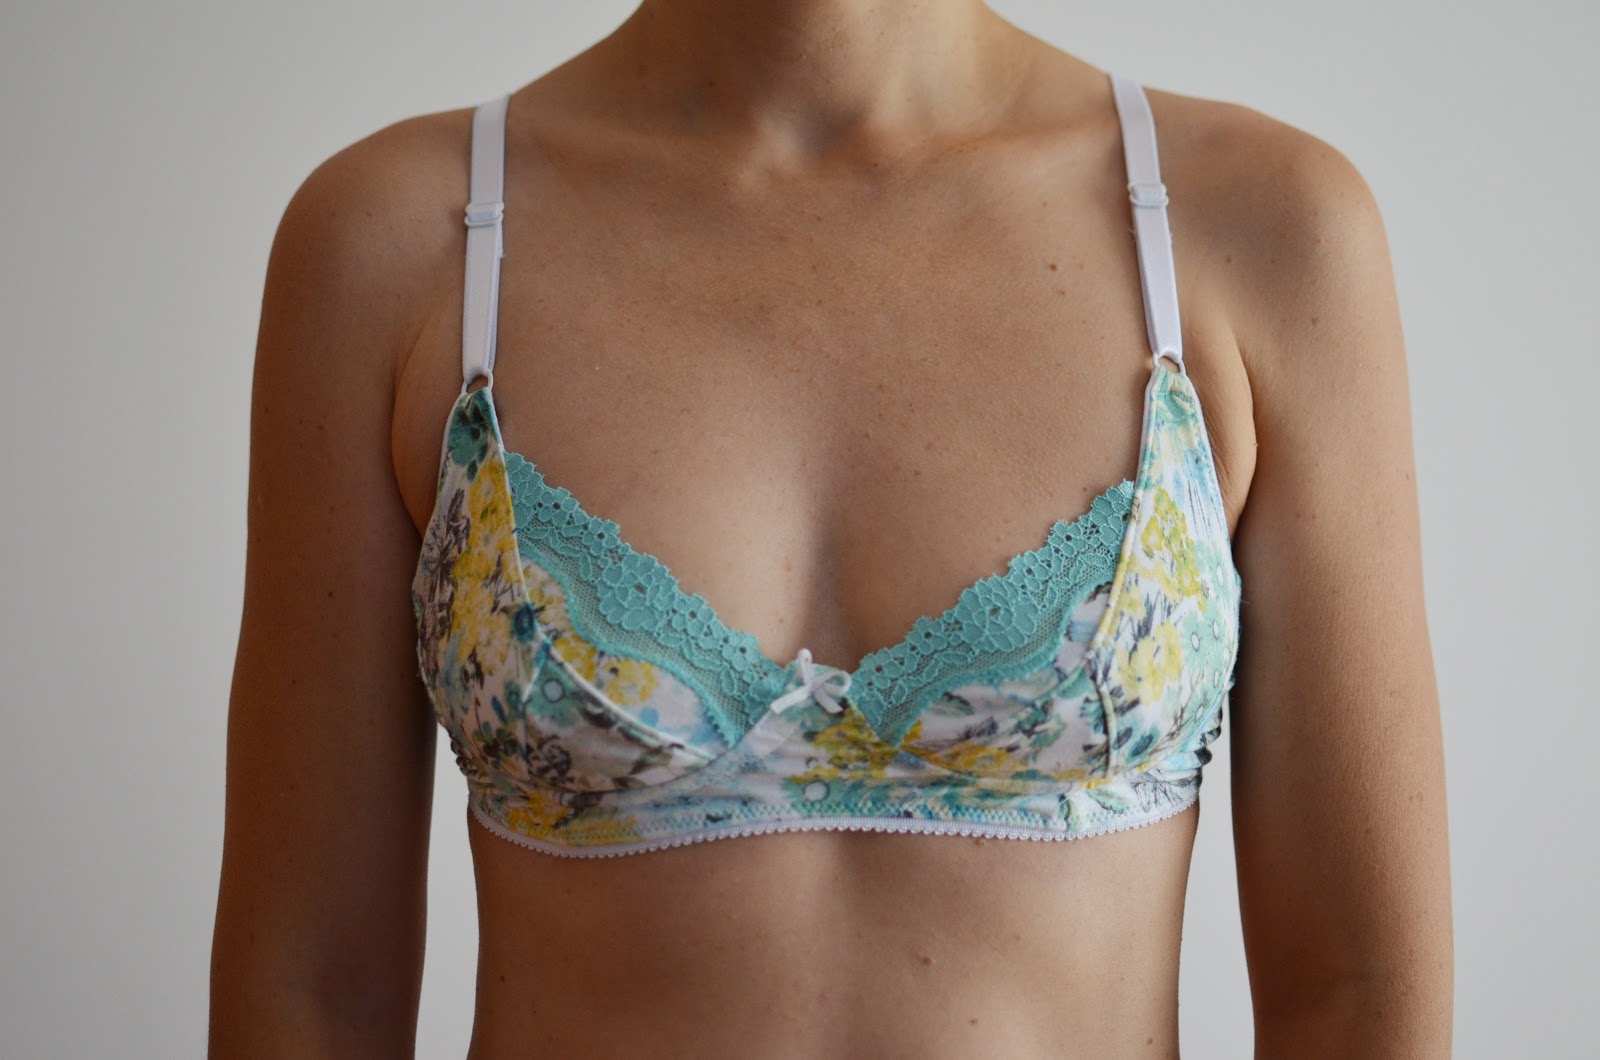
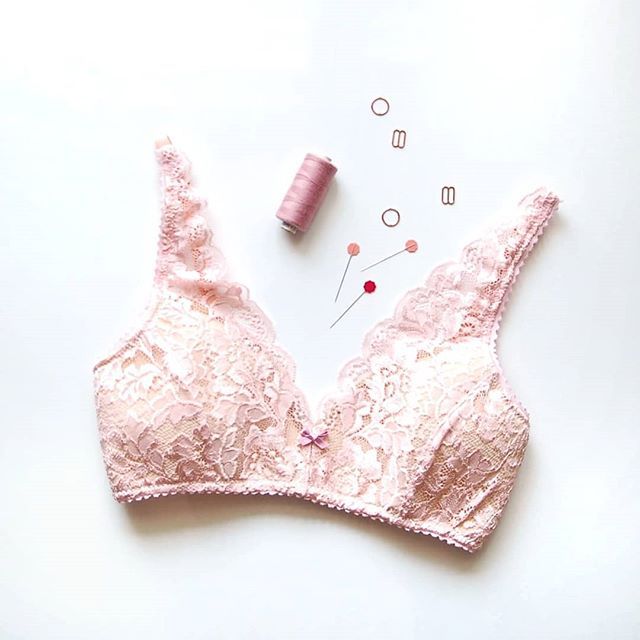
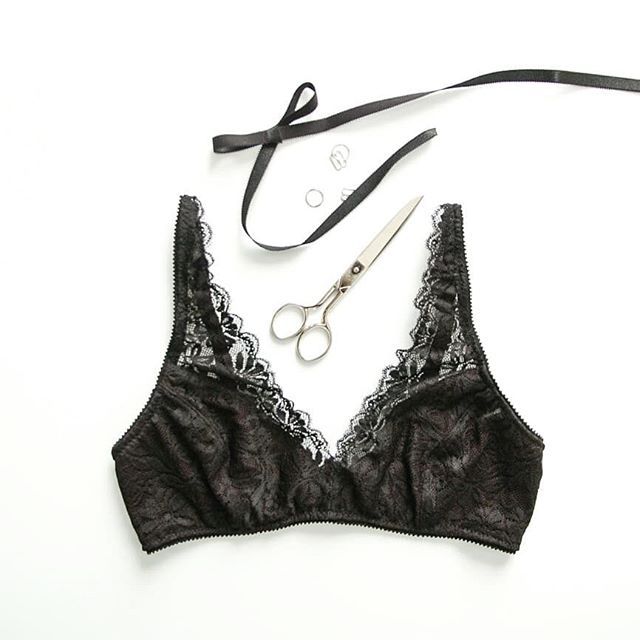
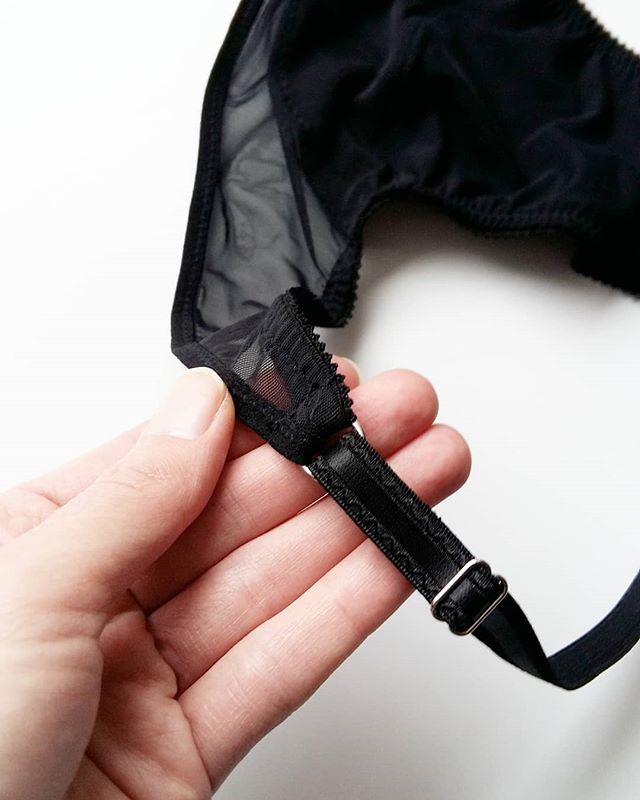
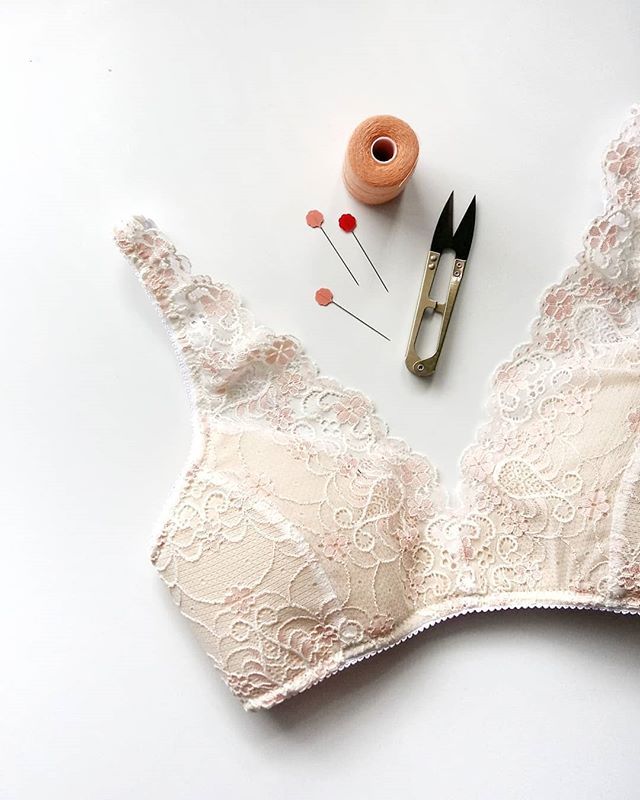
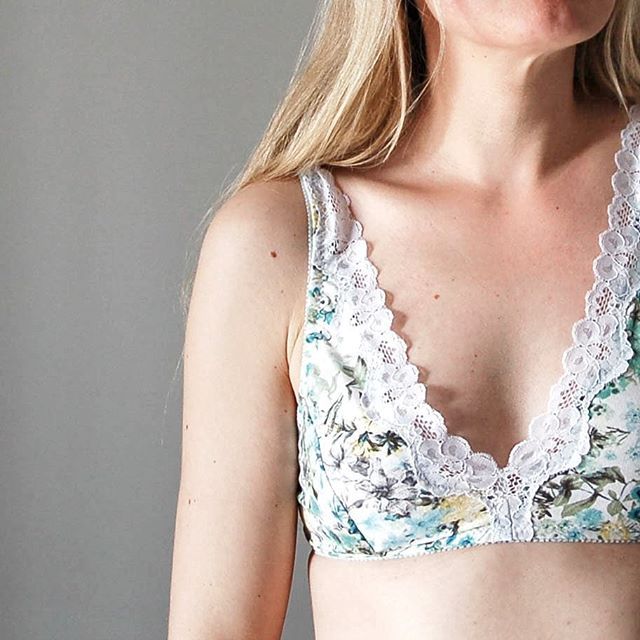
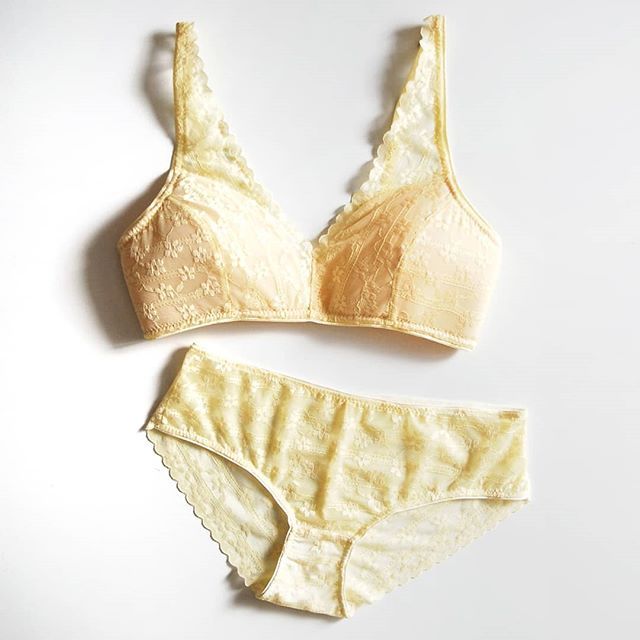
Desde luego el ganador de prendas que más me he puesto es el Suki Kimono, y éste sí que tiene post para más detalles, estoy super contenta con el modelo y me lo pongo todos los días. La única pieza de lencería que me hice para mí (sí sí, este año me hice UNO para mí) ha sido este sujetador Boylston con el encaje de color carne. Al principio me lo puse bastantes veces, ahora me parece que está en el fondo de mi caja de sujetadores, creo que no queda tan tan tan cómodo como me gustaría…y nada, es proceso, solo el proceso…

The first prize winner for this year is of course the Suki Kimono, I’ve been wearing it every day, there’s also a post about it actually. The only bra I made for myself (yes, yes, it’s the ONE bra I made this year for myself) is this Boylston bra in nude lace. I wore it several times when I finsihed it but now it’s somewhere in the bottom of my lingerie drawer, I think it’s not just right for me, the fit needs more tweaks…process, it’s just a process…

www.studiocostura.com

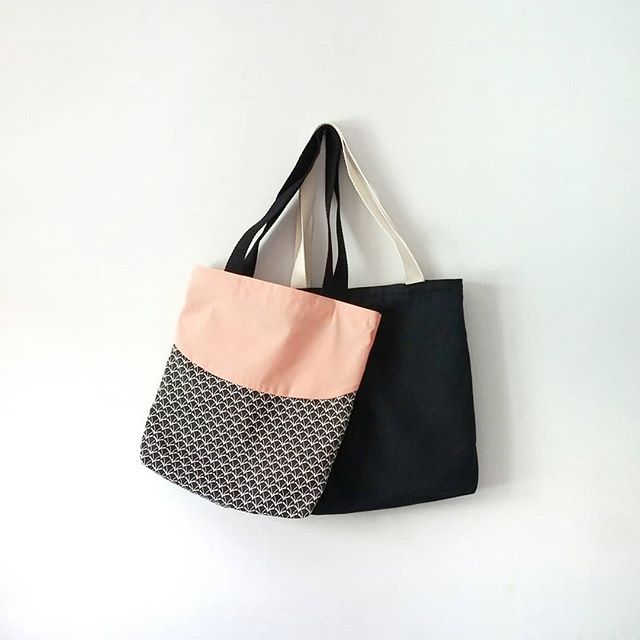
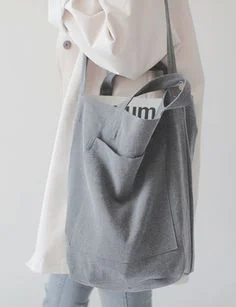
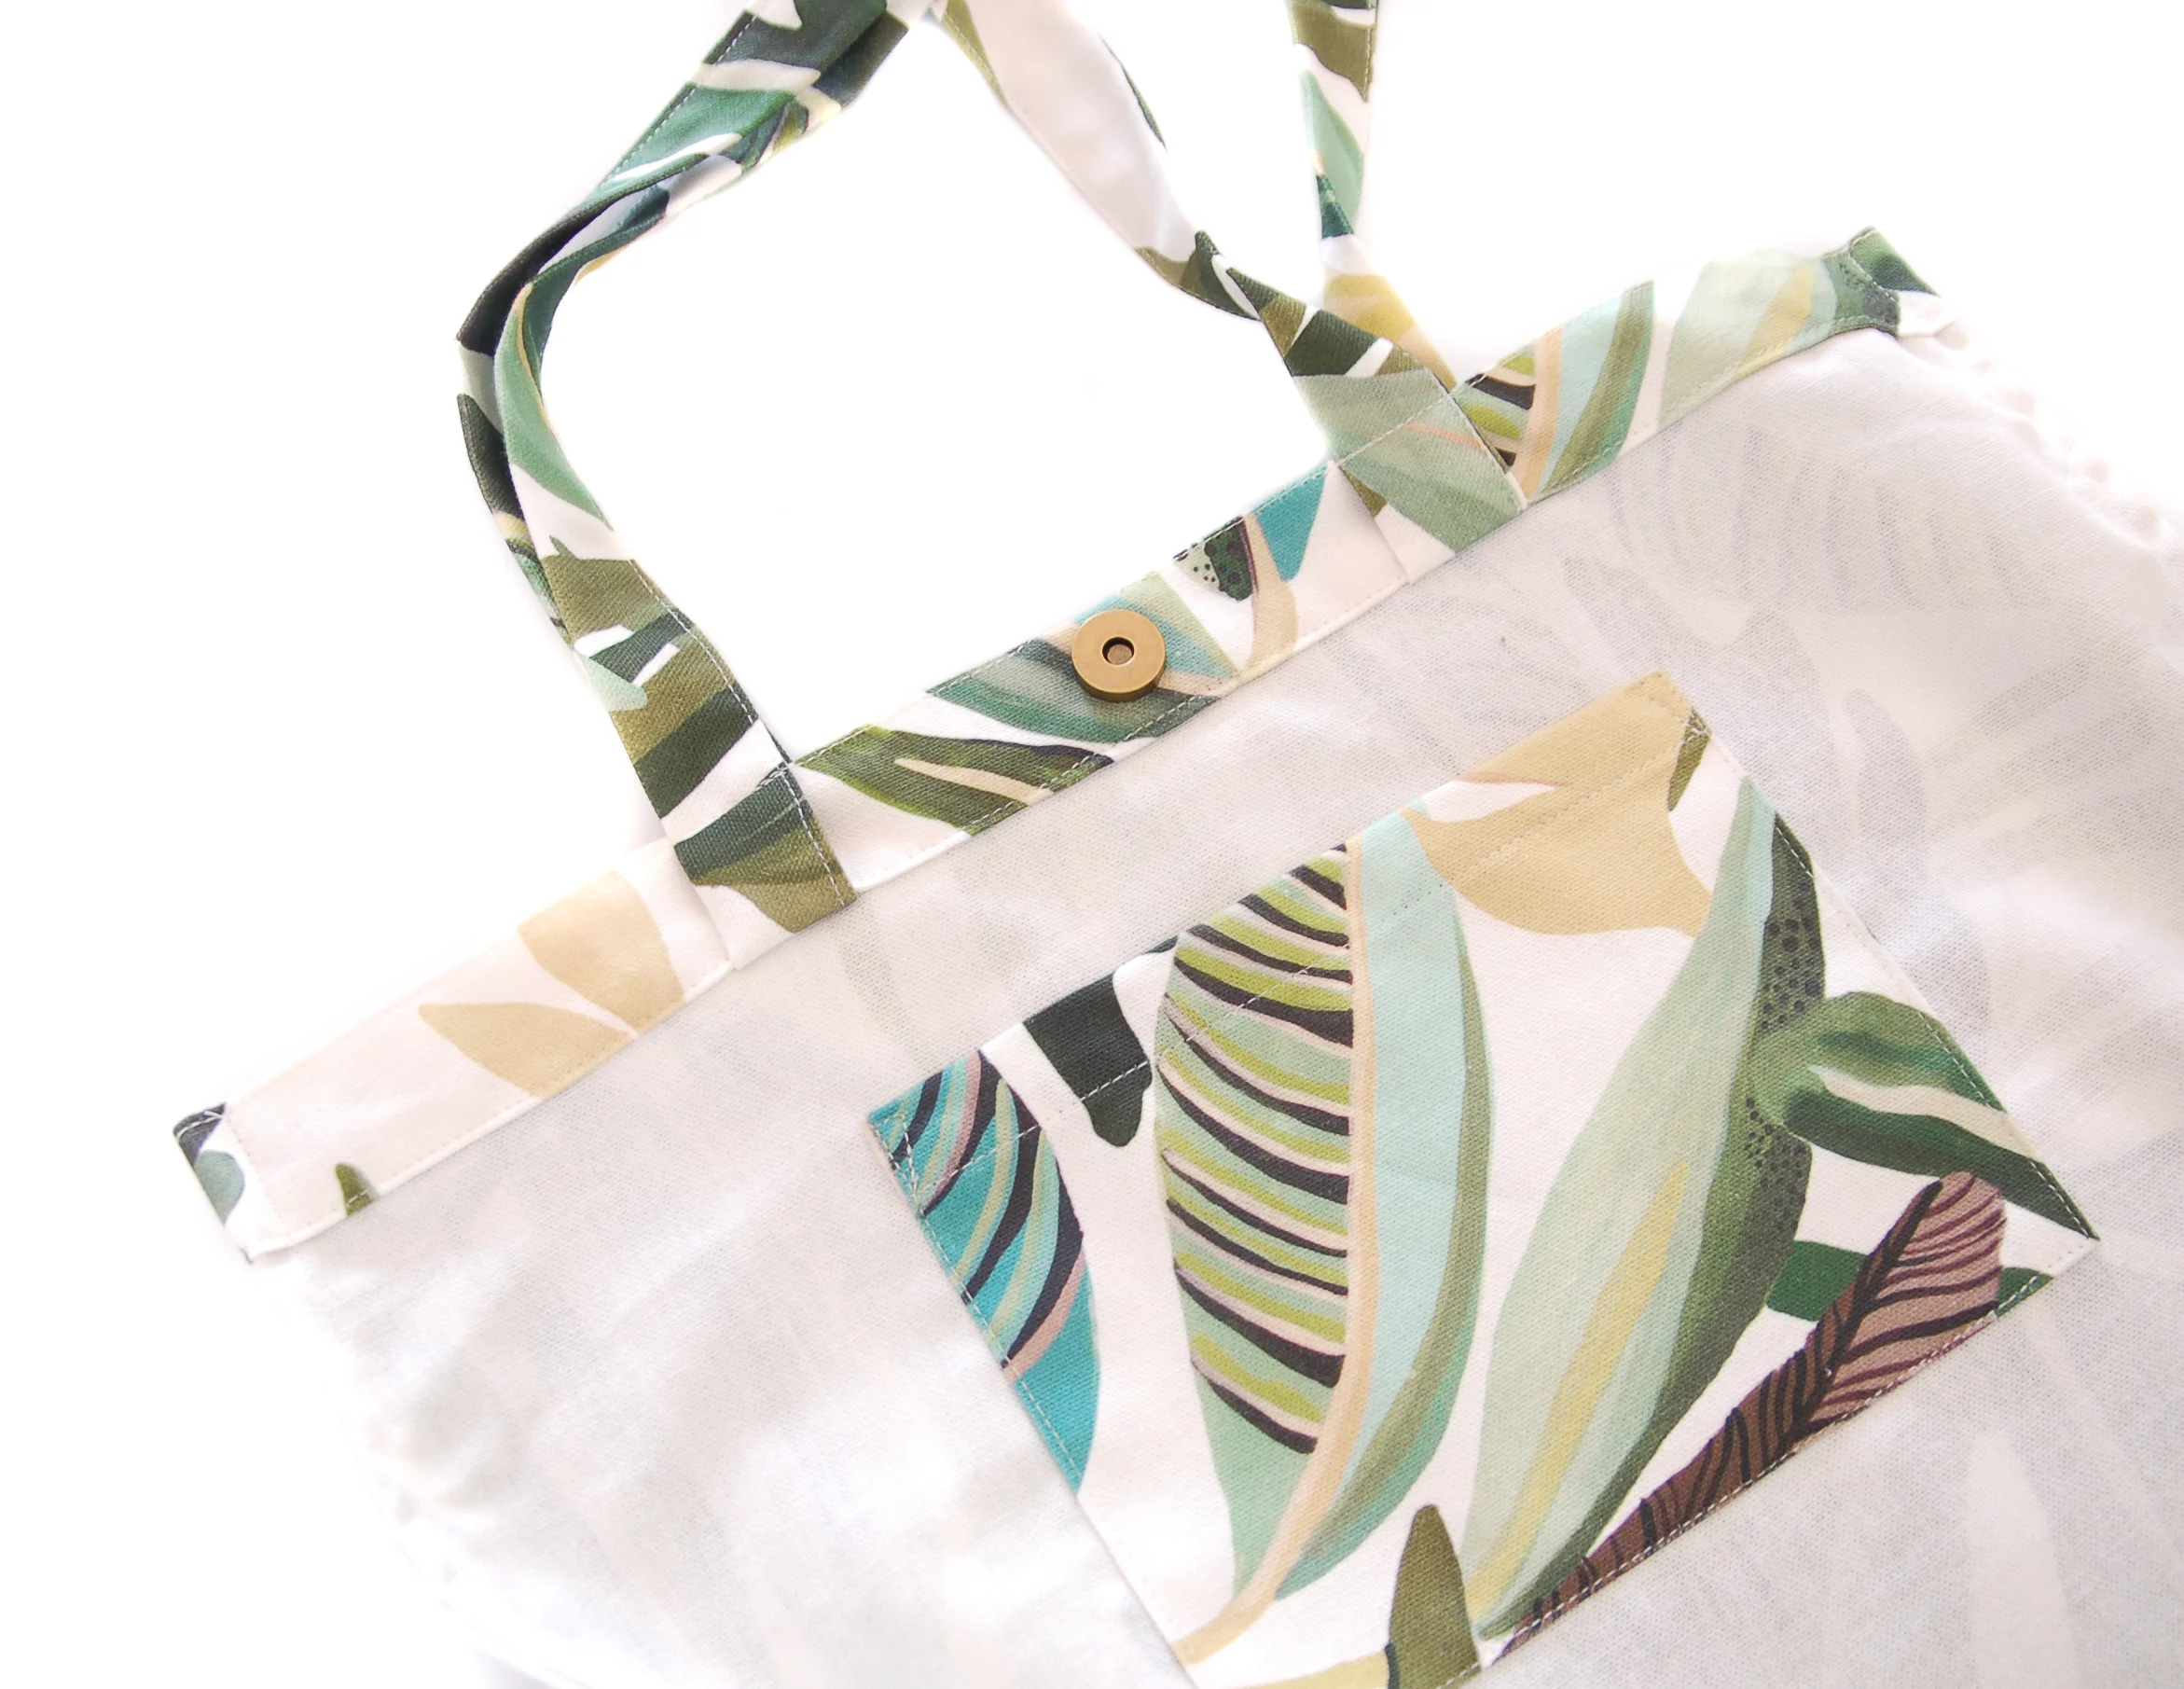
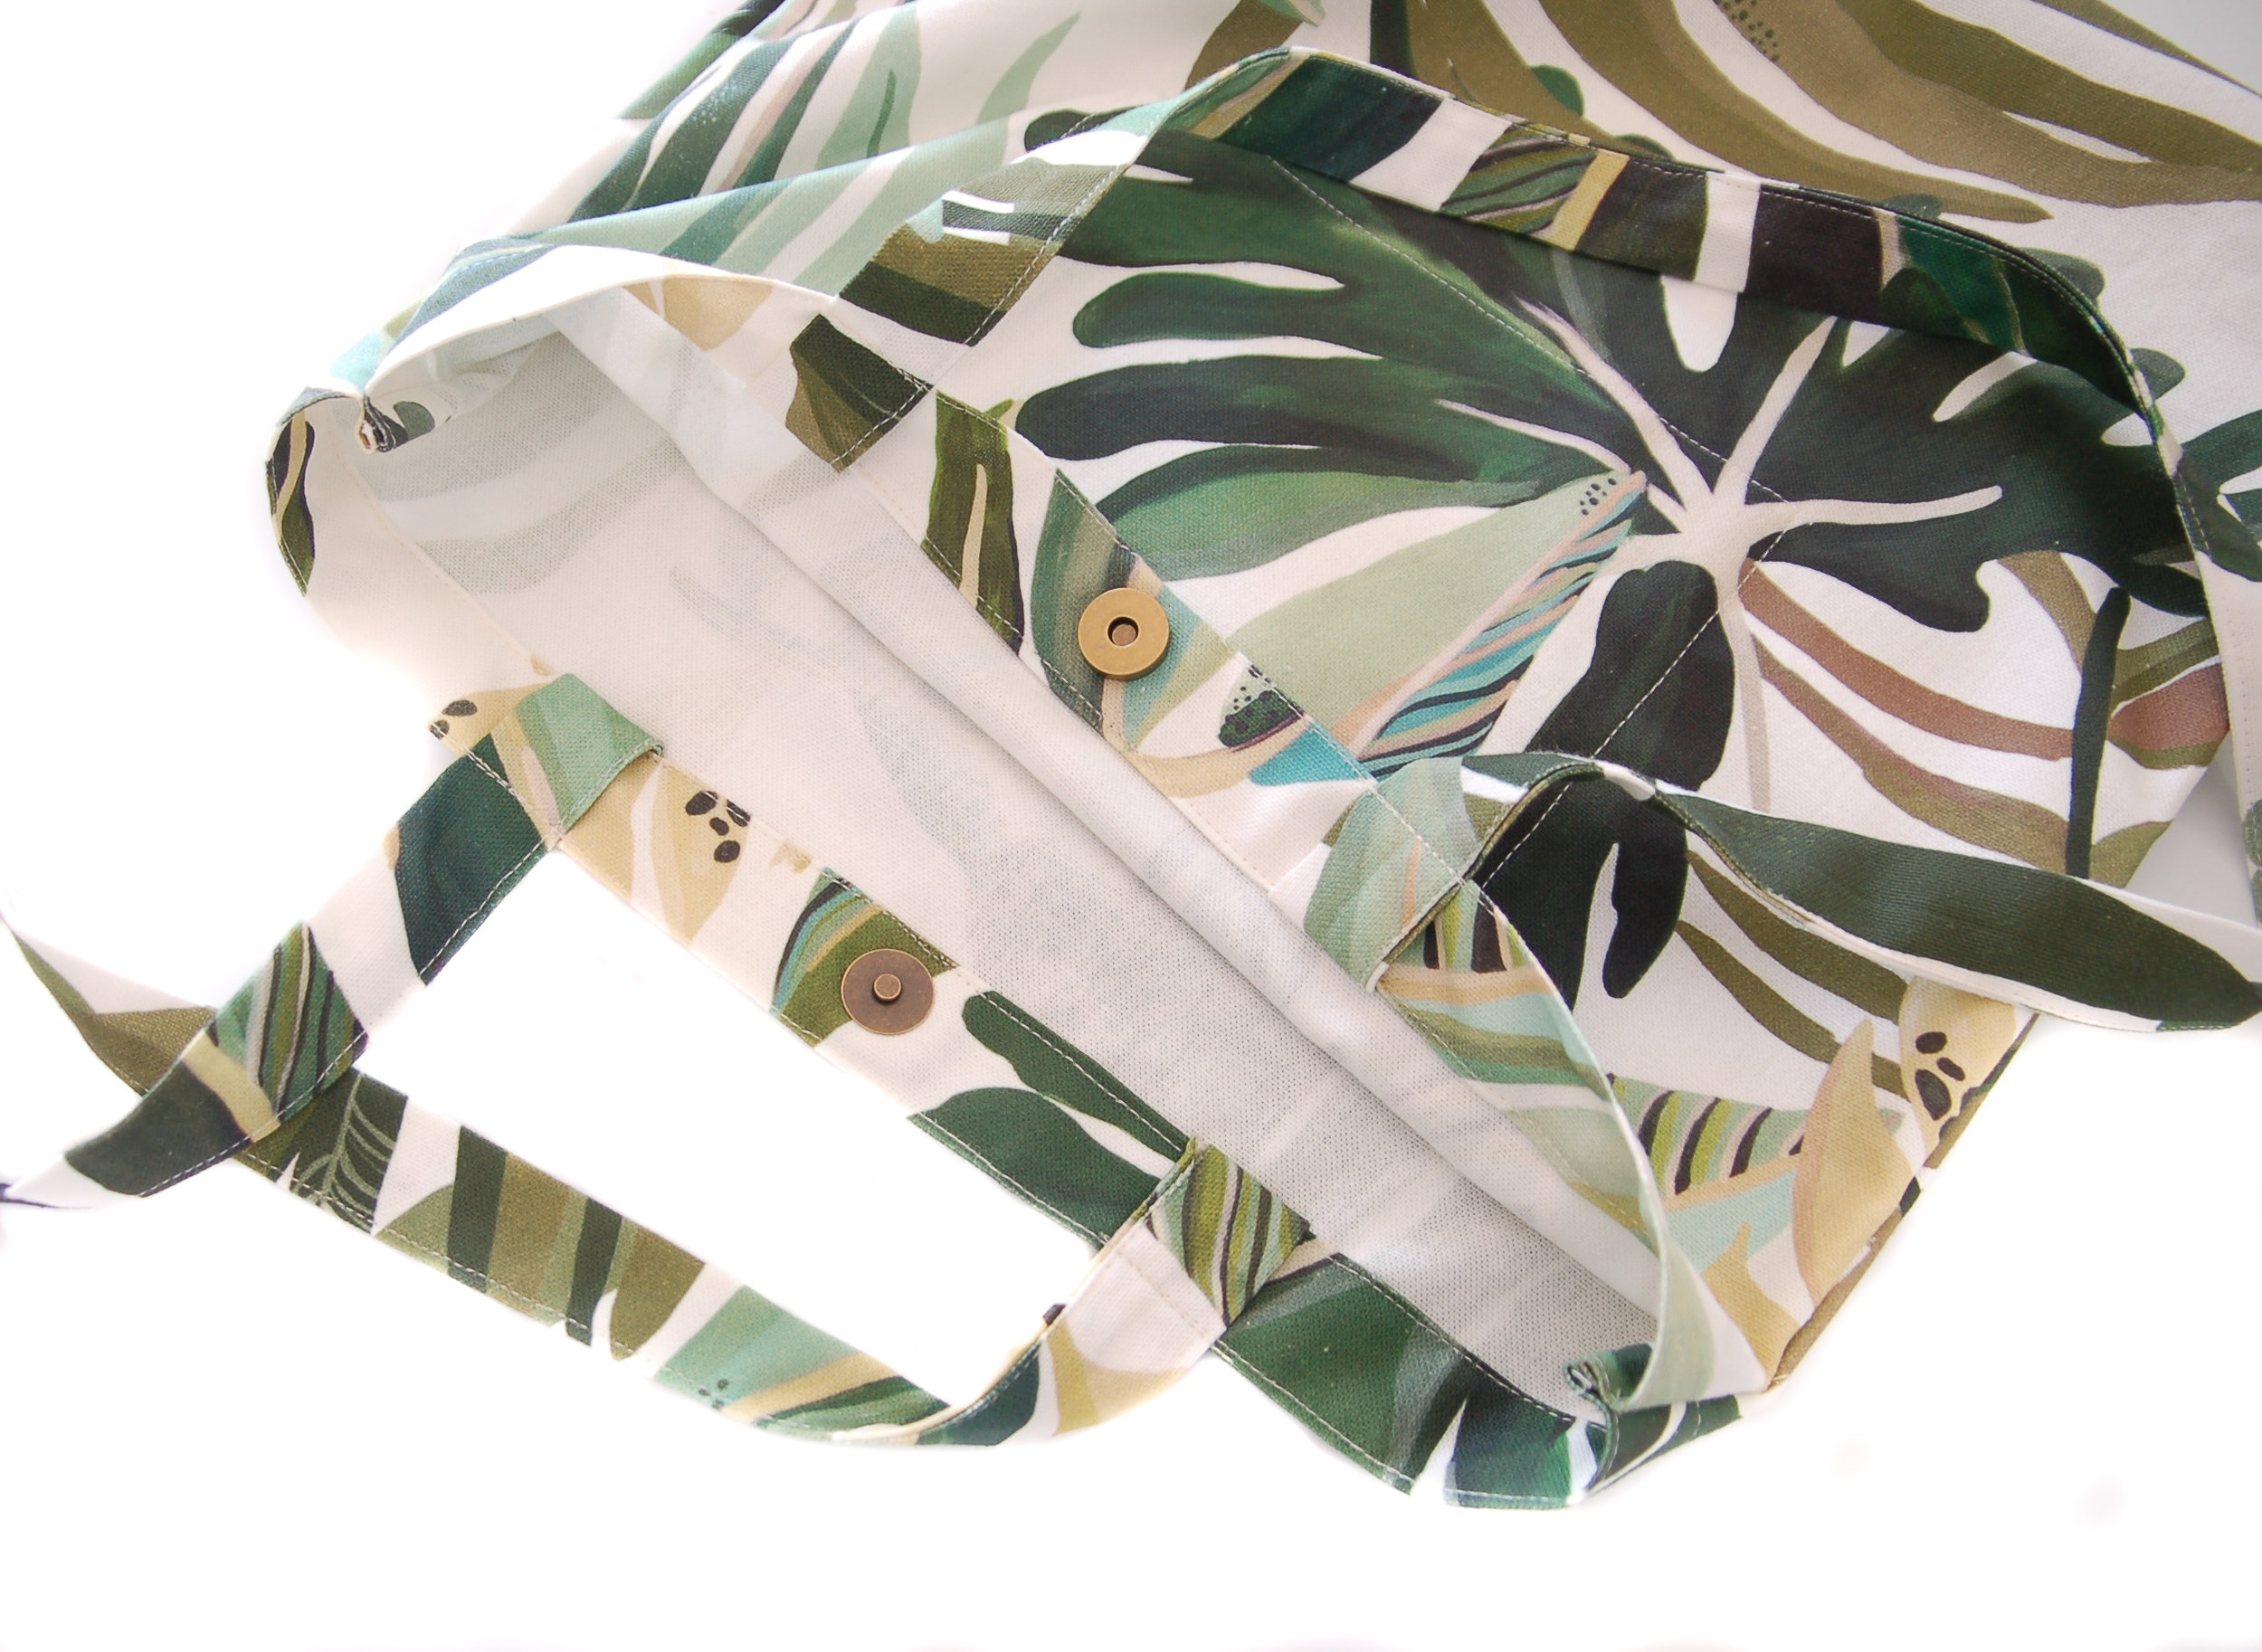
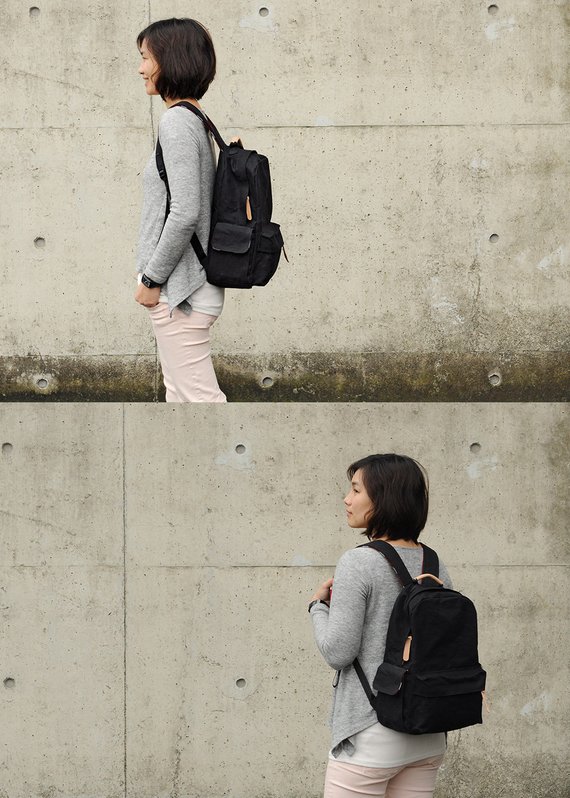
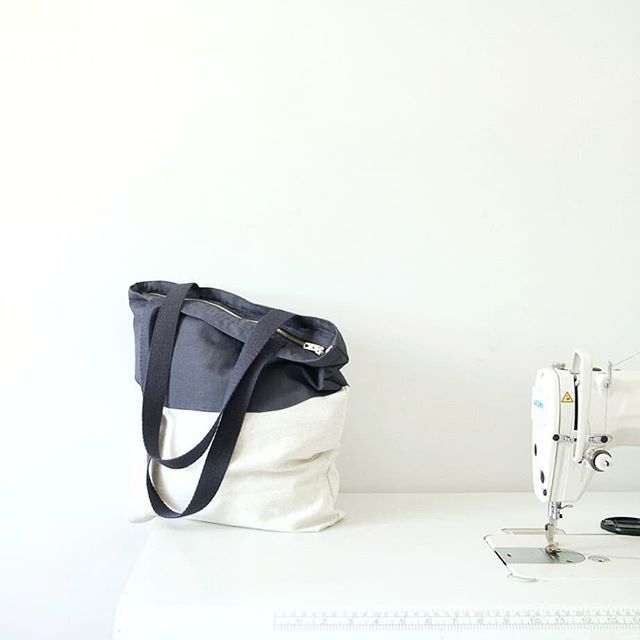
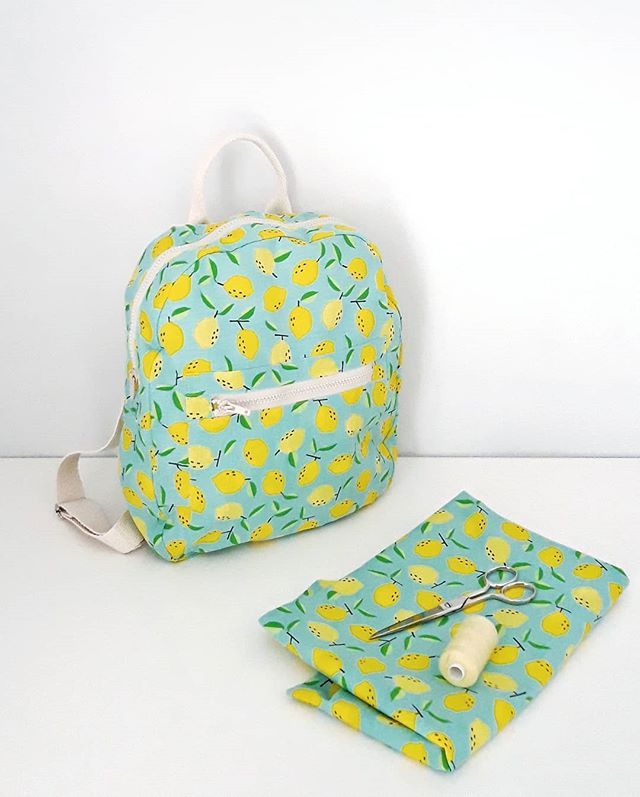
Hice un par de bolsos también (aparte de todas las muestras para Daily Tote, claro). La mochila quedó muy bonito pero le falta estructura para quedar bien del todo, lo tengo en mi lista de cosas para arreglar. El bolso azul me lo llevo muchísimo, cabe todo y es cómodo. El bolso grande lo hice en un momento cuando efectivamente necesitaba un bolso donde quepa bastante ropa etc y lo he usado algunas veces. Y el bolso negro con asa beige ha tenido mucho uso también (y el de melocotón con blanco y negro era un encargo).

I also made some bags (apart from the Daily Tote samples of course). The backpack really turned out nice but it needs more structure to be firmer, I have it on my list of things to unpick. I’ve been wearing the blue bag a lot, it fits all mu stuff and it’s very comfortable. The big bag was made when I actually needed a big bag to fit lots of clothes etc and I’ve been using it a coulple of times. And the black tote with beige straps has been in a lot of use too ( the peach and black and white one was a custom order).

www.studiocostura.com

En el verano en casa de mi madre le hice este alfiletero que también tiene varios bolsillos para llevar todas las cositas pequeñas, el patrón es del libro Handmade Style de Noodlehead. Yo también tengo uno y es super útil.

In the summer I made this pincushion for my mother, it also has many different pockets to fit all the small stuff. The pattern is from the book Handmade Style by Noodlehead. I have one myself and it’s super practical.

www.studiocostura.com

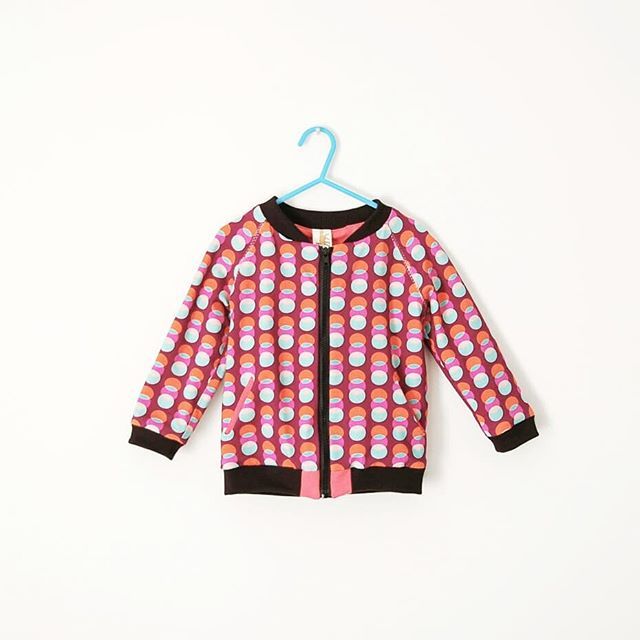
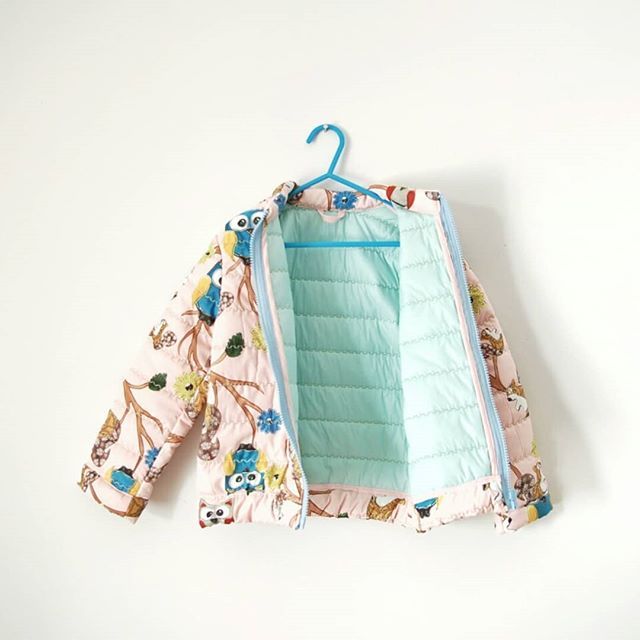
Para mi hija: pocas cosas, ya ves… crece con una rapidez que sinceramente prefiero hacer alguna cosa así más especial y ya está, sino en dos meces le queda corto y no lo puede llevar más. En el verano le hice el bañador y la braguita del bañador, para su cumple la túnica de sudadera y en la primavera el bomber de puntitos (todos los patrones de Ottobre Design). También gorros de verano y alguna cosita pequeña más.

For my kid: not so much really…she’s growing bigger so fast that honestly I prefer making only some special garments and that’s it, otherwise everything is too small for her in two months time. I made her the baithing suit and ruffled panties in the summer, the sweatshirt tunic for her birthday and the bomber in spring (all patterns are from Ottobre Design). there were also some summer hats and other small stuff.

www.studiocostura.com

También le hice su vestido/pichi especial de Halloween con la tela muy mona de calaveras con flores. Desde luego el proyecto más laborioso de este año fue el abrigo Tosti Utility Jacket que hice para mi novio…ha quedado muy bien y el proceso molaba mucho. Tardé un buen rato pero el resultado mereció la pena. Mi idea era después hacerme un abrigo para mí también pero la verdad es que el frío ya estaba aquí y no tenía muchas ganas así que me fui y me compré uno. Me sentí algo mal…pero también me sentí bastante humano, jaja.

I also made her this Halloween bib with a really cool print fabric. Without doubt the most complicated project of the year was this Tosti Utilty Jacket that I made for my boyfriend…it looks great and the process was very interesting too. It took me time to sew but the result is worth it. My initial idea was to sew myself a coat after that but the cold days were already here and I wasn’t so much in the mood either so I just went shopping and bought myself one. I felt a bit bad…then I also felt quite human, haha.

www.studiocostura.com

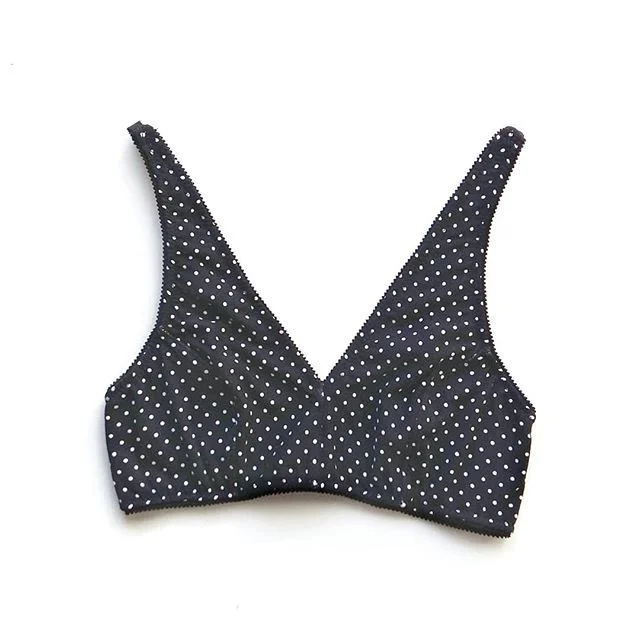
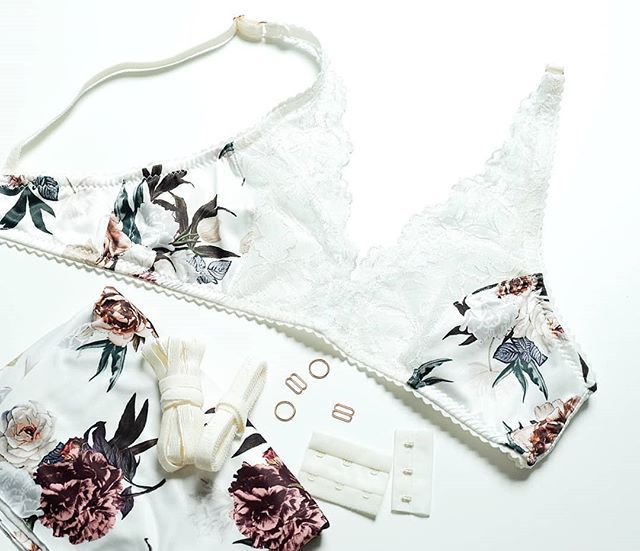
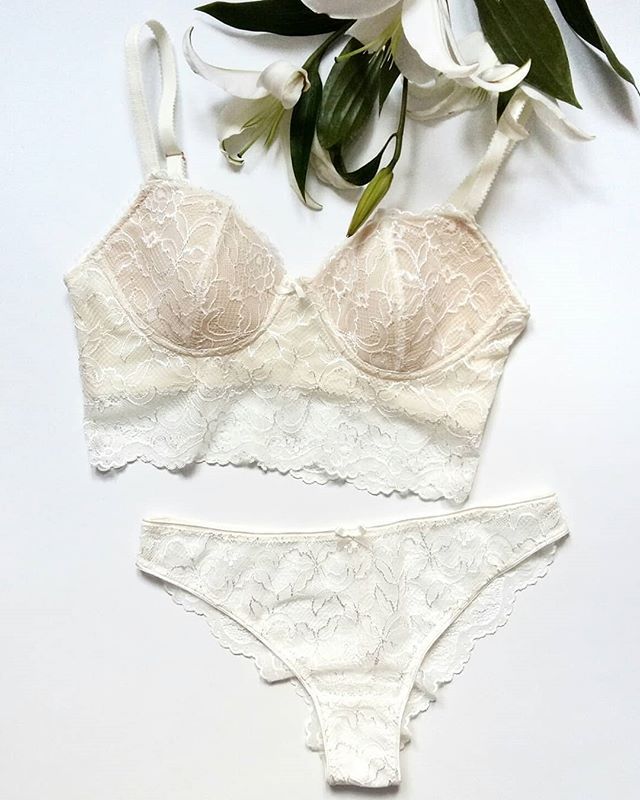
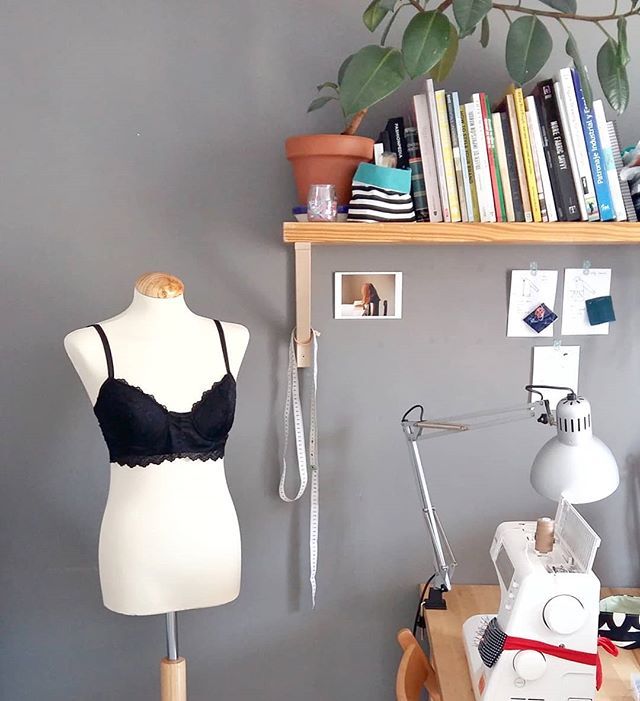
Y para mi madre y mi hermana les hice para su cumple también estos sujetadores, el primer patrón es de Madalynne y el otro es el bralette Hanna.

Seguro que faltan más cosas, ahora mismo recordándolo hice también dos pares de pantalones, unos con el patrón de vaqueros Ginger y otro del patrón calcado del pantalón que ya tenía. Dos vestidos que me puse una vez…este año me di cuenta que ahora sí, hay que ser honesta: no me pongo los vestidos! Y también empecé proyectos que no he terminado…y que tengo pocas ganas de terminar, jaja. Así que éstos son mis proyectos personales de este año, que a ver, pocos no son, muchos tampoco…en un año caben bastantes cosas. Como ya os conté hay cosas que me pongo un montón, cosas que me pongo menos y otras que nada. No me gusta acumular prendas sin usar y suelo regalar casi todo que sé que no me pongo, me da más pena una prenda hecha a mano sin usar que el hecho de separarme de una prenda que seguramente ha sido fruto de bastante trabajo y esfuerzo.

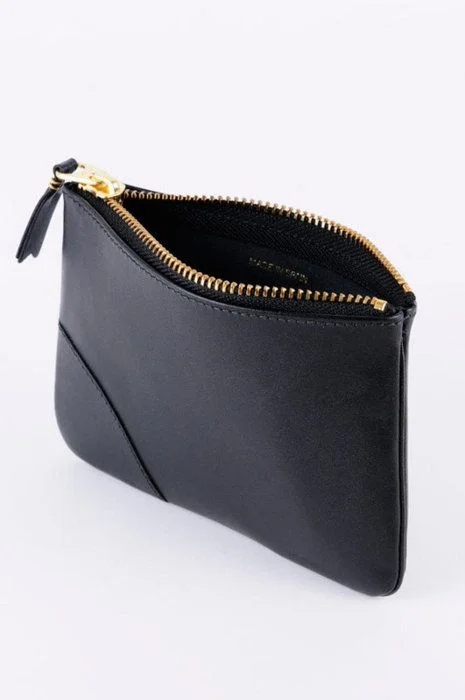
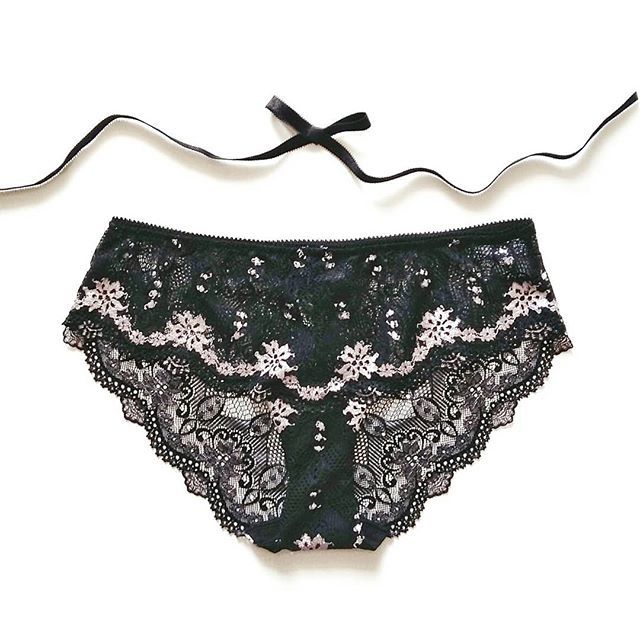
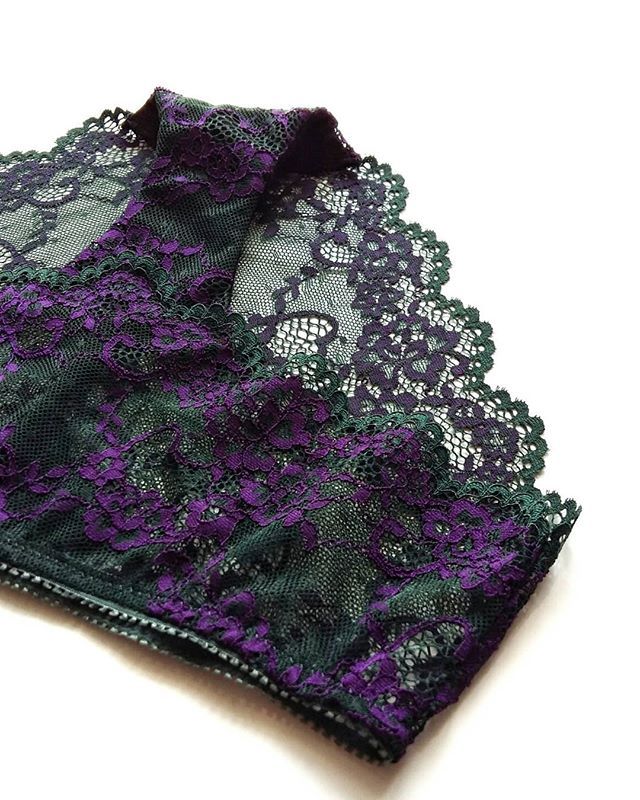
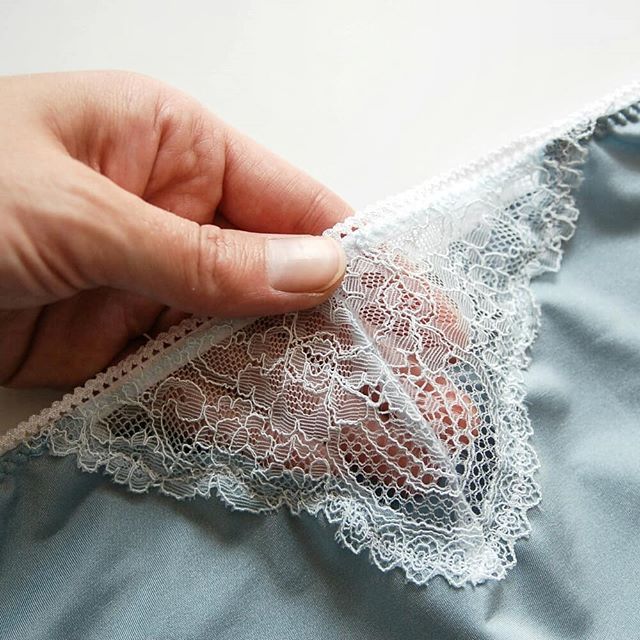
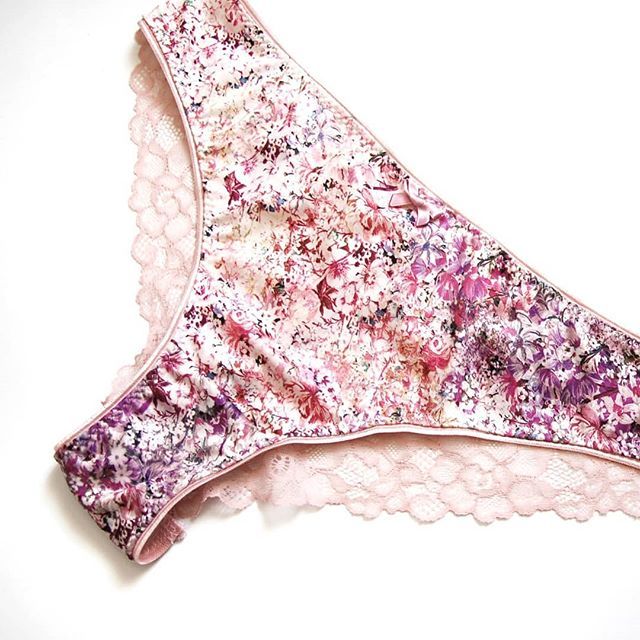
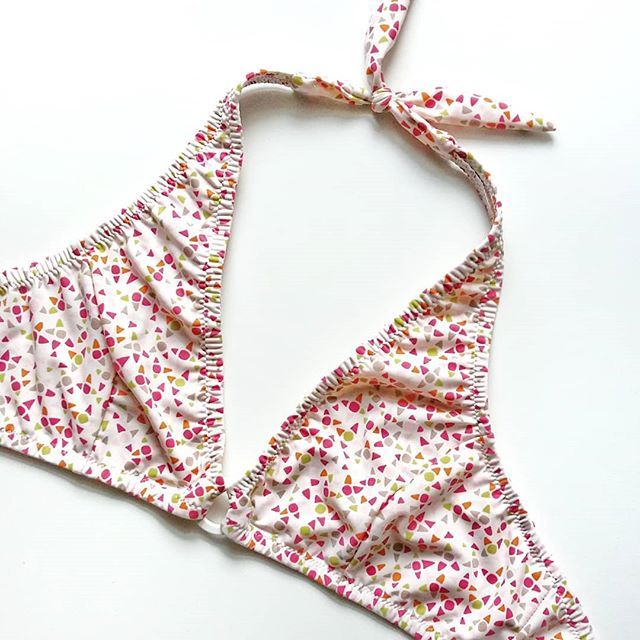
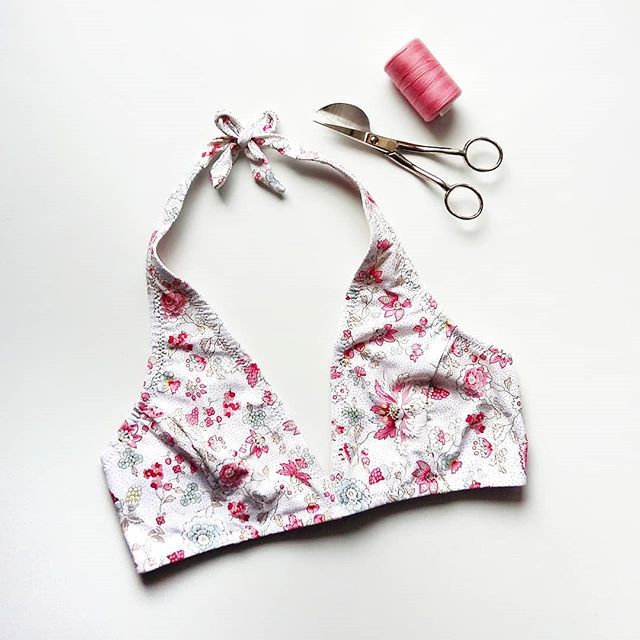
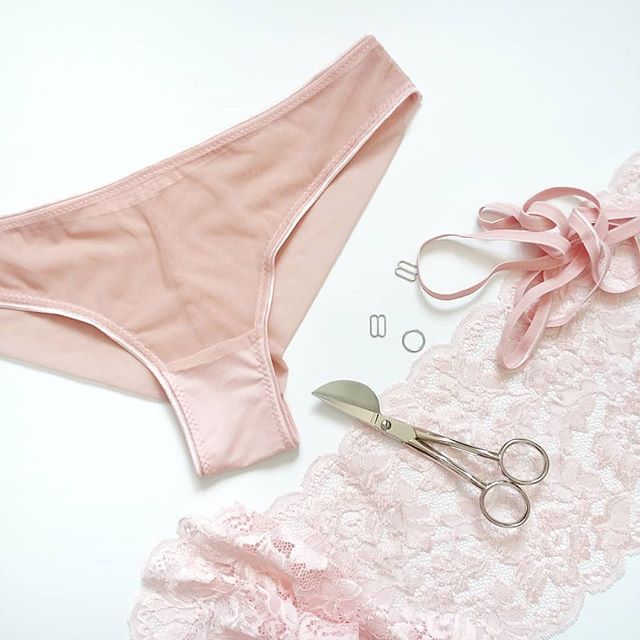
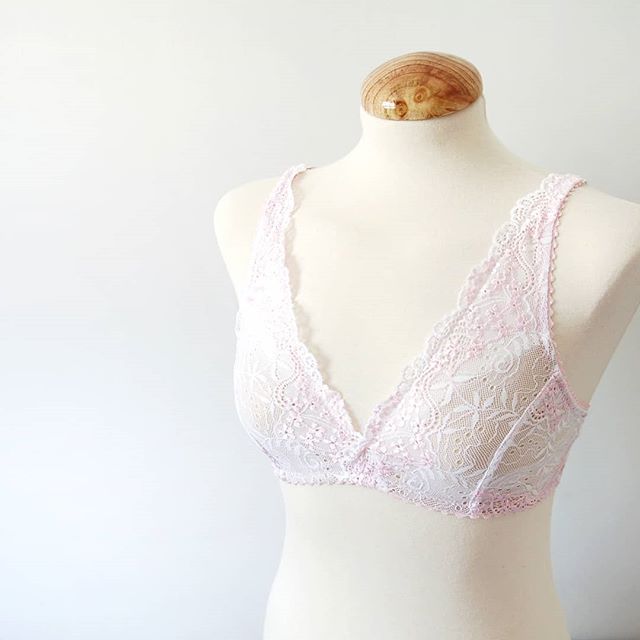
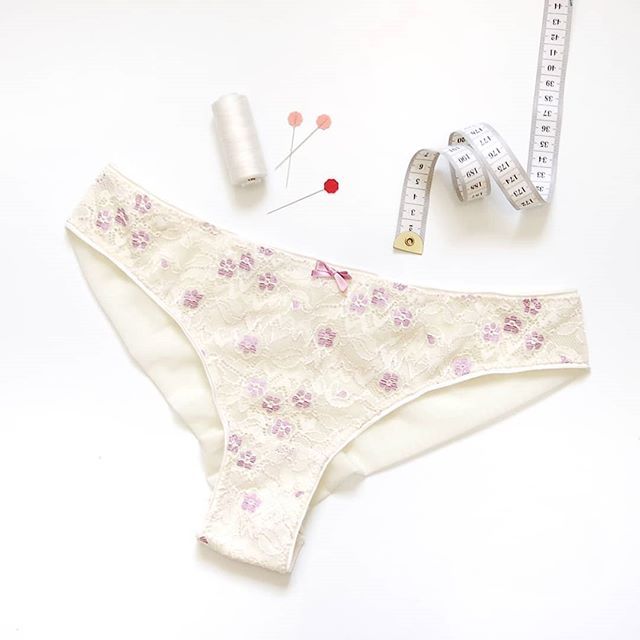
El resto del tiempo estaba cosiendo muestras de patrones que saqué este año: bralette Hanna, braguita Stella, braguita Mia, el estuche con cremallera y el Daily Tote. Tengo una caja de muestras bastante grande que de vez en cuando saco para buscar regalos a mis amigas, jaja. Abajo tienes una selección de ellas:

I also made bras for my mother and my sister for their birthdays, the first one is a pattern from Madalynne and the second one is the Hanna bralette.

I’m sure there are things that I’ve missed, actually I just remembered that I also made two pairs of pants: one with Ginger jeans pattern and another one I copied from a rtw pair I own. There were two dresses I wore once…this year it was time to say it out loud: I just don’t wear dresses! I also started projects that I didn’t finish…and that I don’t feel like finishing, haha. So these are my personal sewing projects from this year, lets see, there’s not soooo much, also not very little…you can make a lot in a year. As I told you before, there’s stuff I wear a lot, stuff I wear sometimes and things I never wear. I don’t like having garments I don’t use in my closet so I usually give away everything I don’t wear: yes, giving away garments you have put hours and effort in kind of hurts but I feel worse seeing a handmade garment without anyone wearing it.

The rest of the time I was sewing samples for the patterns I launched this year: Hanna bralette, Stella panties, Mia panties, zipper pouch and Daily Tote. I have a pretty big box of samples that I use from time to time to find presents for my friends, haha. Here’s a selection of those:

Y para lo último…algunos encargos. De varios no tengo fotos porque los entregué sin sacar fotos, faltan muchos bolsos de este verano ahora que lo pienso.

And the last things…some custom orders. There are many that I didn’t take pictures of, actually there are many bags I made in summer now that I think about it.

Y con esto termino mi entrada de costuras del 2018. Estos días estoy todavía cosiendo algunas cosas que me han pedido para regalos pero espero muy pronto alejarme de la máquina y ponerme a…tejer. También espero escribir todavía una entrada de este año contando sobre mis proyectos con lana porque la verdad es que de los proyectos personales de costura fuera del trabajo no tengo mucho: llevo dos meses sin coser nada…supongo que son épocas y ahora es la época de tejer :)

Os deseo felices fiestas y gracias por leer este blog, por apoyar a mi pequeño negocio y en general…por estar allí!

And that’s the end for this 2018 recap post. I’m still sewing some gifts that my friends have asked me for but I hope that I can leave the machine soon to start to…knit. I also hope I manage to write a post about my knitting journey as I haven’t really been sewing for myself at all during the last two months. It’s all about phases and my phase is at the moment full of yarn and knitting :)

I hope you’ll have a wonderful holdiay season and thank you for reading this blog, for supporting my small business and in general…for being there!


Inspiración para Daily Tote // Daily Tote inspiration

 
www.studiocostura.com

Hola! Hoy os traigo ideas para coser vuestro Daily Tote. Es un proyecto muy simple pero realmente hay muchísimas maneras de hacerlo y aquí os pongo algunas que más me han gustado. Una cosa que me gusta hacer es colocar las telas que tengo juntas y hacer “pruebas”. Me cuesta mucho decidir qué combinaciones usar y así puedo por ejemplo hacer fotos de cada combinación y decidir cuál es mi favorito!

Todas las imágenes de este post son de mi tablero de Pinterest, puedes seguirlo para más inspiración!

Hey! Today I’m giving you some ideas for sewing your Daily Tote. It’s a simple project but there are so many ways to make it and I’m sharing some of the ideas I’ve found. One thing I like to do is to put the fabrics together and “try them out”. I’m always super hestitant about which combinations to use so what I do is I take photos and then decide which combination is my favourite!

All of the photos in this post are from my Pinterest board that you can follow for more inspiration!

4bb51db74fb08d46a84c34a9b666f1aa.jpg
cb0cef8cdec18a1122e83dbf9c8de7b9.jpg
5c32243cadd46436aff475ce7e297f59.jpg
192bf17e845fd1485b358288aaf241b4.jpg

Una forma super fácil de cambiar este patrón es usando dos telas distintas. Puedes recortar el patrón de cuerpo de bolso donde quieras que que quede la unión de las telas y lo único que tienes que hacer es añadir 1 cm para márgenes de costura en las dos piezas. Después simplemente coses las dos telas entre sí y sigues las instrucciones como siempre. Yo suelo también coser un pespunte encima de esta costura en el lado derecho de la tela, así los márgenes de costura se quedan hacia el fondo del bolso y la pieza de cuerpo queda más lisa.

También tienes otra opción que yo uso mucho: en vez de dividir la pieza lo que hago es que corto la pieza de fondo nuevo y lo coso encima del cuerpo. De esta manera haces que el fondo tenga más estructura ya que tiene doble capa de tela. Lo que hago es cortar la pieza del tamaño que quiero y le añado 1 cm para margen de costura en la parte de arriba. Doblo este margen hacia el revés y con un pespunte coso la nueva pieza encima del cuerpo en el lado derecho.

A super easy way to change up this pattern is to use different fabrics to do some color blocking. You can cut the body piece pattern up where you want the fabrics to meet and the only thing you need to do is to add 1 cm seam allowance to these edges. Then just sew the two pieces together with right sides together and follow the instructions as always. I usually also topstitch the seam allowance of this seam towards the bottom of the bag on the right side, this makes the piece stay flat.

I also use this other method a lot: instead of dividing the body piece in two what I do is I cut the new bottom piece and I sew it on top of the existing body piece. This way the bottom of the bag will be sturdier as it will have two layers of fabric. I cut the new piece in a size I want and add a 1 cm seam allowance on the upper edge. I then press the seam allowance under and sew the piece on top of the body piece on the right side of the fabric.

74efc98576ab759074a7cd888b279c44.jpg
a689402cdc728d51851310f4c3386e4f.jpg
4ca41913f4314b8a60c57967290e86ba.jpg
f06c47a2e19f118f4a05705b08c4f9a8.jpg

A veces tienes la tela perfecta para tu proyecto pero a veces parece que le falta un “algo”… Pues nada más fácil que unir trozos de diferentes telas en modo patchwork para conseguir un resultado muy bonito. De nuevo me parece que ayuda mucho ir colocando las telas para ver posibles combinaciones, además así puedes aprovechar retales pequeños de otros proyectos. Me ha gustado mucho el Daily Tote que Naii ha hecho combinando su tela de rayas, ah que es un truco super fácil para conseguir telas bonitas?

Me encanta también la idea de reusar telas de ropa que ya no usas u otras cosas como cortinas, sábanas etc para hacer un bolso nuevo, me parece muy buena idea para darle una vida nueva a los materiales que ya tenemos a mano.

Sometimes you have just the right fabric for your project but other times it feels like there’s “something” missing… Well, what could be easier than using diffrent fabrics like in patchwork to have a pretty new fabric. Again I find that putting pieces of fabric together to test your idea is a good option, you can also use up scraps from other projects. I really like the Daily Tote that Naii made using her striped fabric, isn’t it a nice trick to change up the fabric?

I also really like the idea of reusing garments or other things like curtains, bedsheets etc to make a new bag, I think it’s such a good way to give new life to the materials we already own.

c2020d12c3f206582b9adbc5397caf23 (1).jpg
e22dd6cb926263fa0ac7424de086aaf0.jpg
01efcd084ada6b3b10c4f078f9afc3af.jpg

No te olvides de los bolsillos, pueden ir tanto por fuera como por dentro y puedes usar telas distintas para un detalle interesante. Daily Tote tiene tres bolsillos diferentes pero con un poco de imaginación puedes cambiarlos a tu gusto!

Don’t forget about the pockets, they can be sewn both on the outside and on the inside and you can use different fabrics for interesting details. Daily Tote has three different pocket options but with a bit of imagination you can hack them as you want!

4c150444b874a061bda625909a99ef27.jpg

Este tipo de bolsos de tela son también como un lienzo…por qué no usar diferentes técnicas y dar vida a telas lisas? Puedes usar tintes para tejidos, rotuladores, sellos… También puedes probar a teñir parte del bolso y conseguir un efecto único.

This kind of totes are also like a canvas ready to work with…it’s easy to use different supplies to give life to a solid fabric. You can use fabric paint, markjers, stamps… Dip dying a bag can also give a really cool effect.

1746e2f347673f39d14098b64ed6a900.jpg
6333a3cb2206235467088afaee151275.jpg

Otra manera de adaptar el bolso a tu gusto es cambiarle el tamaño, aumentar las piezas es muy sencillo y tendrás un bolso donde puedes llevar toooodas las cosas a la vez.

Another way to customize you tote is changing its size, making the pieces larger is very easy and you can make a bag to fit allll of your stuff.

63380caab0d28d790960c54884e49b3a.jpg
d938cf5bb9cdfc4542f3950f224bd48a.jpg
f220bbd9b4e4bae1650df168c735bdee.jpg

O también puedes hacer las asas más cortas y tienes un bolso perfecto para llevar de compras en vez de usar bolsas de plástico. Si usas telas más ligeras no ocupa nada cuando lo doblas y lo puedes tener dentro de tu bolso habitual siempre que salgas de casa y así lo tienes a mano cuando lo necesitas. De nuevo se me ocurre que sería genial usar telas recicladas para este tipo de bolso: das nueva vida a una prenda olvidada y cuidas del medio ambiente al no usar plástico.

Or you can reduce the strap length and you’ll have the perfect shopping bag to use instead of the plastic bags. Using lighter fabrics make this bag super small when folded together and you can put it in your main bag every time you leave the house so you’ll always have it in hand when you need it. Again I think that it would be great to use recycled materials for this type of bags: you’re giving a new life to an old garment and at the same time you care for the planet when not using plastic.

27447c2947456ba817f727710353011a.jpg

Y para último me ha parecido super graciosa esta idea: hacer que el bolso sea de una tela por un lado y de otra tela por otro lado, seguro que os ocurren ideas para esto :)

Espero que hayas visto algún bolso que te gustaría hacer, puedes aprovechar que Daily Tote está de oferta hasta este domingo (compralo aquí!). Si te pones a coser este fin de semana lo tendrás listo para lunes…no te digo más!

And to wrap things up I found this idea to be very funny: you can make a bag that has one fabric on one side and another one on the other side, I’m sure you can come up with ideas for this one :)

I hope you’ve seen a bag you’d like to sew! Daily Tote is on sale until Sunday (you can buy the pattern here!) so if you start sewing this weekend you’ll have it ready by Monday…I’m just saying!


Nuevo patrón Daily Tote // New pattern Daily Tote

 
www.studiocostura.com

Hola! Estoy super contenta de anunciaros que el patrón con que he trabajado los últimos meses por fin está listo: aquí está el Daily Tote! Se trata de un práctico bolso de tela que viene en dos versiones, la primera más sencilla sin forro y la segunda más avanzada con cremallera y forro. Puedes comprarlo en mi tienda de Etsy y hasta el final de esta semana estará con descuento de -15%.

Hey! I’m super happy to tell you that the pattern I’ve been working on during the last months is finally ready: meet the Daily Tote! It’s a practical tote bag that has two versions: the first one is a simple tote without lining and the second one is a more advanced bag with a zipper and lining. you can buy the pattern at my Etsy shop and it has a 15% discount until the end of this week.

www.studiocostura.com

El patrón está pensado tanto para los más principiantes como para la gente que ya tiene un nivel y quiere experimentar con un bolso más complejo (pero no por eso complicado!).

La versión 1 incluye:

  • diseño sencillo sin forro, rematado por dentro con costuras francesas para que quede muy bonito tanto por fuera como por dentro

  • bolsillo interior con esquinas reforzadas

  • cierre opcional de imán

  • esquinas en el fondo para que sea más funcional

This pattern is suitable both for beginners and for skilled sewers who want to sew a more advanced bag.

Version 1 includes:

  • a simple design without lining, sewn with French seams on the inside for a neat finish

  • interior pocket with reinforced corners

  • optional magnetic closure

  • the bottom has corners for more funcionality

www.studiocostura.com

La versión 2 incluye:

  • bolso totalmente forrado, acabados limpios tanto por fuera como por dentro

  • cierre del bolso con cremallera

  • bolsillo exterior con cremallera

  • bolsillo interior de dos compartimientos con esquinas reforzadas

  • esquinas en el fondo para que sea más funcional

Version 2 includes:

  • a completely lined tote, neat finishings both on the outside and on the inside

  • zipper for the bag opening

  • exterior pocket with a zipper

  • interior pocket with reinforced corners

  • the bottom has corners for more funcionality

www.studiocostura.com

He usado este patrón un montón para mis bolsos y me parece un básico super bueno para el uso diario. La versión 1 es sencillo y llevo años enseñando cómo coserlo en mis clases con gente que recién aprende a usar la máquina de coser. Aún así tiene acabados bonitos y el resultado es un bolso muy práctico. La versión 2 es mi favorita porque al llevar cremallera me resulta muy útil: me encantan los bolsos de tela pero siempre he echado de menos poder cerrarlos bien! Le añadí un bolsillo con cremallera para fuera para llaves etc y otro por dentro para otras cositas pequeñas para que no den vueltas en el fondo. Los bolsillos son opcionales por supuesto y también puedes ponerlos por dentro o por fuera, tú decides!

I’ve used this pattern so many times for my own tote bags and I think it’s a great wardrobe staple. Version 1 is simple and I’ve used it for years in my beginner sewing classes to teach people how to use a sewing machine. It’s an easy make but the finishings are neat and the end result is a very practical tote bag. Version 2 is my favourite as it has a zipper: I love tote bags but I have always missed a proper way to close them! I’ve added an exterior pocket with a zipper to hold keys etc and an interior pocket for other small stuff so you won’t have little things lost inside your bag. The pockets are of course optional, you can put them both on the outside or on the inside, you choose the way you sew!

www.studiocostura.com

Como siempre cuando hago mis patrones he intentado explicar todos los pasos con mucha claridad. Mi intención es enseñar las técnicas para que luego las puedas usar también en otros proyectos. Los pasos están ilustrados con fotos y texto, donde sea necesario he añadido flechas y otras marcas para que quede todo claro.

As always when writing instructions for my patterns I’ve tried to explain all the steps with a lot of clarity. My intention is to teach you tricks you can then use in other projects too. The steps are illustrated with photos and text, I’ve added arrows and other signs where necessary.

www.studiocostura.com

Puedes usar un montón de telas distintas para coser el bolso, dependiendo del grosor que eligas tendrás un resultado con más o menos rigidez. Mi tejido favorito es la loneta ya que no es muy gruesa pero le da buena forma. Como la versión 2 lleva forro tiene también más cuerpo y allí puedes combinar telas para hacerlo a tu gusto.

Espero que te guste el nuevo patrón, tenía muchas ganas de ponerlo en papel ya que he cosido muchos bolsos de estos y los uso a diario! En breve haré un par de posts sobre inspiración y trucos para que tengas más ideas. Por cierto, todavía estás a tiempo de coser con este patrón regalos de navidad, me parece un acierto que gusta a todo el mundo!

Muchísimas gracias a mis testers Mary, Auxi, Susana, Maimu, Mónica, Maider y Marta, sin ellas este patrón no sería lo mismo. También mil gracias a Sandra y Lena por las correcciones de texto :)


You can use a lot of different fabrics to sew this tote, the end result and look will vary according to the weigth of the fabrics you choose. My favourite fabric for this tote is canvas as it’s not too heavy but maintains a nice shape. As version 2 has also a lining, the bag has a more defined form and you can combine different fabrics there to make it as you like.

I hope you like the new pattern, I was really happy to finally draft it as I’ve used it so much for the bags I use myself every day! I’ll write an inspirational post and more about tricks and variations soon to give you more ideas. By the way, you still have time to sew a tote bag with this pattern and give it as a holiday gift, I think it could be such a great gift for anyone!

Big thanks to my pattern testers Mary, Auxi, Susana, Mónica, Maimu, Maider and Marta, without these ladies this pattern wouldn’t be the same. Also big thanks to Sandra and Lena for the text corrections :)


5 ideas de regalos para costureras // 5 gift ideas for sewers


www.studiocostura.com
 

Hola! Las fiestas se están acercando, muchos están pensando en qué regalar y qué mejor idea que hacer un regalo relacionado con costura. Hace dos años escribí el post 5 ideas de regalos para costureras y las ideas que recopilé allí pueden serviros de inspiración. Este año quería volver a hacer una entrada sobre este tema con novedades así que aquí van algunas ideas que me han gustado en las mismas categorías.

Hey! The holidays are close and many of you are thinking about presents…what could be a better idea than something related to sewing? Two years ago I wrote the post 5 gift ideas for sewers where I gathered many ideas that can be helpful. This year I wanted to write the post again to add some new stuff so here goes a list of things I’ll add to these categories.

Libros // Books

Named acaba de publicar su primer libro Breaking the Pattern que tiene muy buena pinta. Han incluido proyectos que van desde más sencillos a más complicados para que vayas aprendiendo según coses prendas que componen las piezas clave en cualquier armario.

Named just launched their first book Breaking the Pattern and it looks very good. They have included projects that teach you skills while you start with something easy and then move on to more advanced things. You can sew garments that make great wardrobe staples!

Stretch_sewing_book_7_grande.jpg
Cover_Stretch_sewing_book_grande.jpg

Uno de los libros de que también se ha hablado mucho este año es el Stretch! de Tilly and the Buttons. Es un libro dedicado a las prendas de punto y te enseña cómo trabajar con tejidos elásticos. Tiene muchos proyectos diferentes a todos los niveles.

Another book that has been very popular this year is the Stretch! from Tilly and the Buttons. It’s a book about knit garments that teaches you how to work with this type of fabric. It includes many different projects for all sewing levels.

MendingMatters_approved_cover_hs-copy-420x540.jpg
MendingMattersPhoto12-420x540.jpg

Arreglar prendas queridas y hacerlo de manera visible está teniendo un éxito últimamente y el libro Mending Matters de Katrina Rodabaugh te enseña técnicas bonitas para hacerlo.

Mending well loved clothes in a visible way seems to gain popularity these days and the book Mending Matters by Katrina Rodabaugh shows you pretty ways to do it.

Sewing Activewear es el libro escrito por Johanna Lundström que comparte su gran conocimiento sobre coser prendas deportivas. El libro incluye un montón de tutoriales, guías y entrevistas para que aprendas las técnicas más avanzadas a la hora de trabajar con tejidos específicos. En 2019 publicará también el libro sobre recubridora que tiene muy buena pinta y merece la espera!

Sewing Activewear by Johanna Lundström is a book where she shares her valuable knowledge about sewing all garments related to activewear. The book contains a lot of tutorials, guides and interviews with makers to show you advanced ways when working with elastic fabrics. In 2019 she will also publish a coverstitch book that looks very nice and I’m sure it will be worth the wait!

Clases // classes

94c1a13642aa06c9caa1d73fb1cf4ad3.jpg

Quizás tu amiga solo está empezando en el mundo de costura o estás pensando en convencer a alguien a que pruebe por primera vez a coser algo. Ya sabéis, las amigas que siempre te dicen que como mola lo que tú haces y ojalá que lo podrían hacer ellas. Pues qué mejor que darles ese pequeño empujón regalando clases de costura. Puede ser un monográfico de iniciación o clases continuas, seguro que en tu localidad hay sitios donde se puede aprender a coser. Además, hacerlo en grupo junto a otras personas es siempre más divertido.

O si tienes tiempo y ganas, puedes dar tú la primera clase! Un proyecto chulo para empezar es hacer un estuche con cremallera: puedes usar mi patrón gratuito, comprar unas telas bonitas y podéis hacer una clase juntas.

Para las que ya tienen un nivel les pueden igualmente interesar las clases pero ya algo más específico. Un monográfico de cómo usar la remalladora, aprender a coser lencería u otros cursos. Busca tiendas que dan clases en tu zona y mira qué oferta tienen, puede haber cosas muy chulas!

Maybe your friend just started sewing or you are trying to convince someone to give sewing a chance. You know, the people around you who always say how cool it is what you make and they wish they could sew too. Well, you could give them the opportunity to do so giving them a class as a gift. It could be a one day class or a month of sewing lessons, I’m sure there are places where there are sewing lessons where you live. Also, learning in a group is always nice.

Or maybe if you have time and you feel like it you can teach the class yourself! A nice project for a beginner is to make a zipper pouch: you can use my free zipper pouch pattern, get some pretty fabric and get together for a class.

Sewers who are more experienced might like a more specific class. A one day class about using a serger or a bramaking course maybe. Search for classes in your area, there might be nice offers!

Patrones // patterns

Womens_Kimono_Jacket_8_1024x1024.jpg
2d57cf7a2da35b10e281dd64d787c6cc.jpg
il_570xN.1462796562_nycc.jpg
Tamarack_Flat02_small.jpg

Siempre he dicho que donde más he aprendido sobre las técnicas de costura es de patrones. Los hay para todos los niveles y es un buen regalo para cualquier persona a quien le gusta coser. Mis favoritos de este año son:

I’ve always said that I’ve learned so much from sewing pattern instructions. There are patterns for all levels and it’s a great gift idea for any sewer. My favourites from this year are:

Kits

il_570xN.1621619389_bd7w.jpg
EC7BD995-A6E8-4DEC-8F1E-B42D57336BDB_720x.jpeg
Hanna bralette.jpg

A veces no nos lanzamos a un proyecto por falta de materiales específicos así que un buen regalo es un kit. Los hay de todos los tipos pero uno de los que más me han gustado es lo de mochila de Niizo Craft por ejemplo. Y también me han encantado las etiquetas graciosas de Kylie and the Machine. En mi tienda también he preparado unos kits especiales para estas fiestas: tienes la posibilidad de elegir entre el bralette y dos tipos de braguitas que vienen con sus materiales. Sería un buen regalo para alguien quien quiere empezar a coser lencería!

Sometimes you’re not trying out something new because specific supplies are hard to find so a good gift would be a kit. There are a lot of them available but one of my favourites is the backpack kit by Niizo Craft for example. I also like the funny labels by Kylie and the Machine. In my shop you can also find kits: I’ve prepared specific kits where you can combine a pdf sewing pattern with all the supplies. It’s a great gift for someone who wants to start sewing their own lingerie!

Más que coser // other than sewing

Knit-How-Pom-Pom-Press_BeginnerBookCover_Border.png

Y para terminar…si me sigues por Instagram habrás visto que estoy super enganchada a tejer últimamente. Me he quedado totalmente pillada y no paro de pensar en todas las cosas relacionadas con punto…ni siquiera estoy cosiendo en mi tiempo libre, jaja. Haré un post sobre mis proyectos de punto en breve pero mientras tanto quería compartir esta publicación que me parece super bonito. Es la edición Knit How de la revista Pompom y está dedicado a los principiantes en punto. Me parece un regalo ideal para cualquiera quien quiere iniciarse en el mundo de lanas.

And to wrap things up…if you follow me on Instagram you have noticed that I’m super hooked with knitting lately. It has been such a fun activity and I can’t stop planning all things related to wool…I’m not even sewing in my free time, haha. I’ll write a post about my knitting projects soon but I wanted to share this magazine that looks so pretty. It’s the Knit How edition from Pompom magazine and it’s dedicated to beginner knitters. I find it to be the perfect gift for anyone who wants to learn how to knit.

Espero que te hayan gustado las ideas…para regalar a alguien o para regalarte a ti misma! En el otro post de 5 ideas para regalos para costureras tienes más cosas si todavía no lo has leído. Y si Papa Noel o los Reyes Magos no saben qué regalarte le puedes pasar este post que seguro que ayuda :)

I hope you liked the ideas…to give as a gift to someone or to yourself! In the 5 gift ideas for sewers post there are more ideas if you haven’t read it yet. And when Santa Claus is asking what to bring you…just pass the link for this post, I’m sure it will be helpful :)


Studio Costura Lingerie Sewing Club: Anya from Anna-Zoe

 
www.studiocostura.com

Hola! Aquí va el nuevo post de la serie Studio Costura Lingerie Sewing Club. Hoy viajamos bastante lejos, a Canadá, para conocer a Anya, la costurera que escribe el blog Anna-Zoe. Recuerdo de haber visto los proyectos tan bonitos de lencería que ha compartido Anya en su cuenta de Instagram y cuando estaba pensando en gente que quería invitar a este club sabía que tenía que escribirle. Ella cose un montón de prendas variadas y su manera de escribir es muy divertido, sus posts siempre me hacen reír! Así que primero vamos a conocerla un poco más y luego vemos los sujetadores bonitos que ha cosido.

CUENTAME UN POCO SOBRE TU TRAYECTORIA EN COSTURA: CUÁNDO EMPEZASTE A COSER Y QUÉ SON TUS COSAS FAVORITAS PARA COSER?

Mi trayectoria en costura empezó cuando yo era muy pequeña. Mi madre solía hacer cosas para mí y mi hermano. No cosía todas las prendas para nosotros pero había un par de cosas muy especiales que hizo que todavía recuerdo. Mis dos abuelas también cosían, mi abuela Anna solía hacer sus propios vestidos. Pensándolo ahora parece que lo hacía más por necesidad que por placer pero mis memorias más tiernas son de sentar al lado de ella mientras ella montaba los vestidos y yo hacía los nudos para terminar las pinzas.

Empecé a coser haciendo vestidos para mis muñecas y me lo pasé genial cosiendo todo tipo de diferentes prendas para ellas. Cuando era adolescente me interesó el tema de coser prendas para mí e incluso hice un par de cosas que llevé con orgullo al instituto. Dejé de coser cuando me mudé a Canadá con 17 años y después empecé de nuevo cuando terminé la universidad. Son 10 años ya y no me puedo creer que he estado cosiendo casi sin parar desde entonces.

POR QUÉ EMPEZASTE A COSER LENCERÍA? TE PARECIÓ DIFÍCIL? QUÉ PATRONES/RECURSOS RECOMENDARÍAS A GENTE QUE ESTÁ INTERESADA EN APRENDER A COSER LENCERÍA?

Me gusta decir que tengo gustos caros y un bolsillo que no me los permite digamos… Así que como quería tener lencería bonita pero no quería gastar mucho dinero decidí por fin probar a coser mi propia lencería. Tenía mucho miedo!! Parecía que había tantas partes, materiales y trocitos en todo eso que me volvía loca. Estoy muy agradecida a las tiendas como Studio Costura Shop que tienen kits de lencería! Me parece que los kits ayudan mucho a la hora de entender cómo coser lencería.

Como me sentí que no sabía lo suficiente para intentar a coser mi primer sujetador me apunté al curso online de Craftsy sobre coser sujetadores. Lo vi muchas veces hasta que sentí que estaba preparada para hacerlo. No esperé que mi primer sujetador salga bien y aunque sí salió bien lo hice dos tallas más pequeño que mi talla de verdad. Aun así estaba tan contenta de haberlo hecho! Desde ese punto seguí intentando una y otra vez. Usé patrones diferentes, telas y elásticos distintos. Ha sido un proceso largo pero nunca he estado más satisfecha con mi lencería y con lo bien que me queda.

Mi consejo para la gente que quiere aprender a coser lencería es que se apunten a un curso online. Craftsy tiene a menudo rebajas en sus clases y es fácil comprar un curso por un precio razonable. Si puedes ir a una clase presencial mejor aún! Yo sí que pienso que pasar por un curso ayuda mucho. Y desde allí mi consejo es seguir intentándolo. Seguramente te saldrán mal algunas cosas pero también otras te saldrán bien y con cada nuevo intento la lencería que coses se mejora.

CUÁL ES TU PROYECTO DE LENCERÍA FAVORITO HASTA AHORA?

Es una pregunta difícil! Creo que el proyecto más reciente que haya hecho, especialmente si me queda bien (todavía cometo errores) seguramente es mi favorito. Será porque los proyectos recientes son los que mejor reflejan mis gustos y estado emocional.


Hey! Here’s a new post in Studio Costura Lingerie Sewing Club series. Today we’re travelling all the way to Canada to meet Anya, the maker behind the sewing blog Anna-Zoe. I remember seeing Anyas gorgeous lingerie makes over at her Instagram and when I was thinking about who to invite to this club I knew I had to write her. I love her makes and her super funny writing style, her posts always make me smile! So first, let’s get to know her a bit and then we can take a look at the pretty bras she made.

TELL ME A BIT ABOUT YOUR SEWING JOURNEY: WHEN DID YOU START TO SEW AND WHAT ARE YOUR FAVORITE MAKES TO SEW?

My sewing journey started back when I was very little. My mom used to make things for my brother and I. She did not make everything but there were a few very special pieces she made for us that I still remember. Both of my grandmothers used to sew as well. My grandma Anna used to make her own dresses. Looking back at it, it seems that she did it more out of necessity rather than pleasure. But sitting next to her and tying the knots in the darts while she assembled the dresses are some of my fondest memories.

I started sewing with making clothes for my dolls and I had an absolute riot making all sorts of dresses for them. As I became a teenager I got interested in making clothes for myself and I even made a few pieces I proudly wore to school. I stopped sewing once I moved to Canada at the age of 17, and then I picked it up again shortly after I graduated from university. I’ve been out of school for 10 years now and I can’t believe I have been sewing almost non-stop since then!

WHY DID YOU START SEWING LINGERIE? DID YOU FIND IT DIFFICULT? WHAT PATTERNS/RESOURCES WOULD YOU RECOMMEND FOR PEOPLE WHO ARE INTERESTED IN LEARNING HOW TO SEW LINGERIE?

I like to say I have expensive taste and a wallet that doesn’t quite support it… So in wanting to have gorgeous lingerie and not willing to spend the money on it, I eventually decided to give lingerie making a try. I was petrified!! It seemed like there were so many parts, supplies and pieces involved and I felt like I was losing my mind. I am so thankful to stores like Studio Costura who carry lingerie making kits! They truly help to demystify lingerie making.

Because I felt very inadequate in trying to make my first bra, I signed up for Bra Making Class on Craftsy. I watched it and re-watched it until I felt like I was ready to try making a bra. I didn’t expect my first bra to turn out okay and although it did, I made it two sizes too small. Still, I was so happy I did it! From that point on I kept trying and trying. I used different patterns, different fabrics and elastics. It’s been quite a process, but I have never been happier with my lingerie and how well it fits.

My advise for anyone who is wanting to start in making lingerie is to take an online class. Craftsy often has sales on their classes and it is very feasible to buy a class for a reasonable price. If it is possible for you to take a class somewhere in person, it is even better! But I do believe taking a lingerie making class helps quite a bit. From there, my advice is to just keep on trying. You will most certainly fail, but you will also succeed and your lingerie will only come out better every time you try making it.

WHICH IS YOUR FAVORITE LINGERIE PROJECT THAT YOU HAVE MADE SO FAR?

It’s a hard question! I think the newest / latest bra I make, especially if it is wearable (I still make mistakes), is almost always guaranteed to be my favorite. It is probably because my latest make reflects my current tastes and mood.  

www.studiocostura.com

Me costó mucho decidir qué encaje elegir para estos sujetadores! Estaba mirando los encajes de Studio Costura Shop desde hace tiempo y me puse muy contenta cuando me preguntaron si quería participar en Studio Costura Lingerie Sewing Club. Después de reflexionar mucho por fin decidí de elegir el kit azul con elásticos blancos y el encaje tan bonito en verde esmeralda con elásticos negros.

Aunque me encanta coser lencería no me veo cosiendo braguitas. Hay algo en coser elásticos que me da bajón. Pero si hablamos de los sujetadores, allí sí que sí, me encanta coserlos! Me puedo pasar días enteros haciendo sujetadores para mí. Esto me viene muy bien ahora ya que estoy embarazada y mi cuerpo ha estado cambiando durante este tiempo. Esto no solo me ha ahorrado mucho dinero pero también he podido tener sujetadores bonitos para el embarazo que me hacen sentir super bien cuando me los pongo.

I had such a hard time choosing the lace of these bras! I’ve been drooling over the laces at Studio Costura shop for a while now and I was beyond excited when I was asked to participate in Studio Costura Lingerie Sewing Club. After much deliberation I finally settled on a light blue lace and white findings kit and a gorgeous emerald green lace with black findings kit.

As much as I like to make lingerie, I find that I rarely spend my time making underwear. It is something about attaching the elastic that turns me off. But when it comes to bras, boy oh boy, I absolutely love making those! I can spend entire days making bras for myself. This comes in very handy in my current situation. You see, I am pregnant and my body has been changing as the pregnancy progresses. The ability to make my own bras has really been amazing in this journey. Not only it has saved me copious amounts of money but also I have pretty pregnancy bras that make me feel amazing when I wear them.

www.studiocostura.com

En agosto me apunté a un curso de patronaje de sujetadores y me encantó! Me parece que me he olvidado ya casi todo lo que aprendí pero sí que terminé ese curso con un patrón de sujetador patronado para mí y con los conocimientos para poder modificarlo según los cambios que tenga mi cuerpo. Este patrón hecho por mí ha sido desde entonces que más uso. El sujetador tiene aros y la banda completa (full band bra) con un corte diagonal en las copas. He estado llevando variaciones de este mismo patrón sin parar desde el verano.

I took a bra drafting class back in August and I really enjoyed it! I do feel like I have already forgotten everything I’ve learned, but I did come out of the class with a self-drafted pattern for a bra and some knowledge on how to change it as my body changes. This self drafted pattern has become my go-to favorite. It is a wired full band bra with a diagonal cup. I’ve been wearing a variation of this pattern non-stop since summer.

www.studiocostura.com

Para mi primer sujetador decidí usar el encaje azul con el resto en blanco y foam. Me gusta tener de vez en cuando un sujetador con copas de foam para un soporte ligero y un forro muy ligero también. Tenía que hacer la parte de arriba de la copa recta para poder usar la bonita puntilla de este encaje. La parte debajo de las copas está cortado también de encaje y forrado con forro de lencería para soporte.

For my first bra I decided to use the soft blue lace and white findings together with a foam. I enjoy having an occasional foam cup bra for light support and very light lining. I straightened the top edge of my upper cup so that I could cut it on that gorgeous lace edge. The cradle is also cut in lace and lined with firm lining for support.

www.studiocostura.com

No me di cuenta que dejé demasiado espacio para enganchar el tirante. Creo que mi patrón tenía que tener un tirante de tela o de encaje más ancho y no quería hacerlo en ese momento. Así que terminé improvisando y le puse la anilla de la manera que el trozo de tirante está en una forma de “v”. Pensé que no quedaría bien pero al final me gusta el resultado! Parece casi como que lo había planeado así.

I didn’t realize that I left a big space for a bra strap attachment. I think my drafted pattern was supposed to have a fabric or lace strap and I didn’t want to bother with it. So I ended up improvising and attaching a ring support in a slight “v” manner. I didn’t think it would look good, but in the end I am quite happy with the result! It looks almost intentional.

www.studiocostura.com

Después de hacer el primer sujetador no pude parar de pensar en lo delicado que parecía este encaje azul encima de la copa de foam en color carne. También quería combinar el mismo encaje con forro en color carne para hacer algo bonito y tenía justo la cantidad de encaje para hacer otro sujetador!

After I made this bra I couldn’t stop thinking about how delicate the blue lace looked on nude foam cup. I really wanted to combine the lace with nude lining to create something ethereal looking. Thankfully, I has just enough lace left to make another bra!

www.studiocostura.com

Forré las copas de este sujetador con forro de lencería y corté la parte de encaje un poco más corto para crear esa imagen más ligero de sujetador. Cosí la parte de arriba de encaje al forro usando el zig-zag y entonces cosí las partes de abajo colocando las piezas de la manera que las costuras no se vean. Así el sujetador se ve igual de bonito por dentro y por fuera.

I lined the cups of this bra with nude lining and I cut the upper cup lace piece a bit shorter to create an airy feel for the bra. I attached the upper piece to the lining using zig zag stitches and then sewed the bottom cup piece around it, effectively encasing the seam allowances inside the cup. This way the bra looks just as beautiful on the inside as it does on the outside.

www.studiocostura.com

Hice el tercer sujetador con este bonito encaje en verde esmeralda. Este encaje no tenía el típico borde de puntilla así que rematé los bordes de la copa con elástico de lencería. Las copas están también forradas con forro de lencería y las costuras ocultas entre las capas.

I made the third bra using the stunning emerald lace. The lace did not have the usual lace edge so I decided to finish off the cups with a lingerie elastic. The cups of this bra are also lined with lingerie lining and the seams are encased within the cup.

www.studiocostura.com

Es difícil de apreciar en las fotos pero el sujetador tiene la parte ancha debajo de las copas también! Supongo que tiré muy bien del elástico del bajo y así cuando el sujetador está así en plano el elástico se dobla hacia dentro. Me encanta como ha quedado! Tengo que decir que las fotos no expresan lo bonito que es este encaje, se ve mucho mejor en vivo!

It’s hard to tell from the pictures but this is a full band bra as well! I must have stretched my band elastic really good when attaching it, so now when lying flat it rolls to the inside. I love how this bra turned out! I gotta say the pictures do not do this lace justice. It looks even better in person!

www.studiocostura.com

Probablemente estoy loca pero creo que los tres sujetadores me han salido un poco distintos aunque usé el mismo patrón. Me gusta que los tres tienen cada uno un aire distinto y después de llevarlos todos me encantan.

Qué te parece usar el mismo patrón una y otra vez? Te aburre? Y cuál es tu favorito?

Anya

Muchísimas gracias Anya, estos sujetadores tienen tannn buena pinta! Puedes seguir a Anya en su blog Anna-Zoe y en su Instagram.

El kit con el enacje azul está disponible en la tienda pero el de verde esmeralda se ha vendido :( Espero que te haya gustado este post de inspiración y que pruebes a coser tu propia lencería también, los resultados son tan bonitos!


I am probably biased, but I think that all three of my bras turned out slightly different despite being made from the same pattern. I love how all three have different feel to them and after wearing all three of them I am very happy with them.

What do you think of using the same pattern over and over? Do you get bored? And which one of the bras is your favorite?

Anya

Thank you so much Anya, these bras look sooo good! You can follow Anya at her blog Anna-Zoe and at Instagram.

The light blue kit she has used is up at the shop but the green lace has already been sold out :( I hope you liked this inspirational post and that it makes you want to try out sewing your own lingerie too, the results are stunning!


Studio Costura Lingerie Sewing Club: Mary de Diario de Naii

 
www.studiocostura.com

Hola! Igual os diste cuenta que en el mes de septiembre no había entrada de Studio Costura Lingerie Sewing Club y tengo que decir que la vuelta al cole (vaaale, al trabajo) me pillo con tantas prisas que el post se quedó para octubre aunque mi bloguera seleccionada estaba ya más que lista! Así que antes de que se acabe también el mes de octubre aquí estoy para presentarte a Mary.

Las que son de España o simplemente leen blogs de costura en castellano no necesitan una introducción: Mary es la superwoman detrás del popular blog Diario de Naii. Yo recuerdo que cuando abrí mi blog conocía por redes poca gente de aquí quienes cosían y tenían un blog, ella era una de las pocas. Me pareció algo como una heroína de costura, hacía cosas tan atrevidas, tenía todo tan claro…me dio mucho respeto, jaja. Con el timpo como suele ocurrir en comunidades tan pequeñas como la nuestra de costura, empecé a "relacionarme” con ella por Instagram, era una de mis primeras clientas en la tienda y después mi fiel tester para los patrones. Una mujer encantadora que parece que puede con todo y nunca deja de sorprenderme con sus creaciones originales. En fin, no voy a escribir más porque ella os tiene preparado un post con CUATRO conjuntos preciosos pero antes…vamos a conocer un poco más a Mary!

Cuentame un poco sobre tu trayectoria en costura: cuándo empezaste a coser y qué son tus cosas favoritas para coser?

Empecé a coser hace...casi siete años, en noviembre de 2011. En el primer año del cole de mi hijo mayor nos pidieron un disfraz de lobo, pasé una tarde en la mesa del salón cosiendo a mano una polaina con una tela horrorosa de pelos y mientras daba puntadas pensaba si sería útil una máquina de coser. Terminé los accesorios del disfraz y en aquella semana pedí consejos a mi hermana, porque ella sí aprendió a coser cuando era joven. Ella poco sabía la verdad y me dijo que comprara una máquina con zigzag , ahí está, nada más :-).  No he tenido en la familia modistas con quienes pudiera aprender y me he lanzado en la costura de cabeza sin saber por donde empezar. Tampoco tenía miedo, sabía que con las instrucciones y unos vídeos que vi de Alfa me podría apañar, jajaja, no podría ser más difícil que educar a un hijo. Así empecé, descosí mucha ropa mía para ver cómo estaba hecha y luego volvía a coser para mi hijo.Tardé unos meses en pisar a una tienda de telas porque me daba verguenza . Al principio solo cosí para mis hijos, poco a poco fui cosiendo cosas para mi y para mi marido. Lo que realmente me gusta es coser para ellos. Soy fan total de las telas de punto y jersey porque es lo que más usamos. A veces alterno proyectos con otras telas pero siempre vuelvo a declarar mi amor por el punto. Me gusta coser pantalones , camisetas y sudaderas pero reconozco que necesito coser prendas de mayor dificultad y que absorban mi energía de vez en cuando. 

Por qué empezaste a coser lencería? Te pareció difícil? Qué patrones/recursos recomendarías a gente que está interesada en aprender a coser lencería?

La ropa interior estuvo en mi lista siempre. Cosí unos calzoncillos para mi primer hijo cuando tenía unos cuatro años quizás. Nunca compré bragas para mi mediana. Luego empecé a coser bragas para mi y los sujes vinieron de último, esto sí que me imponía respecto. Más que parecer difícil el problema mayor era encontrar los accesorios (elasticos, cierres, tejido). Felizmente en la red empezó a aparecer las primeras tiendas con materiales para lencería, aquí en España creo que Studio Costura Shop fue la primera que vi. Yo tenía miedo de comprar patrones y decidí diseñar mi propio patrón de sujetador y así estudiar cómo era la construcción y la costura. Luego he comprado los Watson y el Harriet bra de Cloth Habit. 

Yo uso una copa A y no puedo decir a las que tienen copa D que les va a quedar bien, pero aún así recomiendo para empezar con el bralette Hanna, es muy sencillo de coser y los ejemplos que vi en la red dan resultados muy buenos. 

Cuál es tu proyecto de lencería favorito hasta ahora?

El Watson bra me ha gustado bastante pero mi favorito es el Hanna, y lo digo de verdad, no es porque estoy aquí de invitada!  Las versiones que he cosido me sentaron muy bien. La forma me da volumen en la copa sin usar aros y las piezas del delantero dan mucho juego tanto para punto como para encaje.


Hey! Maybe you noticed that in September there was no Studio Costura Lingerie Sewing Club post around here and I have to say that the back to school campaign (well…back to work) was busier than ever. The post was left for October although the blogger I picked out had everything ready! So before this month will be over too here I am to introduce you to Mary.

Those who live in Spain or just read sewing blogs in Spanish need no introduction: Mary is the superwoman behind the popular sewing blog Diario de Naii. I remember when I first started blogging I didn’t know lots of people who were sewing and had a blog, she was one of the few. She seemed to me like a sewing goddess, her work was bold, she had everything on point…I was really impressed and gave her lots of respect for that, haha. It’s quite common in small communities like ours that you end up knowing others with time and that’s exactly what happened, I started to “communicate” with her over at Instagram, she was one of my first clients when I opened up my shop and fast forward she has been a magnificent tester for my patterns. She’s a charming woman who seems to tackle everything she decides to do and her original creations won’t stop surprising me. Well, it’s time for me to stop writing because she has FOUR beautiful lingerie sets prepared for this post but first…lets get to know her a bit!

Tell me a bit about your sewing journey: when did you start to sew and what are your FAVORITE makes to sew?

I started to sew…almost seven years ago, in November 2011. When my oldest son was on his first year of preschool we were asked to bring a wolf costume for him for the school. I was sewing by hand a pair of gaiters all evening on my dining table, the fur fabric was horrible and while I was hand sewing I was thinking if a sewing machine would be useful for me. I finished the accessories for the costume and that week I asked my sister for some advice as she had learnt to sew when she was young. To be honest she knew very little, she only told me that I should buy a sewing machine with a zig-zag stitch option but that was all :-). I don’t have any dressmakers in my family to learn from so I dived into sewing without knowing from where to start. I wasn’t afraid though, I knew that with the instructions and the video I saw from Alfa I could figure my way out, I thought that it can’t be more difficult than parenting after all. And this is how I started, I unpicked lots of my clothes to see how they were constructed and then I sewed the garments back together making something for my son. I didn’t go to fabric shops during those first months as I was kind of intimidated.

At first I only made things for my son, little by little I started to sew for myself and for my husband. What I really like is to sew for them. I’m a big fan of knit and jersey fabrics because these are the ones we wear the most. Sometimes I change the things up and use other types of fabrics but I always go back and declare my love for the knits. I like sewing pants, t-shirts and sweatshirts but I recognize that from time to time I also need to make more complicated garments that would absorb my energy.

Why did you start sewing lingerie? Did you find it difficult? What patterns/resources would you recommend for people who are interested in learning how to sew lingerie?

Lingerie was always in my sewing list. I sewed a pair of undies for my son when he was maybe four years old. I didn’t ever buy panties for my middle child. Later I started to sew panties for me and the bras came up later on, making bras did intimidate me a bit. Not that it would seem so difficult but because it was hard to source materials (elastics, closures, fabrics). Fortunately the first online shops that sold lingerie making materials started to appear and I think that Studio Costura Shop was the first one I saw here in Spain. I was afraid of buying patterns and decided to draft my own to study the construction and to see how everything came together. I then bought Watson and Harriet patterns from Cloth Habit.

I use an A cup and I can’t say that D cup will have equally good fit but I would suggest starting out with the Hanna bralette pattern, it’s very easy to sew and the versions I’ve seen online give really nice results.

Which is your favorite lingerie project that you have made so far?

I like the Watson a lot but my favorite is Hanna, and I’m serious, I’m not saying this because I’m a guest here! The versions I have sewn fit me great. I can have volume on my cups without using underwires and the front pieces make it possible to play around with different versions a lot, you can use both knits and lace.

Hanna bralette + Mia panties de Studio Costura

www.studiocostura.com

Antes de presentaros las costuras de hoy quiero decir que es un honor y un verdadero placer volver a colaborar con Studio Costura. Ésta no es la primera vez ya que hace dos años Karu me envió un kit para coser lencería y fue ahí que aprendí las diferencias entre los elásticos. Este año he sido tester de sus patrones y es muy gratificante ver cómo ha crecido y expandido su trabajo. 

De esta vez he recibido varios kits para coser #loquemedieralagana y es que #mehadadoganadecosertodo. Sé que me he excedido cosiendo cuatro conjuntos pero era una tela más chula que la otra y mi miente explotó. Así que he cosido dos conjuntos de punto y dos conjuntos de encaje.

Before presenting you my sewing projects I’d like to say that it’s an honor and joy to collaborate with Studio Costura again. It’s not the first time as two years ago Karu sent me a lingerie sewing kit and it was when I learned the differences between different elastics. This year I have been testing her patterns and it has been really gratifying to see how the project has grown and she has expanded her work.

This time I received various kits to sew #whateverIwant and #Iwantedtosewitall. I know that I have exceeded the expectations when sewing four lingerie sets but the fabrics were all so lovely and my mind exploded. So I made two sets with knit fabric and two sets with lace.

www.studiocostura.com

Desde que vi las mezclas que hizo Karu en las entradas del bralette Hanna y de la braguita Mia sabía que un día cosería los encajes en tela de punto. En su tienda hay estos encajes estrechos, preciosos y en varios colores. Un lado es algo recto y el otro tiene olas que dan toda la gracia al encaje. Esta tela no sé si aún la hay en la tienda pero es un rosa muy fácil de combinar, además tiene los elásticos también en rosa y para los cierres y arandelas usé unos de color blanco.

Ambos patrones ya había cosido anteriormente y no tuve problemas en coser otra vez. Consulté el blog de Studio Costura para ver cómo rematar el encaje y es muy sencillo. Las piezas las he cortado conforme las instrucciones, he cosido con zigzag el encaje sobre la pieza y luego corté el excedente de tela siguiendo la forma del encaje, consulta el blog de Karu para ver más detalles.

Las braguitas llevan elástico en la pernera por delante y por la espalda llevan solamente el encaje. De esta manera son muy cómodas de usar ya que en la espalda no hay elástico. Lo que me encanta en estas braguitas es lo rápido que se cose comparado al suje.

Since I saw the combinations that Karu made in Hanna bralette and Mia panties posts I knew that one day I’ll sew knits with lace trims. There are these narrow lace trims in her shop that are beautiful and come in a variety of colors. One side is straight and the other one has waves that make them look really pretty. I’m not sure if this fabric is available at the shop but this pink is really easy to combine, the elastics come in pink too and I used white ones for the closures and rings and sliders

I had used both patterns before and I didn’t have any problems this time either. I looked up how to sew the elastic lace trims in Studio Costuras blog and it’s very easy. I cut the pieces as shown in the instructions, then I used a zig-zag stitch to sew the trim on top of the pieces and then I cut away the fabric part underneath the lace following it’s shape. You can see Karus blog for the tutorial.

The panties have elastic sewn on the front in the leg openings and in the back they are finished with the scalloped lace trim. This makes them very comfortable to wear as there’s no elastic in the back. I love that you can sew these panties so fast compared to the bra.

Harriet bra de Cloth Habit y Mia panties de Studio Costura

www.studiocostura.com

Aquí volví a coser tela de punto con el encaje de la misma manera que en el conjunto anterior. El patrón para el sujetador es el Harriet de Cloth Habit, lo he cosido hace tiempo pero en una talla muy grande, era la oportunidad de probarlo otra vez.

Muchas cosas me han pasado con este modelo, intenté ponerle foam y aros y fue un desastre absoluto. He cosido una talla 32A que al principio estaba de acuerdo con mi contorno pero resultó muy puntiagudo en el centro de la copa. Fue un descoser y coser constante , por muchos momentos estuve a punto de tirarlo a la basura pero me daba pena y insistí. Lo he terminado a fuerzas porque quería un suje para las braguitas de la misma tela. Volveré a probar este patrón después de una temporada quizás, no me doy por vencida pero por ahora le castigo en la montaña de patrones por coser.

This time I used the scalloped lace trim with knit fabric in the same way as in the last set. The bra pattern is the Harriet bra from Cloth Habit, I had sewn this pattern some time ago but I made it in a size too big for me so it was a good opportunity to try it out again.

A lot of things happened to me with this pattern, I tried to use foam and underwires but it was an absolute disaster. I made a size 32A which is supposed to be my size according to the band measurement but the cup shape was too pointy. I had to unpick and sew again and again and during various moments I was thinking about throwing the project to the dumpster but it was such a pity to do so, so I insisted. I made an effort as I really wanted the panties to have a matching bra. I’ll try this pattern again maybe in the future, I won’t surrender but at the moment I’ll leave it in my pile of “I’ll sew this one day” patterns.

www.studiocostura.com

En las braguitas Mia puse el encaje en todo el contorno de la cintura. Tengo unas braguitas solo con encaje y me pareció una buena alternativa, detrás del encaje cosí el elástico transparente para asegurarme que no desbocara.

I used the scalloped lace trim in the waist of these Mia panties. I have a pair of panties made only with lace and it seemed like a good alternative, I used a clear elastic tape to stabilize the lace part.

Sierra Bra de Madalynne y Mia Panties de studio costura

www.studiocostura.com

Ahora cambié de tela y usé encajes y tul elástico. Había cosido encajes de Studio Costura pero sin forrar y no me acababan de convencer , no me gustaba  ver la piel detrás del encaje. Cuestión de gustos no? Pues el Sierra Bra es un patrón gratuito y muy rápido de coser, lleva encaje y forro. Tenía mis dudas si vestiría bien ya que la banda va cruzada en el delantero y no hay elástico debajo del pecho. 

Antes de poner los elásticos lo he probado para evaluar la forma y como tengo poca copa , ejjj, no hace falta mucho soporte y el cruce ya da la "sensación de soporte". En todo el contorno lleva elástico excepto en la parte de abajo que puse solamente elástico transparente y dejé el encaje a la vista de la misma manera que los conjuntos anteriores (corté el tul más grande que el patrón, cosí el encaje al forro y luego corté el excedente de tul).

This time I changed the fabric and used lace and stretch mesh. I had used the lace from Studio Costura before without lining and I didn’t really like the transparent look. I guess it’s all about preferences, right? Sierra bra is a free pattern and it takes no time to sew, it has lace and a lining. I was about worried if it would look good as the band is crossed in the front and there’s no elastic on the lower part of the band.

Before attaching the elastics I tried out the fit and as I have a small cup size, well, I don’t need lots of support and the front crossover gives “a sensation of support”. It has elastics in all the edges except the lower part of the band where I put the clear elastic. I left the scalloped edge of the lace visible using the same method as in the last sets (I cut the mesh pieces larger than the pattern, sewed the lace to the mesh lining and then cut away the extra mesh).

www.studiocostura.com

Para las bragitas Mia, me vais a decir #otravez pero es que la tenía a mano, decidí dejar el encaje en los costados como una propuesta que puso Karu en su blog. Queda un detalle precioso y las bragitas siguen siendo 80% tela de punto :-) . Cosí elástico en la pernera y en la cintura.

I know you’ll say #again about the Mia panties but this is what I had in hand. I decided to leave the lace on the sides as shown in one of the examples that Karu has at her blog. It’s such a pretty detail and the panties are still made with 80% knit fabric :-). I sewed the elastics on the waist and leg openings.

Barret de Madalynne y Mia Panties de Studio Costura

www.studiocostura.com

Confieso que al coger el encaje blanco en mis manos pensé que era demasiado de boda para mi gusto. Luego al decidir el patrón vi que podría quedar muy muy chulo. Bajé otro patrón gratuito de Madalynne porque quería hacer un sujetador con piezas triangulares, había pensado en usar el Watson bra pero este tenía una pieza abajo de las copas que quería evitar.

El Barret lo he modificado, si miráis el original lleva una abertura en el centro del pecho, he extendido las piezas de la copa para que cruzasen y así fuera más fácil de coser. Debajo de las copas solo hay un elástico cosido a vista, no la manera tradicional de coser los elásticos (cuando quedan escondidos en el revés). Para el forro he usado tul elástico blanco que queda muy bien y refuerza el encaje delicado. 

Me repito con las braguitas, la manera más sencilla de coser sería sin forro pero para estar a juego con el sujetador usé el tul blanco también. No os tengo que decir que es mi patrón de bragas favorito, no?

Con este conjunto acabo el empacho de lencería y esta lectura interminable, espero que os animéis a coser ropa interior porque hay una infinidad de combinaciones y patrones para investigar. Otro día he ido a tres tiendas y no encontré ninguna copa A para comprar y pensé: qué bien saber coser!!! Si tú también tienes dificultad de encontrar ropa interior no queda otra que lanzarte a coser tu propia ropa, os aseguro que es muy divertido y aprendes mucho. Gracias Karu por este espacio! Ánimo a todas!

I have to confess that when I had the white lace fabric in my hands I thought that it was too much of a wedding style for me. Then when I was deciding what pattern to use I saw that it could look really nice. I got another free pattern from Madalynne as I wanted to make a triangular cup bra, I was thinking about using Watson but it has a separate band piece which I didn’t want to use.

I have hacked the Barret, when you look at the original version you can see an opening in the front between the cups. I just extended the pieces so they would cross over and it was easier to sew that way. There’s a visible lingerie elastic under the cups that is not sewn in the traditional way (when you fold the elastic back on the inside). I used stretch mesh for the lining at it looks great and it makes the delicate lace a bit more structured.

I’m repeating the pantie pattern again, the easiest way was to sew them without lining but I wanted a matching set so I used the white stretch mesh again. I guess I don’t have to say that it’s my favorite pantie pattern, right?

So with this set I’m finishing my batch of lingerie makes and this never ending post. I hope you’ll take up lingerie sewing because there are so many possible combinations and patterns to explore. The other day I went to three different shops and I didn’t find any A cup bras to buy for myself, this is when I thought: how great is to know how to sew!!! If you also find it difficult to buy lingerie you’ve got to jump into sewing your own, I assure you it’s super fun and you learn so much. Thank you Karu for this feature! Good luck to everyone!

www.studiocostura.com
 

Los conjuntos de Mary han sido super bonitos, además ha enseñado variaciones para todo: punto con encaje, encaje con la puntilla visible y la tela elástica de encaje! Muchísimas gracias de nuevo Mary por participar e inspirarnos con tus creaciones :) Podéis seguirla en su blog Diario de Naii y en su Instagram donde últimamente está subiendo videos super chulos!!!

Los kits de Studio Costura Shop que ha usado Mary son:

Los patrones usados:

Marys lingerie sets have been so beautiful! she has also shown all the variations: knit with lace, lace with the scalloped edge and stretch lace fabric! Thank you again Mary for participating and inspiring us with your makes :) You can follower her at her blog Diario de Naii and at her IG where she’s lately showing some super cool videos!!!

The kits that Mary has used from Studio Costura Shop are:

The patterns she used are:

Inspiración para el estuche / Zipper pouch inspiration

 
www.studiocostura.com

Hola, hoy estoy de vuelta con la entrada que prometí la última vez: inspiración para coser estuches con cremalleras. El patrón gratis lo tienes en esta entrada y ahora te dejo algunas fotos de estuches para que veas que tienes muchísimas posibilidades de usar diferentes tejidos, tamaños y acabados. Todas las fotos son de mi carpeta de Pinterest.

Hey, here’s the post I promised the las time: inspiration for sewing zipper pouches. You can find the free pattern in that post and in this post I’ll show you some photos so you can see that it’s possible to use so many different fabrics, sizes and finishings. All the photos are from my Pinterest board.

7.jpg
13.jpg
2.jpg
8.jpg

El mismo modelo es muy diferente si lo haces en formato pequeño o en formato grande, es muy fácil adaptar el patrón.

The same pattern can be easily adapted into different sizes and the results vary a lot.

11.jpg
12.jpg

Piensa en este patrón como base y de allí puedes ir avanzando hasta donde quieras. Estos bolsitos con asa no son nada más que estutches que tienen unas tiras de tela en las costuras laterales para enganchar las asas después. También le podrías poner un bolsillo extra cosiendolo antes de cerrar todo el estuche.

You can think about this pattern as a base and from there you can go to more advances levels if you wish. These shoulder bags are just zipper pouches with some fabric strips sewn into the side seams to attach the cord later on. You can also add an extra pocket, just sew it in before closing the whole pouch.

6.jpg
4.jpg
15.jpg

En vez de hacer el estuche con el fondo cuadrado puedes hacerlo curvado, simplemente modifica el patrón y corta las cuatro piezas de la misma forma.

Instead of making a squared bottom pouch you can also choose to make it round, just modify the pattern and cut four equal pieces.

5.jpg
9.jpg
17.jpg

Bordados, hilos, botones…todo vale para hacer un estuche original. Me gusta mucho también la idea de añadir algo de decoración al carrito de la cremallera.

Embroider, texture, wool, bottons…you can use lots of things to make a unique pouch. I really like the idea of adding a detail for the zipper pull.

18.jpg
16.jpg

Piel y polipiel dan resultados muy elegantes. Elige materiales que no sean muy gruesos para que sean más fáciles de coser.

Leather and faux leather have really elegant vibes. Choose the materials by their weight, lighter ones are easier to sew.

1.jpg
10.jpg

Espero que te hayan surgido muchas ideas para tu próximo proyecto después de ver estos ejemplos!

I hope you have many ideas for your next project after seeing these samples!


Estuche con cremallera - patrón gratis / Zipper Pouch - free pattern

 
www.studiocostura.com

Hola! Hoy os cuento sobre un proyecto que quería compartir desde hace tiempo. Ya sabéis que este año he publicado tres patrones de costura digitales, todos ellos de lencería. Ahora toca el turno para algo que no tiene que ver ni con encajes ni elásticos de lencería. Os presento este nuevo patrón de estuche, que además es gratis!

He usado el proyecto de estuche muchísimo en mis clases de costura porque viene muy bien para los principiantes. De hecho suele ser el segundo proyecto (después de un sencillo bolso de tela) que cosemos con gente que empieza desde cero a aprender a coser. Así que de verdad, es sencillo para todos los niveles. Aunque es una cosa muy fácil de coser, no por eso es menos bonito o útil. A mí me encanta este proyecto porque se puede hacer de miles de maneras, puedes usar muchos tipos de tejidos y es un regalo ideal.

Hey! Today I want to tell you about a project I’ve wanted to share for some time now. As you know I have published three digital sewing patterns this year, all of them are lingerie patterns. Now it’s time to present you something that doesn’t include neither lace nor lingerie elastics. Here’s my new zipper pouch pattern and the good news is that it’s free!

I’ve used the zipper pouch project so much in my sewing classes as it’s the perfect thing for beginners to sew. We actually make it as a second project with people who start from zero (after an easy tote bag). So honestly, it’s a simple make for all levels. Although it’s easy to sew, it’s also pretty and practical. I love this project because you can customize it in so many ways, use different fabrics and it makes a perfect gift.

www.studiocostura.com

Normalmente a la gente les da un poco de miedo el tema de coser cremalleras. Con el método que te enseño en este patrón no hay complicaciones. Puedes seguir las instrucciones paso a paso y verás que el resultado queda muy bonito. He escrito las instrucciones especialmente pensando en gente sin experiencia así que aunque sabes muy poco, lo vas a poder coser!

En las instrucciones aprendes cómo hacer el patrón a la medida que TÚ quieras, explico cómo usar cualqier largo de cremallera. El estuche está completamente forrado y queda bonito tanto fuera como por dentro. Todos los pasos vienen con fotos y texto explicativo tanto en castellano como en inglés. Espero que os gusta y os resulta útil!

Normally people are a bit afraid of sewing zippers. With the method I show you in this tutorial you’ll see it’s easy. Just follow the steps and it turns out great. I’ve written the instructions so they will be understandable for new sewers and even when you have very little experience you will be able to sew this project!

Following the instructions you will learn how to make the pattern according to the measurements YOU choose, I show you how to use any size of zipper. The pouch is completely lined and will be pretty both on the outside and on the inside. All the steps come with photos and text both in English and Spanish. I hope you’ll like it and that you find it useful!

DSC_0281-3.jpg

Estoy muy contenta de poder compartir este patrón porque me parece que puede molar a mucha gente. Estuve un tiempo dudando si publicar el estuche o seguir con lencería. De hecho, pensaba que si hago patrones de lencería debería “siempre” seguir con eso. Y la verdad es que me agobié un poco estando en un punto muerto entre muchas ideas y sin saber qué hacer este verano.

Pero luego al pensar bien sobre por qué hago los patrones y qué es lo que me motiva de este trabajo, llegué a la conclusión que la palabra es ENSEÑAR. Y entonces tenía claro que en vez de quedarme en un nicho concreto de patrones y seguir con lo mismo porque es lo que yo “debería hacer” y porque es algo que otra gente espera de mí, era una tontería. Tengo más ideas, más que compartir y hoy quizás es un estuche pero mañana puede ser una camiseta. Creo que lo importante es producir contenido de calidad, sea lo que sea la temática. Con eso quiero decir que mi siguiente patrón va a ser de bolso de tela donde quiero explicar muchas maneras de cremalleras, bolsillos, forros etc. También quiero decir que eso no significa que ya no haga más patrones de lencería. Simplemente en este momento me motiva más la idea de bolsos y tengo mucha ilusión al preparar las cosas nuevas para compartir mi trabajo con vosotros. También estoy abierta a sugerencias por si buscáis algún patrón en concreto y pensáis que lo pueda hacer :)

Así que aquí os dejo este patrón gratis para que lo uséis a vuestro gusto y me encantaría saber si os gusta y/o si tenéis sugerencias sobre el tema, siempre me podéis escribir un correo electrónico o un mensaje en Instagram. Volveré en breve con un post de inspiración de estuches…por si todavía no os he convencido para que cosáis uno! Pincha en el botón de abajo para obtener el patrón en formato PDF:

I’m really happy to share this pattern with you and I think that a lot of people will like it. For a while I was doubting if I should publish the pouch pattern or if I should continue with lingerie patterns. Actually I thought that as I make lingerie patterns I should continue just making them “forever”. And I did stress out this summer when facing a mental block and not knowing which idea to pick for the next pattern.

But then I started to think about why I actually do what I do and what motivates me about my work. I came to a conclusion that it is TEACHING. And then I saw it: it’s kind of stupid to stay in the same niche of products just because it’s something that “I should do” or if I think that it’s what other people expect me to do. I have more ideas, more to share and maybe today it’s a zipper pouch and tomorrow it can be a t-shirt. I think that the important thing is to produce quality content no matter what the topic is. With this I want to announce that my next pattern will be a tote bag and I want to share all I know about sewing zippers, pockets, linings etc. With this I also want to say that it doesn’t mean that I will not make lingerie patterns anymore. It’s just that at this moment I’m more motivated to work with bags and I feel really passionate about preparing new stuff so I can share my work with you. I’m also open for recommendations if you are looking for a specific pattern and think that I could make it happen :)

So here goes this free pattern, use it as you like and I’d love to get the feedback so you can always write me on my email or at Instagram. I’ll be back soon with an inspirational post about zipper pouches…just in case I haven’t convinced you yet to sew one for yourself! Now click on the button to get the free pattern in PDF format:

www.studiocostura.com