Abrigo Kelly de Closet Case Patterns // Kelly Anorak from Closet Case Patterns

 
Kelly anorak www.studiocostura.com

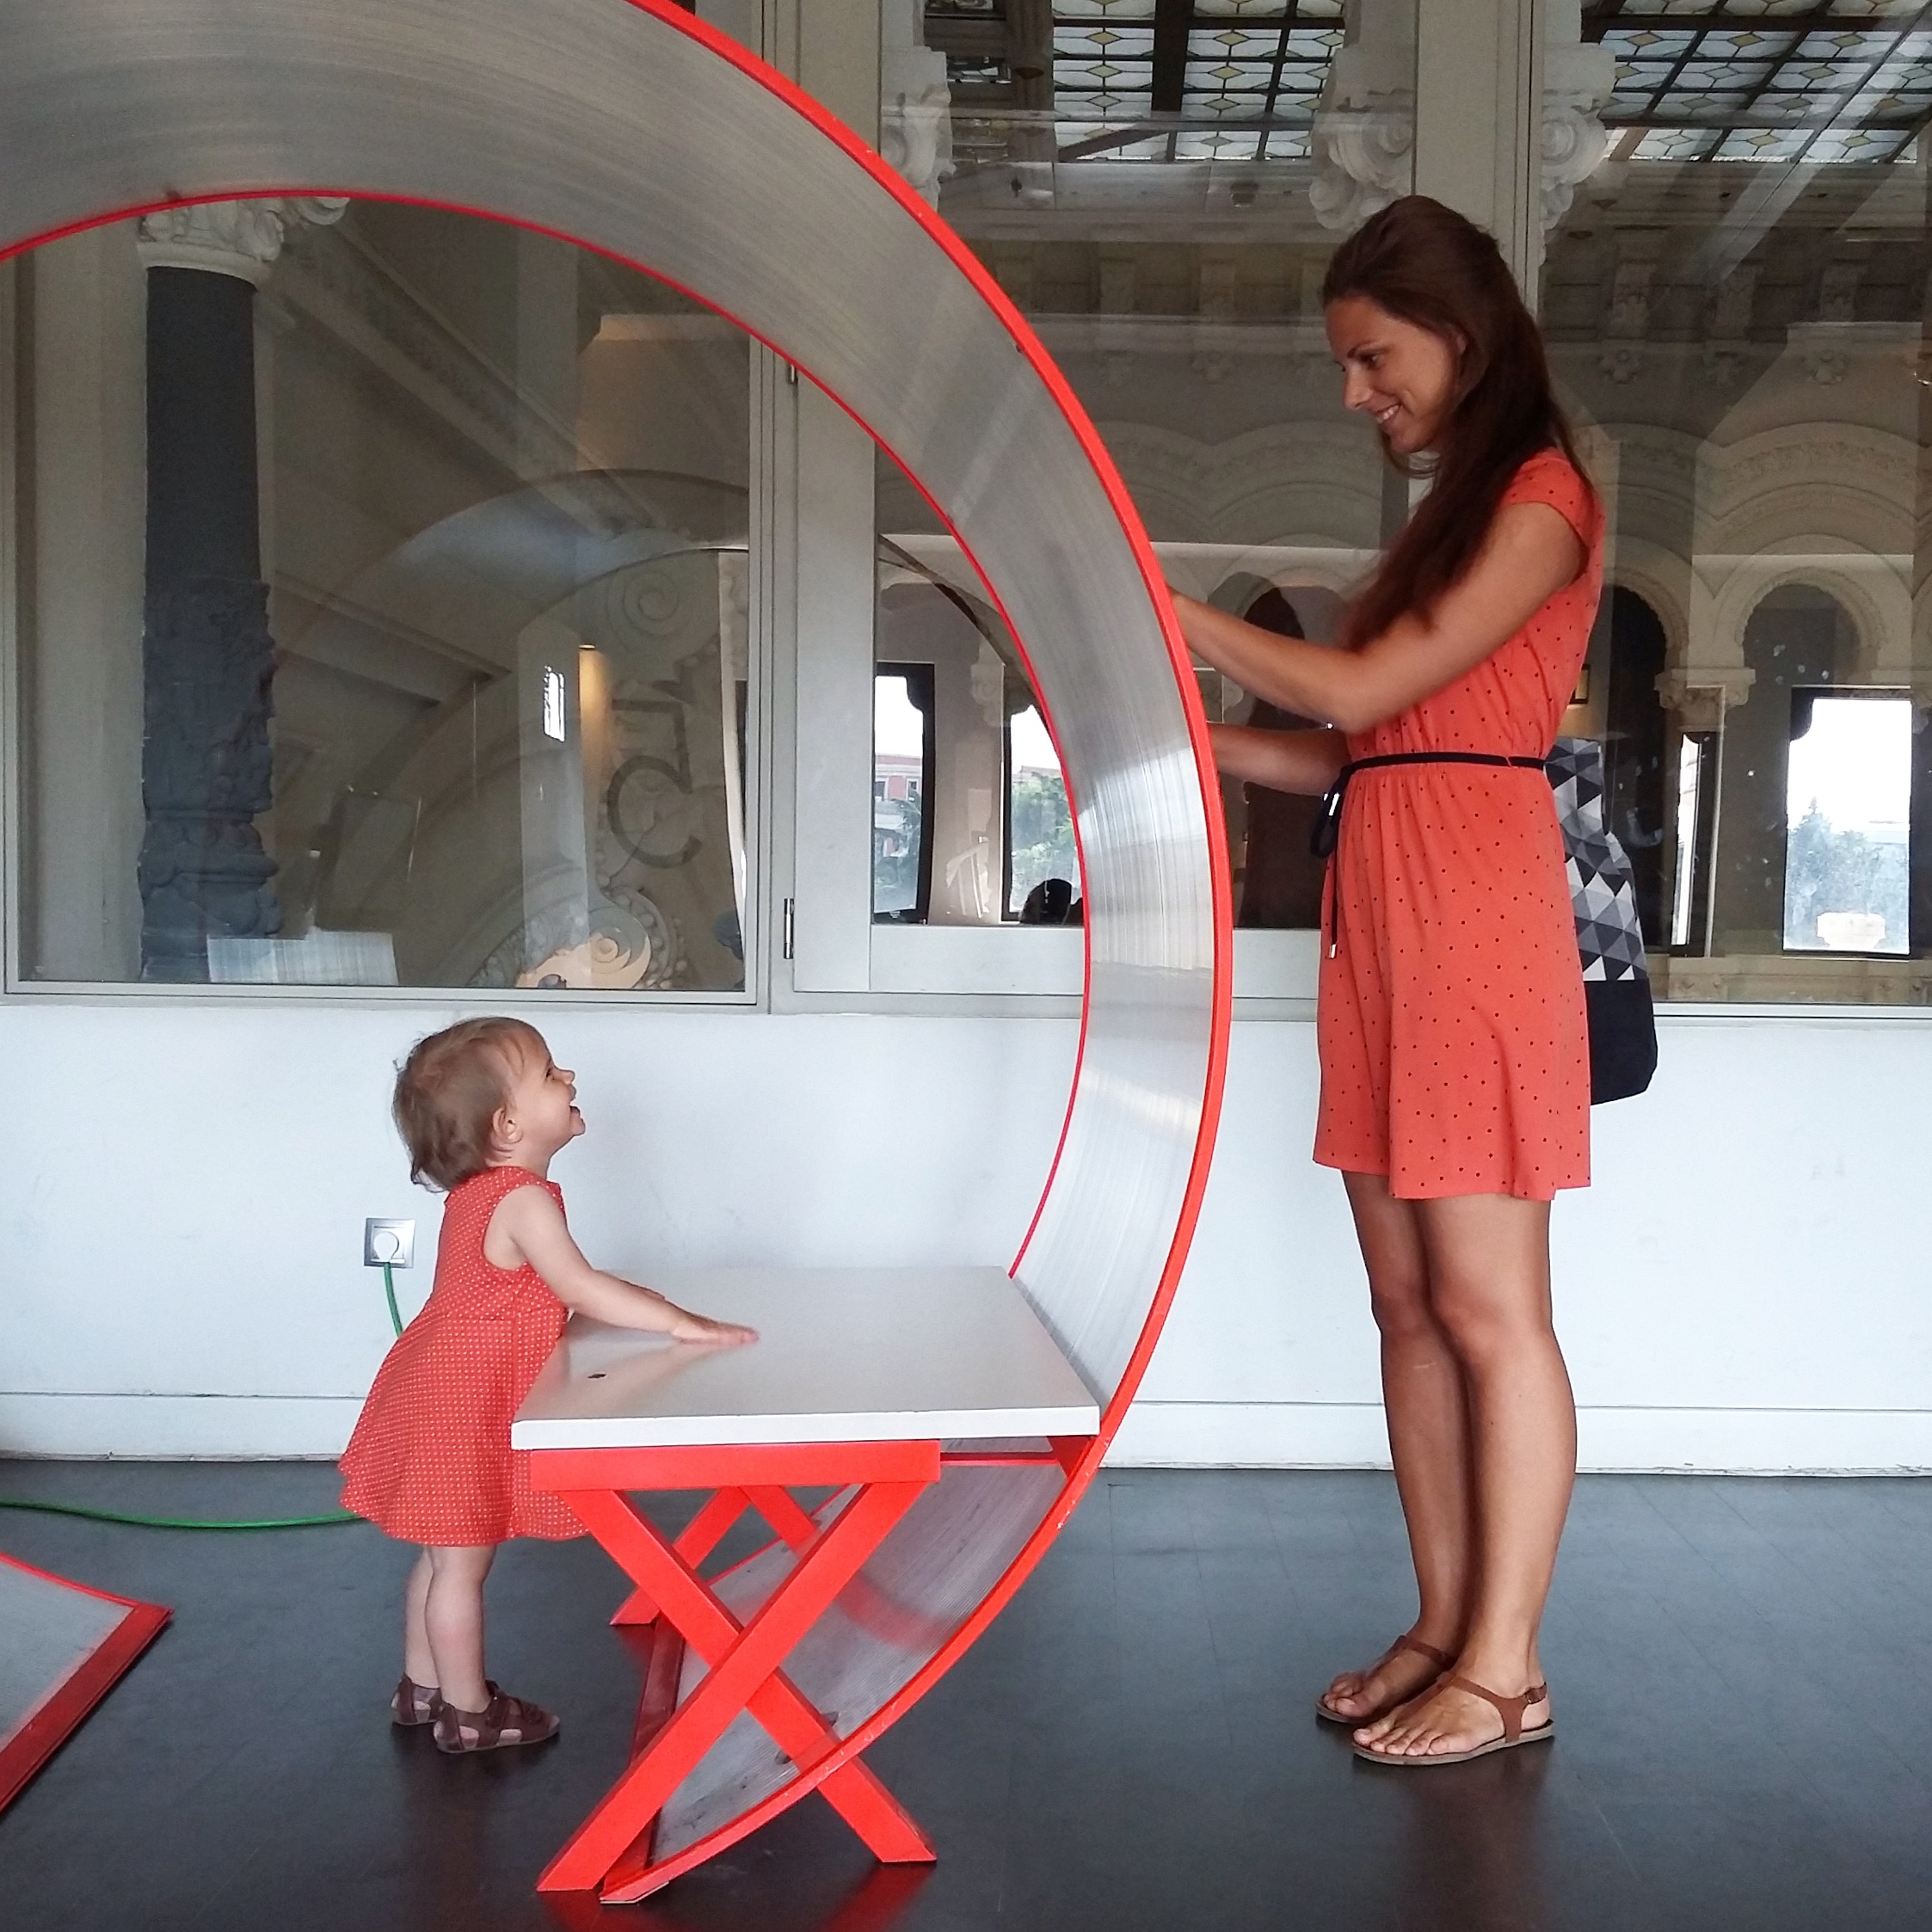
El mes de noviembre se acaba y ya queda poco para las vacaciones. 20 días en mi caso para ser exactos, jaja. Noviembre ha sido lleno de nuevos proyectos, costuras y mucho más. Aparte de mis clases de siempre hemos hecho dos monográficos de lencería en Trizas y Trazos, han sacado bolsos cosidos por mí en la tienda online Pipol Art y acabo de terminar con las rebajas en Studio Costura Shop...tiempos de mucho trabajo y pocas horas de sueño, pero mucha ilusión también. Pero para hoy os muestro por fin mi abrigo Kelly de Closet Case Patterns.

November is ending and there's little left until the holidays. To be exact, in my case 20 days, hehe. This month has been filled with new projects, sewing and a lot more. Apart from teaching my usual sewing classes we've done two lingerie classes in Trizas y Trazos, my handmade tote bags were released in Pipol Art online shop and I just finished the sale weekend at Studio Costura Shop...times full of work and not enough sleep, but also so much exitement. But today I finally show you my Kelly Anorak from Closet Case Patterns.

Kelly anorak www.studiocostura.com


No viene de sorpresa si digo que Closet Case Patterns es mi marca independiente de patrones favorita y que Heather me parece una diosa de costura y patronaje. Sus patrones están muy bien hechas con todos los detalles explicados y se atreve con proyectos más avanzados...con ella he cosido vaqueros, bañadores y ahora también el abrigo. Para mí este tipo de patrones más complicados me resultan de muchísima utilidad ya que directamente aprendo de ellos y luego las nuevas técnicas me sirven para mil otras cosas.

It's not really a surprise when I say that Closet Case Patterns is my all time favourite from indie sewing pattern labels and that Heather seems to be a goddess of sewing and patternmaking. Her patterns are well drafted with all the details explained and she really goes for more complex projects...with her patterns I've sewn jeans, bikinis and now also an anorak. This type of more complicated patterns are really useful for me as I learn so much from the process and I can use the new techniques in so many other projects.

Kelly anorak www.studiocostura.com

Cuando sacaron el patrón Kelly me lo compré enseguida...justo estaba pensando que este otoño me gustaría coser algún abrigo y estaba pensando en hacerme un Cascade Duffle Coat de Grainline Studio, en plan más otoñal como este por ejemplo. Pero entonces llegó Kelly y me enamoré y ya está. Ahora, sí que he comprado el Cascade durante las rebajas de Black Friday y lo tengo para estas navidades...a ver si consigo alguna tela de lana buena que vaya bien.

When Kelly pattern came out I inmidiately bought it...I was just thinking about sewing a coat this autumn and I was thinking about making myself a Cascade Duffle Coat from Grainline Studio, something with fall vibes, like this one for example. But then Kelly arrived, and I fell in love and that's it. I anyhow still bought the Cascade pattern during Black Friday sales and I have it in my sewing list for this Christmas...lets see if I can get my hands on some nice wool for that coat.

Kelly anorak www.studiocostura.com

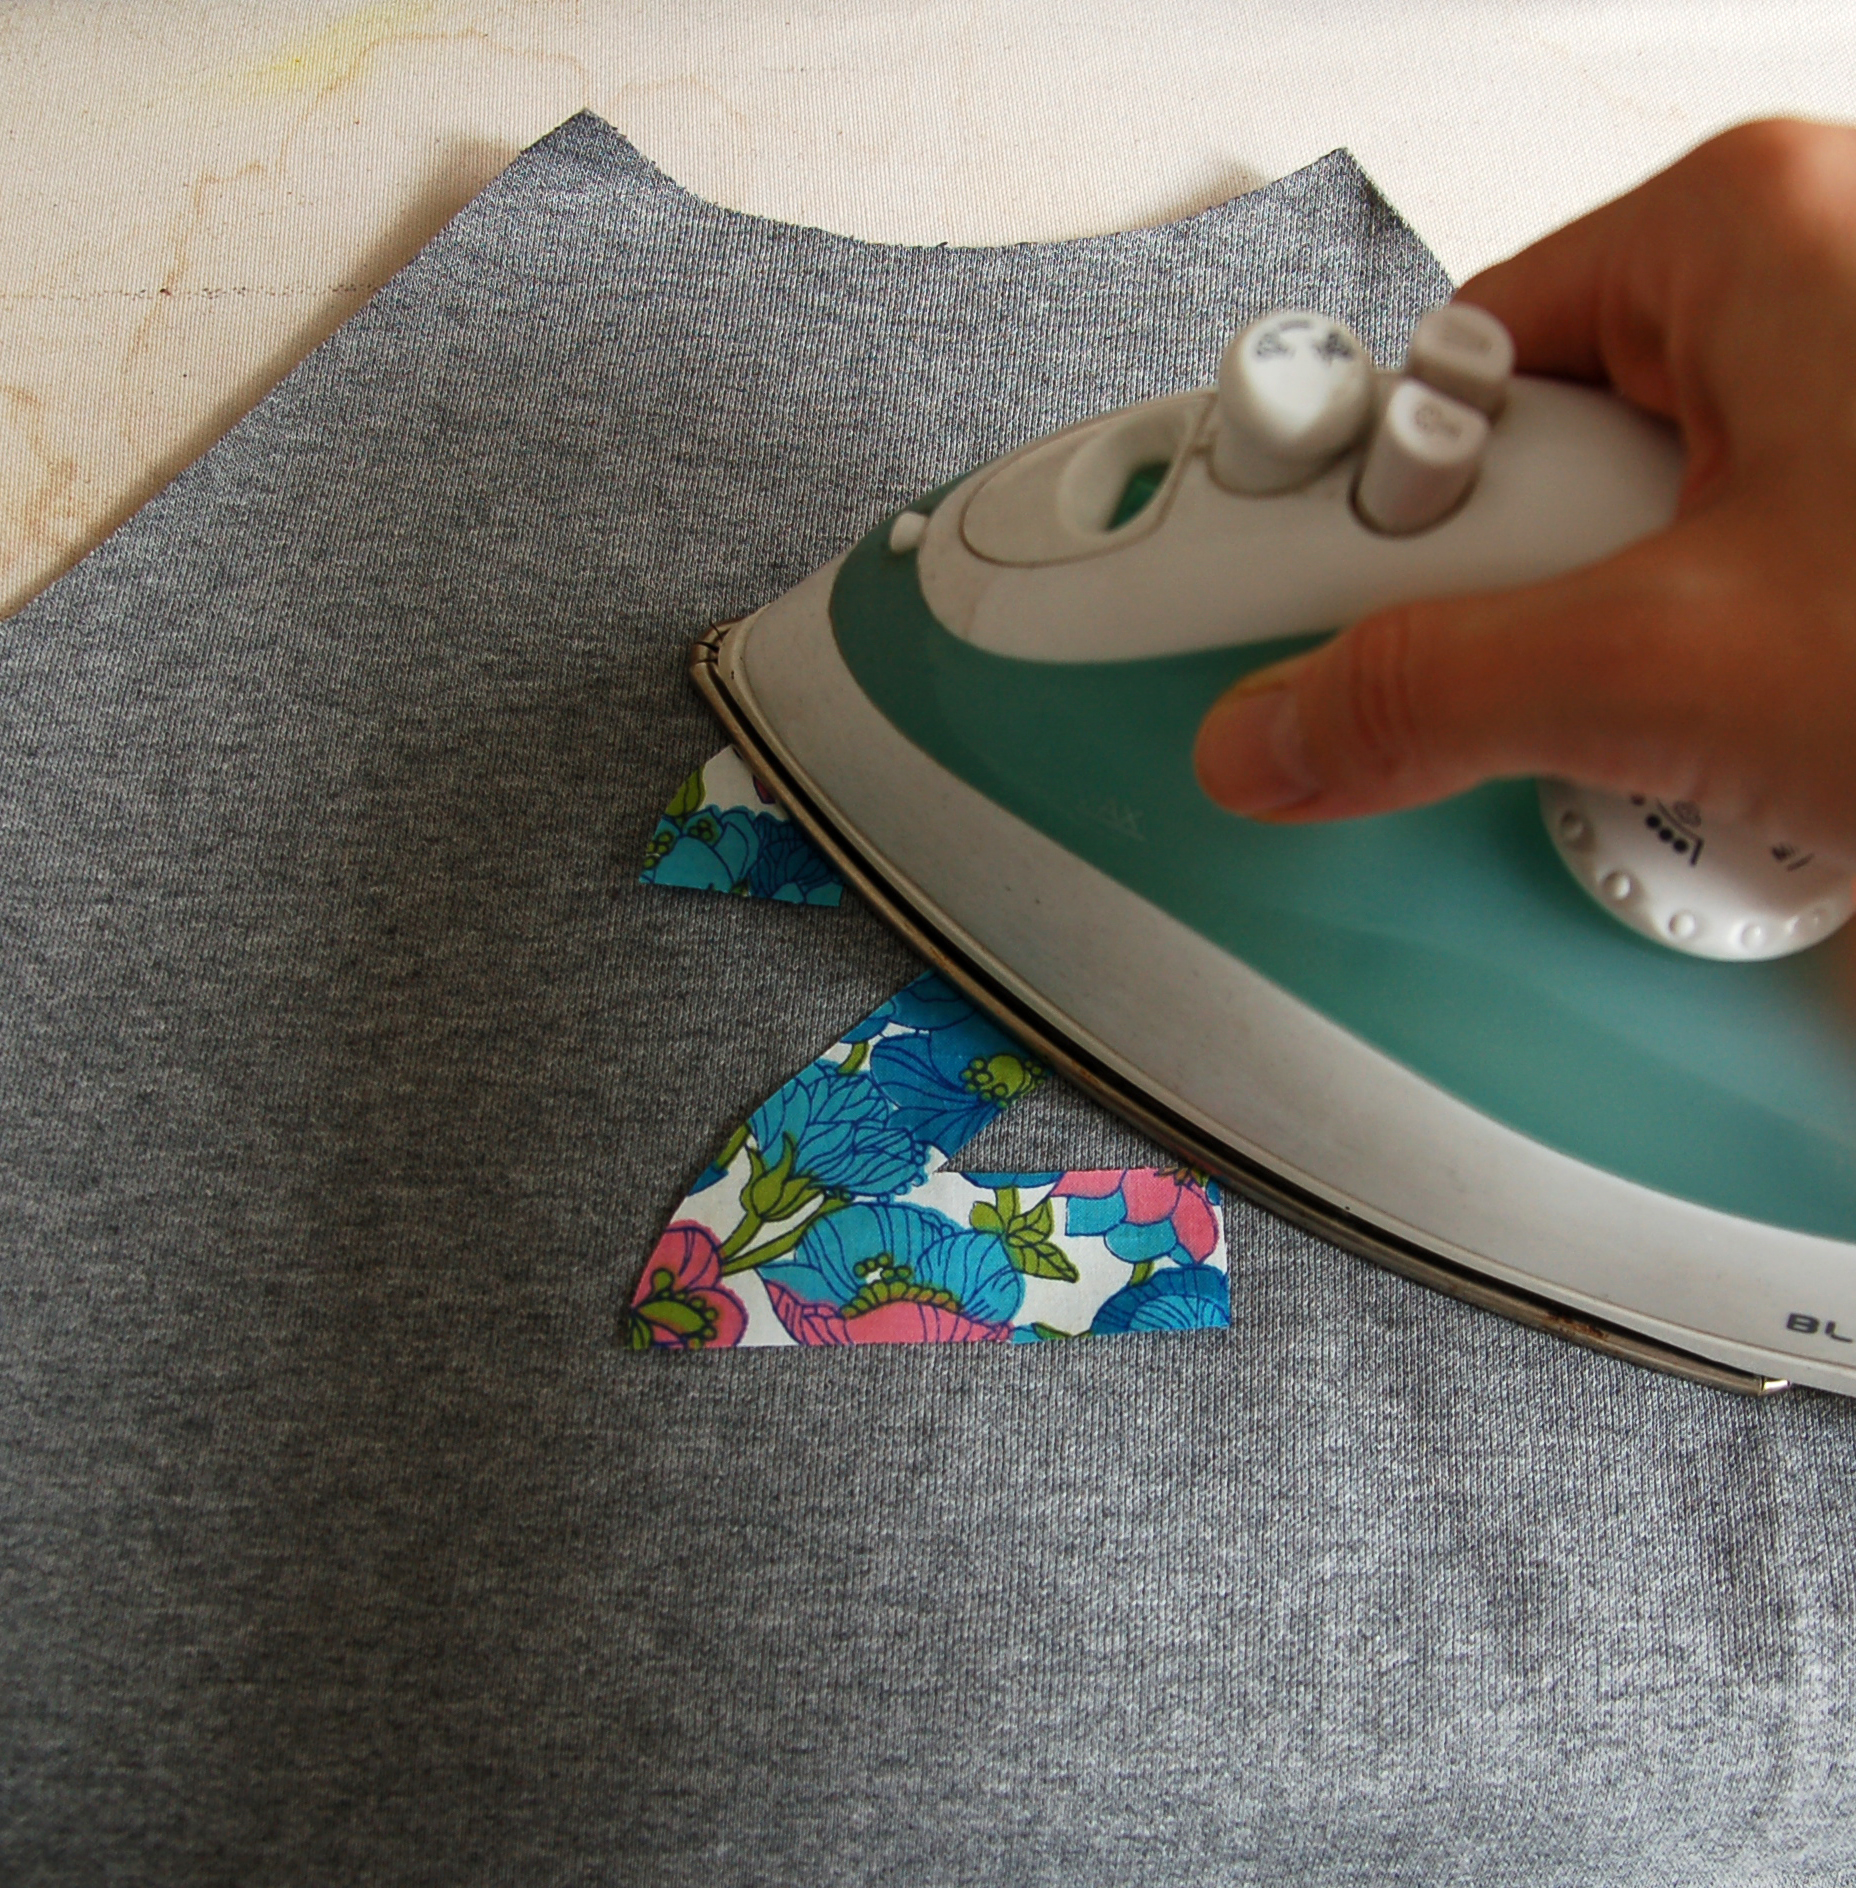
Como el abrigo tiene muchas partes, ya por el tema del corte es un proyecto que lleva tiempo. Un día imprimí el patrón, lo pegué y lo corté, otro día corté las mil (vale, es una broma...) piezas, de allí ya a entretelar y cuando llegué a coser casi ya se veía el final. O eso pensaba en su momento. Me ha pasado de todo con mi Kelly en mis noches de costuras. Primero corté mal algunas piezas...lo de derecha y izquierda no me quedó muy claro (pero también en la vida diaria tengo que pensar primero cuál es, jaja) pero luego ya me concentré más y mejor (lee: leí bien las instrucciones) y conseguí tenerlo bien.

As a coat, or anorak in that case, has many pieces, just the work of cutting everything out takes time. One day I printed, assembled and cut the pattern, next day I cut out the thousand (ok, kidding...) pattern pieces, from there it was the interfacing and when I reached the point of sewing I could almost see the end already. Or that was what I thought back then. I've made so many mistakes on my Kelly during my late night sewing shifts. First I cut out some pieces the wrong way around...the right side and the left side wasn't very clear to me (then again, I have to think about which one is which one on daily basis too, hehe) but later on I made an attempt to concentrate more and better (read: I read well the instructions) and I managed to get it right.

Kelly anorak www.studiocostura.com

La construcción de la prenda está bien explicada pero sí que había partes donde dudé cómo tenía que hacer el paso exactamente. Pero yo soy bastante poco miedosa en este sentido y seguí adelante, que luego ya vemos como corregirlo (lee: descoserlo)... Muchas veces echo de menos de tener la muestra adelante para ver cómo tiene que quedar, pero bueno, improviso, jaja.

The construction of the garment is well explained but there were parts where I wasn't sure how I should exactly proceed. But I'm kind of fearless when sewing so I just continued and figured I'd find a way to solve (read: unpick) the possible mistakes later on....Lots of times I miss having a real sample in front of me to see how it's supposed to look like in real life, but well, I improvise, hehe.

Kelly anorak www.studiocostura.com

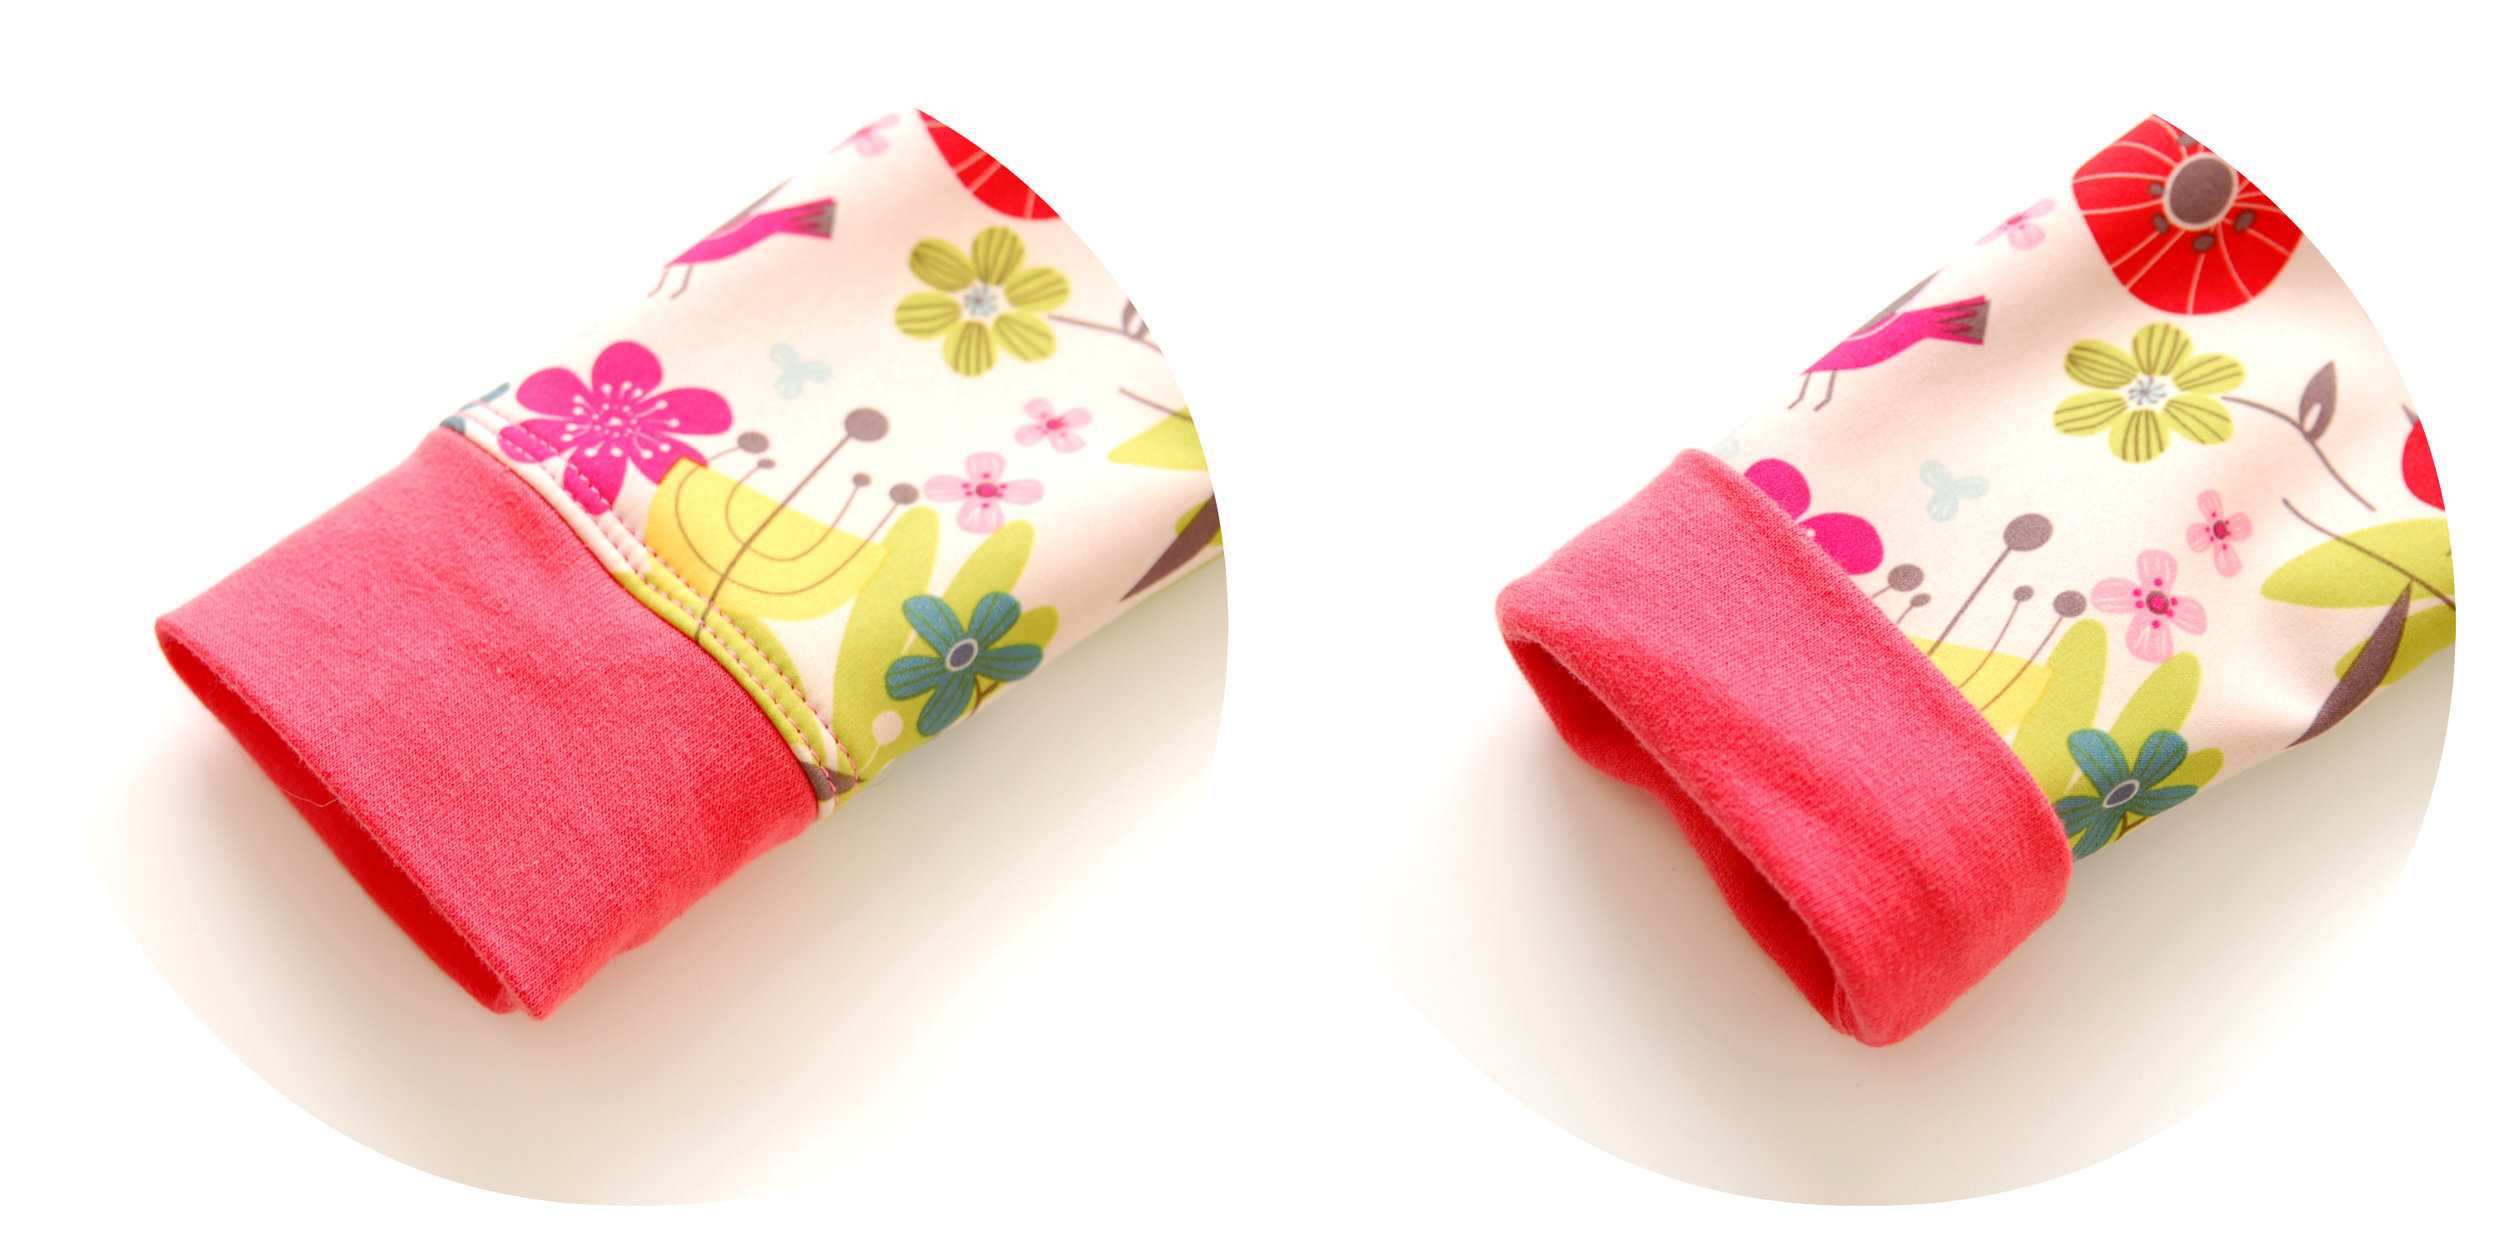
La parte de los bolsillos mola mucho. Luego son muy muy cómodos, pero su construcción tiene una forma bonita también. Sobre las mangas...las puse, las quité, pensaba que las tenía mal, corté otras, resulta que estaban bien las primeras, ya había descosido los puños, volví a poner los puños, al final las mangas quedaban demasiada cortas (es habitual en mi caso), quité los puños, corté nuevos más largos, cosí los nuevos puños...todavía sigues leyendo? Pues eso, que ha sido divertido, digamos.

The pockets are so cool. They are very comfortable when wearing the anorak, but the construction process is beautiful too. About the sleeves...I put them on, I took them off, I tought they were cut out wrong, I cut out new sleeves, turned out the first ones were fine, I had already unpicked the cuffs, I sewed the cuffs on again, saw that the entire sleeve was too short (usual thing in my case), unpicked the cuffs again, cut out new longer cuffs and sewed them on...you still reading this? So yes, it has been fun, lets say.

Kelly anorak www.studiocostura.com

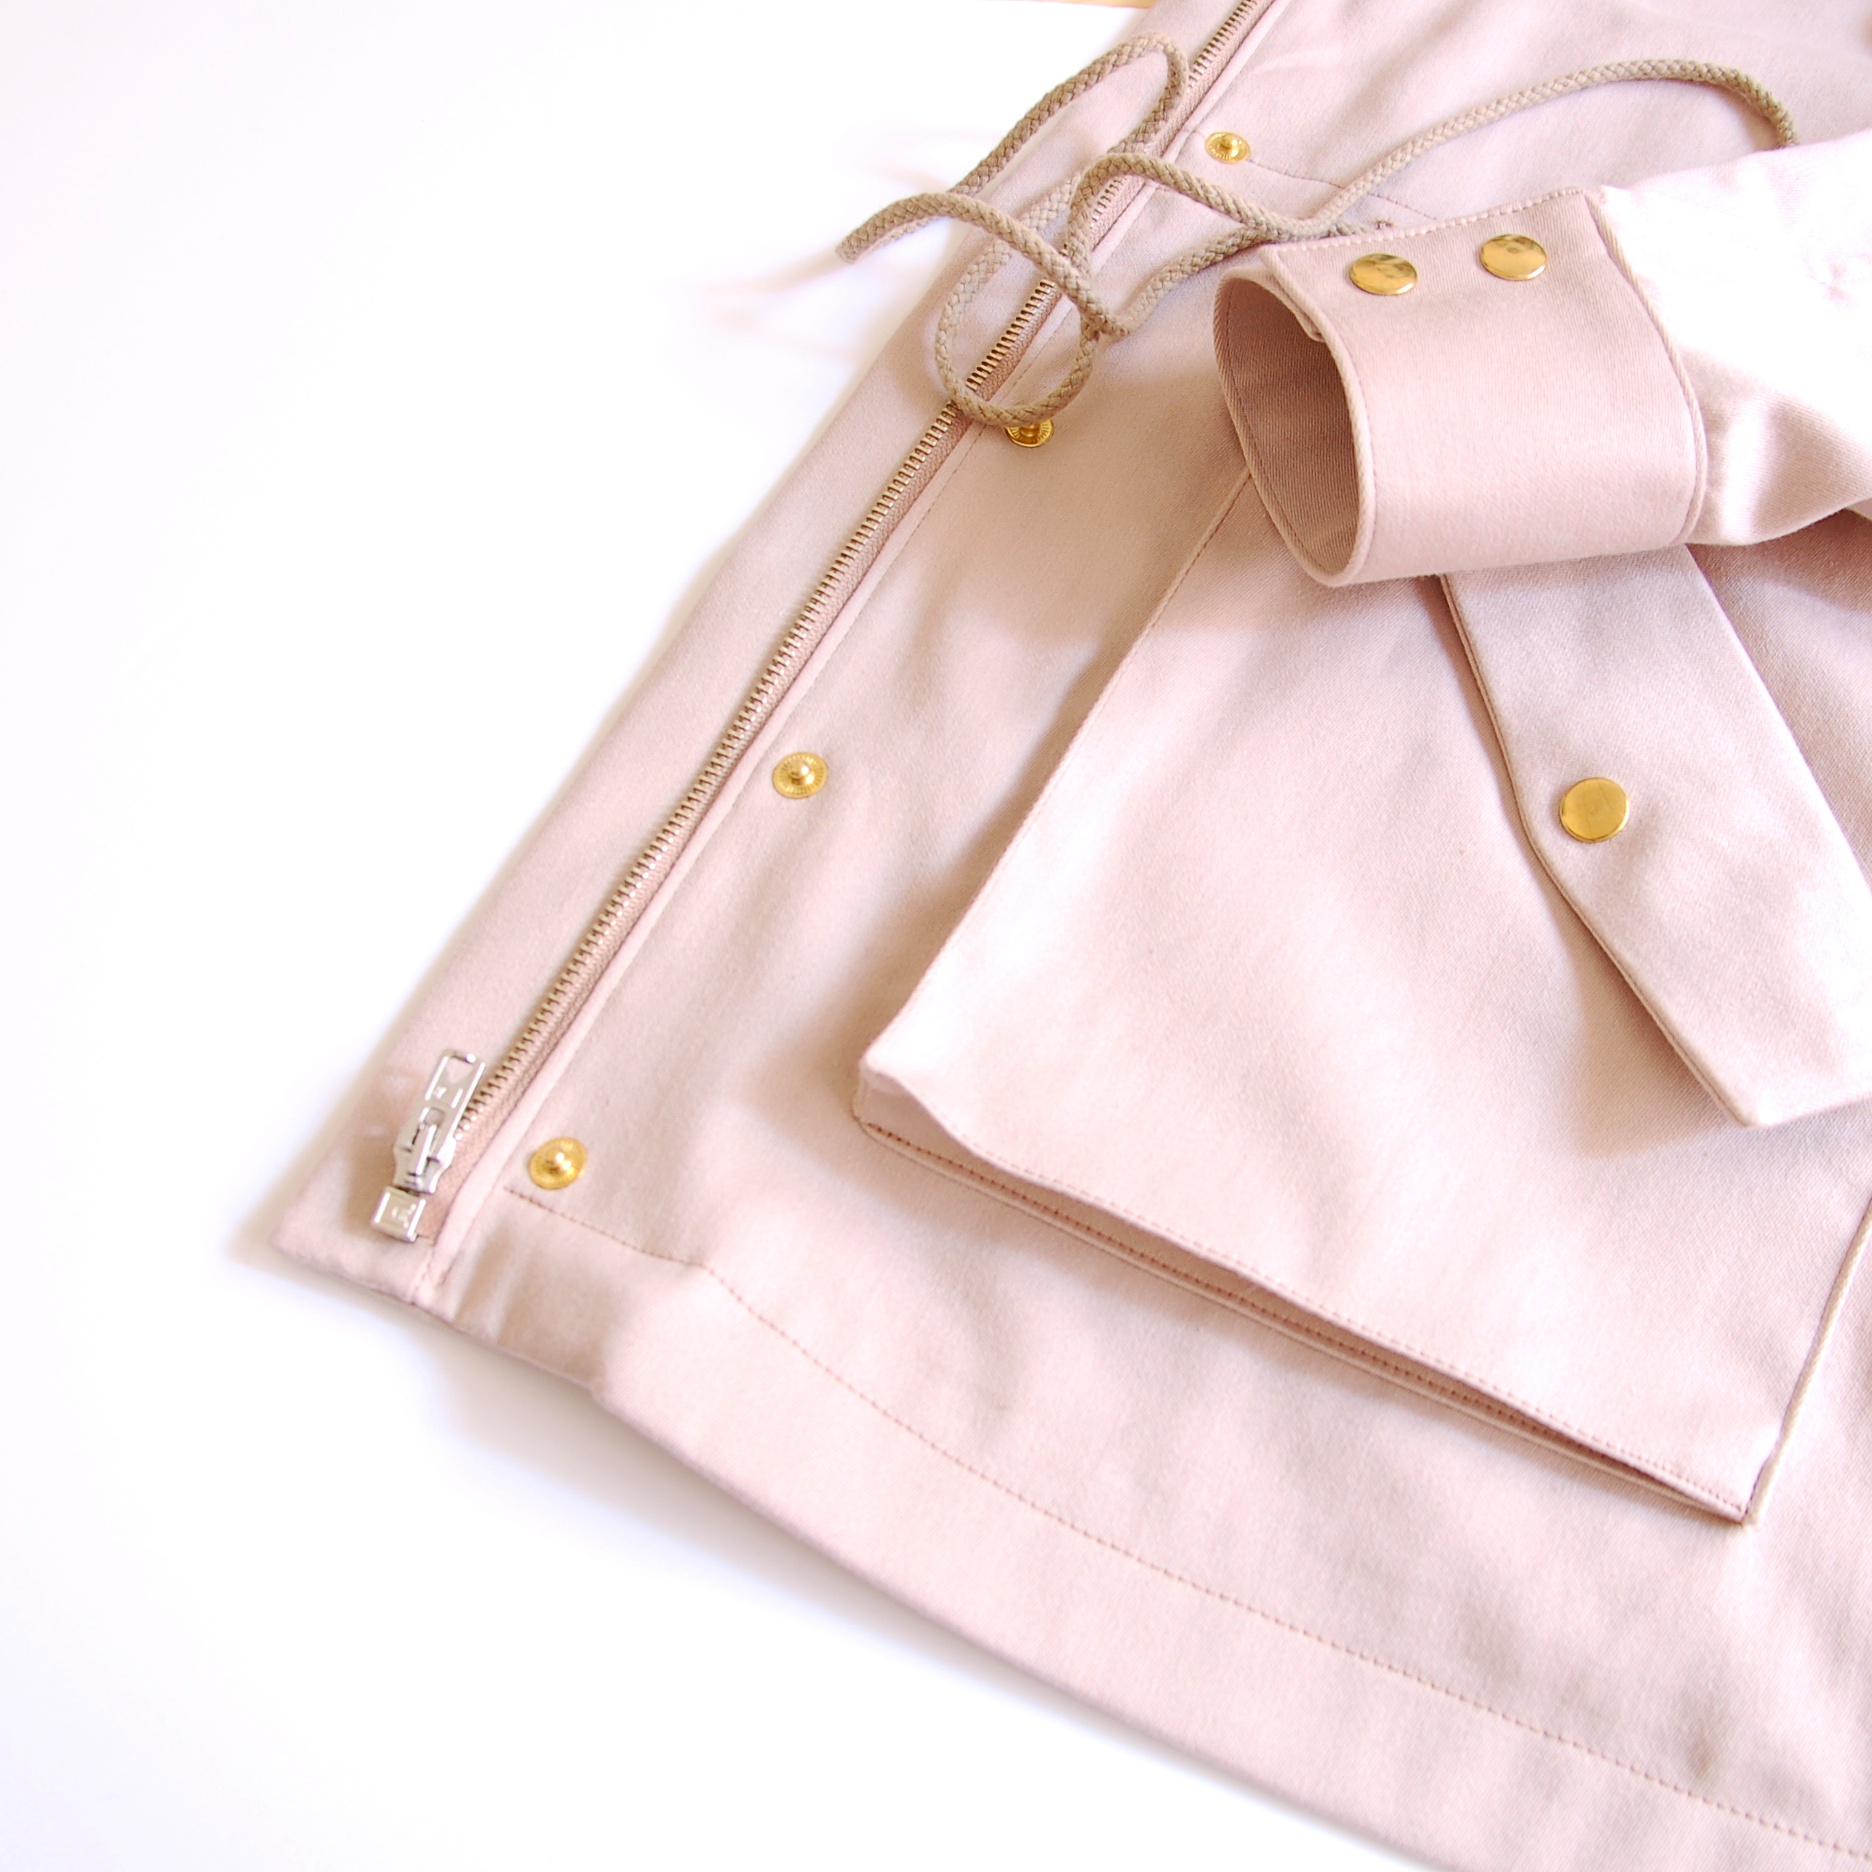
La tela la compré en Ribes y Casals y no recuerdo qué composición tiene (efecto de eso de dormir poco que conté antes), pero algo de algodón etc. De hecho es de la planta de arriba, de la sección de la tapicería, pero es muy suave y muy similar a un abrigo que tengo comprado. Venía en doble ancho así que con 1,30m lo he sacado...y he tenido que volver a cortar varias piezas, así que de sobra. Compré los remaches en color cobre pero era incapaz de ponerlos con el martillo sin destrozar mis manos. Supongo que los de Prim con las tenazas podrían funcionar mejor en un plan casero. De hecho el abrigo lo terminé hace mucho y estaba colgando en la percha durante semanas esperando sus toques finales. Por suerte Isa me echó una mano y me prestó su prensa, así que pude poner los remaches fácilmente con una remachadora profesional. Ella sólo tenía ese color, así que con doradas vamos. La cremallera es plateada, pero esa combinación menos mal que no se ve, porque está cubierta. 

I bought the fabric in Ribes y Casals and I don't remember what the exact composition was (a result of that not sleeping much thing I mentioned before), but something cotton mix etc. Actually it's from the second floor, from the upholistery section, but it's really soft and very similar to a RTW anorak I own. It has double width so with 1.30m it was enough...I had to cut out some pieces again so it was plenty. I bought the copper snaps but I was unable to insert them with a hammer without destroying my hands. I guess the Prim ones with the right tool work better in home conditions. Actually the coat was finished a long time agao and it was hanging around here during weeks, waiting fo the final touch. Fortunately Isa helped me out and borrowed me her press, so I could finally use the professional tool. She only had this color so golden we shall go. The zipper is silver one but fortunately it is covered so you can't see this crazy color combo going on there.

Kelly anorak www.studiocostura.com

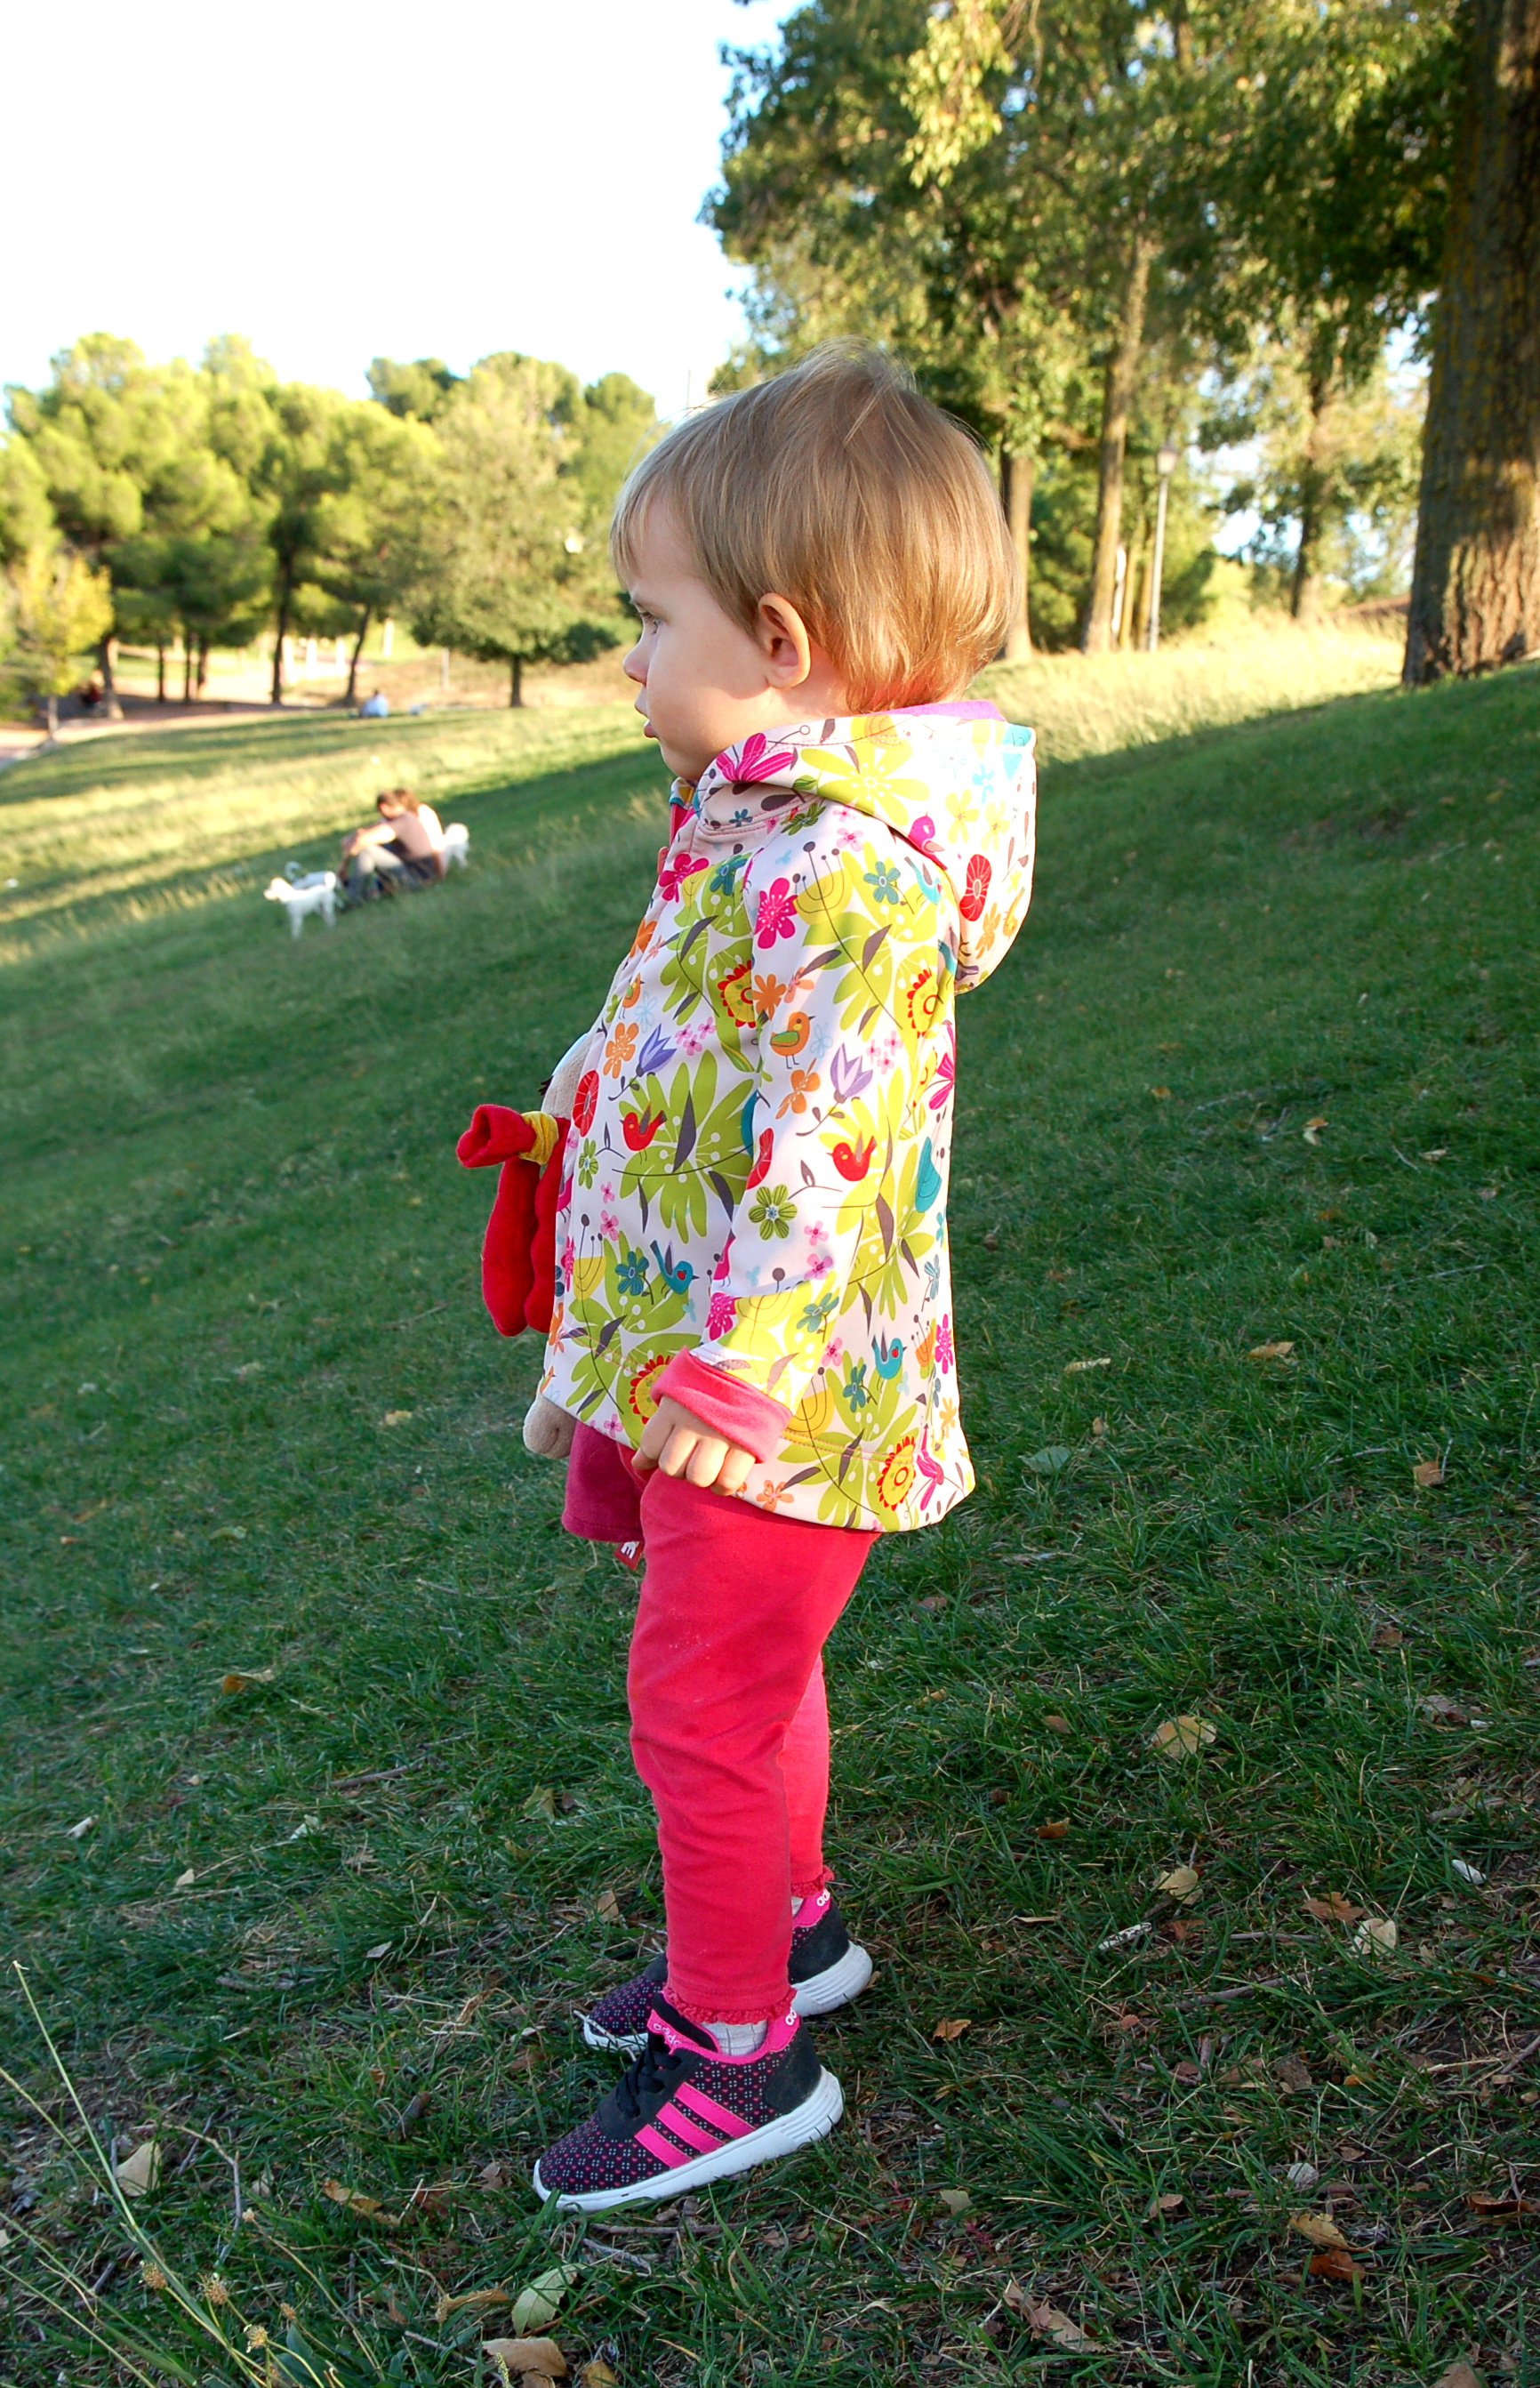
Kelly es un abrigo sin forro, así que para otoño, ahora ya hace mucho frío para salir con él. Lo bueno es que está diseñada de tal manera que no se ve ningún margen de costura feo, todo está o cubierto o rematado con bies, de todas maneras la mayoría de costuras están reforzadas y planas, así que todo se ve limpio y ordenado también en el interior de la prenda. Como me ha encantado el resultado, lo más seguro es que lo haga de nuevo y probaré también forrarlo...que yo soy bastante friolera. 

Kelly is an unlined coat for autumn, it's too cold now to take it out there. The good thing is that it's designed in a way that you don't see any raw (serged etc) seam allowances, everything is either covered with other parts or with bias tape, and anyway most of the seams are flat fell seams so everything si very clean looking also on the inside. As I love how this one turned out there will for sure be more Kellys coming up and I'll try to line it as I like more layers to protect me from cold.

Kelly anorak www.studiocostura.com

Como ya dije, hice los puños más largos, pero la próxima vez haré la manga directamente 2 cm más larga, aparte de eso la talla 38 que me corresponde según la tabla de medidas, me va muy bien. El tapete delantero quizás lo haré algo más ancho también, porque me parece que los remaches están muy al borde... Ah, y uno de los remaches lo coloqué algo mal y no está 100% alineado la parte macho con la parte hembra, pero yo sobreviviré. Así que nada...estoy contenta de haber cosido algo que parece comprada de la tienda y mola mucho! A por más abrigos!! Animaros con el abrigo Kelly porque es una pasada de prenda para tener y un patrón muy bueno para ir experimentando!

As I already told, I made the cuffs longer, but the next time I'll directly make the sleeve 2 cm longer. Apart from that, the size 38 that I cut with my measurements in the chart, is a good fit for me. I'd maybe make the front placket a bit wider as I think that the snaps are a bit too close to the border of the placket... Oh, and I miscalculated the place of one of the snaps so the male and the female part are not 100% aligned but I'll survive this. So anyway...I'm really happy to have sewn something that looks store bought and so beautiful! Let's go with more outerwear!! You guys should definitely give Kelly a try as it's  such a versatile garment to have and a nice pattern to experiment with!

Kelly anorak www.studiocostura.com

*Cada foto del abrigo parece tener un color distinto ya que hay tan poca luz estos días, lo siento!

*Every photo of the anorak seems to have different color as there's so little light these days, sorry!


Editado: aquí también tenéis una foto del interior donde se ve el bies y las costuras.

Edit: a photo from the inside where you can see the bias binding and the flat fell seams

kelly anorak www.studiocostura.com
 

Novedades en mi taller // New in my atelier

 
New in my atelier www.studiocostura.com

Hola! Los que me seguís en IG ya habéis visto que en mi taller hay una nueva máquina de coser. También hay una nueva silla y una mesa alta más grande. Gracias a eso ya puedo tener tres alumnos por clase! Como este otoño la gente me ha sorprendido mucho con su interés por las clases, realmente no tengo más huecos, todas las tardes están completas con alumnas que ya me habían escrito antes.

Hello! If you follow me on IG you've already seen that there is a new sewing machine in my atelier. There are also a new chair and a bigger table now. This means that now I can teach classes in groups of three students! As this autumn people have been very interested in my sewing classes, I don't have any more free places for new students because all the new spots are occupied by the people who have written me before.

New in my atelier www.studiocostura.com

Pero ahora por algunas fotos del taller, me hace muy feliz tenerlo todo organizado y funcional por aquí. Más contenta estoy por mi mesa...es muy grande, se puede cortar tela tranquilamente sin que la mitad del tejido esté colgando por el borde del tablero. Tener una mesa alta para trabajar es muy importante para mí, si puedes organizar tu casa de tal manera que tengas un espacio así, por favor hazlo, eso te hará muy muy feliz! Los caballetes que he usado son de Leroy Merlin y su altura se puede regular, bieeen!

But now some photos of the atelier, it makes me really happy to have it all organized and funcional over here. I'm really proud of my new bigger high table...it's really wide now, you can cut fabric without half of it sliding down from the corner of the table. It's really important for me to have a higher work table, so if you can manage a space in your house for something like that , really you should try it, it will make you so happy! The table is supported by the legs that are bought from Leroy Merlin, you can change their height, yeaaah!

New in my atelier www.studiocostura.com

La nueva máquina...qué os voy a contar. Es bonita, es buena y es ideal para aprender porque tiene control de velocidad y puede ir en un paso de tortuga, si quieres. Mi otra máquina, también Janome tiene esa función y después de ver que a los principiantes les gusta tanto poder coser lento cuando aprenden, sabía que la nueva máquina también tiene que tenerlo. Lo compré por Sewing Machines Direct, es una tienda online inglesa que te manda la máquina (gratis) aquí. Es la tercera vez que compro a ellos y nunca me han fallado. Aparte de tener buenos precios te envían un montón de hilos y accesorios gratis. Además son muy majos, ya son dos veces que les he preguntado por consejos y me han indicado la mejor máquina según mis necesidades y posibilidades económicas.

No voy a ir muy a fondo ahora sobre el tema de las máquinas porque esto requiere un post aparte, pero sí que me parece un tema muy importante. Será la mala suerte mía pero aparte de Sewing Machines Direct, siempre he tenido malas experiencias con tiendas de máquinas de coser. No voy a poner nombres, pero estoy hablando de Madrid de aquí adelante.

My new machine...what to tell you. It's beautiful, it's good and it's ideal to learn how to sew because it can go as slow as a turtle if you want to. My other machine, also Janome, has this funcion and after seeing how well it works with new students, I knew I had to get this funcion on my new machine too. I bought it from Sewing Machines Direct, it's an English online store and they send you the machine (for free) to your home. It's the third time I buy from them and it has been always a great service. Apart from having really good prices, they send you a lot of threads and accesoiries fo free. And they are really nice, it has been now the second time I wrote them for advice and they told me which machine to buy according to what I needed and what I could spend.

I don't want to go too deep here talking about sewing machines because it would need a post on its own but it really is an important subject for me. I don't know if it's my bad luck, but apart from Sewing Machines Direct I've always had bad experiences with sewing machine retailers. I'm not going to put names, but I'm talking about shops in Madrid here.

New in my atelier www.studiocostura.com

Cuando compré mi máquina industrial me lo montaron en casa y después al usarla tenía un ruido muy fuerte. Cuando llamé a la tienda para preguntar, me trataron como una tonta y me dijeron que eso del ruido era normal. Después de que lo vea otro mecánico resulta que le habían puesto mal el motor! En fin... Ahora otra amiga acaba de tener igual de mala experiencia con la misma tienda: su máquina (también industrial) no funciona correctamente y en vez de ofrecerle soluciones lo primero que le dijeron era que ella no sabía usar la máquina y que si iba a salir el mecánico lo iba a pagar ella! Qué tipo de atención al cliente es esto???

El otro día llevé mi máquina doméstica a un taller y según ellos me lo arreglaron. Cuando llegué a casa vi que el problema seguía allí, cuando volví me dijeron que no tenían las partes para esa marca. No me lo hubieran podido decir ANTES de que me lo entreguen? Qué pensaban, que no me iba a dar cuenta??? La verdad es que así es el día a día por desgracia.

Y qué os voy a contar sobre los consejos a la hora de comprar una máquina? Seguimos con lo tradicional, siempre te intentan vender lo que más les conviene a ellos. Eso me llamó mucho la atención el otro día en la feria Creativa...todas las tiendas con sus súper máquinas. De hecho pregunté por modelos para tener aquí en clase y lo primero que me intentaron vender era uno de mil euros. De verdad?? Por qué hacéis eso, tiendas de máquinas? Yo cuando oigo una respuesta así, se me bloquea el cerebro...me estás intentando vender algo que no tiene nada que ver con lo que te estoy preguntando...o no entiendes lo que te estoy diciendo, te da exactamente igual, o me tomas por tonta? Las tres opciones me parecen malas, la verdad. 

When I bought my industrial sewing machine they installed it in my house and after using it I noticed that it made a really strong noise. When I called the shop they treated me like I was stupid and told me that everything was normal. After that, another technician revised the machine and turns out they had put the motor on it the wrong way. Horrible... Now another friend had a similar experience with the same shop: her machine (also an industrial one) wasn't working like it was supposed to and when she called the shop, the first thing they told her was that she didn't know how to use the machine and that she had to pay the technician to go to check it out if she wanted to! What kind of customer service is that???

The other day I took my domestic sewing machine to a shop and according to them they repaired it. When I arrived home I saw that the problem was still there and when I returned they told me that they didn't have the parts from that manufacturer. Couldn't they tell me this BEFORE I took the machine home? What did they think, that I wouldn't notice it was still broken??? Unfortunately that's how things go around here.

And what to tell you about advice when buying a sewing machine? Still going strong the traditional way: they just try to sell you the machine that they want to sell, not the one you ask for. I noticed it again the other day at the craft fair...all the companies with their super machines. I actually asked in one place for a machine for my classes and the first one they wanted to sell me was a machine that costs aprx. one thousand euros. Really?? Why do you do this, sewing machine retailers? When I hear an answer like this my brain freezes...you really are trying to sell me something that isn't at all what I just asked you for...you either don't understand what I'm looking for, you just don't care or you think I'm stupid? The three options don't really do it for me.

New in my atelier www.studiocostura.com

Venga, que no sigo más allí, jeje. Lo que quiero decir es que en mi humilde opinión es más importante la persona detrás de la máquina...ningún modelo te va a coser las cosas guays sin que tú sepas cómo usarla. Antes de comprar una máquina divina te recomiendo ver si puedes conseguir una buena pero sin mil adornos y el dinero que te ahorras puedes gastarlo en libros, patrones, clases, cursos etc. Eso sí que te hará coser mejor. (Ah, y si de verdad tienes recursos ilimitados, ¡qué suerte tú!, desde luego compra lo más guay...estoy aquí hablando sólo desde mi punto de vista.)

La máquina que acabo de comprar es fuerte y tiene bastantes cositas que molan pero no todas ellas son necesarias para una persona que acaba de empezar, ni siquiera  para las que ya saben. Nuestras abuelas han cosido con máquinas muy simples y sin ningún problema. Yo coso todos los días y tengo clases seis días a la semana, a estas máquinas les dan mucha caña y no puedo poner uno de cien euros aquí, sería tirar el dinero. Además quiero que mis alumnos tengan una agradable experiencia a la hora de coser, y yo también quiero tenerla. Así que en fin...todo eso venía porque en la tienda donde compré la mía sí que me han aconsejado bien y en ningún momento me han intentado vender algo que sea diferente de lo que yo he pedido. Ahora que he podido expresar todo esto, vamos a seguir con el taller, jajaa.

Ok, I'm not going to continue with this, hehe. What I want to say is that in my humble opinion the person behind the machine is more important than the machine itself...no fancy model will sew nicely if you don't know how to sew. Before buying an expensive machine I recommend you to search if you can get something more affordable but still good quality and the money you save just use it for buying books, patterns, classes, courses etc. That for sure will help you to sew better. (Oh, and if you really do have lots of money, lucky you, go buy the fancy machine, I'm just talking from my point of view.)

The machine I bought is strong and has quite many sweet funcions but not all of them are necesary for a new sewer, not even for an experienced one. Our grandmas sewed with very simple machines and without problems. I sew every day and there are classes here six days a week, my machines are used a lot so I can't just put a cheap one here, it wouldn't last and instead it would be a waste of money in my opinion. Also I want my students to have a nice sewing experience, and I want that for me too. So anyway...I'm writing all of this because in the shop I bought my machine they really were very helpful and they never intended to sell me something I didn't need. Now that I've expressed everything I needed to say, let's continue with the atelier, hehe.

New in my atelier www.studiocostura.com

He estado cosiendo un par de cositas para tenerlas aquí, por ejemplo cestos pequeños para tirar hilos cuando estás cosiendo y un par de alfileteros también. Ah, y una funda de cojín para la nueva silla. Esto siempre es una buena ocasión para sacar mis telas favoritas en blanco y negro, jeje.

I made some things to have around here, for example these little fabric trays to put the thread and fabric scraps in them when you sew, and some pincushions too. Oh, and also one pillow cover  for the new chair. It's a good chance to use up those balck and white fabrics I love, hehe.

New in my atelier www.studiocostura.com

El alfiletero grande es del libro "Handmade Style" de Anna Graham del blog Noodlehead, haré una reseña sobre el libro en breve, tiene proyectos muy bonitos. La tela de gatos es de Trizas y Trazos.

Estoy muy contenta con los grupos más grandes ahora, he conocido gente muy maja y todas están haciendo proyectos bonitos, qué mejor que coser en estos días de otoño?!

The big pincushion is from the book "Handmade Style" by Anna Graham from the blog Noodlehead, I will make a book review about it soon, it has really beautiful projects. The cat fabric is from Trizas y Trazos.

I'm really happy with my new bigger classes, I've met some really amazing people, everybody is making beautiful projects...what better than sewing on these autumn days, right?!

New in my atelier www.studiocostura.com

Espero que te haya gustado mi pequeño estudio taller, siento por el rollo sobre las máquinas de coser, jaja...Y si quieres venir a coser aquí, sólo tienes que mandarme un correo para ver los horarios disponibles :)

I hope you liked my little studio/atelier, sorry for the long story about sewing machines, hehe...And if you want to come to sew here, just send me an e-mail to see the available class hours :)


Ropita de cumpleaños y tutorial para coser aplicaciones // Birthday garments and an appliqué tutorial

 
Appliqué tutorial www.studiocostura.com

Hola, parece que mis posts van intercambiando entre lencería y costura infantil jeje...(y efectivamente el siguiente es algo sobre lencería otra vez). Hoy os escribo un poco sobre las dos prendas que hice para mi pequeña por su cumple! 

Quería hacerle algo que ella pueda poner en la guarde el día de su cumple y como los vestidos no son del todo cómodos allí, pensaba en algo como sudadera o blusa. Encontré esta tela gris que ya había usado el año pasado para hacerle un mono que no ha salido por el blog pero quedó super bien y el invierno pasado lo usó mucho en el parque. Yo soy muy friolera y siempre le quiero poner ropa que no se le destape la espalda y me horroriza ver niños pequeños con sus abrigos cortítos enseñando el ombligo en pleno enero...por eso la mía iba con el mono, el gorrito y esta bufanda redonda hecha a mano que me regaló una alumna muy maja.

Hello, looks like my posts interchange between lingerie and sewing for kids, hehe (and the next one by the way is about lingerie, oh well...). Today I'm going to tell you about two little pieces I made for my girl for her birthday!

I wanted to make her something she could wear at the daycare on her birthday and as the dresses aren't really the most comfortable things to wear there I was thinking about maybe a blouse or a sweatshirt. I found this grey fabric that I used for an overall (not blogged) for her the last year, it was so cute on her and she used it a lot. I'm really not a cold wather person and I always try to dress her the way she wouldn't have her back exposed and that she wouldn't get gold out there and I kind of panic with those kids with their short winter clothes and their bellies out there in the wind in the middle of the winter...so my kid was going out with her jumpsuit, a beenie and a scarf that is a handmade gift from one of my nice students.

www.studiocostura.com

El patrón del mono es de Ottobre Design (no recuerdo ya el número...uno del año pasado probablemente). El gorro también es de Ottobre.

The pattern for the jumpsuit is from Ottobre Design (I don't remember the number anymore...but from last year I guess). The beenie is also from Ottobre.

Appliqué tutorial www.studiocostura.com

Así que se me ocurrió la idea de hacerle una sudadera con el "2" para su cumple. El patrón es el mismo que usé para las sudaderas que hice este verano, pero esta vez sin capucha. Le quité 1 cm a las piezas en la parte del cuello para que quepa mejor por la cabeza. De hecho es una talla 80 pero bastante grande.

So it occured to me that I could make a sweatshirt with a "2" on it for her birthday. The pattern is the same one as the hoodies I made this summer, but this time I took away the hood. I cut away 1 cm or so in the neck parts of the patterns so it's not so snug there. It's size 80 but it's kind of big anyway.

Appliqué tutorial www.studiocostura.com

Hacer la aplicación realmente es muy fácil y así puedes hacer cualquier cosa que se te ocurra con la tela: números, letras, simbolos. Yo vi esa técnica en el blog de Grainline Studio y voy a hacer un pequeño tutorial aquí también para que lo veáis.

Sewing the appliqué is actually really easy and you can use it in so many ways: for making numbers, letters, symbols. I saw this tutorial in Grainline Studios blog and I'm just going to recap a little bit here about the process too.

Appliqué tutorial www.studiocostura.com

Lo primero es cortar la pieza que vas a usar para tu aplicación. Puede ser tanto de telas planas como de punto. Yo imprimí en papel un 2 grande y lo usé como patrón. Recuérdate de cortarlo al revés, si no se te queda luego con el estampado al revés. El primer paso que hago es cortar un poquito de Fliselina en trozos pequeños para pegar la aplicación a la tela para que no se mueva mientras coso. El que ves en la foto viene en formato de tira y es como entretela pero de dos lados, así se pega entre las dos telas y tienes tu pieza fija. 

Puedes encontrar Fliselina como tela por metro y así podrías directamente cortar la misma pieza sin tener que usar trocítos como yo. También lo he visto en formato con papel en una cara, así primero lo pegas a tu aplicación y luego con las dos capas ya juntadas lo pegas a donde quieras que vaya. Y por último ahora parece ganar popularidad también un producto que se llama Wondertape o una cinta que cumple la misma función pero luego desaparece con el lavado. Lo que tengas a mano vale para este proyecto.

The first thing to do is to cut out the piece you are going to use for your appliqué. It can be done both in normal fabrics and knits. I printed out a big 2 on paper and then used it as a pattern. Remember to cut the pieces out mirrored, otherwise you'll have the print on the other side. First I cut out some Fliseline stay tape in small pieces so I can fix my piece in place and it won't move when I sew. The one you see on the photo comes in a tape version and it's like a interfacing but with the two sides that can be glued on the fabric, you just iron it between your pieces and that's it.

You can also find Fliseline per meter like fabric and then you just cut out your appliqué piece and  you don't have to use scraps like I did. I also saw it in a verison with one side having like a paper layer on it so you can first iron one side, then tear off the paper and iron the other side too. And one more version that you can use is the Wondertape that does the same thing but later dissapears when you wash your garment.

Appliqué tutorial www.studiocostura.com

He colocado el 2 en su sitio y le puse pequeños trozos de Fliselina abajo, no muchos, pero suficiente como para que se quede más o menos fijo. 

I've put the 2 in the place I want it to be and then added some Fliseline scraps between the two layers, not too many, but enough for it to stay where I want it to be.

Appliqué tutorial www.studiocostura.com

Un poco de plancha para que se peguen entre sí.

Press a little and the layers glue together.

Appliqué tutorial www.studiocostura.com

Y ahora a coser. Lo que hago es que le paso puntada de zigzag todo alrededor de los bordes, estando segura de pillar bien la orilla de la pieza. Yo usé un zigzag de 0.5 largo y 3 de ancho. Básicamente es la puntada de ojal si en tu máquina no puedes controlar el ancho directamente. Mi tela de sudadera es algo gruesa y no tuve problemas de que la máquina no quiere coser, pero si usas punto tipo camiseta puede que te pase que la tela se engancha en los dientes de la máquina. Pues no pasa nada, para eso hay un truco: pon entre tu trabajo y los dientes trozo de papel de seda o similar y la máquina va mucho mejor teniendo como una barrera para no "comer" tu tela.

Now the sewing part. I just sew a narrow zigzag stitch all the way around the pattern piece, making sure I catch the borders of it well. I used a zigzag with 0.5 lenght and 3 wide. Basicaly it's a buttonhole stitch so if your machine doesn't have so many different ones just use your buttonhole setting. My knit fabric is medium weight so I didn't have any problems when sewing it but if you use lighter weight knits you might have problems with fabric getting stuck between the feed dogs. No worrys, there's a trick for that: put some tracing paper between your sewing project and the feed dogs and the machine goes way better having something to block the feed dogs from "eating" your fabric. 

Appliqué tutorial www.studiocostura.com

Ahora toca rodear toda la pieza con el zigzag teniendo un poco de cuidado en las esquinas para que quede bonito. Lo que hago es seguir un poquito más después de llegar a la esquina de la aplicación, entonces clavo la aguja y giro para ver si tengo bien el ancho para que quede una esquina correcta. Nada más: así de fácil es coser este tipo de cosas y la verdad es que las posibilidades son infinitas!

En algunas telas de punto que tienen más elasticidad te conviene usar algo para estabilizar esa zona, hay entretelas que se pegan primero en el revés de la tela y después de coser la aplicación se quitan tirando las partes que no pillaste con tu costura, así se queda más reforzado. En mi caso no lo he usado porque mi tela es bastante estable pero sería una opción con telas más finas. Tengo para probar también un producto que es como plástico pero pensado también para bordar a máquina...ya os contaré.

Now you just have to stitch all the way around your piece making sure you sew beautiful corners. I just sew a bit past the corner and then put the needle down, turn the work to the next direction and see if I'm on a right width from my previous stitching line. That's it: it's quite easy to sew this kind of things and you have so many possibilities!

In some stretchier knits it's a good idea to use tear away stabilizer in that area, it's like a intercafing that is applied on the wrong side of the fabric before sewing and you tear away the parts that you didn't sew on after making your appliqué. In that case this area will be more stable. In my case I haven't used it as my fabric is quite stable, but it's sure a good option for light weight knits. I also have some clear elastic like product here for machine embroidery that I haven't tried out yet but I'll tell you when I do that.

Appliqué tutorial www.studiocostura.com

Mis puntadas no son perfectas porque al ir a veces más despacio y a veces más rápido al girar en las curvas pues es lo que tiene, igual si vas más despacíto tus puntadas salen más uniformes. Pero a mí me vale...normalmente la gente no anda con la lupa mirando las costuras, jaja.

My stitches aren't perfect because I went in some parts slower and the other ones faster when turning the curved sides, when you go slowly all the way around it sure is more beautiful. But I'm OK with that...normally people don't observe your appliqué stitching too much, hehe.

Appliqué tutorial www.studiocostura.com

Otra cosíta que cosí es este vestido en punto. Era para el día del cumple familiar. Descubrí que había que coser un vestido la noche anterior y aunque estaba muerta de cansancio decidí esforzarme por la buena causa (y para que en el futuro tenga fotos de todos los cumples de ella con los vestidos, claro, qué te crees, jaja). Dos horas desde sacar el patrón, modificarlo, cortar y coser. Remalladora, eres mi mejor amiga! Nada especial, pero algo así quería: que lo pueda llevar día a día pero que sea bonito también.

En el día del cumple se tiró encima un vaso de agua así que durante la fiesta su vestido estaba secando. No digo nada...

The other garment I made was this knit dress. It was for the family birthday party. I found out I had to sew a dress the night before and altough I was very tired I made an effort for the good cause (and that I would have photo of her in all her birthday dresses in the future, of course, hehe). It took me two hours to copy the pattern, alter it, cut the fabric and sew it up. Serger, you really are my best friend! Nothing special but it's as I wanted it to be: so she can wear it daily but that it would be pretty too.

At that day she spilled a glass of water on the dress and during the party the dress was drying out there. No comments...

Appliqué tutorial www.studiocostura.com

El patrón es de Ottobre Design 1/2015 (ojo con el ruso, jaja) y lo que cambié es que hice un corte bajo la sisa y aumenté el el ancho del patrón para tener esa falda con frunce. Usé elástico transparente para fruncir y me encanta porque hace un frunce muy uniforme. La tela es suave punto de algodón con 5% de elastán y muchos corazones.

Esto es todo por hoy, te animo a probar lo de aplicaciones, que queda muy bonito!


The pattern is from Ottobre Desing 1/2015 (Russian in your face, haha) and my alteration was to cut the bodice and widen the skirt so it would have some ruffle. I used clear elastic tape to shir the skirt and I love it as it makes really pretty shirring. The fabric is soft cotton and 5% spandex knit with lots of hearts on it :)

That's it for today, I recommend you to try out sewing appliqué, it's really pretty!


Alerta de estampados (lee: la ropa nueva de mi nena) // Print alert (read: my girls new clothes)

 
new kids clothes Sewing blog: www.studiocostura.com

Buenas, buenas! Hoy algo diferente para variar un poco del tema de lencería que ha invadido este blog de costura. Vamos con la actualización de armario de mi nena!

Hey hey! Today something different from the lingerie theme that's all over this sewing blog. Let's see my girls wardrobe upgrade!

new kids clothes Sewing blog: www.studiocostura.com

"Como ya ha llegado el otoño y su tiempo fresquito..." me gustaría empezar así este post. Pero no es verdad! Hace un sol por el mediodía en Madrid que flipas. No hay ni rastro del otoño. Pero no me quejo, soy más de calor, jaja. Eso sí, gracias al calentamiento global me ha dado más tiempo para preparar el cambio de temporada en el armario de mi nena. Oyes, pensamiento positivo, no? Total que encontré esta tela de softshell monísimo y también este patrón de sudadera que van juntos muy muy bien. El patrón es de sudadera (de la revista Ottobre Design  3/2016) para telas de punto pero con pequeñas modificaciones lo conseguí coser con mi tela también.

"As the autumn has arrived and the weather is getting cooler..." I'd like to start this post with these words. But it's not true! The sun at noon time here in Madrid is kicking hard. No sign from fall. But I don't complain, I'm more of a warmth fan anyway, hehe. Thanks to the global warming I've had more time to prepare my girls wardrobe for the seasonal change. Hey, positive thinking, right? So I found this cutest softshell fabric and also this hoodie pattern and they match up pretty good. The pattern is a hoodie (from Ottobre Design magazine 3/2016) drafted for knit fabrics but I made some small modifications and managed to use it with my fabric too.

new kids clothes Sewing blog: www.studiocostura.com

La tela es una maravilla, es súper ligera, no pesa nada! Está ya hecho de tal manera de que la capa exterior es con una superficie que protege contra viento (y algo de humedad me imagino...) y el otro lado es un forro polar muy finito. Así que no hay que forrarlo ni nada, como no se deshilacha dejé las costuras tal cual después de hacer pespuntes más bien decorativos en el lado derecho de la prenda.

The fabric is really nice, it's so light weight, it really is like air! It's made with a windproof (and I guess with somewhat humidity proof too...) exterior layer and a soft thin fleece layer on the inside. So no need for lining and as it doesn't fray, I just sewed the seams as usual and then topstitched them down from the right side.

new kids clothes Sewing blog: www.studiocostura.com

Las modificaciones que hice al patrón eran mínimas. Añadí más margenes de costura en general (1 cm) y algo más que eso para el doblez de la capucha y de la manga. No usé elástico transparente para el borde de la capucha porque por una parte me olvidé y por otra no sé si quedaría bien al no ser de punto. Hubiera podido hacer unos ojales para meter cordón para ajustar la capucha pero volvemos al punto uno: el olvido. Luego, como esta tela no tiene elasticidad, cambié la tela en los puños por una tela de punto y así mantiene su forma cómoda y se puede subir muy fácil para las manitas pequeñas. Y luego bajar los puños cuando crezcan. Y así la prenda dura un poquiiiito más porque crecen tan rápido estos bitchitos y cualquier truco me vale.

La talla que hice es de 80 cm y le queda bien (ella mide 83 cm ahora) con algo de manga corta o un body de manga larga abajo. Como esta tela no se da de sí, al hacer algo tipo abrigo se puede usar una talla más grande por si acaso, eso sí. Este abrigo está pensado para el tiempo un poco fresquito y no voy a poner un jersey abajo, si quisiera hacer eso, seguro que habría que coger la talla siguiente

The pattern alterations I made were minimal. I added more seam allowance (1 cm) and some more for folding back the hood and the sleeves. I didn't use clear elastic on the hood edge, first because I forgot and second because I'm not sure if it would be a good idea with a non knit fabric. I could have made some buttonholes for drawstring to adjust the hood but then again going back to the first point: bad memory. I then changed the cuff fabric for a knit one because the main fabric doesn't have stretch, so the cuffs are still comfortable to fold up for those little hands. And then  you can fold them back down when they grow. So the garment actually lasts a tiny bit more time as these little bugs grow up so fast, any sewing trick is good for me.

I made the size 80 cm and it suits her well (she's at 83 cm right now) when wearing something short sleeved or with long sleeved body under the hoodie. As this fabric doesn't have strtech you could go up a size for sure. This one is meant to be worn on chilly autumn days but I'm not going to put a sweater under it, if I wanted to do so, I'd definitely have to choose the next size.

new kids clothes Sewing blog: www.studiocostura.com

Obviamente hice mis errores con el abrigo, cómo no. Primero cosí mal la manga ranglán. Ya sabes, esa cosa relativamente fácil de unir las mangas con el cuerpo y luego el costado. Pues no, para qué facilitarte la vida. Total que pude arreglarlo sin descoser (yeahh) y conseguí también coser los pespuntes en toda regla. Luego la vista del bajo lo cargué también, para rematar. Un pliegue pequeño no me va a matar...lo repasaré a mano ya que está dentro. Lo malo de esta tela es que si descoses se ven las puntadas. Lo bueno es que es una buena excusa para mí para no descoser...

Obviously I made some mistakes with this hoodie. First I sewed the ranglan sleeves wrong, of course. You know that easy thing to attatch the sleeves to the bodice and then sew together the sleeves and the sides. Well no, why make your life easier? Anyway I could still save my poor work without unpicking (yeahhh) and I topstitched the whole thing quite like a pro. Later I also sewed the hem facing wrong just to finish it off great. A little fold doesn't kill me though...so I'll just hand stitch it somehow as it's on the inside. The bad thing about this fabric is that when you unpick, the stitches made will still be visible. The good thing is that this is a perfect excuse for me to not unpick...

new kids clothes Sewing blog: www.studiocostura.com

La sesión de fotos no ha sido muy fácil. La modelo quería ir a comer galletas. O helado, si no hubiera galletas. Y hacía calor!!! Es todo un falso otoño en las fotos. Tenía que limitar la sesión a cinco minutos porque la pobre iba sudando. Soy una madre muy maja, verdad??

The photo session was not a success. The model wanted to go to eat cookies. Or ice cream if there were no cookies available. And it was too warm!!! It's totally a false autumn you see on the photos. I had to limit the photo session to five minutes because the poor girl was sweating inside the hoodie. I'm the nicest mom, right?

new kids clothes Sewing blog: www.studiocostura.com

Por cierto, siempre le coso cosas con colores "de chico". Hoy vamos de rosa: saludos a la abuela, por favor!

By the way, I always sew her the clothes in "boy colors". Today we're pink: greetings to her granny, please!

new kids clothes Sewing blog: www.studiocostura.com

Y aquí la segunda parte de los estampados! Tres pares de leggings recién salidos del horno. No voy a contar con el detalle que los empecé a coser hace un año. Slow fashion al límite, jaja. Por cierto: parece que necesito urgentemente un clavo para colgar la percha para las fotos...

So now the second part of the cool prints! Three pairs of leggings hot off the oven. Not counting with the fact that I started to sew them a year ago. Slow fashion on the limit, hehe. By the way: looks like I urgently need a nail on my wall for the hanger on my photos...

new kids clothes Sewing blog: www.studiocostura.com

Vale, el cuento es que ya hace un año y más que le hice un montón de leggings con telas de estampados súper guays. Me gustaron tanto que pensé que voy a coser más para venderlos. Compré la tela y empecé a hacer muestras ya en tallas más grandes. Fin de la historia.

Otras cosas por el medio y nunca llegué a realizar el proyecto pero las muestras que sólo les faltaban las cinturillas se quedaron allí. Y ahora un año después los he terminado, van justo para la nena ahora con su altura.

So the story is that a year or so ago I made my girl a lot of baby leggings with the coolest prints. I loved them so much that I thought that I'd make some more and sell them. I bought the fabric and started to make the samples in bigger sizes. End of the story.

With other things on the way I never finished the project of the samples and there they were with their waistbands waiting to be attatched. And now one year later they are exactly  in the right size for my girl.

new kids clothes Sewing blog: www.studiocostura.com

Así que de los tres pares mi gran trabajo ahora ha sido coser las cinturillas, jaja. Me gusta mucho el detalle de los parches en las rodillas. Una cosa sí que aprendí con mis primeras muestras también. Primero los cosí con el mismo método que he compartido en este tutorial para coser curvas. Pero cuando regalé un par a mi amiga, lo que pasó es que su bebé en la fase de gateo/arrastre todoterreno intensivo lo primero que destrozó eran los parches. Como tenían costuras con bordes ligeramente más altos pues eso enseguida se descosió! Menos mal que lo descubrí antes de hacer un montón de pares así. Eso dicho con los 8 pares o así que usó mi nena nunca pasó lo mismo y hasta hoy día (ahora de formato "casi pantalón corto") los tiene en una forma muy aceptable y algún enanito podría perfectamente usarlos de nuevo.

So the big sewing task of mine on these three pairs has been attatching the waistbands, hehe. I really love the knee patch deatail. I actually did learn a lesson when making the samples too. At first I used the same way I've described in this tutorial to sew the patches on. But when I gave a pair as a gift for one of my friends, what happened was that her baby who was on the phase of crawling/rolling around all day every day, destroyed the knee patches immidiately. As the edges of the patches were slightly higher they were ripped off fast. That was actually a good thing to discover before sewing up a lot of pairs. That said my girl used the same pants and nothing like this happened and until today (now on the "almost shorts" version) the leggings are in a good shape and some little person could easily use them again.

new kids clothes Sewing blog: www.studiocostura.com

Así que esta vez simplemente corté los parches y los cosí con una de las puntadas de falso coverstitch que tiene mi máquina normal. Cómo no deshilacha pues está guay, creo. Otra cosa más. El patrón es mío y al principio puse los parches en el medio de la rodilla pero luego vi que siempre se veían como demasiado en el interior de la pierna una vez puestos. Por eso después medí el sitio exacto ya puesto el pantalón y los coloqué allí, así cuando están puestos quedan justo en la rodilla. Antes de coser los pegaba con la Friselina de doble cara con la plancha para que no se muevan al coser.

So this time I just cut the patches and sewed them on using a mock coverstitch stitch on my reular machine. As the knit fabric doesn't fray I think it's ok. One more thing. The pattern was drafted by me and first I put the patches at the center of the knee but later I saw that they seemed too much on the inner side of the leg once the baby was wearing them. That's why I later sewed them more on the side of the knee so they end up exactly on the right spot when wearing them. Before sewing I ironed them on with some double side Friseline stay tape to prevent them from moving around when sewing.

new kids clothes Sewing blog: www.studiocostura.com

Tanto los puños del abrigo igual como la parte de abajo en los leggings los coso de forma de que uno antes la pieza en círculo y luego lo doblo y entonces lo uno con la prenda, con el derecho con derecho. De esa manera al doblarlo arriba se ve todo bonito y limpio. Y venga, otra vez más tiempo usando la ropita!

I sew all my hoodie cuffs and leggings bottom parts in a way that I first close the piece as a circle, then fold it in half and then attatch it to the main piece, right sides facing. That way when you fold it up it still looks pretty and clean. And again, more wearing time for the little ones!

new kids clothes Sewing blog: www.studiocostura.com

Aquí pongo una foto del verano 2015 de las chicas con sus leggings puestos haciendo malabares. 

Here's a photo from summer 2015 with those two girls playing around in their leggings.


Y para terminar, mirad a quienes conocí el finde pasado! Sonia del blog La Pequeña Aprendiz y Arancha de What Aran Loves pasaron por mi taller para comprar sus kits de lencería y charlamos sobre costuras, patrones y mucho más, esas chicas son majísimas. Las dos son blogueras de costura viviendo aquí en Madrid y me alegro un montón por haberlas conocido en persona!!! 

And to finish things up, look who I met last weekend! Sonia from La Pequeña Aprendiz and Arancha from What Aran Loves passed by my atelier to buy their lingerie kits and we talked about sewing, patterns and much more, they are so sweet. Both of them live in Madrid and write sewing blogs and I'm so happy I finally met them in person!!!

Recogiendo las costuras de verano // Summer sewing recap

 
Summer sewing recap www.studiocostura.com

Hoy hago un poco de orden en mis cosas para empezar el septiembre con ideas nuevas y proyectos resueltos. He publicado posts sobre varias cosas que he cosido este verano pero tengo un par de ellas más y pensaba recopilarlo todo en uno. Han salido por mi IG pero voy a contar los detalles aquí.

Today I’m organizing my things a bit to start the month of September with new ideas and finished projects behind my back. I’ve posted about some things I’ve sewn up this summer but I’ve got some more and I tought I’d put them together in one recap post. This stuff has been on my IG but I’m going to share the details here.

Summer sewing recap www.studiocostura.com

Al principio de verano estaba probando diferentes combinaciones de telas usando “digamos” patchwork. No tengo mucha experiencia con este tipo de cosas como ya os conté en este post donde puse un montón de trabajos de quilting y patchwork súper bonitos que me inspiran. Pero tenía curiosidad de probar algunas cosas y luego usé esas pruebas primero para un bolso de tela con cremallera que me gustó mucho cómo queda.

In the beginning of the summer I was trying out different fabric combinations using “let’s say” patchwork. I don’t have a lot of experience in this subject as I already wrote in this post about beautiful quilting and patchwork projects that really inspire me. But I was curious to try some things and later I used them first in a tote bag with zipper with which result I’m very happy with.

Summer sewing recap www.studiocostura.com

Otro proyecto de las pruebas es este estuche para mis labores de ganchillo y me ha venido bien para llevarlo conmigo a la piscina (lo que sale del ganchillo le damos un tiempo...un buen tiempo jaja).

The other test turned into a zipper clutch for my summer crotchet project and it has been a good company to take to the pool side (what comes out of the crochet thingy takes time...quite some time hahaa)

Summer sewing recap www.studiocostura.com

Seguía probando más cosas y quería conseguir hacer unas hojas con los trozos de tela pero todavía me falta darle una vuelta y pensar cómo hacerlo mejor...pero me está gustando como queda.

I tried more combinations and wanted to sew together some leaves from the fabric scraps but I still need to rethink how to get the look I’m aiming for...but I quite like it.

Summer sewing recap www.studiocostura.com

Luego claro, el verano y sus piscinas. Mi bikini Sophie ya salió con toda su historia pero luego hice también la versión de bañador en negro para mi hermana. Está hecho según sus medidas y al principio le quedaba bien pero después de meterse en el agua resulta que le queda un poco grande...yo confiaba en las tallas porque a mí me quedaba bien tanto antes como después del baño. Pero bueno...eso me queda arreglar entonces.

Then of course the summer and the pools. My Sophie bikini was in a post already but later I made my sister the bathing suit version in black too. It’s made with her measurements and in the beginning it looked good on her but after the water it was just too big...I was counting on the sizing as my bikini was good before and after the pool. So I have to remake it...

Summer sewing recap www.studiocostura.com

También hice un bañador para la nena de la misma tela de mi bikini y lo estrenamos en Asturias, es un patrón de Ottobre Design 3/2016 con un frunce bonito y va bien de talla. En general no me preocupo mucho que ella vaya sin el bañador en la playa pero en España el sol pega tanto que prefiero que lleve por lo menos algo puesto (aparte de todo un bote de crema solar, claro jajaa).

I also made a bathing suit for my girl from the same blue fabric I used for the bikini and she got to wear it in Asturias (North of Spain). It’s a pattern from Ottobre Design 3/2016 with a cute ruffle and the size is correct on her. In general I don’t mind that she goes without bathing suit at the beach but the sun is so strong here in Spain that I prefer that she has at least something on while out there (apart from a lot of sunscreen of course hahaa).

Summer sewing recap www.studiocostura.com

Este vestido de la nena lo presenté para el concurso de MaMeMiMo blog donde había un montón de vestidos chulos para las pequeñas. Es de punto de algodón y si hay suerte el verano que viene lo usa como blusa jaja (nada de no usar las cosas hechas a mano a tope por aquí eh).

I posted this dress for the contest held by MaMeMiMo blog and there were lots of nice dresses for the little ones. The fabric I used is a cotton knit and hopefuly she can wear it as a blouse the next summer too, haha (hey, no wasting handmade clothes here).

Summer sewing recap www.studiocostura.com

El bolso con la tela de las palmeras es mi favorito creo...esta tela lo encontré en Julián López en Madrid y me enamoré. Tanto que lo compré en la segunda visita a las rebajas de este verano y el señor quien me atendía recordaba de que ya había preguntado el precio la primera vez una semana antes (jajaaaa...era un poco caro por mi presupuesto normal de las telas, qué os voy a contar). Pero del medio metro que compré salen un montón de cosas porque es 2,80m de ancho!

I think that this tote with palm leaves is my favourite...I found this fabric in Julián López in Madrid and I fell in love. I actually bought it on my second trip to the fabric sale there and the man who attended me remembered that I already had asked for a price of that fabric a week ago (hahaaa...it sure was a bit expensive for my fabric budget, not gonna lie about that). But from half of a meter I bought I can make lots of things for sure as it’s 2,80m wide!

Summer sewing recap www.studiocostura.com

Por ejemplo también este estuche con polipiel y cremallera metálica que hice para el viaje. Todo tropical total.

For example this faux leather zipper pouch which I made for my trip. Very tropical indeed.

Summer sewing recap www.studiocostura.com

De tropical tanto que en el querido polo norte lo primero que cosí era una sudadera para la nena. Esta tela ya lo pillé el año pasado y es súper suave y el estampado mola mucho. Lo malo es que al tirar mucho se ve el fondo, o sea la impresión no es de mucha calidad...pero los cactus molan demasiado como para notar eso! El patrón es del Ottobre Design 4/2016.

So tropical that the first thing I sewed on my lovely North Pole was a hoodie for my girl. I got this fabric already last year and this print is so cool. The only bad thing is that when you pull it a lot you can see the white backround as it’s not a good quality print...but the cactus are too cool to be bothered by that. The pattern is from Ottobre Design 4/2016.

Summer sewing recap www.studiocostura.com

Luego hice la misma sudadera pero combinando colores para la nena y su amiga del norte. Las dos van muy raperas para ir a la guarde jajaa! Esta vez cosí los puños como lo hago siempre, antes uniendo la pieza del puño y luego cosiéndolo en círculo a la manga, así cuando tienes que subir la manga no se ve la costura fea, el puño es limpio. En las instrucciones unían la pieza del puño con la manga, le pasaban recubridora encima y luego cerraban toda la manga, por eso se ve la costura y no me gustaba mucho.

Noto que esta abertura cruzada de la capucha es un poco justa para mi gusto, o sea para el gusto de la nena. Nunca le ha gustado vestirse, pero lo que menos le gusta es cuando hay que poner algo encima de la cabeza y “tirar” como es el caso de las prendas que no se abren por delante. En la versión con cactus le tela es más flexible y no le molesta pero esta versión me parece que lo haría un poco más grande del cuello o haría alguna otra modificación para más movimiento. El resto todo bien, la sudadera es más bien grande de talla pero como va siempre encima de algo lo prefiero así.

Y eso es todo para hoy...pronto cosas nuevas! :)

I later made the same hoodie using some color blocking for both my girl and her northen friend. Both of them have now proper rapper style to go to the daycare haha! This time I closed the cuffs before and then sewed them together with the sleeves in a circle, that way when you turn up the cuffs they are clean with no visible seams. In this models isntructions they sew together the cuff and the sleeve still open, they pass the coverlock and then sew the sleeve all together and that’s why you see the side seam on a sleeve which I don't like.

I also saw that the opening of the hood is a bit small for me..well for my girl. She always hated putting on clothes but she especially doesn’t like when you have to "pull" something on her head as in all the clothing that doesn’t open in the front. The cactus version is good because the fabric has a lot of give, but this one I would make the neck opening a bit bigger or some other alteration for more movement there. Other than that it’s all good, the sizing is in a bigger scale but as the hoodie goes on other clothing I prefer it to be a bit bigger anyway.

That’s all for today...new things coming soon! :)


Pantalones cortos de este verano

 
Pantalones cortos de bebé www.studiocostura.com

Hola julio, te traigo un par de cosas de junio...ya probados y pasados por la lavadora (y un par de fuentes) como cinco veces.

Pantalones cortos de bebé www.studiocostura.com

Estaba haciendo a la par con los vestidos del otro día también unos pantalones cortos para la nena. El patrón original es de la revista Ottobre Design 3/2016 y viene con dos modelos, uno con la aplicación de la flor (dibujo abajo).

Pantalones cortos de bebé www.studiocostura.com

Ya que estaba con el bies haciendo los vestidos me vine arriba y para empezar le hice una versión con lazos. El bies simplemente continúa en tiras más largas para poder hacer el nudo. La tela es el punto de algodón con lycra (3%)

Pantalones cortos de bebé www.studiocostura.com

El siguiente par es como en la revista, la tela rosa es un punto de algodón y el bies de algodón con lycra (3%)

Pantalones cortos de bebé www.studiocostura.com

La verdad es que me gusta mucho este detalle de la abertura y con un bies de otro color queda mono.

Pantalones cortos de bebé www.studiocostura.com

Por último también un par sin la abertura lateral, simplemente rematado con tiras de la misma tela dobles y la tela es otra vez el algodón con lycra.

Mis verisiones son un poco más anchas de la pierna porque no tenía en casa la goma elástica transparente que requiere el patrón. Así que yo simplemente uní la parte de la pierna con el bies (o la tira de la tela en el último) ajustandolo al largo de bies que es más corto y así sale la forma. Al principio pensaba que igual se quedan muy anchos así pero al llevarlos son súper cómodos y no los haría más estrechos porque ahora sí que se puede mover, trepar, sentar y todo lo demás con comodidad.

Pantalones cortos de bebé www.studiocostura.com

Allí está a punto de probar el agua en esa "playa urbana" de Madrid.

Pantalones cortos de bebé www.studiocostura.com
 

Y aquí el uniforme de todos los días...con la camiseta de Club de Malas Madres (su blog es la lectura obligatoria para las madres con mucho sueño como yo jajaa)

Ahora sólo debería hacer siete pares más para alcanzar el ritmo de la pequeña porque lleve o no el babero...lo de comer sin mancharse (mucho) es un arte. Vamos, que las rebajas de verano, allí voy!

El vestido para Reelika

 
Vestido para Reelika www.studiocostura.com

Por fin puedo presentar el proyecto con que he estado poco a poco trabajando estas semanas. Hice este vestido para mi amiga Reelika quien ha estado aquí durante este mes y me vino genial para practicar un poco de patronaje (voy a hacer otro post sobre la clase de patronaje a medida que estaba haciendo en Craftsy) Aprovechando que tenía la modelo a mano más o menos a todas horas, hice según sus medidas el patrón base y todo fue muy bien. Aparte de hacer yo mal un par de cosas que luego arreglé, el patrón base le quedó como un guante y eso casi sin alteraciones. 

Vestido para Reelika www.studiocostura.com

A partir de allí empezó el trabajo con el vestido. Reelika eligió este vestido de seda de Anthropologie para que haga algo similar. El corte me parecía bastante simple, cosa que luego se complicó jaja. La tela la compramos en Ribes y Casals y es una viscosa con buena caída y no es excesivamente fina. Lo bueno de la tela también es que no se transparenta y no había que preocuparse por forrarlo.

Vestido para Reelika www.studiocostura.com

Así que manos a la obra...el cuerpo base no era difícil como ya le había probado el patrón base muchas veces. Las complicaciones empezaron con esta parte que está suelta encima. Primero lo corté más o menos como en el vestido original, en la parte de la espalda más larga, hasta la cadera casi. Pero resulta que no sé por qué al moverse parecía como si tuviera alas de abeja...nada parecido a la bonita foto. La solución era acortar el largo de esta parte y después se quedó mejor. Después de rematar las sisas con bies resulta que de un lado sobraba tela y me tocó descoserlo todo para que las dos capas sean 100% iguales y que no sobre ni milímetro. Eso lo hice dos veces...claro.

Vestido para Reelika www.studiocostura.com

Luego, para que la sisa de la parte de la espalda quede bien había que coser a mano la parte superior de la capa exterior al interior en el centro donde la cremallera, si no al mover las partes sueltas se movían hacia los lados y aparecían nuevas arrugas! 

En total probamos este vestido como mil veces me parece jajaa...no me extrañaría nada que ella no lo quiere ver en un tiempo después de todos los retoques. Y yo qué aprendí en todo eso? Pues que hay que cortar con lupa y que no hay que juzgar un corte por sencillo porque puede tener cosas ocultas!!! Eso dicho todavía no sé el truco de patronaje para arreglar este problema de la capa exterior para que quede como lo veo en la foto original...

Vestido para Reelika www.studiocostura.com

Y por último la modelo mostrando las diferentes maneras de llevar este vestido jaja.


Pequeños vestidos de verano

 
Pequeños vestidos de verano www.studiocostura.com

Ahora sí que no hay vuelta atrás y se puede guardar las prendas de manga larga con el calor que hace. Acabo de terminar dos vestidos para mi niña para este verano y han quedado muy bonitos!

Me gusta mucho este corte de vestido que vi el otro día en Polarn O. Pyret (una marca sueca de ropa para bebés y niños muy muy recomendable por su alta calidad y diseños bonitos y al mismo tiempo super cómodos) y bueno, en vez de comprar los vestidos me hacía ilusión hacerme yo algo similar. Las fotos de los vestidos de arriba son de Polarn O. Pyret y Thief & Bandit Kids.

Pequeños vestidos de verano www.studiocostura.com

El primero es en punto de algodón con un poco de elastán y en rayas de azul marino. Es un corte muy simple pero me gusta mucho cómo queda la combinación de rayas al cambiar la dirección en la parte de la falda. Además al estar al bies queda tan mono con sus rayas en diagonal. El cuello y las sisas están terminados con el bies de la misma tela y atrás tiene una pequeña abertura que se cierra con un botón. El patrón está basado en una camiseta y está modificado para la parte de la falda.

Pequeños vestidos de verano www.studiocostura.com

No tengo la máquina recubridora pero el resultado queda bien también con una máquina doméstica porque al usar la doble aguja se queda igual de profesional, lo único que se tarda más al tener que hacer el proceso digamos dos veces. En este dibujo de la revista Ottobre Design se puede ver la técnica: primero se aplica el bies al lado derecho con la puntada normal y luego se le da la vuelta y se vuelve a coser encíma en el derecho con la doble aguja. Si sobra bies en el revés se recorta. Al hacer eso detrás se forma como un zigzag y por eso la puntada tiene la elasticidad que hace falta para telas de punto. Es importante usar también en las agujas dobles la especialidad para telas de punto (ballpoint/strech) si no, se saltan las puntadas.

Otra cosa al usar el bies es que hay que cortarlo un poquito más corto que la área donde va a ir para que quede bien y no demasiado "suelto". La norma general es que sea 85% del largo donde va pero a veces depende de la elasticidad que tiene la tela.

Pequeños vestidos de verano www.studiocostura.com

Otra versión es en punto de algodón naranja con lunares y tiene un poco menos de vuelo que el vestido de rayas. El resto es todo igual. La nena ya ha estrenado los dos vestidos y le quedan genial, los hice un poquito más grandes para que haya espacio para llevarlos durante más tiempo. Por eso también prefiero los modelos sin manga porque de esa manera es más fácil luego en el otoño poner alguna cosa de manga larga abajo y seguir disfrutando del vestido.

La verdad es que lo primero y lo más importante para mí a la hora de hacer y comprar ropa de bebé/niño es que sea cómodo. Tanto para ellos que para mí porque no voy a contar cuentos...no tengo mucho tiempo para planchar y lo mejor es que con las prendas de punto los sacas del tendedero y están listos para poner. Porque aunque hay tantos vestidos y otras prendas de telas muy bonitas que le podría hacer yo ya sé que una vez lavados, van a esperar la plancha y mientras tanto no se aprovechan todo lo que se podría...

Además, el día a día de un niño pequeño es como tener la clase de educación física todo el rato y qué más cómodo que ropa que no "molesta" a la hora de descubrir, correr, saltar, trepar y todo lo que se puede ocurrir en esas cabezas pequeñas. Los vestidos también los hice hasta la rodilla para que no se queden en el medio de toda esta acción diaria.


Así que ya se puso su nuevo vestido para un picnic en el Retiro...cómo no con su nuevo atlas mundial de la feria del libro de este año.

Son los dos primeros vestidos, pero me parece que va a haber más. También porque últimamente en esta casa hace falta un par de cambios de ropa al día: entre el parque, las comidas y los helados imprescindibles del verano...