Tutorial: Vera panties with lace ruffle // Tutorial: braguita Vera con frunce de puntilla

 
www.studiocostura.com

Hey, it’s tutorial time! I’ve been having a lot of fun dreaming up making pieces of lingerie inspired by images in Pinterest (I have a biiig lingerie inspo board there if you ever feel like you need some eye candy) lately so I’ll try to post a tutorial periodically on this topic. For me it’s interesting to see how to alter the patterns to make something I’ve seen in ready to wear and while it’s a cool challenge for me, I think it can be something interesting for you to see too! I’m always repeating myself but I’ll say it again: I really want to offer possibilities to alter my patterns (or really, any patterns)  so you can get the most out of them! I also think that even when the particular style isn’t for you, you can still learn a ton of techniques when reading through sewing tutorials so if you’re as geeky as I am about sewing you can probably learn a thing or two and maybe someday when you want to create your own custom pieces, you can use some of these tips you’ve learnt along the way. So let's dive in, here’s a tutorial to create cute ruffles for Vera panties!


Hola, es la hora de tutorial! Últimamente he estado muy entretenida pensando en hacer piezas de lencería inspiradas por fotos en Pinterest (tengo una carpeta muuuy grande de lencería allí si alguna vez quieres ver cosas bonitas) así que intentaré subir tutoriales sobre ese tema por aquí. Me parece muy interesante modificar patrones para hacer piezas inspiradas por lencería de marcas de moda y mientras es una prueba guay para mí, pienso que puede ser algo interesante de ver para vosotras también! Siempre me repito pero lo digo otra vez: de verdad me gustaría poder ofrecer posibilidades para modificar mis patrones (o cualquier patrón la verdad) para poder sacar lo máximo del corte que más os guste! También pienso que aunque un estilo particular no sea algo que te guste, aún así puedes aprender un montón de técnicas si lees los tutoriales y si eres igual de empollona como yo sobre los temas de costura, puedes probablemente aprender bastantes cosas y un día cuando hagas algo para ti puedes usar estos conocimientos que has adquirido en el camino. Así que empezamos, aquí va el tutorial sobre cómo hacer frunces para la braguita Vera.

www.studiocostura.com

This is a simple alteration that gives a super cute touch to already super cute Veras, hehe. I’ve used viscose knit for the panties but you can of course use lace as in the original version of this pattern. When you use knit fabric or mesh or whatever fabric without scallops on the back, remember to add 6 mm (¼ in) to the back leg opening seam allowance as there’s no seam allowance there. You can also use FOE for contrast, it looks very cute! In that case as always with FOE just remove all the seam allowances on the openings. First sew the pieces together as usual and apply the elastics as usual (leaving the 1 cm (⅜ in) extra on the waist elastic to attach rings).

Es una modificación muy sencillo que da un toque super cuqui a las braguitas Vera que ya de por sí son muy cuquis, jeje. He usado punto de viscosa para las braguitas pero obviamente puedes usar encaje tal como viene en el patrón original. Si usas telas de punto o tul o lo que sea que no tenga puntilla para el trasero, recuerda que tienes que añadir los 6 mm de margen de costura en las aberturas de las piernas porque allí no hay margen de costura. También puedes usar FOE (bies elástico) para el contraste, queda muy mono! En este caso como siempre, elimina todos los márgenes de costura en las aberturas. Une las piezas como siempre y cose los elásticos también (dejando 1 cm de extra en la cinturilla para unir las anillas después).

www.studiocostura.com

Attach rings as usual.

Une las anillas como siempre.

www.studiocostura.com

Now let’s go with the ruffle. In this case I’ve used stretch lace and I’ve cut the piece in a way that it will have a wider part in the center and it goes to zero in the beginning and in the end. When you are making this version of Vera panties you’ve probably already tried out the version 3 and you know the strap elastic length you need for the sides. In this case the elastic won’t be regulable (like the strap elastic) so you need to know your preferred length. I want the elastic to be 10 cm (4 in) long so I’m cutting the lace piece 20 cm (8 in) wide in total as it will be gathered first. For the widest part I measured 5 cm (2 in) and then just freehanded the curve. This is my choice but you can make this piece narrower if you want. Cut two of these pieces out.

Ahora vamos con los frunces. En este caso he usado puntilla elástica y he cortado la pieza de tal manera que la parte central es más ancho y los lados se disminuyen a cero. Si haces esta versión de Vera es que probablemente ya habrás probado la versión 3 y sabes el largo de elástico que necesitas para los lados. En este caso el elástico no va a ser regulable (como los tirantes) así que tienes que saber el largo que te va bien. Yo quiero un elástico de 10 cm así que corto la pieza de encaje 20 cm de ancho en total ya que primero se frunce. Para la parte más ancha he medido 5 cm y después hice la curva a ojo. Es mi preferencia, puedes hacer la pieza más estrecha si lo prefieres. Corta dos de estas piezas.

DSCF9949.jpg

Now sew a long straight stitch over the curve of the lace to gather that part of the ruffle. Gather the piece so this edge measures 15 cm (6 in). I prefer to use the gathering to reduce some of the length and then reduce the rest with the elastic in the next step.

Ahora cose una línea de puntada recta y larga en la parte de la curva para fruncir. Frunce la pieza tirando del hilo hasta que ésta mida 15 cm. Prefiero usar este método para fruncir un poco ahora y el resto con el elástico en el siguiente paso.

DSCF9973.jpg

Cut a piece of lingerie elastic 12 cm long (5 in), it’s the 10 cm (4 in) I need for the length of my side elastic + 2 cm (1 in or a bit less) to be able to fold the elastic under once I attach it to the rings. Sew the elastic on with two passes of zig-zag as you usually do when sewing lingerie elastics. Make sure you first leave the first 1 cm (⅜ in) free, then pull the elastic to gather the lace and sew it in place and then leave the other 1 cm (⅜ in) free. Although it seems you have to pull the elastic a lot, I found it’s the exact amount to create a nice ruffle. You can use FOE for that too, it would look very cute!

Corta el elástico de 12 cm largo, los 10 cm son para el largo de elástico que necesito + 2 cm para las anillas. Cose el elástico con dos pasadas de zig-zag como siempre cuando coses elásticos de lencería. Primero deja 1 cm de elástico sin coser, después tira del elástico para fruncir con él el resto de encaje y deja en el otro extremos 1 cm libre. Aunque parece que tienes que estirar mucho el elástico, va a quedar bien para crear un frunce bonito. Puedes usar también FOE para eso, quedaría muy mono!

www.studiocostura.com

Once you have the ruffle ready just attach it to the rings on both sides and you are done! As I’m a real sucker for the black + pink combo I’m really loving this result :) I hope you liked this tutorial and that you’ll try out the Vera panties pattern, if you want to learn about more pattern alterations you can get my ebook about hacking patterns for panties (free when you subscribe to my weekly newsletter!).

Cuando tengas los dos frunces hechos coselos a las anillas y ya está! Como tengo una debilidad por negro + rosa me encanta el resultado :) Espero que te haya gustado este tutorial y que pruebes el patrón de la braguita Vera, si quieres ver más modificaciones puedes leer mi libro electrónico sobre coser braguitas (es gratis si te apuntas a mi newsletter semanal!).

93f1ef1ffa3b425aa6f5cc9f96d48bc9.jpg
5b390f9a75f3fda7499a4b77da075da4.jpg
8250fd526ad78df9fc25746df40992bc.jpg

Also, check out these images from Pinterest for more inspiration for ruffles. You can also try it out with mesh, it would look so cute! Just cut out a piece of mesh in the same way or as a strip with the same width instead of making it curved. I should definitely try out the mesh ruffles, these polka dots look amazing!

Mira también a estos imágenes de Pinterest para más inspiración de frunces. Puedes probar a hacerlo también con tul, quedaría muy mono! Simplemente corta una tira de tul de la misma manera o en una tira de un mismo ancho. Debería definitivamente hacer algo con frunces de tul, el ejemplo de lunares queda super bonito!

www.studiocostura.com

Can’t help myself to post a behind the scenes photo of making this tutorial...we have a new kitten, she’s called Mustikas and she looks sooooo cute (and jumps on top of anything you try to photograph, hahaha).

No puedo dejar de añadir una foto del proceso de hacer este tutorial...tenemos una gatita nueva, se llama Mustikas y es taaaaan mona )y se salta encima de cualquier cosa que quieres fotografiar, jaja).


Tutorial: how to sew period panties // Tutorial: cómo coser braguitas de menstruación

 
pin.jpg

It’s tutorial time and today I’m showing you how to sew period panties! You’ve probably heard about period panties before: they are a special kind of panties that have an absorbent layer + waterproof layer in the crotch area to prevent any leaking. This type of underwear is meant to be used as an extra protection when using tampons or cups during your period and you can even use them on their own on the first/last days of your period ! I first saw this type of panties when I discovered Thinx, a well known brand that sells period panties in many different styles. And you know what’s the best news? Sewing your own period underwear is super easy and you can make ANY style you want! And the second best news? That I just added some super nice kits to the shop so you can start with eeeeverything you need in one place :)

I had been seeing people making their own period panties over at Instagram for a while now and I finally made myself a pair to check out how it works. I don’t know what the hell was I waiting for for so long!!! Seriously, it’s such a genius idea in the first place and as we seamstresses can actually do it ourselves it’s also a money saver (I’m planning to make like…7 pairs, haha). I used my two test pairs during my period and I was so happy with the result, they really absorb very nicely and I especially love the idea of wearing them on their own (without the cup/tampon) during the days when I have less and less spotting but I can still have a bad surprise whenever I least expect it. I was especially happy to see that they work so nicely for the nighttime, as the “protected” crotch area is longer (and you can make it as long as you want to, according to your needs, more about that when I show you how to alter the pattern), they really are life savers you guys!!


Es la hora de un nuevo tutorial y hoy os enseño cómo coser bragas para la menstruación o “period friendly” bragas como las llamo yo, jeje. Me imagino que habrás oído hablar de bragas de este tipo: llevan en la parte de la entrepierna capas de tela absorbente e impermeable para evitar que salgan los líquidos. Este tipo de ropa interior está pensado para usar junto a tampones o copas menstruales durante la regla y también sirven para llevarlas sin más por ejemplo durante los primeros o los últimos días de la regla. La primera vez que conocí a este tipo de bragas era cuando descubrí la ahora conocida marca Thinx, esta empresa vende las bragas especiales de menstruación y tienen un montón de modelos para elegir. Pero sabéis qué es la buena noticia? Que es super fácil coser tus propias bragas y puedes elegir el estilo que más te guste a ti! Y la segunda buena noticia? Que acabo de subir unos kits muy guays a la tienda por si quieres empezar con toooodo lo necesario en un mismo sitio :)

Hace tiempo ya que había visto por Instagram chicas que cosían este tipo de bragas y por fin me hice un par para ver qué tal. No sé por qué tardé tanto en hacerlo!!! En serio, es un invento genial para empezar y además nosotras las costureras las podemos hacer en casa así que puedes ahorrar dinero (que yo me quiero hacer 7 pares o así, jaja). Usé mis dos pares de prueba durante mi última regla y estoy encantada de la vida, absorben muy bien y además me gusta mucho la idea de que las puedo usar así sin más en los días que ya solo mancho pero aún así puedo tener “malas sorpresas” cuando menos me lo espero. También me encantó que se pueden usar super bien por la noche ya que la zona protectora es más larga incluso al estar tumbada (y lo puedes hacer con el largo que tú quieras, más sobre eso cuando so digo cómo cambiar el patrón) y realmente son super cómodas!

supplies

period panties sewing kit

So first of all let’s talk about what you need to sew your own period panties:

  • a panties pattern that you like (most of the patterns will work, I used my Vera panties pattern for my period panties)

  • knit fabric for your panties

    whatever you like really: I’m a fan of viscose and bamboo knits, you can also use cotton or polyamide knits, whatever makes you feel good

  • crotch lining fabric

    the fabric that is closest to your skin: I always recommend it to be a breathable (natural) knit fabric, for example cotton knit or viscose/bamboo knit

  • absorbent layer fabric

    the fabric that will absorb all the liquid: there are many options available, for example cotton, bamboo or hemp fleece knits and my favorite Zorb, it’s a speficfic absorbent layer designed for this kind of garments

  • waterproof layer

    the fabric that won’t let the liquid come through the panties: the best option is to use PUL fabrics (PUL stands for Polyurethane Laminate and it’s a waterproof but at the same time breathable fabric)

  • fold over elastic for the leg and waist opening of the panties, wider FOEs are easier to sew with


To make it easier for you I’ve also made kits that are available at my shop! I’ve sourced some really nice high quality materials and the full kits include:


(edited: please read the product listing information, there might be changes with which fabrics and elastics are currenly included in the kits!)


  • super soft bamboo knit for the panties

    the SOFTEST knit I’ve got my hands on, seriously way comfier than my regular go-to viscose knit, you will love it!

  • absorbent Zorb Original interlining infused with Silvadur especially made for reusable period pads and diapers

    this high quality super absorber is a blend of bamboo viscose, cotton, organic cotton and polyester fibres and it absorbs 10x its weight in moisture in half a second – that’s 20x faster than cotton, bamboo or hemp knits (each layer will replace 2-3 layers of conventional knit material like cotton, bamboo or hemp fleece/french terry). This fabric is infused with SILVADUR™ antimicrobial silver ions to inhibit bacterial growth, control bad odours and create long lasting freshness without toxic chemicals

  • waterproof and breathable food safe PUL fabric

    unique heavy duty waterproof PUL with a 2 mil waterproof film for additional strength & long lasting durability, it’s super soft, breathable and flexible and tested for food safety. Tested to withstand 300 washings and 100% eco-friendly

  • soft picot edge FOE to finish the leg and waist openings, way easier to sew than other elastics

And if you already have the rest of the supplies and you only need the absorbent layer + the waterproof layer I’ve also prepared these kits so you can get only those two fabrics and start sewing! And now you have both the Zorb and the Food Safe PUL at my shop sold by the meter too.


Así que primero vemos qué necesitas para coserte unas bragas así:

  • un patrón de bragas que te guste (casi todos valen, yo usé mi patrón Vera para las mías)

  • tela de punto para tus bragas

    lo que más te guste la verdad: soy fan de punto de viscosa y de bambú pero puedes también usar punto de algodón o puntos de poliamida, lo que sea que te haga feliz

  • forro de la entrepierna

es la tela que va a estar en contacto con tu piel, siempre recomiendo que sea una tela natural como algodón o viscosa/bambú

  • tela absorbente

    la tela que absorbe los líquidos: hay bastantes opciones, por ejemplo rizo de bambú (tipo toalla), muletón de cañamo, telas de punto gorditas que absorben líquido (cotton, bamboo, hemp fleece en inglés). Mi favorito es el Zorb, una tela absorbente que absorbe mucho más rápido y más cantidad, está diseñado justo para este tipo de proyectos!

  • tela impermeable pero transpirable

    para esta capa lo mejor es PUL (Polyurethane Laminate en inglés) que es una tela impermeable pero transpirable

  • bies elástico (FOE) para las aberturas (los bieses más anchos de 20 mm son mejores y más fáciles de coser)

Para hacerlo más fácil he preparado también kits que tienes disponibles en mi tienda online! He conseguido unas telas de alta calidad que te van a encantar, los kits incluyen:

(editado: lee con atención la descripción del producto cuando lo compres en mi tienda, puede haber cambios en las telas o elásticos según el momento que estés comprando)

  • punto de bambú super suave para las braguitas

    es la tela de punto MÁS SUAVE que he probado, de verdad, es mucho más suave que el punto de viscosa que solía usar para mis braguitas, te va a encantar!

  • Zorb Original absorbente que contiene Silvadur, especialmente creado para compresas y pañales reusables

    esta tela especial de alta calidad es una mezcla de bambú, algodón, algodón orgánico y poliester y absorbe 10 veces su peso en líquido en medio segundo: es 20 veces más rápido que la absorción en puntos de algodón, bambú o cañamo (cada capa de esta tela super absorbente es equivalente a 2-3 capas de un punto normalmente usado para estos casos). La tela está además combinado con SILVADUR™, iones de plata antimicrobianos para evitar el crecimiento bacteriano, controlar malos olores y crear un frescor duradero sin usar químicos tóxicos

  • impermeable y respirable tela de PUL Food Safe

    tela especial con gran resistencia, impermeable con una capa muy duradera y fuerte y al mismo tiempo muy suave y transpirable. Esta tela está además aprobada por la seguridad alimentaria. Dura por lo menos 300 lavados y es 100% amable con el medio ambiente

  • Bies elástico muy suave con puntilla para los acabados en las aberturas de piernas y cintura

Pattern alteration

www.studiocostura.com

So, first things first, you need to alter your favourite underwear pattern. As I’ve mentioned I used the Vera panties for this pair (I’d also suggest that Stella panties are great too). As you will be making the crotch lenght longer you need to put your pattern pieces together in a way like they would be already sewn together: this pattern has 6 mm seam allowances so when you overlap the pieces by 12 mm you have eliminated the seam allowance (you can fold your crotch pattern piece to have everything lined up). Draw this into a separate paper.

Primero necesitas hacer unos cambios a tu patrón favorito de braguitas. Como dije antes, yo he usado mi patrón Vera para hacer este par (la barguita Stella también es un buen modelo para este tipo de braguitas). Como tenemos que aumentar el largo de la pieza de entrepierna, tienes que primero colocar las piezas de la manera como si ya estuvieran cosidos: este patrón tiene margenes de costura de 6 mm así que si superpones las piezas por 12 mm has eliminado los margenes de costura (puedes doblar tu pieza de entrepierna para tener todo bien colocado). Dibuja esta silueta a un nuevo papel.

www.studiocostura.com

Next step: make the front and the back of the crotch piece longer so the absrbent area will be bigger than your regular crotch pattern piece. I added 3 cm both for the front and the back piece (counting from where my original crotch piece ends, without the seam allowance). So this is my personal preference, I tested it out and I liked it so this is what I will probably use for all of my period panties. But you can of course alter your patter in a diffrent way, adding more or less, maybe more on the back, less on the front…I’d try out a pair and make adjustments if needed.

Also just a side note: I did some research on period panties that are sold in the ready to wear industry and many of them have a separate back piece that extends from crotch all the way until the waist, I guess then you can use a longer absorbent layer. If this is something you are interested in trying out just hack away! (The only thing I’d be careful with is that if your absorbent piece is very large you are “taking away” the elasticity of the panties and you might need to play around with that a bit)

Segundo paso: hay que aumentar el largo de la pieza de entrepierna para poder tener un espacio más amplio donde se absorbe el líquido. Yo añadí 3 cm tanto para la parte delantera como para la parte trasera de mi entrepierna (contado desde donde se acaba la pieza original de la entrepierna sin márgenes de costura), lo probé y me gustó, creo que esta medida es lo que voy a usar para todas mis braguitas de este tipo. Pero tú puedes cambiar tu patrón como quieras, puedes añadir más o menos centímetros, quizás más en la parte trasera, menos en la delantera…yo probaría hacer un par y después de llevarlas sabes qué es lo que más te gusta.

También un comentario: hice un poco de investigación sobre las barguitas de menstruación que se venden en las tiendas y muchas de ellas llevan una parte separada del trasero que empieza con la entrepierna y llega hasta la cintura, supongo que es para poder tener la capa absorbente más larga. Si es algo que te puede interesar simplemente adapta tu patrón todo lo que quieras! (Lo que sí haría es estar pendiente de le elasticidad: si hacer la parte absorbente muy larga estás quitando la elasticidad a la braguita en general y quizás tienes que hacer pruebas con el alrgo y ancho del patrón en general)

3.jpg

Then mark your new seam allowance for the crotch piece on both of the sides.

Después marca los nuevos márgenes de costura de la pieza de entrepierna.

www.studiocostura.com

This is the new crotch piece, you can cut it out.

Esta es la nueva pieza de entrepierna, puedes recortarlo ya.

www.studiocostura.com

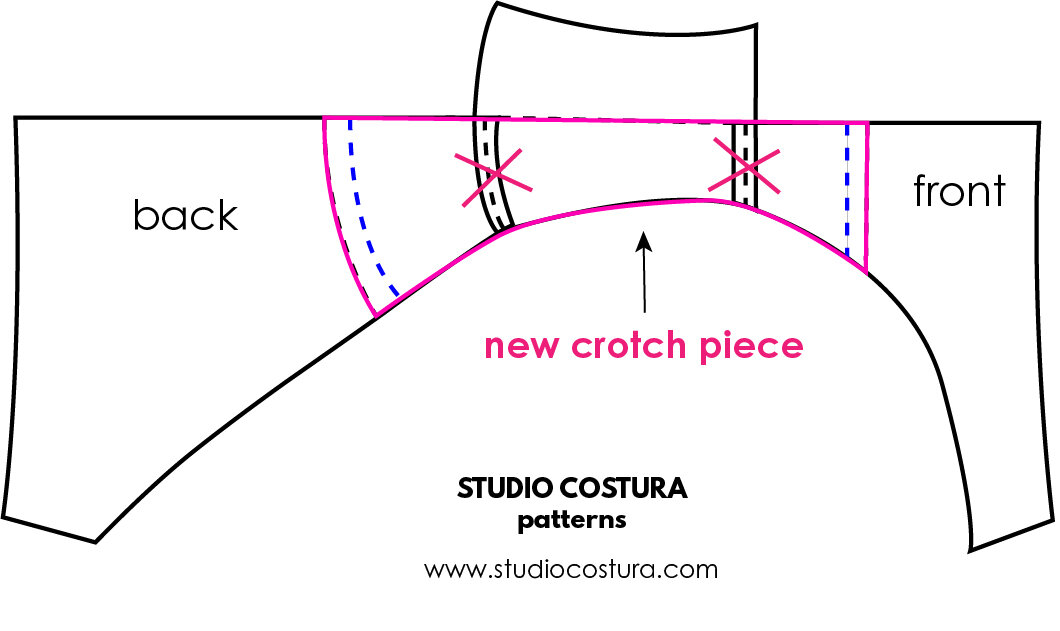
The back and front pieces need their new seam allowance as well, add to both pieces. Note that my new crotch piece is only the half of the crotch actually. I’d recommend to cut this peiece on folded paper to have the full crotch piece, it’s easier to cut fabric that way.

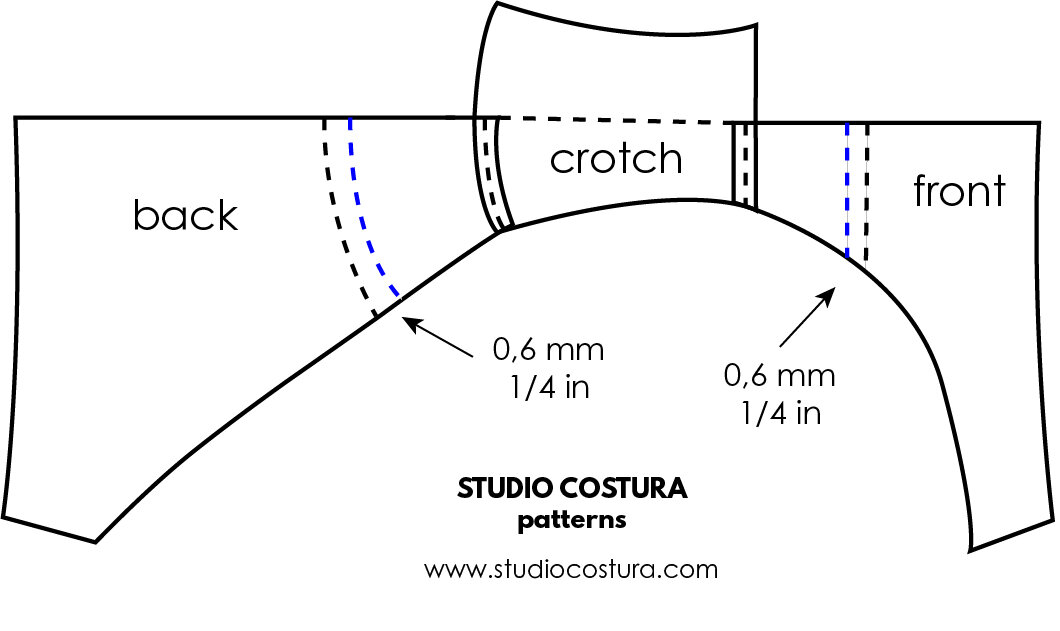
One thing I didn’t alter was the rest of the seam allowances included in the pattern for the elastic. For my panties patterns I use 7 mm seam allowance that is included in the pieces, you use it for sewing lingerie elastics on the leg and waist openings and it is folded under once the elastic is sewn on. So if you want to have the same width of the crotch as you usually have in my patterns (once the lingerie elastic is sewn under) when using FOE that doen’t need any extra seam allowance you should take away this seam allowance on all the openings. I didn’t do it as I prefer my period panties to be a bit wider in the crotch area, I just feel more comfortable this way. Also the soft FOE I’m using is very comfortable so it’s not something that “digs in” while I wear my panties. But if you feel that this might be something you don’t like just go ahead and reduce all the pieces in the leg and waist opening areas.

So this is it with the pattern alteration, now let’s cut out the pieces.

La parte trasera y delantera necesitan sus nuevos márgenes de costura también, añade los 6 mm a las dos. Mi nueva pieza de entrepierna es solo la mitad y hay que cortarlo al doblez. Yo recomeiendo que lo cortes en doble de papel directamente para tener el patrón completo, así que más fácil cortar las piezas de tela.

Una cosa que no hice era cambiar márgenes de costura en el resto de la braguita. En mis patrones uso el márgen de costura de 7 mm que está incluido en las piezas para coser los elásticos de lencería en las aberturas de las piernas y la cinturilla, este márgen se dobla hacia abajo una vez cosidos los elásticos. Así que si quieres tener el mismo ancho de la entrepierna que sale normalmente en mis patrones (una vez cosidos los elásticos) si usas el bies elástico, deberías quitar este márgen de costura en las aberturas. Yo no quité nada en mis barguitas ya que prefiero que la entrepierna esté un poco más ancho en este caso, me siento más cómoda así. Además el bies elástico que uso es muy suave y no molesta nada al llevar las braguitas. Pero si crees que es algo que puede no gustarte puedes quitar los márgenes en todas las aberturas.

Así que ya estamos con los cambios de patrón, ahora vamos a cortar las piezas.

www.studiocostura.com

You need to cut out the front, back and the crotch piece from your main fabric. You then need to cut out the crotch piece again one time from the absorbent layer, one time from the waterproof PUL layer and one time from you inner crotch lining fabric (I use the same bamboo knit if you are using the kit from my shop).

To make the crotch seams invisibe we’ll be sewing all the layers together. This means you’ll want to avoid bulk and the absorbent layer needs to be trimmed down before working on all the layers at once. I didn’t make a separate pattern for that layer as I find it easier to work this way but if you want to make a separate pattern just go ahead.

Tienes que cortar el delantero, espalda y la entrepierna de tu tela exterior. Después tienes que cortar la entrepierna una vez de la capa absorbente, una vez de PUL y una vez de la tela que usas para el forro de entrepierna (en mis kits uso el mismo punto de bambú para eso).

Para poder tener las costuras de la unión de las piezas de entrepierna ocultas hay que coser todas las piezas juntas. Eso significa que para que estas costuras no se abulten tanto hay que recortar la pieza de la capa absorbente un poco antes de unir todo. Yo no hice un patrón por separado para esta capa ya que me parece más fácil trabajar así pero si quieres directamente hacerlo más peqeuño puedes hacerlo.

sewing the panties

www.studiocostura.com

First put the absorbent crotch piece on top of the waterproof fabric (with the shiny side up) and sew about 1 cm (3/8 in) from the edge to join the two layers. You can use a straight stitch as these fabrics are not stretchy.

Primero pon la capa absorbente encima de la capa impermeable (con el lado brillante hacia arriba) y cose aprox 1 cm desde el borde para unir las dos capas. Puedes usar la puntada recta ya que estasa telas no son elásticas.

www.studiocostura.com

Now cut away the seam allowance on the absorbent layer, this way when you’ll sew the crotch pieces together you won’t be sewing on top of the buly absorbent layer.

Ahora recorta el márgen sobrante de la capa absorbente, así no hay que coser encima de esta capa una vez que unimos todas las capas entre sí.

www.studiocostura.com

To make it easier to sew together various layers of fabric I first sew together the exterior fabrics and then sew the crotch pieces together with everything on a second pass, this way the pieces won’t shift so much.

Sew the front piece together right sides facing with the exterior crotch piece and do the same with the back piece.

Para que sea más fácil unir todas las capas vamos a coser primero juntas las piezas de la tela exterior y después lo unimos con las otras capas en la segunda costura, así las piezas no se mueven tanto.

Cose el delantero con la entrepierna derecho con derecho y haz lo mismo con el trasero.

www.studiocostura.com

Roll both the front and the back piece on top of the crotch piece until you see the seams you have just sewn together.

Enrolla el delantero y el trasero hacia la entrepierna hasta que ves las costuras que acabas de hacer.

www.studiocostura.com

Put the crotch lining piece with the right side facing down on top of that.

Coloca el forro de la entrepierna encima de eso con el derecho hacia abajo.

www.studiocostura.com

Now put the absorbent layer together with the waterproof layer on top of that (the absorbent layer is facing down and the waterproof layer is facing up).

Ahora coloca la capa absorbente junto a la capa impermeable encima de eso (la capa absorbente está hacia abajo y la capa impermeable está hacia arriba).

www.studiocostura.com

Sew a zig-zag stitch or overlock the seams.

Cose con zig-zag o remalla las dos costuras.

www.studiocostura.com

Turn your pieces right sides out and this is the enclosed crotch right there.

Da la vuelta a las piezas y ya tienes la entrepierna cosida sin que se vean las costuras.

www.studiocostura.com

You are now ready to sew on the elastics and finish up the panties. I prefer sewing the fold over elastic first on the leg openings before sewing the side seams. For me it’s always complicated to get a neat finish when working with FOE when sewing in the round. That’s why I sew it on flat pieces and then sew the side seams.

Ahora puedes coser los elásticos y terminar las braguitas. Yo prefiero coser el bies elástico a las aberturas de las piernas antes de juntar los laterales. Me cuesta conseguir un resultado limpio y bonito cuando coso bies elástico en círculo, por eso lo coso en plano y después uno los laterales.

www.studiocostura.com

You can use your regular fold over elastic, the wider the better. I’m going to use this nice FOE available at my shop, it’s already prefolded so it’s very easy to sew in one pass. If you’re using the regular FOE you can follow this tutorial.

Puedes usar el bies elástico normal, míentras más ancho mejor. Yo voy a usar este FOE de mi tienda que es muy fácil de coser en una misma pasada. Si usas un FOE normal puedes seguir a este tutorial.

www.studiocostura.com

Just wrap the FOE around the raw edge of the leg opening and sew on top of that with a zig-zag stitch (2.5 lenght, 2.5 width) pulling slightly when sewing to get an even tension. I prefer a normal zig-zag stitch but there are people who use a three step zig-zag, use whatever you like the best.

Simplemente coloca el borde de la abertura de la pierna entre las dos capas de FOE y cose con un zig-zag (2.5 de largo, 2.5 de ancho), mientras estiras ligeramente para tener una buena tensión. Yo prefiero usar un zig-zag normal pero hay gente que usa el zig-zag de tres pasos, usa lo que más te guste.

www.studiocostura.com

Once you are done with the leg openings you’ll go and sew one of the side seams. This way you can sew the elastic on the waist opening in the same way while it’s flat.

Una vez cosido el elástico a las dos piernas cose uno de los laterales. Así puedes después coser la cinturilla en plano también.

www.studiocostura.com

When using an overlock hide the threads inside the seam with a yarn needle.

Si usas le remalladora esconde los hilos dentro de la costura con una aguja lanera.

www.studiocostura.com

To reduce bulk and to make the seam allowance stay flat sew a small bartack on top of the right side of the panties, pushing the seam allowance towards the back of the panties.

Now go on and attatch the waist elastic, then join the remaining side seam and you are done!

Para reducir bulto y hacer que el márgen de costura se quede más plano puedes echar el márgen hacia el trasero y en el derecho de las braguitas hacer un remate encima de esta zona.

Ahora cose el elástico de la cinturilla y une el otro lateral y ya está!

www.studiocostura.jpg

And that’s it! It actually is very easy, you’ll have a nice pair of period friendly panties in no time and I’m sure you’ll want to make more when you try them out. Experiment with the crotch lenght and make your own personalized pair exactly as you want to.

About washing your period panties: I usually just rinse them in cold water right after wearing them and then wash them with my regular clothes in the washing machine. No more plastics and all the comfort!!!

I hope this tutorial was useful and that you’ll try out sewing your own pair. As I mentioned, we have kits available if you want to have all your supplies in one place :)

Y nada más! Ya ves que es muy sencillo hacer unas braguitas aptas para usar con la regla y estoy segura de que quieras hacer muchos pares una vez que las pruebas. Experimenta con el largo de entrepierna y haz un par totalmente personalizado y a tu gusto.

Sobre cómo lavar tus braguitas: yo normalmente justo después de usarlas las aclaro con agua fría y luego a la lavadora. Se acaban los plásticos y tienes toda la comodidad!!!

Espero que te haya gustado el tutorial y que pruebes coser tu propio par. Tenemos los kits con todo lo necesario si quieres tener todas las cosas de un mismo sitio :)


Nuevo patrón: la braguita Vera // New pattern: Vera panties

 
www.studiocostura.com

Hola, os presento mi nuevo patrón braguita Vera! Es un patrón con el corte bikini y viene en tres versiones, uno para punto y dos para encajes.

Hey, here’s my newest pantie pattern: meet the Vera panties! It’s a bikini/brief cut pattern that comes in three versions, one for stretch knit fabrics and two for stretch lace.

www.studiocostura.com

Hace tiempo que quería publicar un patrón con este corte ya que era lo que faltaba entre los patrones de braguitas que tengo disponibles. Aparte de así tener una variedad de cortes para todos los gustos para gente que cose en casa, también puedo ofrecer a las que asisten a mis cursos de lencería la mayor variedad.

It was about time to publish this style as it was missing from my pantie pattern collection. Apart from making patterns for people who sew at home I also teach lingerie sewing classes so now there’s one more style they can choose when they attend the classes.

www.studiocostura.com

La versión 1 es la más básica: se hace con telas de punto con elastano y la cinturilla y las aberturas de piernas están rematadas con elásticos de lencería. Puedes usar cualquier tela de punto que sea elástica y no muy gruesa, mis favoritos son puntos de viscosa ya que son de grosor fino y el tejido es respirable. Es también buena oportunidad de aprovechar los típicos cortes pequeños que quedan de los proyectos de camisetas etc. Si quieres probar coser braguitas por primera vez, esta versión es lo mejor para empezar y así aprendes lo básico (ya sabes que como de costumbre mis patrones vienen con instrucciones muy detalladas, tienen fotos con texto explicativo sobre cada paso que tienes que hacer). Si necesitas elástico de lencería puedes mirar en esta sección de mi tienda que hay varios colores y tipos.

Version1 is the very basic pantie: it’s sewn with knit fabrics (with spandex for more comfort) and the waist and the leg openings are finished with lingerie elastic. You can use whatever light weight knit fabrics with stretch in them, my favourites are viscose knits as they are light weight and breathable. Sewing panties is also the perfect occasion to use up scraps of fabric from t-shirt projects etc. If you’re new to sewing lingerie, this version is perfect for starting out and learning the very basics (as always my patterns come with step by step instructions full of photos and text about each step you have to follow in order to finish a pretty pair of panties). If you need narrow lingerie elastics for panties you can check out this section of my shop for various colors and types.

www.studiocostura.com

La versión 2 se cose con encaje elástico y queda muy bonito con el borde de la puntilla en las aberturas de las piernas. Las piezas de encaje se juntan en el centro delantero creando un diseño diferente! Este diseño es similar a la versión de encaje de las braguitas Stella pero el corte es diferente ya que está adaptado al corte bikini, cubriendo menos en la parte de la pierna.

Version 2 is made with stretch lace and the scalloped lace edge looks very pretty on the leg openings. The front lace pieces are joined on the center front in a special way that creates as a result a unique design element! This design is similar to the Stella panties pattern in the lace version but this time the same style is drafted for a bikini style with a higher leg opeing.

www.studiocostura.com

La versión 3 es algo distinto, también se cose con encajes elásticos pero tiene un bonito detalle de elástico de tirante en la parte de los costados. Era un diseño que quería añadir a los dos previos ya que me parece muy fácil de hacer y el resultado es diferente aunque el corte en sí es lo mismo que la base. Además este estilo lleva bastante poco material así que es ideal para hacer conjuntos con los bralettes y sujetadores. Aparte de los materiales que normalmente necesitas para coser un par de braguitas, tienes que tener 4 arandelas y 2 reguladores y 0,4m de elástico de tirante. Si los quieres comprar aparte tienes diferentes variedades en mi tienda en las secciones de tirantes y de arandelas y reguladores.

Version 3 is different, it’s also made with stretch lace but it has a beautiful strap elastic detail on the sides. I really wanted to add this style as one of the versions as it’s easy to make and the result is completely different altough it’s based on the same pattern block. Also this version can be made with a little amount of supplies so it will be a great scrap buster to sew up panties that match with your handmade bras and bralettes. Apart from the usual supplies you need for sewing panties this version also uses 0,4 m of stap elastic and 2 sliders + 4 rings. If you want to get them from my shop you can check out this section for strap elastics and this one for rings and sliders.

www.studiocostura.com

Como siempre tienes en la tienda los kits específicos para coser braguitas, vienen con material suficiente para coserte un par de braguitas de punto y otro de encaje. En el caso de querer coser la versión 3 de este patrón Vera puedes escribirme en los comentarios de la compra y te añado los materiales que necesitas: el tirante y las arandelas y los reguladores.

También tienes la opción de comprar directamente el patrón Vera + kit de braguitas, es la versión más económica! En este caso como siempre, cuando lo compras me dices allí qué kit quieres y yo te mando el patrón a tu correo.

As always there are specific pantie making kits in the shop that include enough supplies to make one pair of knit and one pair of lace panties. In case you want to sew the 3rd version of Vera panties you can leave me a comment so I will add the strap elastic and rings + sliders you need.

You have also the option to buy the Vera panties pattern directly with a pantie kit, it’s also the cheapest option! In this case as always just leave me a comment about which kit you’d like to get and I will send you the pattern to your e-mail address.

www.studiocostura.com

También aprovecho para recordaros que aquí en los archivos del blog tenéis varios tutoriales y posts de inspiración para hacer tooodas las variaciones de braguitas que querías. Primero podéis ver los posts de inspiración para las braguitas Stella y Mia que os sirven perfectamente también para este patrón.

I't’s also a good time to remind you that there are several inspiration posts and tutorials about pantie sewing here at the blog archives so you can make allll the variations you want. First you can check out the inspiration posts about Stella and Mia pantie patterns, both of these are great for this pattern too.

www.studiocostura.com

Y luego tenéis tutoriales para:

And tehre are tutorials about:

www.studiocostura.com

Espero que os guste el nuevo patrón! Ya sabéis que en mi cuenta de IG @studiocosturashop pongo un montón de fotos de lencería para que os animéis a probar a coserlo!!!

I hope you like the new pattern! As you know you can follow along on my IG account @studiocosturashop where I share customer makes, inspirational photos about lingerie and my own lingerie sewing process pics!