Nuevo patrón: la braguita Vera // New pattern: Vera panties

 
www.studiocostura.com

Hola, os presento mi nuevo patrón braguita Vera! Es un patrón con el corte bikini y viene en tres versiones, uno para punto y dos para encajes.

Hey, here’s my newest pantie pattern: meet the Vera panties! It’s a bikini/brief cut pattern that comes in three versions, one for stretch knit fabrics and two for stretch lace.

www.studiocostura.com

Hace tiempo que quería publicar un patrón con este corte ya que era lo que faltaba entre los patrones de braguitas que tengo disponibles. Aparte de así tener una variedad de cortes para todos los gustos para gente que cose en casa, también puedo ofrecer a las que asisten a mis cursos de lencería la mayor variedad.

It was about time to publish this style as it was missing from my pantie pattern collection. Apart from making patterns for people who sew at home I also teach lingerie sewing classes so now there’s one more style they can choose when they attend the classes.

www.studiocostura.com

La versión 1 es la más básica: se hace con telas de punto con elastano y la cinturilla y las aberturas de piernas están rematadas con elásticos de lencería. Puedes usar cualquier tela de punto que sea elástica y no muy gruesa, mis favoritos son puntos de viscosa ya que son de grosor fino y el tejido es respirable. Es también buena oportunidad de aprovechar los típicos cortes pequeños que quedan de los proyectos de camisetas etc. Si quieres probar coser braguitas por primera vez, esta versión es lo mejor para empezar y así aprendes lo básico (ya sabes que como de costumbre mis patrones vienen con instrucciones muy detalladas, tienen fotos con texto explicativo sobre cada paso que tienes que hacer). Si necesitas elástico de lencería puedes mirar en esta sección de mi tienda que hay varios colores y tipos.

Version1 is the very basic pantie: it’s sewn with knit fabrics (with spandex for more comfort) and the waist and the leg openings are finished with lingerie elastic. You can use whatever light weight knit fabrics with stretch in them, my favourites are viscose knits as they are light weight and breathable. Sewing panties is also the perfect occasion to use up scraps of fabric from t-shirt projects etc. If you’re new to sewing lingerie, this version is perfect for starting out and learning the very basics (as always my patterns come with step by step instructions full of photos and text about each step you have to follow in order to finish a pretty pair of panties). If you need narrow lingerie elastics for panties you can check out this section of my shop for various colors and types.

www.studiocostura.com

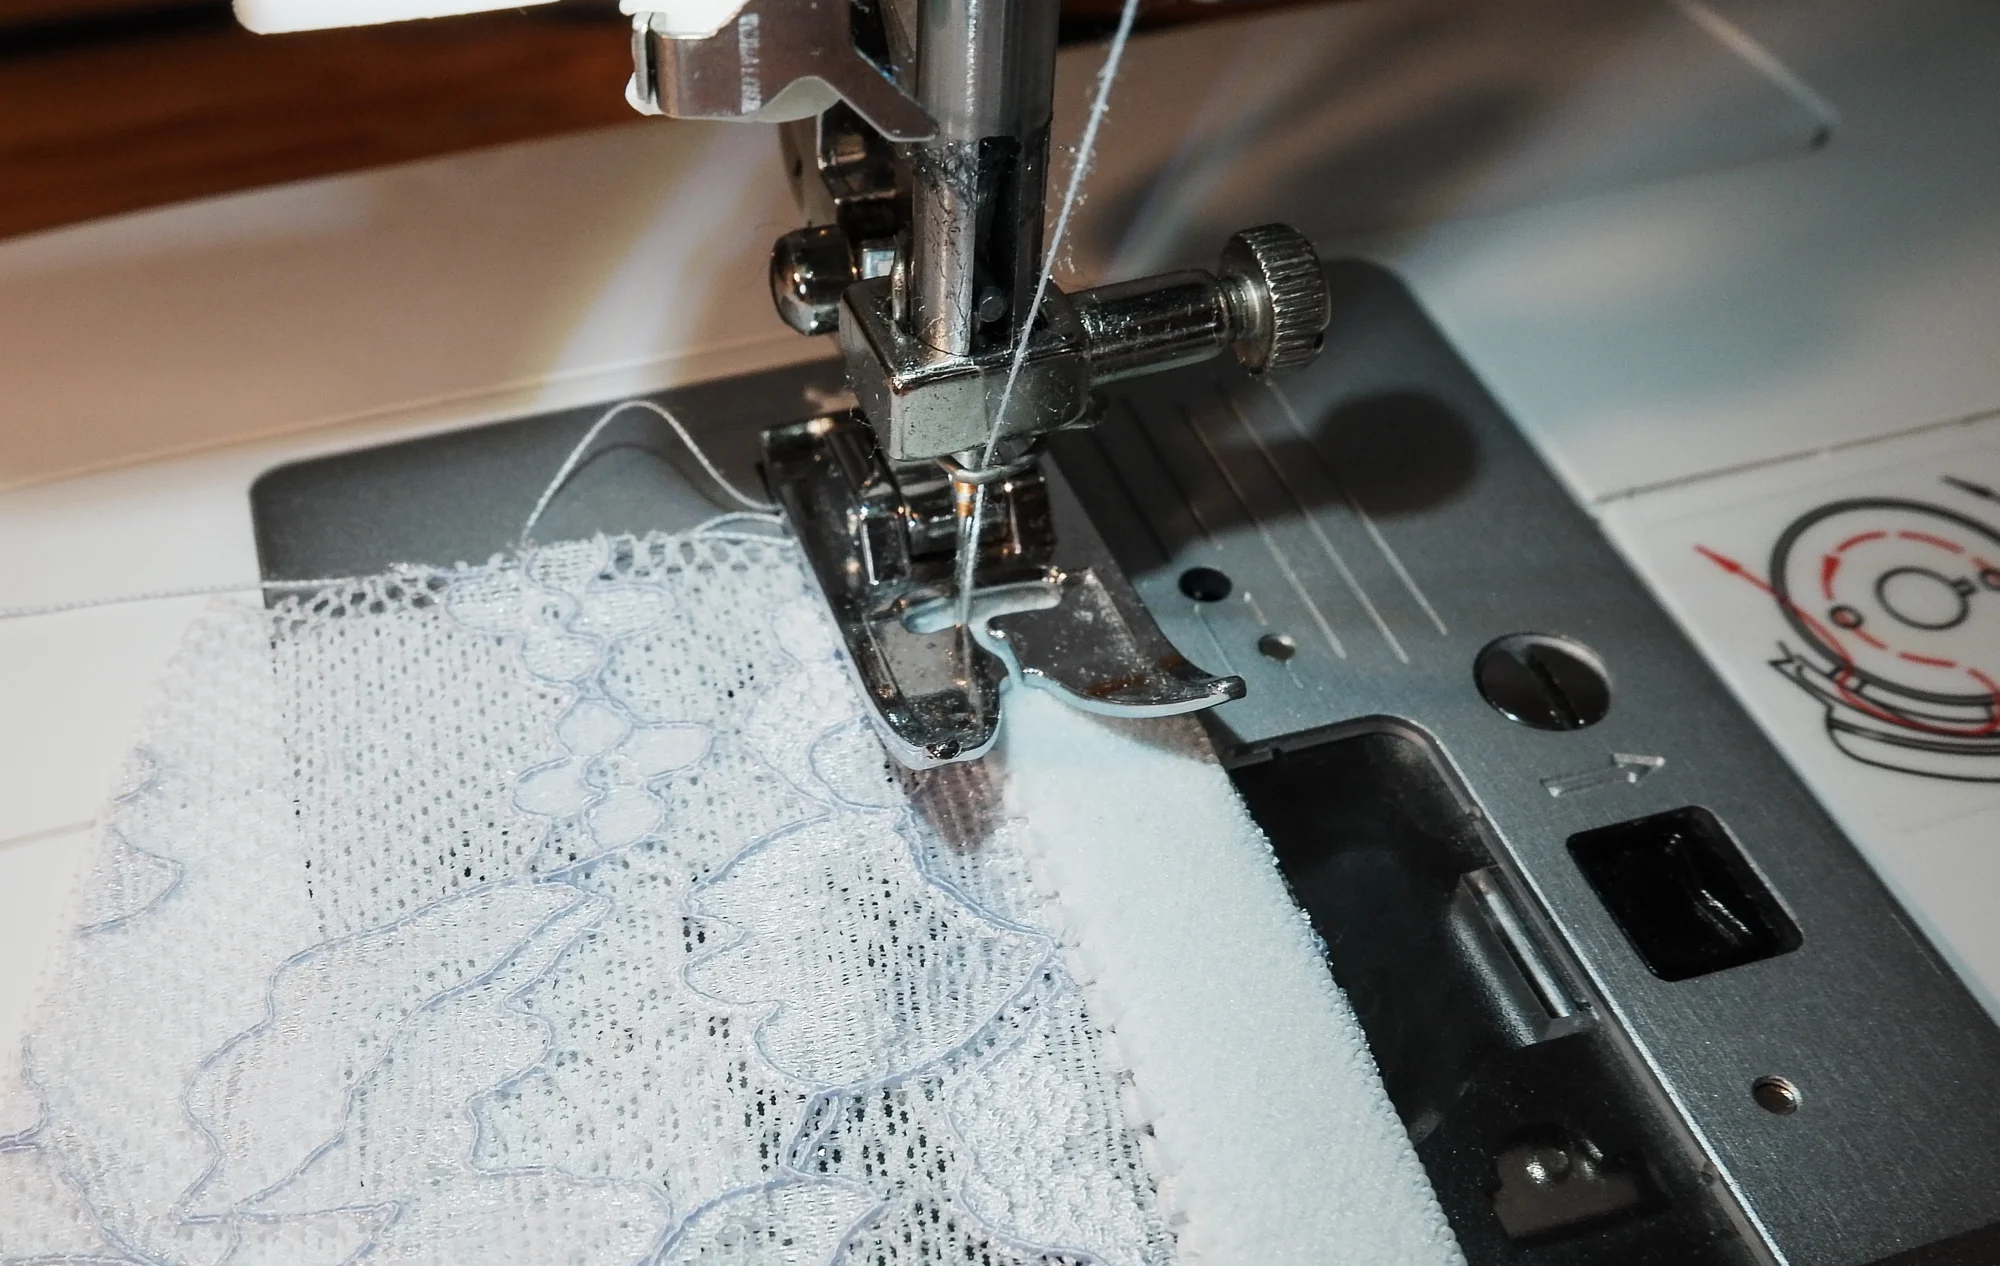
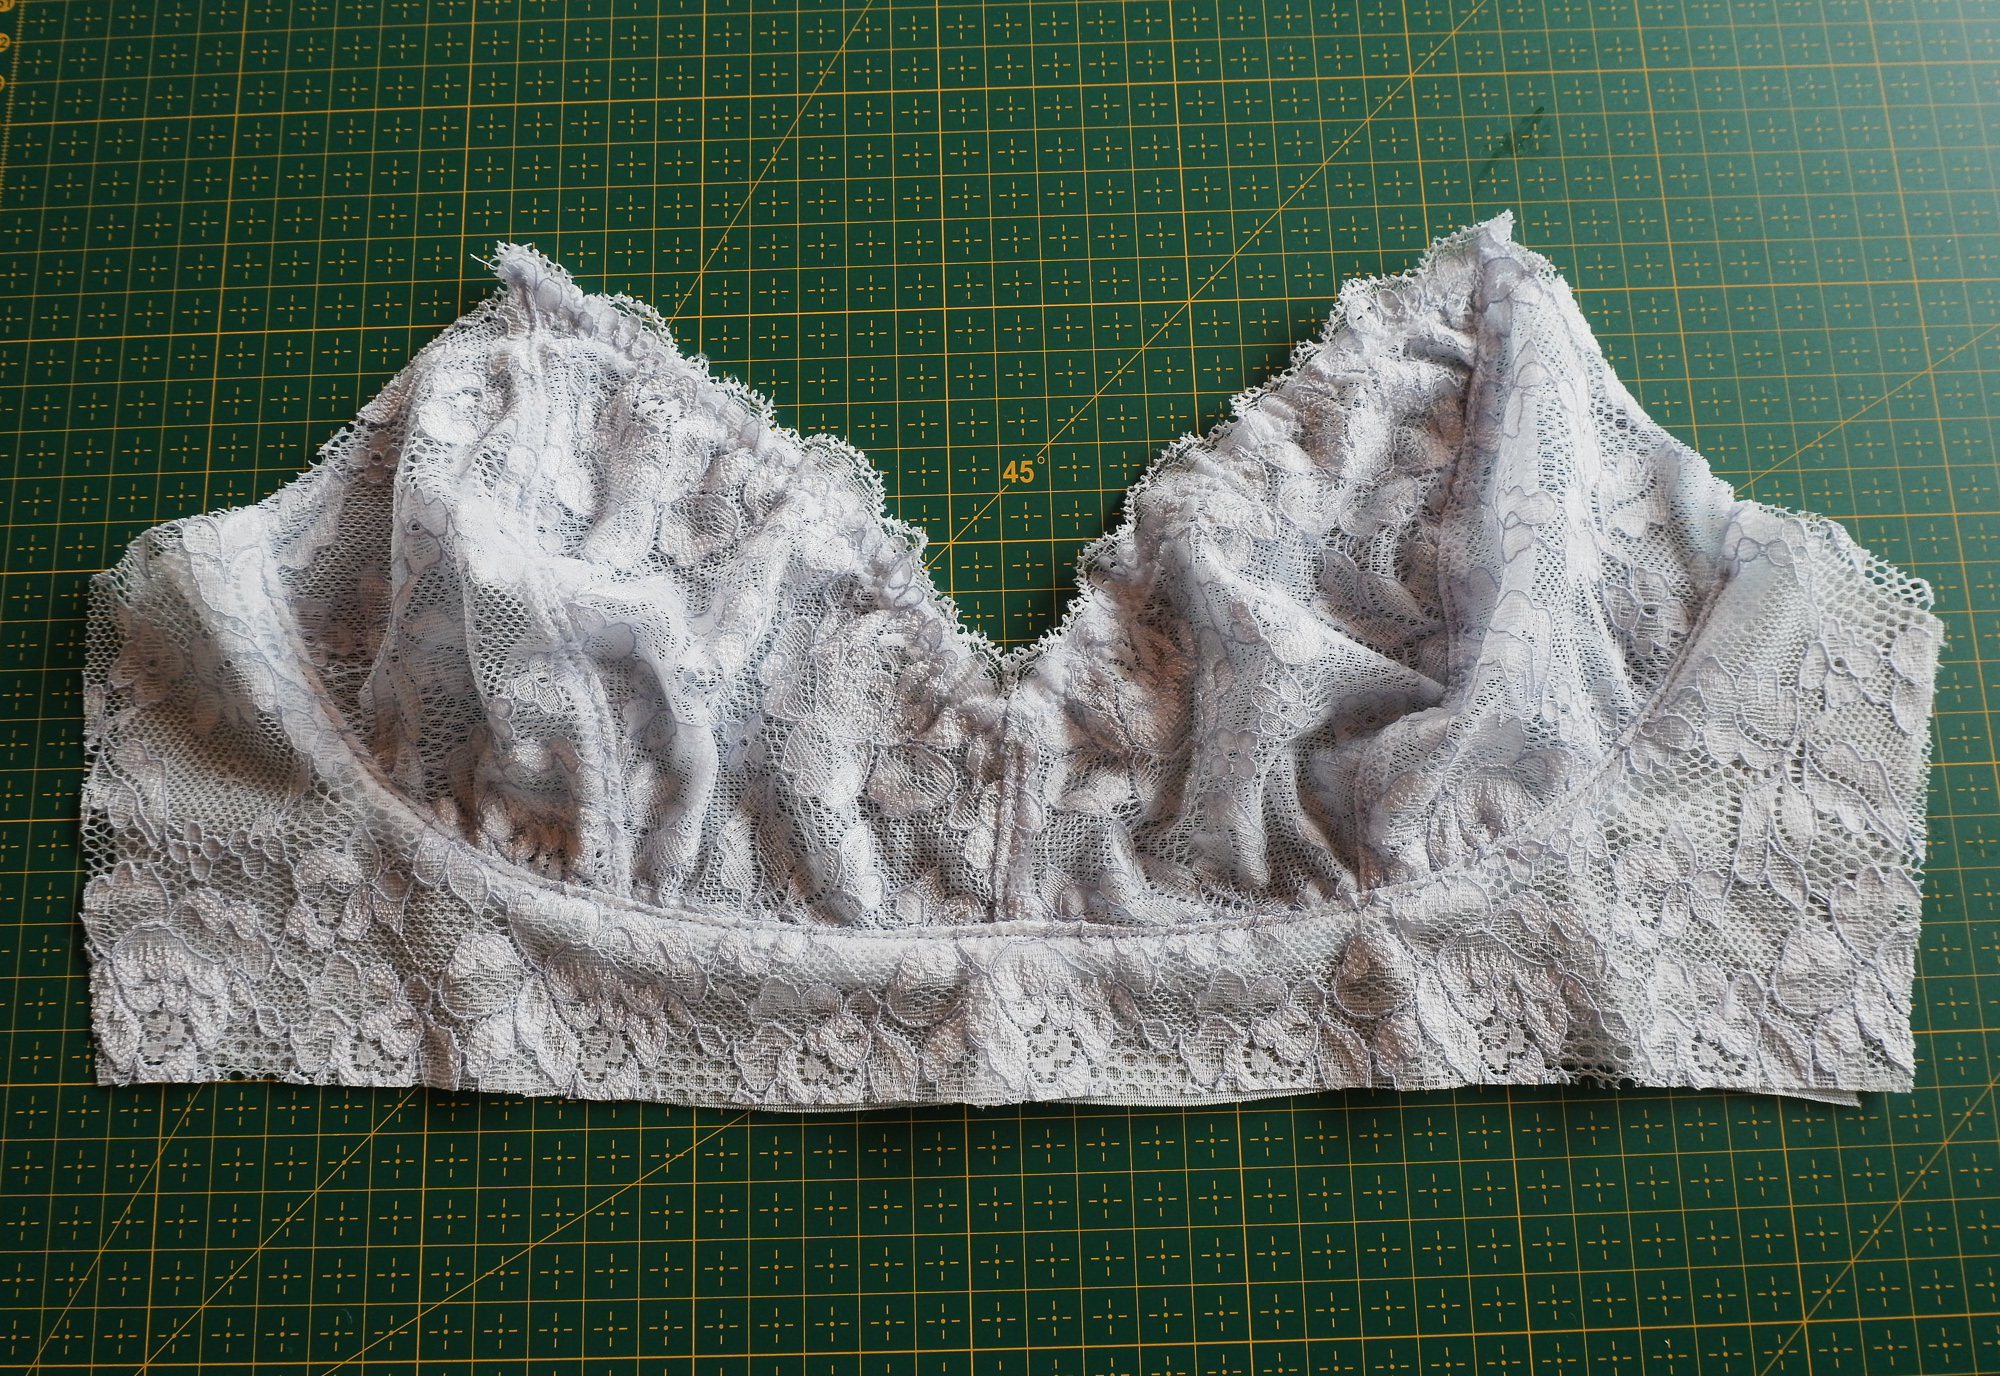
La versión 2 se cose con encaje elástico y queda muy bonito con el borde de la puntilla en las aberturas de las piernas. Las piezas de encaje se juntan en el centro delantero creando un diseño diferente! Este diseño es similar a la versión de encaje de las braguitas Stella pero el corte es diferente ya que está adaptado al corte bikini, cubriendo menos en la parte de la pierna.

Version 2 is made with stretch lace and the scalloped lace edge looks very pretty on the leg openings. The front lace pieces are joined on the center front in a special way that creates as a result a unique design element! This design is similar to the Stella panties pattern in the lace version but this time the same style is drafted for a bikini style with a higher leg opeing.

www.studiocostura.com

La versión 3 es algo distinto, también se cose con encajes elásticos pero tiene un bonito detalle de elástico de tirante en la parte de los costados. Era un diseño que quería añadir a los dos previos ya que me parece muy fácil de hacer y el resultado es diferente aunque el corte en sí es lo mismo que la base. Además este estilo lleva bastante poco material así que es ideal para hacer conjuntos con los bralettes y sujetadores. Aparte de los materiales que normalmente necesitas para coser un par de braguitas, tienes que tener 4 arandelas y 2 reguladores y 0,4m de elástico de tirante. Si los quieres comprar aparte tienes diferentes variedades en mi tienda en las secciones de tirantes y de arandelas y reguladores.

Version 3 is different, it’s also made with stretch lace but it has a beautiful strap elastic detail on the sides. I really wanted to add this style as one of the versions as it’s easy to make and the result is completely different altough it’s based on the same pattern block. Also this version can be made with a little amount of supplies so it will be a great scrap buster to sew up panties that match with your handmade bras and bralettes. Apart from the usual supplies you need for sewing panties this version also uses 0,4 m of stap elastic and 2 sliders + 4 rings. If you want to get them from my shop you can check out this section for strap elastics and this one for rings and sliders.

www.studiocostura.com

Como siempre tienes en la tienda los kits específicos para coser braguitas, vienen con material suficiente para coserte un par de braguitas de punto y otro de encaje. En el caso de querer coser la versión 3 de este patrón Vera puedes escribirme en los comentarios de la compra y te añado los materiales que necesitas: el tirante y las arandelas y los reguladores.

También tienes la opción de comprar directamente el patrón Vera + kit de braguitas, es la versión más económica! En este caso como siempre, cuando lo compras me dices allí qué kit quieres y yo te mando el patrón a tu correo.

As always there are specific pantie making kits in the shop that include enough supplies to make one pair of knit and one pair of lace panties. In case you want to sew the 3rd version of Vera panties you can leave me a comment so I will add the strap elastic and rings + sliders you need.

You have also the option to buy the Vera panties pattern directly with a pantie kit, it’s also the cheapest option! In this case as always just leave me a comment about which kit you’d like to get and I will send you the pattern to your e-mail address.

www.studiocostura.com

También aprovecho para recordaros que aquí en los archivos del blog tenéis varios tutoriales y posts de inspiración para hacer tooodas las variaciones de braguitas que querías. Primero podéis ver los posts de inspiración para las braguitas Stella y Mia que os sirven perfectamente también para este patrón.

I't’s also a good time to remind you that there are several inspiration posts and tutorials about pantie sewing here at the blog archives so you can make allll the variations you want. First you can check out the inspiration posts about Stella and Mia pantie patterns, both of these are great for this pattern too.

www.studiocostura.com

Y luego tenéis tutoriales para:

And tehre are tutorials about:

www.studiocostura.com

Espero que os guste el nuevo patrón! Ya sabéis que en mi cuenta de IG @studiocosturashop pongo un montón de fotos de lencería para que os animéis a probar a coserlo!!!

I hope you like the new pattern! As you know you can follow along on my IG account @studiocosturashop where I share customer makes, inspirational photos about lingerie and my own lingerie sewing process pics!


CC bralette Mara día 6 // Mara bralette Sewalong day 6

 
kuus.jpg

Aquí está el último post del CoseConmigo de bralette Mara, estamos casi casi terminando ya!

Here’s the last post in the Mara bralette Sewalong series, we’re almost done here!

DSCF7599.jpg

En este punto vamos a empezar con la parte debajo de la banda y allí es donde vamos a poner primero el elástico de lencería. Sobre este tema siempre tengo muchas preguntas,voy a intentar explicaros como pueda para que quede claro (también tengo un post sobre cómo coser los elásticos de lencería si quieres más información). Se cose en dos vueltas, primero en el derecho del bralette y luego se dobla hacia el revés y se vuelve a coser.

Coloca tu bralette con el derecho hacia arriba (con el encaje hacia ti) y pon el elástico encima de la parte debajo del pecho de la manera que el lado suave del elástico se quede hacia ti y la orilla decorativa se quede hacia dentro del bralette. Alineamos el elástico con el borde y vamos a coserlo a lo largo de todo el bajo.


We're going to start with the band part of the bralette for the first elastic. I always have lots of questions about inserting elastics, I'll try my best to explain it the easiest way possible (I also wrote a post about sewing lingerie elastics it if you want to read more). The elastic is sewn in two rows, first on the right side of the bralette and then it's folded on the reverse and stitched again.

Put your bralette with the right side up (with the lace part up) and put the elastic on top of the band in the lower part. The plush side is up and the decorative edge is towards the inside of the bralette. Align the elastic with the border, we'll sew it along all the underbust area.

DSCF7601.jpg

Usando un zig-zag (2.5 ancho, 2.5 largo) cose cerca del borde decorativo del elástico mientras estiras ligeramente del elástico. Ligeramente significa que queremos que el elástico tenga tensión (sino no va a sujetar) pero que no apriete demasiado. En el caso ideal se forma un ligero frunce en el revés, así sabemos que el elástico tiene la tensión correcta. No estires el bralette, sólo estira el elástico.

Cuánto tirar? No quería poner en las instrucciones medidas exactas de elástico para cada talla porque según mi experiencia en vender los elásticos sé que no todos son igual de firmes. Un elástico más firme lo tienes que estirar un poco menos, un elástico más flojito pues al revés, tienes que tirar más para que sujete. Mi recomendación general es tirar 1 cm por cada 5 cm de elástico y observar después de coser un poco si en el revés parece que has tirado lo suficiente o no, hay tensión? Al principio cuesta hacer las dos cosas a la vez: tienes que coser recto y cerca del borde y encima estirar y no sabes ni cuánto... Viene con práctica, no te desesperes. Dentro de poco lo tienes "en la mano" y ya no piensas en los centímetros.

Es importante que mantengas el zig-zag cerca del borde a una distancia uniforme porque en el siguiente paso le damos la vuelta al elástico y allí es cuando se ve la puntilla (u otro tipo de borde decorativo).

Yo prefiero coser el elástico de esa manera, tirando mientras coso, porque también así aprovecho más los materiales, corto justo donde acabo. Si aún así eres de estas personas que necesitan medidas te recomiendo probar este cálculo: mide el bajo de tu bralette y multiplica ese número con 0.8. Corta este largo de elástico y divídelo en cuatro partes iguales al lo largo del mismo. Luego divide el bajo del bralette también en cuatro partes iguales y coloca el elástico juntando los puntos en el bajo y en el elástico. De esa manera (que es similar como poner los cuellos en prendas de punto por ejemplo) consigues que el elástico esté igualmente tensado en todo el largo del bajo del bralette. Ahora, ojo, lo de multiplicar con 0.8 es en un caso general, si resulta que tu elástico es más firme/más flojo, habrá que ajustarlo.

En fin, prueba y ve qué tal. Ya sé que eso no suena nada bien, pero siempre puedes descoser y volver a empezar (aunque reconozco que descoser el elástico de lencería es un rollo, jaja).


Using a zig-zag stitch (2.5 width, 2.5 length) sew close to the decorative edge of the elastic while you pull the elastic slightly. Slightly means that we want the elastic to have tension (otherways it won't give support) but we don't want it to pull too much. When done right there should be a slight gathering on the wrong side of the bralette, that way we know that the tension of the elastic is correct. Don't stretch the bralette, only stretch the elastic.

How much should I pull? I didn't want to put the exact measurements in the instructions of this pattern as my experience when selling lingerie elastics is that all of them have a different firmness. There are stiffer ones you need to pull less and there are softer ones that need to be pulled a bit more. My general recommendation is to pull 1 cm for every 5 cm of the elastic and observe on the wrong side of the bralette if the tension feels right. In the beginning this step seems to be complicated: you need to sew straight and close to the edge while at the same time pulling the elastic and not knowing exactly how much to do it... It really comes with practice, don't feel overwhelmed. In no time you'll have it "in your hand" and you won't obsess with the centimeters.

It's important to maintain the same distance when sewing the zig-zag stitching close to the decorative edge of the elastic. On the next step we'll fold the elastic on the wrog side and here you'll see the little decorative edge of the elastic.

I prefer sewing the elastic that way, pulling while I sew as this way I'll save elastic as I cut it exactly where I finish sewing. If you are one of those people who really needs the concrete measurements I suggest this calculation: measure the band edge of your bralette and multiply it with 0.8. Cut this length of elastic and divide it in four equal parts.  Now divide the band edge in four equal parts too and pin the same points together on both the band and the elastic. With this method (same as sewing a knit neckband for example) you'll have the same tension in all of the band piece. Still you need to be careful as 0.8 is a general number, if your elastic is firmer/softer you still need to make adjustments.

You just have to try and see how it goes. I know it doesn't sound good but you can always unpick and start again (altough I have to recognize that unpicking zig-zag on lingerie elastics is horrible, hehe).

DSCF7602.jpg

Así se ve la primera pasada de zig-zag en el derecho de trabajo.

This is how the first zig-zag pass look like on the right side of the work.

DSCF7605.jpg

Ahora da la veulta a tu trabajo y recorta toda la tela en el margen de elástico que sobra hacia fuera. La idea es que vamos a doblar el elástico hacia el revés y no queremos que se vea el borde de la tela una vez que lo hacemos. Con cuidado metiendo la tijera entre la tela y el elástico, recorta al ras del zig-zag todo lo que sobra. Este paso también va a eliminar el bulto que vas a tener una vez que doblas el elástico.


Now turn your bralette around and on the reverse side cut away the fabric that extends from the zig-zag stitching. We'll be folding the elastic down on the wrong side so you don't want the seam allowance to peek out once you sew the elastic on. You need to carefully cut the fabric while not cutting the elastic, slipping the scissors between the two layers. This step also eliminates the extra bulk that you'll have when you fold the elastic.

DSCF7606.jpg

Una vez que tenemos la primera vuelta de elástico cosido vamos a ir con la segunda. Pero antes vamos a preparar los trozos pequeños para enganchar después los tirantes, vamos a aprovechar esa segunda costura para colocarlos ya en su sitio.

Corta dos tiras de elástico de tirante, cada una 9 cm de largo.


Once we have the first pass of elastic done we'll sew the second one. But before we'll prepare the short straps that will be holding the bra straps later on, we’ll sew them under the band elastic too.

Cut two 9 cm long strips of strap elastic.

DSCF7607.jpg

En la pieza de la banda (D) tienes el piquete que marca el sitio donde va el tirante. Aprovechamos la segunda vuelta de zig-zag para enganchar el tirante en su sitio. Coloca el tirante con el derecho hacia arriba donde el piquete en el revés del bralette y dobla el elástico de bajo también al revés del bralette. El tirante se queda entre el forro y el elástico. Puedes sujetar el tirante con un alfiler mientras lo coses.


On the band piece (D) you have the notch that marks where the strap goes. We'll use the second row of zig-zag stitching on the band elastic to secure the straps in place. Put the strap elastic with the right side up in its place on the wrong side of the bralette. Fold the band elastic also on the wrong side of the bralette. The strap will be between the lining and the band elastic. You can pin it in place until you sew it.

DSCF7609.jpg

Es la hora de coser la segunda pasada de zig-zag. Esta vez cose en el revés del bralette cerca del borde no decorativo del elástico (2.5 de ancho, 2.5 de largo) a lo largo de todo el bajo. Esta vez no tienes que pensar cuánto tensar el elástico, con la primera vuelta ya lo has hecho. Ahora falta estirar el bralette ligeramente junto con el elástico para que pase por la máquina más fácilmente y para que no se formen arrugas abajo. Yo suelo sujetarlo con las dos manos, una adelante y otra detrás del prensatelas y así aseguro que todo va bien mientras hago la puntada. Cose de un extremo al otro doblando el elástico encima de los tirantes y la cinta recubrearos en los laterales.


It's time to sew the second row of stitching on the band elastic. This time you sew on the wrong side of the bralette, close to the non-decorative edge of the elastic (2.5 width, 2.5 length) along all of the band. This time you don't need to think about how much to pull as this is already done on the first pass. Now you just need to stretch slightly both the band and the elastic in order to be able to pass everything trough your machine as smoothly as possible. I usually use two hands, one behind the presser foot and the other in front, that way I can assure that I have everything under control. Sew from one side to the other, folding the elastic on top of the strap elastics and underwire channeling on the side seams.

DSCF7610.jpg

Así es cómo se ven las dos pasadas del zig-zag en el revés del bralette. En el derecho sólo se ve una pasada.


This is how the two rows of zig-zag stitch look like on the inside of the bralette. On the outside side you only see one row.

DSCF7612.jpg

El elástico de debajo del pecho ya está y ahora falta coser el de la sisa. Antes de empezar vamos a comprobar de nuevo si todo cuadra en el final de la banda y que nuestro cierre tiene el mismo ancho que el final de la banda. Ahora mismo el final de la banda tiene que medir lo mismo que tu cierre + el ancho del elástico que usas para la sisa. Si te sobra tela, recórtalo suavizando la línea en la parte de arriba, si te falta tienes que intentar coser más al borde ahora al poner el elástico de sisa.


The band elastic is attached and now we'll sew the underarm elastic. But before we'll check again if the closure fits with the band piece. The band piece should at this moment measure the same as your closure + the remaining elastic you are about to sew now. If there is too much fabric you can cut it away, smoothing out the seamline. If you don't have enough width you can try sewing with a smaller seam allowance at the end of the band.

DSCF7613.jpg

El elástico de la sisa se pone exactamente igual como en la parte de debajo del pecho. Empiezas en el derecho del bralette colocando el elástico con la parte suave hacia arriba y con el lado decorativo hacia dentro del bralette. Estiras ligeramente y coses el zig-zag (2.5 ancho, 2.5 largo) al lado del borde decorativo. No cosas encima del tirante, dejalo fuera porque lo vamos a enganchar en el siguiente paso. Después recorta el sobrante de la tela y dobla el elástico hacia el revés. Cose el zig-zag (2.5 ancho, 2.5 largo) al lado no decorativo del elástico. Repite en el otro lado.


The underarm elastic is sewn exactly the same way as the band elastic. You start with the elastic on top of the right side of the bralette with the plush side up and the decorative edge towards the center of the bralette. Sew the zig-zag stitch (2.5 width, 2.5 length) close to the decorative edge while pulling slightly the elastic. Don't sew over the strap elastic, leave it out, we'll attatch it on the next step. Cut away the remaining fabric and fold the elastic to the wrong side of the bralette. Sew the second row of zig-zag stitching (2.5 width, 2.5 length) close to the non decorative edge of the elastic. Repeat on the other side.

DSCF7614.jpg

Así se ve el elástico de la sisa una vez cosidas las dos pasadas.

This is how the underarm elastic looks like once it’s sewn.

DSCF7615.jpg
DSCF7616.jpg

Preparamos los tirantes regulables. Corta dos tiras de elástico de tirante, cada una 40 cm de largo. Con el derecho del tirante hacia arriba, pasa el tirante a través del regulador.

Now we’ll prepare the adjustable straps. Cut two 40 cm long strips of strap elastic. With the right side of the elastic up pass the elastic trough the slider.

DSCF7617.jpg
DSCF7619.jpg

Dobla la punta de tirante unos 1.5 cm hacia el revés y haz un remate en el revés del tirante con puntada recta. Pasa la arandela por la otra punta libre del tirante.

Fold the ending down for aprox 1.5 cm on the wrong side and backstitch on the wrong side of the elastic. Pass the other end of the elastic trough the ring.

DSCF7618.jpg
DSCF7620.jpg

Con el revés del tirante hacia arriba pasa la punta libre de nuevo por el regulador de la misma manera que en el primer paso.

With the wrong side of the elastic up pass the free end of the elastic trough the slider like we did on the first step.

DSCF7622.jpg

Coloca el tirante regulable con el derecho hacia abajo en la mesa, el bralette también está con el derecho hacia abajo. Pasa el tirante pequeño a través de la arandela y doblalo debajo de sí mismo, encima del elástico de la sisa.

Put the adjustable strap elastic on the table with the right side facing down, the bralette itself is with the right side facing down too. Pass the short strap through the ring and fold it under itself on top of the underarm elastic.

DSCF7623.jpg

En el revés del bralette haz unos remates con la puntada recta encima del elástico de la sisa. Yo suelo hacer dos filas, así es más seguro.


Secure it with a row of straight stitching on top of the underarm elastic on the wrong side of the bralette. I usually sew two rows to make it extra secure.

DSCF7624.jpg

Coloca el otro lado del tirante en la parte superior de la copa, donde empieza el elástico de la sisa.

Put the other end of the strap elastic on the upper part of the cup, where the underarm elastic ends.

DSCF7625.jpg

Cose un remate en el revés del bralette con la puntada recta. Yo suelo hacer dos remates para asegurarlo bien en su sitio.

Sew with straight stitch on the worng side of the bralette. I usually make two lines of backstitching to secure the strap in place.

DSCF7626.jpg

Así se ve en el derecho. Este paso puede resultar un poco complicado porque son muchas capas de tela a la vez. Cose lento con la ayuda de la rueda de la máquina para no romper la aguja. En el caso de encaje no se suele notar mucho el remate en el derecho, se ve más con las telas lisas. Antes de pensar que eres tú quien no consigue un acabado super limpio ya que se ve esta costura, piensa: por qué muchas veces los sujetadores llevan lazos en este punto y el en centro de las copas? Queda mono, sí, pero también para tapar este tipo de remates! Es normal, cada vez vas a conseguir resultados más “limpios”, pero algo siempre se ve!

Here you can see the right side. This step can be a bit complicated as there are many layers of fabric on top of each other. Sew slowly with the help of the wheel of your sewing machine in order to not break the needle. The backstitching is usually less visible on lace and more visible on knit fabrics. Before thinking that you’re the only one who doesn’t get the super neat finishing as this backstitching will be visible, think about that: why many bras have bow ties in the middle of the cups and where the straps begin? Yes, it looks cute, but they are also there to cover this type of backstitching! It’s completely normal and you will get “cleaner” results once you practice more too!

DSCF7627.jpg

Los cierres: cuando tienes el bralette así mirando "hacia abajo" como en la foto, los ojos del cierre van a la izquierda y los ganchos a la derecha. Si yo dudo dónde van siempre lo pongo así y pienso en el sujetador que llevo y qué parte está por donde, jeje.


The hook and the eye closure: when you have the bralette "face down" like on the photo the hook part goes to the right and the eye part goes to the left. When I'm doubting which way to put those I just check the bra I'm wearing to know, hehe.

DSCF7628.jpg

Para empezar en el derecho de bralette mete el final de la banda dentro del hueco que tiene el cierre con el tamaño predeterminado / abre el cierre y mete el final dentro si usas uno que es de cortar a medida.

Cose unas líneas con puntada recta para enganchar el cierre al bralette. Yo suelo coser como un recuadro y así lo remato bien. En el caso de cierre de ancho predeterminado ya estás. En el caso de usar uno de cortar a medida tienes que pasar un zig-zag en los bordes para rematarlos. Usa una puntada de zig-zag ancho pero corto (tipo 4 de ancho y 1 de largo) similar a lo de ojal para rematar los bordes del cierre.


To start with this step put the end of the band piece on the right side inside the little pocket on the eye piece of the closure. If you are using the other type of closure that you cut as you want, just open it and put the piece in the middle.

Using a straigth stitch sew the eye part to the end of the bralette. I usually sew a rectangle shape to make it secure. When you are using a normal closure it's done now. With the custom length one you need to finish off the raw edges. Using a wide and short zig-zag stitch (like 4 width, 1 length for example) similar to a button hole stitch, sew on top of the raw edges to finish them off.

DSCF7629.jpg

En el otro lado enganchamos los ganchos al bralette. Recuerda que los ganchos tienen que quedar en el revés del bralette para poder cerrar. Mete el final de la banda dentro de la pieza de los ganchos en el cierre de ancho predeterminado. Si usas uno de cortar a medida, dobla esa pieza y mete el final de la banda en el medio.

Cose una línea de costura recta para enganchar el cierre. Tienes que coser en el lado de los ganchos para no dañar la máquina. Como esta parte es más estrecha y tienes los ganchos por el medio te recomiendo que hagas una de las siguientes cosas. Si tienes un prensatelas más fino, usalo. Si puedes mover la aguja de tu máquina a un lado va a ser más fácil de coser (en la puntada recta mueve la aguja como si fuera la puntada de zig-zag). Y si no puedes las dos cosas anteriores puedes probar con el prensatelas de cremallera. Este paso es mucho más fácil si hilvanas la pieza antes.

De nuevo si tienes el cierre de cortar a medida tienes que pasar el zig-zag de remate.


On the other side of the bralette we'll attatch the hooks. Remember that the hooks have to be on the wrong side of the bralette so you'll be able to close the bralette. Put the end of the band piece inside the pocket of the closure. If you use the custom length one you have to fold the piece and wrap it around the band piece.

Sew a straigth stitch line to attatch the closure. You need to sew on the side where the hooks are, in order not to damage your machine. As this part is smaller and the hooks are kind of on your way I recommend you to do one of these things: If you have a narrower presser foot, use it. If you can change the needle position, move your needle to the one side so you'll have more room (on the straight stitch adjustment just move the needle as you’d do when using zig-zag stitch). If you can't do those two things you can try using a zipper foot. Basting this part helps with getting neat results!

Again if you have a custom size closure you need to finish off the edges with a zig-zag stitch.


www.studiocostura.com
 

Ya está!!! Espero que te haya quedado bonito y que estas explicaciones te han ayudado! Si tienes cualquier pregunta lo puedes poner en los comentarios. 

Me encantaría ver vuestras creaciones con el patrón, así que si usas Instagram no te olvides de etiquetarme (@studiocostura) en tus fotos para que las pueda ver. Muchas gracias por seguir el CoseConmigo!

Próximamente haré los tutoriales para poder coser este bralette con telas de punto y con foam y también para saber cómo dejar la puntilla visible en la parte de abajo!

That's it!!! I hope your bralette turned out beautiful and that these instructions helped you! If you have any questions just leave them in the comments section.

I'd love to see your projects using this pattern so if you use Instagram definitely tag me (@studiocostura) so I can see your makes. Thank you so much for following this sewalong.

Next up I’ll prepare the tutorials so you can hack this pattern a bit, I’ll show you how to: use knit fabrics, foam and how to leave a longer scalloped lace edge on the band!


CC bralette Mara día 5 // Mara bralette Sewalong day 5

 
channeling.jpg

Vamos con el siguiente post del coseconmigo de bralette Mara. La última vez quedamos en el paso donde las copas ya estaban cosidas con la banda frontal, ahora vamos a coser allí la cinta recubrearos!

Here’s the next post in Mara bralette sewalong series. The last time we sewed the cups together with the front band, now we’ll add the underwire channeling.

www.studiocostura.com

Cuando diseñé este patrón quería que tenga más soporte y por eso decidí añadir la cinta recubrearos debajo de las copas aunque este bralette no lleva aros. Ahora, cuando hice la prueba, había una chica que no usó la cinta porque no lo tenía y lo que hizo fue en el paso que acabamos de hacer cambiar un poco el orden. Ella cosió las piezas de la manera que las copas se quedaron entre el exterior de la banda frontal y el forro de la banda frontal (la misma manera como cuando unimos las copas para que no haya costuras visibles). Así consiguió un resultado bonito y rematado pero sin la cinta recubrearos. Es una opción si tienes poco pecho y por alguna razón no quieres/puedes usarlo…pero la verdad es que lo recomiendo porque es sorprendente lo cómodo que es el resultado.

When I designed this pattern I wanted it to give better support and that’s why I used underwire channeling even tough this bralette does not have wires included. When I was testing the pattern one of my testers didn’t use the channeling tape as she didn’t have one and she used a different construction method to get a neat inside anyway. In the last step when we joined the cups with the front band she did it like in the cups, putting the cups between the lace band and the lace lining pieces. This way the seam allowances are hidden between the layers and it looks pretty. It’s an option if you have smaller cup size and you are not interested in using the channeling tape or you don’t have it available…I’d still recommend using it as it’s surprisingly comfortable.

www.studiocostura.com

Vamos allí: la cinta recubrearos se va a coser para “tapar” este márgen de costura, el de la unión de las copas con la banda frontal. Se cose de la manera que primero lo unimos solo con el márgen de costura guiándonos con las puntadas hechas en el previo paso y después lo doblamos todo ya hacia abajo y volvemos a coser. Primero coloca en la máquina este márgen de costura, sin que pises con la aguja el resto de las piezas.

So let’s go: the underwire channeling tape will be “hiding” this seam allowance, the one from the union of the cups and the band. First we will only sew it to the seam allowance where we can use the previous seam line as a guide and then we will fold everything down and topstitch again. First put this seam allowance under your machines presser foot, but don’t sew over the rest of the bralette.

www.studiocostura.com

Encima de este márgen coloca la cinta recubrearos. Empezamos 1 cm desde donde has cosido antes, del borde, porque después hay que coser los elásticos de la sisa y para que la cinta recubrearos no doble encima de sí mismo hay que dejar el márgen del elástico porque sino tuvieras mucho bulto en esta zona. La cinta tiene una costura ya hecha de la fábrica, coloca este borde justo donde tu costura de unión.

On top of that seam allowance put the channeling tape. We start 1 cm from your previous starting point, the underarm, as after this step we will have to sew the elastics there and we don’t want the channeling tape to be doubled on itself once you do that, this way we reduce bulk. The tape has an existing stitching line which you will put just where the seamline is.

www.studiocostura.com

Cose encima de la misma costura de la cinta con la puntada recta, en el borde, juntando la cinta justo donde está la costura de unión. Este paso puede parecer algo complicado porque la costura está en curva, hay muy poco de márgen, hay que coser muy pegado pero sin pasarse…además como ves no he puesto alfileres! Realmente este paso resulta que no es tan difícil, tienes que coser lento y seguir poco a poco la curva, no he puesto alfileres porque la cinta es gruesa y sería muy incómodo usarlas pero de verdad, os recomiendo coser poco a poco, manteniendo la tensión y veis que sale bien si vais a guiar la cinta poco a poco.

Sew on top of the seamline on the channeling tape with a straight stitch, on the border, putting the tape just where the seam allowance starts. This step looks a bit difficult as the seamline is on the curve, there’s very little seam allowance to sew on and you have to sew close but not over the cups…and as you can see I didn’t use pins! Actually it’s not so difficult, you just have to sew slowly on the curve, I haven’t used pins as the tape is quite bulky and it would be very uncomfortable. I recommend you to just sew slowly while you guide the tape as you go, I’m sure it will be easier than you think.

www.studiocostura.com

Así es como queda la primera costura.

Here’s the first line of sewing.

www.studiocostura.com

La costura de la propia cinta me sirvió de guía así que casi ni se nota mi costura encima.

I used the existing stitching line already on the tape to guide me so you almost can’t really see my stitching line.

www.studiocostura.com

Si has cosido todo bien no debería sobrar tela más alla de la cinta recubrearos porque los márgenes eran de 6 mm cuando unimos las piezas y la cinta suele ser de 8-10 mm así que debería tapar el márgen anterior. De todas maneras casi siempre en algún punto me queda algo más de tela debajo y eso se puede cortar.

If you’ve sewn everything according to the seam allowances you shouldn’t have any extra fabric peeking out underneith the channeling tape, the seam allowances were 6 mm and the tape is normally 8-10 mm so it should cover the fabric underneith. But almost always I still have some extra fabric that I trim down.

www.studiocostura.com

Con cuidado reduce la tela que sobra debajo de la cinta recubrearos, así también reduces el bulto en general en esta zona.

Carfully cut away the extra fabric underneith the tape, this way you also reduce bulk in general in this zone.

www.studiocostura.com

Ahora vamos a coser desde el derecho del trabajo, vamos a dar el pespunte para dejar la cinta plana.

Now we’ll sew the topstitching on the right side of the the work, this will leave the channeling tape flat on the other side.

www.studiocostura.com

Cose con la puntada recta 1-2 mm desde el borde de la unión de las copas con la bandad frontal, en el lado de la banda (encima de la cinta).

Topstitch with the straight stitch 1-2 mm from the union of the cups with the band, on the band side of the bralette (on top of the tape).

www.studiocostura.com

Así es como queda la primera pasada de pespunte.

This is how the first line of topstitching looks like.

www.studiocostura.com

Ahora le damos otra pasada para dejarlo plano del todo y para que los dos lados de la cinta estén bien cosidos. Deberías coserlo unos 5-6 mm desde tu primer pespunte, así las dos costuras quedan dentro de la cinta cuando lo ves desde el revés del trabajo.

Now we’ll sew another line of topstitching to secure both sides of the tape in place. You should sew it 5-6 mm from you first topstitching line, this way both of the stitching lines will be on the tape when you look at it on the wrong side of the work.

www.studiocostura.com

Así quedan los dos pespuntes una vez terminados.

This is how the two stitching lines look like.

www.studiocostura.com

No es muy importante que en el revés queden justo en paralelo ya que es más importante que estén bien en el derecho del bralette pero con tiempo consigues seguramente que te quedan bien tanto por fuera como por dentro.

It’s not so important that the two lines of stitching would be paralel on the wrong side of the work, it’s more important to sew them paralel on the right side where they will be actually seen. But I’m sure that with a bit of practice you’ll have them pretty and paralel on the inside too.

www.studiocostura.com

Ahora unimos las piezas de la banda trasera con el resto, se hace de la misma manera como antes las copas. Coloca la pieza de forro debajo del bralette con el derecho hacia arriba y la pieza de encaje encima del bralette con el derecho hacia abajo, une las cuatro capas con alfileres. Cose.

Now we’ll join the back band pieces with the front band pieces and it’s done in the same way as when we joined the cup pieces. Put the lining piece under the bralette with the right side up and put the exterior lace band piece on top of the bralette with the right side down. Pin all four layers together and sew.

www.studiocostura.com

Una vez cosido, coloca las piezas en su sitio, la costura se queda entre las capas.

When you have sewed the pieces together the seam allowance will be hidden between the layers.

www.studiocostura.com

En esta parte también cosemos la cinta recubrearos, esto ayuda que la costura lateral sea más firme y no se doble. Corta un trozo de cinta que sea 2 cm más corto que tu costura lateral (arriba y abajo hay que doblar encima el elástico así que no cosemos la cinta allí). Coloca la cinta encima de la costura lateral y cose con la puntada recta los dos lados. Puedes colocarlo justo en el medio de la costura o siguiendo el borde de costura con la cinta como yo en la foto.

Tienes la opción de añadir ballenas dentro de la cinta para dar aún más soporte, recuerda que tienes que hacerlo ahora, antes de coser los elásticos que taparán los bordes de la cinta recubrearos.

In this part we will also sew the channeling tape, this helps the side seam to be stronger and it won’t fold when you wear the bralette. Cut pieces of channeling tape 2 cm shorter than the side seam (we’ll fold the elastic under later on so you have to reduce the tape on the upper and lower part again). Put the tape on top of the side seam and sew the two sides with straight stitch. You can sew the tape just in the middle of the side seam or align it with it like I did on the photo.

You have an option to add boning the side seams, you should do it now as we will be closing the tape with the elastics on the next step.

www.studiocostura.com

Terminamos por hoy, ya está todo listo para coser los elásticos y terminar el bralette, falta muy poco y eso ya tiene forma!

That’s it for today, now we’re ready to sew on the elastics and finish this bralette off, there’s avery little left to do and it already looks like something!


CC bralette Mara día 4 // Mara bralette Sewalong day 4

 
cups.jpg

En este post del coseconmigo de bralette Mara vamos a coser las piezas por fin! Este método de confección hace posible que todos los márgenes de costura estén ocultos entre las capas, solo tienes que seguir unos pasos para conseguir acabados bonitos tanto por fuera como por dentro.

In this post in the Mara bralette sewalong we’ll be finally sewing together the pieces! This construction method makes a pretty end result with clean seams both on the inside and on the outside of the bralette, you just need to follow some specific steps.

www.studiocostura.com

Primero se unen las piezas de la copa interior entre sí, las piezas de encaje y las piezas de forro. Se coserá directamente a través de las cuatro capas así que el orden de las piezas es importante. Primero colócalas en la mesa con los derechos hacia arriba.

First we’ll be joining the inner cup pieces, there are lace and lining pieces. You’ll be sewing directly through four layers so the order of the pieces is very important here. First put all the pieces with the right sides up on your table.

www.studiocostura.com
DSCF7273.jpg

Junta las piezas de encaje derecho con derecho y haz lo mismo con las piezas de forro. Después coloca las piezas de encaje encima de las piezas de forro. Une con alfileres la costura central. Las piezas de forro son un poco más cortas que las piezas de encaje porque se cortaban al ras del borde de patrón (y en las piezas de encaje sobresale la parte de la puntilla).

Put the lace pieces with right sides together and then put the lining pieces with right sides together too. After that put the lace pieces on top of the lining pieces. Pin the central seam. The lining pieces are a bit shorter as you cut out the lining just like the pattern (and the lace pieces have the extra scallop edge there).

DSCF7274.jpg
DSCF7278.jpg

Recuerdas del piquete en el centro que usamos a la hora de cortar, allí colocamos justo el comienzo de la puntilla? Los márgenes de costura son de 0,6 cm y justo donde dejaste el piquete vas a coser hacia abajo. Se puede coser con puntada recta, con un zig-zag pequeño o remallar, tú decides tu método favorito. Normalmente siempre se dice que hay que coser las telas de punto con el zig-zag (o con la remalladora) ya que esta puntada es elástica y así no se rompe la puntada una vez que estiras tu prenda…pero en lencería si la costura es vertical se puede hacer la excepción y coser con la puntada recta. Nunca se me ha roto la puntada allí como realmente no se estira en esa dirección (es el contrario al ancho donde sí que se estira). En el caso de usar remalladora deja los hilos largos en la parte de arriba y escóndelos dentro de la misma costura con una aguja lanera.

Remember that notch close to the center seam that helped us when cutting out and mirroring the lace pieces? The seam allowances are exactly 0,6 cm (1/4 in) and it’s exactly there where the notch is where you’ll sew the central seam. You can use a straight stitch, a small zig-zag stitch or you can serge the seam, you’ll decide your favourite method. I normally always suggest using zig-zag stitch or serger when working with elastic knit fabrics as this way the stitches won’t pop once you pull the elastic fabric…but in lingerie I find there’s one exeption: the vertical seams! I’ve never had a stitch popping when sewing a vertical cup or side seam with straight stitch as this part really won’t stretch so much, it’s not on the “stretchy” horizontal direction. When using a serger leave your thread tails long on the upper part and hide them inside the seam with a large eyed needle.

DSCF7279.jpg

Una vez hecho la costura, coloca las piezas en su sitio, deberías tener un resultado limpio tanto por fuera como por dentro (el margen de costura de la costura central se queda entre las piezas). En el derecho del trabajo pasa un pespunte encima del margen de costura de la costura central para dejarlo más plano, deberías hacerlo aprox 2 mm desde el borde.

Once you’ve sewn the seam put all the pieces in their place, you should have a clean result with the seam being hidden between the layers. On the right side of the work topstitch on top of the seam allowance to make it flat.

DSCF7281.jpg

Después vamos a coser el elástico para juntar el forro y el encaje en la parte superior de la copa interior, de paso se estabiliza esta zona también. Puedes usar elástico de lencería (algo más fino como el elástico de braguitas, de 4-8 mm de ancho) o también puedes usar el elástico transparente de silicona.

After that we’ll sew elastic to join the lace and lining layers on the neckline. You can use narrow lingerie elastic (the one we use for panties for example) or transparent clear elastic.

DSCF7282.jpg

Usando la puntada de zig-zag cose el elástico justo donde se termina el forro, abajo de la puntilla. Si el elástico tiene un lado suave, déjalo hacia arriba (se va a quedar hacia tu cuerpo después). En este punto no suelo estirar el elástico, es solo para estabilizar este borde. Cose desde un extremos hasta el centro, recorta el elástico y vuelve a coser desde el centro hacia el otro borde.

Sew the elastic just where the lining ends under the scalloped lace edge using a zig-zag stitch. If the elastic has a plush side it should be up (it will be towards your skin once you’ll wear the bralette). At this point you shouldn’t pull the elastic, it’s there just to stabilize the lace. Sew from one side to the center, cut the elastic and sew again from the center to the other side.

DSCF7300.jpg

Ahora tienes las piezas de las copas interiores preparadas, falta juntarlas con las copas exteriores. Se hace de la misma manera como antes para que las costuras queden limpias. Coloca las piezas de encaje derecho con derecho y debajo de ellos las piezas de forro derecho con derecho también. Como ya tienes las dos capas unidas de la costura anterior tienes la mitad del trabajo hecho.

Now you’ll have the inner cup pieces ready to join them with the outer cup pieces. You’ll be doing this in the same way as before so the seams will be hidden between the layers. Put the lace pieces with right sides together and under these put the lining pieces with the right sides together too. As you have the inner pieces sewn together already it’s easier this time.

DSCF7301.jpg
DSCF7304.jpg

Junta las piezas con alfileres uniendo primero los piquetes en las cuatro capas, después los principios y los finales, estira para evitar arrugas. Cose con la puntada recta o remalla.

Pin the four layers together first joining the notches then the beginnings and the ends. Stretch slightly to avoid wrinkles and sew with straight stitch or use a serger.

DSCF7346.jpg

Una vez unidas las copas haz un pespunte como antes en el centro.

Once you’ve sewn together the cups, topstitch the cup seams in the same way as you did with the center front.

DSCF7347.jpg

Ahora vamos a unir las copas con la banda frontal. Coloca la pieza de forro de la banda frontal con el derecho hacia abajo en la mesa y coloca la pieza de encaje de la banda frontal con el derecho hacia arriba encima del forro. A mí personalmente no me gusta usar spray temporal de pegamento textil en lencería pero hay gente que lo prefiere, ahora podrías unir el forro y el encaje primero para trabajarlos como una pieza. Yo prefiero usar alfileres para mantener las dos capas juntas :)

Now we’ll join the cups with the front band. Put the front band lining with the right side down on your table and put the front band lace with right side up on top of it. I’m not really a fan of temporary fabric glue or spray but you could join these two layers before you start sewing with them. I prefer using pins to keep the layers together :)

DSCF7348.jpg

Coloca las copas y la banda frontal (las dos capas de ella) el derecho con derecho y junta con alfileres uniendo los piquetes, el centro y los finales. Con cuidado y estirando ligeramente en las curvas de las copas reparte todo el tejido para que no se formen arrugas. Cose con la puntada recta.

Put the front band pieces (the two layers) together with the cup pieces, right sides together and pin together the center, the notches and the beginning and the end of the seam. Carefully ease the cup curve into it’s place avoiding wrinkles. Sew with straight stitch.

DSCF7349.jpg

Así es como queda el bralette con las copas ya unidas a la banda frontal, ya tiene pinta verdad? En el próximo post cosemos la cinta recubrearos y uniremos la banda trasera!

Now it really starts to look like a bralette, right? In the next post we’ll attatch the underwire channeling tape and the back band pieces!


CC bralette Mara día 3 // Mara bralette Sewalong day 3

 
www.studiocostura.com

Hoy en el CoseConmigo vamos a cortar las piezas para el bralette Mara. Después de hacer la prueba en el anterior post ya podemos empezar con el encaje. Voy a contaros cómo cortar el encaje de la manera que las piezas salgan simétricas y que el escote quede bonito.

Today on the Sewalong we are going to cut the pattern pieces for the Mara bralette. After making a quick muslin in the last post we can now cut the lace. I'll tell you how to cut the pices from lace in a way that they'll be symmetrical and the neckline will be very pretty.

www.studiocostura.com

Antes de corte quería también que reviséis si el cierre cuadra bien con la pieza de la banda. Cómo os comenté antes, los cierres vienen en diferentes anchos y es mejor comprobar antes si todo cuadra. El ancho de final de la banda debería medir lo mismo que tu cierre + dos veces el el elástico que vas a utilizar. Para comprobarlo coloca el cierre en el medio y mide si en los bordes de abajo y arriba cabe justo la medida de tu elástico (los elásticos se doblan hacia el revés una vez cosidos).


Before cutting I'd like you to revise if your closure fits properly with the band piece. As I told you before the closures come in a variety of widths and it's better to see if yours fits well before cutting out the band pieces.  The width in the end of your band piece should measure the same as your closure + two times the width of your elastic. To see if that's your case you need to put the closure in the middle and see if the elastics fit exactly in the upper part and the band part (the elastics will be folded down and they will be on the reverse side of te bralette after sewing).

www.studiocostura.com

En el caso de que tu cierre sea más ancho/estrecho o que directamente quieres usar un cierre de tres filas en vez de dos hay que hacer un fácil ajuste al patrón. En este caso me ha sobrado 0,5 cm así que lo he quitado dibujando una línea desde el nuevo ancho uniendo este punto con la parte de arriba en el costado.

En el caso que tu cierre es más ancho, mide el ancho de tu cierre y sumale dos veces el ancho de tu elástico. Copia tu patrón de la banda en una hoja de papel y allí mide el ancho que necesitas (el cierre + dos veces el elástico). Luego une ese punto con el otro lado donde la banda (mira un ejemplo de aumentar la banda en el Coseconmigo de bralette Hanna).


In case your closure is wider/narrower or if you want to use a three-row closure instead of a two-row one you need to make a simple adjustment on the pattern piece. In this case my pattern was 0,5 cm too wide so I took away the excess by marking the width I wanted and joining this point with the upper point on the side seam.

In case your closure is wider copy your pattern piece onto a blank paper and measure there the new width you need (the closure +  two times the elastic). Now trace the new seam line to the other side on the side seam (check out this photo about widening the band on Hanna bralette Sewalong).

www.studiocostura.com

Ahora ya vamos a cortar el encaje. Coloca el encaje en una sola capa con el derecho hacia arriba. Coloca el patrón de pieza A encima del encaje de la manera que la línea recta (el escote) se queda alineada con la parte más baja de la puntilla. Aquí la idea es que independientemente de la diferencia de que tenga tu puntilla en la parte más alta y baja, tú no vas a modificar el ancho de la copa. Por eso es importante poner el patrón en la parte baja de la puntilla, donde comienza digamos. El piquete en esa línea tienes que colocarlo en el punto donde empieza una parte de la puntilla. Ese piquete te marca donde luego está la costura central del bralette y de esa manera la puntilla va a empezar justo en este punto y crea un efecto bonito de simetría. 


Now it's time to cut the lace. Put the lace on a single layer with the right side facing up on your cutting table. Put the pattern piece A onto the lace in a way that the straight line of the piece (the neckline) matches with the scalloped edge of the lace in the part where the scallops start (on the lowest part of the scallops). The idea here is to not reduce the cup piece and that's why it doesn't matter if the scallops on your lace are wider or narrower, you still put the pattern piece aligned with the lowest part. The notch on this pattern needs to be aligned with a point where one scallop starts. This notch indicates where the central seam of the bralette will be and that way you'll have beautiful scallops starting exactly at that point on the neckline of your bralette.

www.studiocostura.com

El encaje se puede cortar perfectamente con las tijeras pero la verdad es que el cutter es bastante cómodo y deja las líneas de corte muy precisas. Ahora ya tienes una copa interior cortada. Para poder tener la simetría de dibujo en tu encaje y que las dos copas sean exactamente iguales te recomiendo cortar la otra pieza con la ayuda de la primera que has cortado en vez de usar el patrón en papel.

La idea es que le das la vuelta a tu pieza A de encaje que acabas de cortar para que las piezas ahora se queden el derecho con derecho y busques justo el lugar donde coincide el dibujo. Dependiendo de cada encaje el dibujo se repite cada tanto y a veces puedes aprovechar el material más a veces menos. En general te va a cuadrar la pieza justo si lo cortas en la otra orilla del encaje. Cómo ves yo corté la primera pieza arriba y ahora lo he colocado abajo, me van a coincidir las piezas exactamente. Ahora corta esa pieza siguiendo el contorno del primero.


You can perfectly cut the lace with your normal cutting scissors but to be honest the rotary cutter is very comfortable and leaves very neat edges. Now you have one of the inner cups cut out. To make the pieces symmetrical I recommend you to cut the second piece of your inner cup with the help of the first one insteaad of using the paper pattern

The idea here is to turn your first piece A around so the right sides of the lace will be together. Find a place where the lace matches up exactly on both of the layers. Every lace is different and the pattern repeats every now and then, sometimes you can save up more lace while cutting the pieces closer together and sometimes you need more space to find the matching pattern. In general the scallops match up on the other border of the lace. As you can see I cut out my fisrt piece on the upper part of the lace and then found the matching place on the lower part of it. Now cut this piece following the lines of the first one.

www.studiocostura.com

De esa manera conseguimos que el encaje quede simétrico, tiene bastante buena pinta!


That way we get perfectly symmetrical pieces, looks quite good!

www.studiocostura.com

En las piezas B y D no va a quedar el borde de la puntilla a la vista así que no tienes que preocuparte de cuadrar nada. Sigue la línea de máxima elasticidad marcada en el patrón para colocar correctamente las piezas. El encaje se mueve bastante pero si ves que lo manejas bien puedes cortar estas dos piezas directamente en doblez de la tela ya que necesitas dos de cada una. Normalmente no suelo buscar la simetría de piezas aquí y directamente corto en doble capa, en el caso que tengas un encaje con un dibujo muy específico donde se va a notar mucho podrías primero cortar la pieza en una capa y buscar su simetría como en el paso anterior.


On pieces B and D we won't have a visible scalloped lace edge anywhere so you don't need to worry about matching patterns. Follow the greatest stretch direction on your pattern pieces to align them accordingly. Lace moves quite a bit but if you feel like you are managing it well you can cut it on double layer to directly cut out two of both of the pattern pieces you need. I usually just cut the pieces on double layer, but if your lace has a very visible pattern on it you can cut on one layer and match the pieces like on the first step.

www.studiocostura.com

Corta la banda frontal C en doblez.

Cut the front band C on fold.

www.studiocostura.com

Ahora vamos con el forro de tul/tela de punto. Dobla la tela para cortar directamente dos piezas de cada pieza de patrón que necesitas. Son las piezas A, B, y D. Fíjate que en la pieza A no hay la flecha de máxima elasticidad porque primero cortaste el encaje según el borde recto. Ahora coloca la pieza como en la foto, la dirección de la máxima elasticidad siempre va a lo horizontal del bralette.


Now let's cut the stretch mesh/knit fabric lining. Fold the fabric to be able to cut on the double layer and directly cut two of each of the pieces A, B, and D. Pattern piece A doesn’t have the greatest stretch arrow marked as we used the straight line of the pattern to cut the lace pieces. Align it as on the photo, always maintaining the greatest stretch direction on the horizontal line of the bralette.

www.studiocostura.com

Corta la pieza de la banda frontal (C) en forro de lencería, en doblez. Esta pieza no debería tener elasticidad a lo ancho (para que pueda estabilizar la banda), si tu forro de lencería tiene elasticidad en una dirección colócalo según la flecha que viene en la pieza del patrón.

Cut the front frame piece (C) on fold from sheer cup lining. This piece shouldn’t have stretch in the horizontal direction (in order to stabilize the frame), if your lining fabric does have stretch in one direction you should align it according to the arrow on the pattern piece.

www.studiocostura.com

Aquí van todas las piezas y sus forros!

Here are all the pattern pieces cut from lace and lining!

www.studiocostura.com

No te olvides de marcar los piquetes cuando cortas las piezas. En las instrucciones he dicho que uses un marcador textil que se vaya con agua (o con aire como la mía en la foto), nunca cortes los piquetes como lo hacemos al coser ropa porque los margenes son tan pequeños que luego se puede notar el corte.

Don't forget to mark the notches on tha pattern pieces when you cut them out. I've mentioned in the instructions that you should use a water soluble fabric marker to do so. Don't cut the notches as we do when sewing garments, the seam allowance is so small that this might show later on.

www.studiocostura.com

A veces tienes el encaje de la forma o de color que hace imposible marcar el piquete con el rotulador, en ese caso suelo marcar los piquetes con un alfiler. Es un poco rollo a la hora de mover las piezas y tienes que tener más cuidado pero es una solución.

Una vez cortadas todas las piezas vamos a coser!

Sometimes the lace has a form or a color that makes it hard to mark with a marker, in that case I usually mark my notches with pins. It's a bit difficult to move the pieces around with pins in them but if you are careful it can be a solution.

Once you have all the pieces cut out we are ready to sew!


CC Bralette Mara día 2 // Mara bralette sewalong day 2

 
blog template.jpg

Hoy en la segunda parte del CoseConmigo vamos a hablar sobre el tallaje de bralette Mara. Como ya os conté cuando publiqué el nuevo patrón, esta vez en el tallaje va como en sujetadores: tenemos la combinación de talla de la banda y de la copa. 

El tallaje de sujetadores suele ser un gran misterio para muchas mujeres porque no saben muy bien cómo medirse, en las tiendas las tallas varian bastante y no queda muy claro cómo elegir tu talla. En las instrucciones del patrón he descrito la manera de cómo hay que medirse para saber la talla, aquí voy a explicarlo un poco más al detalle para quienes no están familiarizados con el método.

Today in the second post of the sewalong we’ll be talking about the sizing for Mara bralette. As I told you in the instroduction post of this bralette, this time there’s a proper bra sizing: the size is composed of the band and the cup.

Bra sizing seems to be quite a mystery for many women as they don’t know how to take their measurements, bra sizing varies a lot in the ready to wear industry and it’s not very clear how to figure out you particular size. In the instructions of this pattern I have described how you should measure yourself in order to know your size, I’ll talk about it more in detail in this post if you are not familiar with the method yet.

 
www.studiocostura.jpg
 

Básicamente tenemos dos medidas: la banda y la copa. Son dos medidas independientes y al combinarlas sale el resultado único para cada cuerpo. Existen varias tablas de medidas según el país y os voy poner aquí el cuadro con los tres más comunes: EE.UU., Europa y España. La diferencia está en el número de la banda, la letra de la copa suele ser igual en las tres tablas.

Para saber tu número de banda tienes que medirte debajo del pecho, es el contorno justo debajo de las copas. Asegúrate de exhalar cuando tomas las medidas si no no vas a tener el resultado correcto. En este patrón he incluido las dos medidas, el europeo y el estadounidense para que sea más fácil de mediros tanto si usáis cinta métrica en centímetros como en pulgadas.

Sistema europeo: mide el contorno de debajo del pecho y redondea el número al más próximo 0 o 5. Si te salen 78 cm, redondea a 80. Si te salen 76 cm, redondea a 75. Ésta es tu talla de la banda en el sistema europeo. En el caso de estar justo en el medio, por ejemplo en 73 cm, tienes que decidir si redondeas hacia arriba o abajo...lo mejor como siempre es hacer una prueba de bralette antes de coserlo (lo voy a contar abajo) con los materiales definitivos así que verás si al final prefieres tener una talla de la banda más pequeña o más grande.

Sistema estadounidense: mide el contorno de debajo del pecho y si te sale el número par añade 4 y si te sale el número impar añade 5. Por ejemplo si te salen 31 pulgadas, añade 5 y te sale 36. Ésta es tu talla de la banda.

Basically there are two measurements: the band and the cup. These are two independent measurements and once you combine them you will know your particular bra size. There are different size charts depending on the country and you can see three different ones on the chart below: United States, Europe and Spain. The difference is in the band size number, the cup letters are usually more or less the same.

To know your band size you need to measure your underbust, it’s the measurement just below the cups. Make sure you exhale when you take the measurements in order to obtain correct results. I’ve included both European and North American sizes on this pattern so you can either use metric or imperial measuring tapes.

European system: measure your underbust and round the number to the closest 0 or 5. If your measurement is 78 cm, round it to 80. If your measurement is 76 cm round it to 75. This is your band size in European size chart. If your measurement falls just between the sizes, for example it’s 73 cm, you’ll have to decide if you go up or down…making a muslin of the bralette before using the final supplies is always a good idea (I’ll explain it in detail below) and you’ll see then with which size is better for you.

North American system: measure your underbust and if your measurement is an even number add 4, if your measurement is an uneven number add 5. For example if your underbust measures 31 inches, add 5 and the result is 36. This is your band size.

www.studiocostura.com

En este cuadro puedes ver la relación entre los diferentes tallajes de número de banda según el país. He añadido el tallaje español aunque no viene en el patrón pero así os hacéis una idea de qué talla tenéis en España. Básicamente es la talla europea + 15. Si tu talla europea es 75 y le añades 15 te sale la talla 90 en sistema español.

In this chart you can see the relation between different sizing systems for the bands in different countries. I’ve added Spanish sizing too altough it’s not written in the pattern instructions. To obtain your Spanish band size you just need to add 15 to your European band size. If you European band size is 75, your Spanish band size is 90.

www.studiocostura.jpg
www.studiocostura.com

Para saber la copa hay que comparar medidas para deducir la talla. Realmente hay dos métodos más comunes para medirse, os voy a contar los dos para que podáis comparar el resultado. El primer método que he incluído en el patrón es el que en mi opinión da mejores resultados pero según cada cuerpo puede que hay que compararlo con el segundo método para ver cuál es más aproximado a la realidad.

Primer método:

Mide la parte más ancha de tu pecho y después mide mide la circunferencia de parte de encima de pecho (la cinta métrica va justo debajo de los brazos cruzando encima de tu pecho). Resta la medida de encima de pecho de la medida de la parte más ancha de tu pecho. 

Sistema europeo: cada 2.5 cm de diferencia entre estas medidas es una copa. Por ejemplo: si la parte más ancha de tu pecho es 90 cm y la parte de encima del pecho mide 85 cm, la diferencia es de 5 cm y tienes la copa B.

Sistema estadounidense: cada pulgada es una copa. Por ejemplo: si la parte más ancha es de 36 pulgadas y la parte de encima del pecho es de 34 pulgadas, la diferencia son 2 pulgadas y tienes la copa B.

Tu talla entonces es la combinación del número de la banda y la letra de la copa. Hay excepciones a este método: por ejemplo si la parte alta de tu tórax es más pronunciado puede que la diferencia entre las dos medidas sale pequeña y calculas una copa pequeña aún al tener bastante volumen de pecho. En este caso puedes también probar el otro método que es comparar la medida de la parte más ancha del pecho con la medida de debajo del pecho. 

Segundo método:

En sistema europeo: resta la parte de debajo del pecho de la parte más ancha del pecho, cada 12,5 cm es una letra de copa.

En sistema estadounidense: resta tu número de la banda (que calculaste antes) de la medida en la parte más ancha del pecho, cada pulgada es una letra de copa.


To know your cup size you need to compare two measurements. There actually are two different ways to measure yourself (at least those two are widely used), I’ll explain both of them so you can compare the results. I’ve included the first one in the instructions of this pattern as I prefer this method but every body is different and you can compare the two to get a realistic result.

First method:

Measure the circumference at the fullest part of the bust. Measure the circumference at the high bust. This measurement requires the measuring tape be high up under the arms and above the breasts. Derive cup size by subtracting the high bust from the full bust.

Imperial: every inch is one cup size. For example: if your bust is 38 in and your high bust is 36 in, the difference of 2 in means you are a B cup.

Metric: every 2.5 cm is one cup size. If your bust is 90 cm and your high bust is 85 cm, the difference of 5 cm means you are a B cup.

Your bra size is the combination of the band and the cup size. There are exeptions for this rule: for example if your torax is higher the difference between these two measurements will be small even if your cups have more volume. In this case you can also check the size using the second measuring method where you compare the full bust with underbust.

Second method:

Imperial: substract your full bust measurement from the band size (that you figured out in the last step), every inch is a cup size.

Metric: substract your full bust measurement from your underbust measurement, every 12,5 cm is one cup size.

 
20190624_174649-01-01.jpeg
 

Puedes medirte según los dos métodos y comparar tu talla. También recomiendo que compares la talla con algún sujetador que tengas y que te quede bien. Define la talla y haz una prueba, esta es la manera más fácil de comprobar si es la talla correcta! 

Sé perfectamente que hacer la prueba previa de bralette da mucha pereza, pero os aseguro que es mucho mejor hacer la prueba y estar segura de que el encaje bonito que vayas a usar se va a convertir en algo que te quede bien! Para hacer la prueba puedes usar tela de punto (incluso sirve una camiseta vieja de algodón, las piezas son relativamente pequeñas) y también necesitas usar el forro de lencería para ver bien la parte central que tiene que estar rígido. 

Cose las piezas de las copas juntos y unelas con la banda central (las dos capas: el de punto y el de forro rígido), después únelas con la banda trasera. Prepara los tirantes según el paso 31 y coselos temporalmente a su sitio (luego los descoses y ya los tienes preparados para el proyecto final. Corta las tiras de tirante de 9 cm como en el paso 25 para poder enganchar el tirante a la banda donde el piquete (de nuevo luego lo descoses y lo usas después). Cose el cierre con la puntada larga en su sitio, así es más fácil de descoser luego. Abajo ves mi primera prueba de bralette, es bastante feo pero sirve para saber la talla (yo cosí también el elástico de bajo pero eso no hace falta hacerlo si no queréis).

You can measure yourself and compare those two methods to find out your bra size. I’d recommend you to also look up what size do you use in ready to wear bras, it’s always a good idea to compare! Once you know your size make a muslin, it’s the easiest way to find out your exact size.

I know…sewing up muslins might not be your favourite thing to do but trust me, you don’t want to use your favourite lace to sew a bralette that won’t fit as you’d like to! You can use any kind of knit fabrics for the muslin (even an old cotton t-shirt works fine, the pieces are relatively samll) and you also need tricot lining to see the correct result.

Sew the cup pieces together and join them with front band (both layers, tricot lining and knit fabric), then join the back band pieces. Prepare the straps as described in step 31 and baste them temporarily in their place (after the test you can unpick them and you’ll have them finished for the actual bralette). Cut two strips of strap elastic 9 cm long like in the step 25 so you can attatch the straps in their place according to the notches (again you will unpick them and use them in your real bralette). Machine baste the closure on. Below you can see one of my test bralettes that looks quite ugly but it worked fine to determine if the size was right (I also did add band elastic which you don’t need to do if you don’t want to).

 
20190709_145522-01.jpeg
 

Prueba el bralette y observa cómo te queda. La banda debería estar bastante ajustada pero todavía le faltan los elásticos así que no hace falta que esté perfecto. El pecho debería llenar la copa si la talla te va bien. Si notas que el bralette no te queda del todo bien puedes ver las posibles soluciones en los siguientes casos:

Problemas con la banda y la copa:

- la banda parece apretar demasiado y las copas están demasiado ajustados

La talla que has escogido es en general demasiado pequeña, sube una talla en banda y copa y prueba de nuevo.

- la banda parece ancha (puedes apartarla con facilidad de tu cuerpo, no sujeta bien) y las copas tienen arrugas

La talla que has escogido es en general demasiado grande, baja una talla en la banda y en la copa y prueba de nuevo.

Problemas con la copa:

- la banda está bien pero las copas te aprietan el pecho

Sube una talla en la copa pero usa la misma talla de la banda. Esto le dará el espacio extra que le falta ahora para tu pecho.

- la banda está bien pero hay arrugas en las copas y parece que hay demasiado espacio en ellas

Baja una talla en la copa pero usa la misma talla de la banda. Esto hará que se reduzca el ancho en las copas y el bralette te sentará mejor.

Problemas con la banda:

- las copas están bien pero la banda parece ancha 

Baja una talla en la banda y sube una talla en la copa. Esto debería hacer la banda más ajustada pero las copas siguen iguales.

- las copas están bien pero la banda parece estrecha

Sube una talla en la banda y baja una talla en la copa. Esto debería hacer la banda más ancha pero las copas siguen iguales.


Try on your muslin and observe the fit: it should be snug but as you haven’t sewn on the elastics yet it doesn’t have to be perfect. Your breasts should fill the cups if the size is right. If you notice any problems follow the guidelines to detect how to solve them:

Problems with band and cups:

- the band feels too tight and the cups seem to flatten the breast tissue

The size you picked is overall too small, go up a size in band and cups and try it out again.

- the band feels too loose (you can easily pull it apart from your body, it’s not snug) and the cups have wrinkles on them

The size you picked is overall too large, go down a size in band and cups and try out again.

Problems with cups:

- the band fits good but the cups seem to flatten your breast tissue

Go up a size on the cup but maintain the band size. This will give your breast tissue the extra room that it’s lacking at the moment.

- the band fits good but the cups have wrinkles on the cup seams and looks like there’s some extra room there

Go down one size on the cups but maintain the band size. This will make the cup pieces smaller and they will fit your breast tissue better.

Problems with band:

- the cups look good but the band is too loose

Go down one size in band and go up one size in cup. This should make the band smaller but you’ll still have the same fit on the cups.

- the cups look good but the band is too tight

Go up one size in band and go down one size in cup. This should make the band smaller but you’ll still have the same fit on the cups.

www.studiocostura.com

En los cambios de la banda verás la relación que tiene la banda con la copa. En el tallaje industrial existe una regla que en inglés se llama sister sizing (tallajes hermanas traducido directamente, jeje) y lo que significa es que el volumen de la copa se mantiene igual en varias tallas de banda. En este cuadro ves cómo están relacionadas las tallas de sujetador según la copa: si sigues el diagonal ves que la talla 90AA tiene el mismo volumen de copa que la talla 85A y 80B etc (se aplica igual en otros diagonales, por ejemplo 85B es igual que 80C etc). Para entender esto piensa que el mismo volumen de copa tiene diferente letra en diferentes tallas de banda. Un 90AA realmente tiene el mismo volumen de copa que un 85A porque ya que el contorno debajo del pecho se ha reducido, este volumen en un cuerpo más pequeño forma una copa más grande. A su vez en un contorno de 80 este mismo volumen ya es una copa B. Básicamente lo explico por dos razones. 

Primero es para que sepáis cómo elegir la talla si habéis hecho la prueba y queréis cambiar la banda, os queda demasiado grande/pequeño pero la copa sí que está bien. Si bajas el contorno por ejemplo de 80 a 75 y mantienes la misma letra de la copa el resultado es que quitas también el volumen de la copa y ya no te queda la copa igual de bien. Lo que tienes que hacer es bajar el contorno y subir la letra de la copa, así mantienes la misma forma de pecho en las piezas de patrón.


Lo segundo es porque os habrá pasado comprando los sujetadores que si no hay vuestra talla, por ejemplo el 75C, os dicen que podéis comprar un 70D y todo bien. A ver, la copa sí tiene el mismo volumen pero aparte de tener ligeros cambios (sitio de los tirantes, el ancho entre las copas,  etc), esta banda te queda pequeña porque no es de tu talla! Te ofrecen alaragadores o te dicen que tengas el cierre enganchado en la última fila pero eso no debería ser así, no va a ser cómodo (igual si te ofrecen la banda más grande y te dicen que lo enganches en la parte más ajustada del cierre). Esta es una manera de tener menos tallas en la tienda y ofrecerlos a más público porque te dicen que las tallas son intercambiables...que a veces te vale pero muchas veces así estamos llevando tallas incorrectas y sufriendo porque no nos dan el soporte y la comodidad necesarias.

Espero que os haya ayudado este post, es un poco largo y técnico pero creo que ayuda mucho saber tu talla de sujetador tanto si lo coses para ti como si vas a comprarte lencería. Existen varias maneras de medirte, todas las marcas trabajan con las tallas a su manera y los materiales usados influyen también...es una combinación de muchas cosas así que hay que tener un poco de paciencia pero merece la pena. Una vez hecha la prueba, en el siguiente post vamos a ponernos las manos a la obra con encaje!


When changing the band size you will see how the cups and the band work together. In the industrial bra sizing there’s this concept of sister sizing which means that the same cup volume stayes the same in different band sizes. In the chart above you can see how the sizes are related: when you follow the diagonal you see that the size 90AA has the same cup volume as 85A and 80B etc (it applies to the other diagonals as well, for example 85B is the same as 80C etc). To understand this you should understand that the same cup volume has a different letter in different band sizes. The 90AA has the same cup volume as the 85A because as the band diameter has been reduced, this same cup volume on smaller underbust diameter forms a bigger cup. And that’s why the same volume is a B cup when you go down to 80 in the band. I’m explaining this because of two reasons.

First because you need to know how to pick the new size once you have tried on your muslin and find that the cups fit well but the band size has to be changed. For example: if you go down a size on a band, from 80 to 75, and maintain the same cup letter you are also reducing the cup volume and the fit won’t be the same. What you need to do is to go down a band size and go up a cup size, this way the cup will fit the same way.

And the second reason is to explain a bit the RTW system. Maybe it has happened to you: for example you want to get a bra in your size 75C but there are none in your size and you are offered 70D instead. The cup should fit the same (apart from smaller changes because of the strap position placement and the bridge width etc) but the band will be too tight for you! You ae probably offered to use the hook and eye extensions or they say you can fasten the hooks in the largest position but it won’t be comfortable enough (it works the same way when you are offered a bigger size where you can fasten the hooks in the smallest position). Thanks to this method the shops have to carry and produce less sizes which they will offer to a wider audience saying that the sizes are interchangable…this method can work sometimes but mostly you just end up wearing a wrong size bra that won’t give you enough support and it won’t be comfortable.

I hope this post has been helpful altough it has been a long one full of technical details, I just hope you can figure out your size when you are sewing your own bras or when you are shopping for one in a store. There are different ways to measure yourself, lingerie brands work with different sizing charts and different fabrics really give different results…it’s a combination of many factors so you just have to be patient until you figure out your perfect size. Once you’ve completed your muslin it’s time to cut out the pieces! We’ll do that in the next post.


CC bralette Mara día 1 // Mara bralette Sewalong day 1

 
www.studiocostura.com

Hola! Empezamos con el CoseConmigo para el patrón bralette Mara. Muchísimas gracias a todas que os habéis lanzado a comprar el patrón desde que lo publiqué, vuestra buena respuesta se agradece enormemente. He trabajando mucho tiempo para preparar este patrón y me alegro mucho de que os guste!

Hoy os enseño algunas fotos de bralettes con cortes similares y espero que sean de inspiración para vuestros proyectos (todas las fotos son de mi carpeta de Pinterest donde podéis ver más inspiración para coser vuestra lencería). Cada tela, encaje y color cambian tanto el aspecto de bralette así que lo podéis hacer totalmente a vuestro gusto. Luego os cuento sobre los materiales necesarios para coser este patrón.

Hey! Today we're starting the sewalong for the Mara bralette pattern. Thank you so much everyone who has ordered my new pattern since the release date, your good response is really appreciated. I’ve worked a long time on this pattern and I’m really happy to see that you like it too!

Today I'm sharing some photos of bralettes that have similar style lines as this pattern and I hope they will be an inspiration for your own sewing projects (all photos are from my lingerie inspiration board on Pinterest). Every fabric, lace and color change so much the appearance of the bralette so you can really make it as you want. I will also tell you about supplies you need to sew with this pattern.

13.jpg
6.jpg
4.jpg
21.jpg

La versión original de este patrón tiene la puntilla en el escote y el resto de los bordes están rematados con elástico. Puedes combinar colores y hacer mezclas de tonos o contrastes. Puedes probar a añadir más tirantes o detalles extra para hacer algo diferente.

The original version of this pattern has scalloped lace edge on the neckline and the rest of the bralette is finished with elastics. You can mix up colors, tones and contrasts. Adding extra straps or other cute details makes a big difference too.

9.jpg
3.jpg
22.jpg
7.jpg
5.jpg
25.jpg
10.jpg
8.jpg
16.jpg
14.jpg

Cuando diseñé a este patrón quería que sea lo más fácil de adaptar para usarlo en con diferentes materiales y cortes. Una cosa que tenía claro era que le quedaría bien también el borde la puntilla en el bajo y por eso esta parte del patrón está recto. Es un cambio de patrón muy sencillo, realmente ni siquiera es cambio, solo se cambia la manera de cortar y coser el bajo, os lo explicaré paso a paso después de las entradas de CoseConmigo “básico” cuando nos ponemos con las variaciones.

Puedes tener la puntilla en la banda para que sea poquito o puedes dejarlo bastante más largo como en las últimas fotos, el resultado queda muy mono.

When I designed this pattern I wanted it to be easily adaptable to use it with different materials or styles. One thing I was sure about was that it would look great with the band cut on scalloped lace edge too. That’s why I left it straight in order to easily make this adjustment. It’s a very easy hack…well it actually really isn’t even a hack, you just have to cut the pieces the other way and sew the band elastic differently. I will make a separate post about it once the “basic” sewalong is done.

You can show off a bit of scalloped lace edge on the band or you can leave it extra long like on the last photos, it looks very pretty!

2.jpg
18.jpg
20.jpg
12.jpg

Combinaciones de encaje con punto también quedan muy bonitas, puedes usar puntillas elásticas estrechas como éstas, o puedes cortar parte del bralette con telas de punto y otra parte con encaje.

Lace and knit combinations also look very pretty, you can use narrow lace trims like these or you can cut some parts of your bralette out of knits and other parts out of lace.

11.jpg
17.jpg
23.jpg
15.jpg

Y obviamente puedes coser este bralette con solo telas de punto, no hace falta usar encajes. Es otra variación que explicaré después de los primeros posts del CoseConmigo pero es muy fácil: solo tienes que añadir márgen de costura para la parte de la copa en el escote (igual que en este tutorial de bralette Hanna). Estampados, lisos, flores…las posibilidades son muy amplias para que cosas un bralette con la tela que más te guste.

And of course you can use only knit fabrics for this pattern, no need to use lace if you don’t want to. It’s another version I will show you once the basic sewalong is over but it’s very easy: you only need to add seam allowance for the inner cup piece (like in this Hanna bralette tutorial). Prints, solids, florals…there are so many possibilities to sew a very special bralette exactly as you prefer.

www.studiocostura.jpg

Materiales

ENCAJE 

El patrón está diseñado para encajes elásticos y telas de punto. Lo ideal es que el encaje tenga por lo menos 50% de elasticidad. Si no sabes cuánto es el porcentaje del encaje (o de cualquier tela) es bastante fácil averiguarlo. Coge un trozo de 10 cm de encaje y estíralo hasta donde se da de sí y mide el resultado. Si puedes estirarlo hasta 14 cm tiene la elasticidad de 40 %, si es hasta 16 cm, sería de 60% etc. Según la elasticidad de cada tejido cambia la forma de cómo va a quedar la prenda. No hay formas correctas e incorrectas, tienes que experimentar y probar!

TELA DE PUNTO PARA EL FORRO DE COPAS Y BANDA

Para que el bralette sea cómodo se forra con tela de punto. Puedes usar diferentes tipos de telas de punto, de nuevo, su elasticidad va a cambiar el resultado (recomiendo por lo menos 50-60% de elasticidad en las telas de punto para este patrón). Yo prefiero usar tul elástico o power mesh para un resultado más fino y transparente o punto de viscosa para más “cuerpo”. Si quieres que tu bralette tenga más "forma" aún puedes usar punto de algodón más fuerte, lycras o incluso telas como neopreno ligero. En el siguiente post os hablaré cómo elegir la talla y hacer una prueba, cuando usas telas distintas tienes que probar si el cambio de elasticidad varia el resultado. Los puntos que tienen la elasticidad en dos direcciones suelen ajustarse mejor que los que solo tienen elasticidad en una dirección pero todo es cuestión de probar!

Lo que os quiero decir es que el tema de las telas es todo un mundo. Ahora se venden todo tipo de telas de punto y tú tienes que ir probando qué es lo que más te gusta. No recomiendo puntos gruesos porque tendrás que coser los elásticos doblandolos encima del encaje y la tela...si el conjunto de todo esto es demasiado grueso tu máquina te puede dar problemas.

FORRO DE LENCERÍA PARA LA BANDA FRONTAL

Para la banda frontal hay que usar forro de lencería (sheer lining o bra tulle o tricot lining en inglés): es una tela fina pero no elástica (por lo menos una dirección tiene que ser sin elasticidad) que ayuda a estabilizar la zona de la banda frontal. Este patrón está diseñado para que la parte central sea rígido, de allí viene el soporte del bralette.


SUPPLIES

LACE

This pattern is designed for stretch lace and knit fabrics. The ideal lace would have aprox 50% stretch. If you don't know the stretch percentage of your lace (or any fabric in that case) you can easily calculate it. Pick a 10 cm long piece of lace and stretch it as long as you can, measure the result. If it measures 14 cm, it would have 40% of stretch, if it measures 16 cm, it would be 60% of stretch etc. Every knit fabric and lace will change slightly the final result. There are no correct or incorrect ways, you just need to experiement and try them out!

KNIT FABRIC FOR CUP AND BAND LINING

To make the bralette extra comfortable it has a knit fabric lining. You can use different types of knits, again their elasticity will vary the result of the garment (I recommend knits with 50-60% stretch for this pattern). I prefer stretch mesh or power mesh for a more delicate and a bit transparent result or viscose knits for more supportive result. If you wish to have more support you can use stronger cotton knits, lycras or even lighter scuba knits. In my next post I will guide you more about choosing the size and how to make a muslin, using different types of knits really makes a difference there. The knits with a four-way stretch are usually more comfortable than the ones with a two-way stretch but it really depends so you can try it out!

I just want to say that fabrics vary so much. You can buy so many different knits these days and you just have to experiment and see what's best for you. I don't recommend heavier knits as you have to apply the elastics later on and sewing trough double layer of bulky fabrics won't be easy on your domestic machine.

SHEER LINING FOR THE FRONT BAND

For the front frame you need to use a sheer cup lining/tricot fabric (or bra tulle): it’s a rigid light weight fabric that doesn’t stretch (at least one direction has to be without stretch), it helps to stabilize the front part of the bralette. This pattern is designed with this rigid front band in mind, that’s why it’s more supportive than bralettes with just knit fabrics.

www.studiocostura.com

ELÁSTICOS

Para la lencería se usan elásticos específicos que suelen tener un lado suave (el que se queda contra la piel) y un lado decorativo que se ve (puedes leer este post en mi blog donde escribí más sobre los elásticos de lencería). En este patrón los margenes de costura están hechos para elásticos de 10 mm de ancho. Puedes usar en el bajo un elástico más ancho (tipo 15 mm) si quieres más soporte, lo que pasa es que tendrás que cambiar márgenes para no hacer el bralette más pequeño. Para la parte de la sisa podrías usar también un elástico más fino, de 7-10 mm, allí no necesitas tanto soporte (de nuevo si cambias el ancho de elástico tienes que modificar los margenes de costura). Básicamente puedes hacer pequeños cambios según los materiales que tengas o prefieras, yo puse el elástico de 10 mm en todo el bralette pensando en vosotras para que no tengáis que buscar muchos elásticos distintos y que la lista de los materiales sea lo más corta posible.

Para rematar el borde de la copa interior se usa el elástico fino de lencería (lo mismo que se usa para las braguitas). También puedes usar elástico transparente de silicona si lo prefieres.

ELÁSTICO DE TIRANTE & LOS ARANDELAS Y LOS REGULADORES

El tirante que lleva este bralette es de 10 mm con sus arandelas y reguladores del mismo ancho. Si queréis podéis usar un tirante más ancho para más soporte (o más fino también), no hace falta hacer ningún cambio al patrón. Simplemente usa las arandelas y reguladores acorde al tamaño de tu tirante.

CINTA RECUBREAROS

La cinta recubrearos se usa en los sujetadores con aros para insertar los aros. En este bralette lo usamos para dar estabilidad a las copas, se coserá debajo de las piezas de las copas y la cinta ayuda a dar más soporte al pecho.

EL CIERRE

El patrón está pensado para un cierre de dos filas pero se puede usar el de tres filas también. No he puesto allí el ancho específico del cierre porque varian bastante según la tienda donde lo compres. En las instrucciones se explica cómo adaptar el patrón de la banda al ancho concreto de tu cierre.


ELASTICS

There are special lingerie making elastics used fo this purpose that usually have a plush back (the one that will be againts the skin) and a decorative edge (you can read this post on my blog where I wrote more about lingerie elastics). This pattern has seam allowances for 10 mm wide elastics. You could use a wider elastic (like 15 mm wide) for the bra band to have more support but you have to remember to change the seam allowances in order not to make your bralette too small. For the underarm area you could use also a narrower elastic (7-10 mm), you don't need so much support in that area (again you have to be careful with the seam allowances). Basically you can mix things up a bit acording to your own likes and depending on what materials you have in hand. I did include 10 mm elastics in the supply list as I wanted the list to be as small as possible so you don't have to go to look for too many supplies.

To finish off the inner cup seam you need to use a narrow lingerie elastic (the same one as used on the panties) or transparent clear elastic tape.

STRAP ELASTIC & RINGS AND SLIDERS

This bralette has a 10 mm strap elastic with the same width rings and sliders. If you'd like to use wider straps for more support (or narrower if you wish) you can perfectly do so, you don't need to change the pattern for this.

UNDERWIRE CHANNELING TAPE

Underwire channeling tape is used in underwired bras to insert the underwires. In this bralette it’s used to stabilize the cups, it will be sewn under the cup pieces and it heps with supporting the breast even without using underwire.

THE CLOSURE

The pattern is drafted for a two row hook and eye set. I din't put the exact width of the closure on the list as they vary quite a lot depending on where you buy them. You can use a three row hook and eye set or any other width of closure, there are instructions about modifying your pattern pieces to fit your closure.

www.studiocostura.com

Consejos para copas pequeñas:

Si tu contorno/copa es pequeña (AA/A) en general tienes menos problema con los materiales. Puedes forrar tu bralette con tul finito o cualquier otra tela de punto. Incluso puedes optar por no forrar la parte delantera con forro rígido y usar el mismo forro de punto ya que no necesitas casi soporte (hice la prueba y me va bien incluso sin eso). Una de mis testers tampoco usó la cinta recubrearos y en vez de eso dejó los márgenes de costura de las copas entre las dos piezas de la banda…con copa pequeña tienes bastantes opciones si no cuentas con todos los materiales por ejemplo. Puedes usar elásticos incluso más finos en la sisa y en la banda aunque yo aún así prefiero usar los de 10 mm que me parecen los más cómodos.

Consejos para copas grandes:

Si tu contorno/copa es más grande (C/D) ayuda mucho si usas materiales más resistentes ya que tu bralette te dará más soporte y estarás más cómoda aún sin llevar los aros. Para forrar tu bralette deberías usar tul elástico más firme (power mesh) o incluso puedes usar el tul elástico más suave en doble capa para que sea más fuerte. También puedes usar punto de viscosa o punto de algodón tipo camiseta. El elástico de bajo puedes elegir más ancho, el de 15mm va bien (el patrón tiene márgenes de 10 mm pero en principio puedes usar un elástico de bajo de 15 mm sin cambiar nada porque el elástico sí que cabe allí una vez que lo doblas pero también podrías añadir 5 mm al bajo de la banda y la banda frontal para no cambiar las medidas terminadas). El tirante también lo puedes usar más ancho, no tienes que cambiar nada y vas a estar más cómoda. El cierre lo puedes poner de tres filas, comprueba el ancho de patrón según las instrucciones!


Recommendations for smaller bust:

If your band/cup is on the smaller scale (AA/A) in general you don’t have a lot of problems with supplies. You can use lightweight stretch mesh for the lining of your bralette or you can also use any other kind of knit fabric. You could even not use sheer lining to stabilize the front band as you don’t need so much support (I did make a sample like this and I found it nicely fitting). One of my testers didn’t use underwire channeling tape and instead left the seam allowances of the cup pieces between the two front band pieces…if you have small cups you can really play around with supplies if you don’t have everything requiered on the supply list. You can also use narrower elastics for the underarm and the band but I really prefer using the 10 mm elastic as I find it more comfortable.

Recommendations for bigger cups:

If your band /cups are bigger (C/D) it really helps to use more stable fabrics and the bralette will give you more support even without wires. You can use power mesh or double layer of stretch mesh for the lining. Viscose and cotton knit fabrics are also a good choice. You can use wider band elastic, 15 mm wide is great (the pattern has 10 mm seama llowance but the 15 mm band elastic can still be sewn on the band without modifications…or you can also add 5 mm extra seam allowance in order to maintain the same band width). Use a wider strap elastic, you don’t need to change anything and you’ll have a more comfortable fit. You can also use a three row closure, check the width of your closure according to the instructions!

www.studiocostura.com

Si quieres usar un kit específico para este patrón puedes comprarlo en mi tienda de Etsy elegiendo la opción "kit de sujetador con aros" bajo (casi) todos los kits de la tienda. Si te gustaría cambiar algo en ese kit me puedes escribir allí en Etsy y te asesoro cómo hacerlo. También tienes la opción de comprar el patrón con el kit directamente (sale más económico!)

Otras tiendas para comprar materiales que te puedo recomendar son Tailor Made Shop(EE.UU.), Emerald Erin (Canadá) y B.Wear (Suecia).


If you'd like to use a specific kit for that pattern you can buy one at my Etsy shop. Choose the option "Underwire bra kit" under (allmost) any of the kits in the shop. If you'd like to change something in that kit you can write me at Etsy and I see what I can do. You also have an option to directly buy the kit and the pattern together (it’s cheaper that way!).

Other places I recommend to buy lingerie making supplies are Tailor Made Shop (USA), Emerald Erin(Canda) and B.Wear (Sweden).


Nuevo patrón bralette Mara // New pattern Mara bralette

 
www.studiocostura.com

Hola! Qué ganas tenía que llegue este día, por fin os presento mi nuevo patrón de lencería: el bralette Mara. Es el patrón con que más he trabajado de todos los que he hecho y la verdad es que estoy muy contenta con el resultado. Ahora os cuento cómo es y por qué me gusta tanto!

Hey! I’m really glad that the day has arrived, I can finally present you my newest lingerie sewing pattern Mara bralette. This pattern is a big labour of love for me as it has been the one with the longest process since I started to design patterns and I’m really happy with the result. I’ll tell you all about it and why I like it so much!

www.studiocostura.com

Igual que Hanna, mi primer patrón de bralette, Mara no lleva aros. Pero esta vez quería que en general haya más soporte y he diseñado pensando en ello. Primero: este bralette tiene la banda separada de las copas y en la parte delantera lleva el forro de lencería para estabilizar la zona y dar más soporte. Otra cosa que hace que incluso las copas más grandes pueden sentirse bien sin aros es que el bralette sí que lleva la cinta recubrearos cosido debajo de las copas...este pequeño detalle hace una gran diferencia. Y ya que estamos hablando de las tallas...esto quizás es lo más novedoso del todo: esta vez el patrón tiene el tallaje como los sujetadores y en vez de S, M, L etc tenemos tooooodo de 65AA hasta 95D (en sistema europeo), en total son 35 tallas únicas! Realmente quería tener estas tallas ya cuando hice la Hanna pero no estaba todavía preparada para realizar este trabajo...pero esta vez lo he conseguido y espero que esto abre la posibilidad de coser este bralette para muchas más personas que antes con Hanna no lo hicieron por el tema de tallas (ya que estamos voy a decir que en mi lista está tanto pasar a Hanna a este sistema de tallaje también, como patronar estos dos patrones en contornos y copas más grandes también...va a costar un tiempo pero quiero hacerlo en breve!).

Like my first bralette Hanna, Mara does not include underwires. But this time I wanted to offer more support and I’ve designed with this in mind. First of all: this bralette has a separate front band and it’s lined with sheer lining to stabilize this area and to give more support. Another thing that makes it more comfortable for bigger bust is sewing underwire channeling tape on the cup seams…this little detail makes a big difference. And as we already are talking about sizes…this is probably the biggest change: this time instead of using the S, M, L etc sizing there are allll the bra sizes starting from 65AA until 95D in European sizing (30AA-42D in United States), in total there are 35 different sizes! I actually wanted to draft Hanna in this sizing when I was working on it too but I wasn’t ready for that kind of work back then…but this time I made it through all of the patternwork and I hope this bigger size range will give an opportunity for more sewers to try out this pattern (and as we are talking about more sizes: I will also redraft Hanna in this size range and I also will offer both of these patterns in bigger cup and band sizes too…it will take some time but I hope to get it done soon!).

www.studiocostura.com

Aparte de estas novedades del patrón puedes esperar un buen básico que se puede hacer en encaje como la versión original y también con telas de punto. Las copas están forradas con tela elástica, así que es más fácil conseguir un buen ajuste y al no tener aros tendrás la comodidad garantizada.

Tengo muchas versiones en la cabeza y poco a poco voy a ir confeccionandolos para enseñaros las diferentes maneras de adaptar este patrón. Ya sabéis que me gusta siempre hacer patrones que sean bases para que a partir de ellos hagáis lo que vosotras más queréis.

Apart from these new things you can expect a good basic pattern that you can sew up like in the original version and also with knit fabrics. The cups are lined with knit fabrics so it’s easier to get a good fit and as there are no underwires, comfort is the number one thing here.

I have so many versions in my head and little by little I’ll be sewing them up to show you the diffrent ways how you can adapt this pattern. As you already know I like to make patterns that are basics for you to work up from.

www.studiocostura.com

Para coser Mara se necesita más o menos lo mismo que lo que se usa para sujetadores con aros, podéis ver la lista en la página de patrón en mi tienda. Si compráis kit de lencería sería uno para sujetadores con aros (se necesita la cinta de recubrearos y el tejido estabilizante para el centro delantero). En la tienda también tengo la opción de comprar este patrón directamente con el kit.

Las instrucciones como siempre están detalladas: con fotos, dibujos y texto. He usado técnicas de confección para que todo el bralette sea bonito por fuera y por dentro. Aprendes a cortar encaje, hacer costuras encubiertas, aplicar elásticos, coser la cinta recubrearos etc. Es un patrón más complicado de nivel que Hanna pero si ya coses este bralette vas a poder coser un sujetador con aros tranquilamente, se usan todas las mismas técnicas! No es muy difícil pero estamos trabajando con tejidos que se mueven mucho ya las piezas son relativamente pequeñas...podéis prepararos para un rato de concentración, algo de desafío y seguramente mucho orgullo costuril al verlo terminado.

To sew Mara bralette you need the same supplies as for an underwired bra, you can see the full list of supplies on Etsy. If you buy a bramaking kit you should choose an underwired bra kit (you need underwire channeling tape and rigid lining fabric for the front band). I have also the option to buy this pattern together with the kit in my shop.

As always the instructions are detailed: tehre are photos, drawings and text. I’ve used sewing methods that ensure neat finishings both on the outside and the inside of the bralette. You’ll learn how to cut lace, sew enclosed seams, apply elastics and the channeling tape etc. It’s a more complicated pattern than Hanna but once you sew this one up you’ll be prepared to sew an underwired bra too, all the same construction methods are used in this pattern! It’s not too difficult but the materials are a bit tricky and the pieces are quite small…prepare yourself for concentration, some challenges and a lot of pride once you’ll see it finished.

www.studiocostura.com
 

Esta vez haré de nuevo el CoseConmigo entero porque quiero que tengáis toooda la información y dudas resueltas, no hay excusas para no coser el bralette Mara! Empezamos con materiales e inspiración y seguimos paso a paso hasta completar este bonito modelo.

Este patrón es el resultado de un trabajo largo y he intentado poner en él todos mis conocimientos para hacer algo que sea bonito y práctico, espero de verdad que os guste! Este trabajo no hubiera sido posible sin mis testers: gracias chicas por todas vuestras correcciones, sugerencias y tiempo, ha sido un lujo teneros a mi lado. Grandes agradecimientos también a mis modelos, así se ve el bralette realmente precioso! Así que estoy muy feliz de por fin compartir Mara con vosotras...ahora me pondré con el CoseConmigo para animaros a probar este bralette!

*el patrón tiene el descuento de -10% hasta este domingo, 7 de julio. Usa el código MARALAUNCH al comprar!


This time I will write a full sewalong again as I want you to have all the information, there won’t be excuses to not sew this bralette! I’ll start with supplies and inspiration, we’ll continue with step by step posts until you sew up this pretty style.

This pattern is a result of a long work and I tried to put all my knowledge in it to make it as pretty and as practical as possible, I really hope you like it! This work would not have been possible without big help from my testers: thank you so much ladies for your tips, corrections and time, it has been an honour to have you on my side. Also big thanks to my models, now this pattern really looks very beautiful. I’m really happy to finally share Mara with you…I’ll now move on to writing the sewalong, I really hope you will join with me!

*this pattern is on sale until this Sunday, 7th of July. Use code MARALAUNCH for 10% off!